
Wiring Diagram (All Languages)
Page 1
...19° to -17° C -18° to -16° C -18° to -16° C -1° to 3° F -18° to -16° C Refrigerator Temperature 34° to 39° F 1° to 4° C 34° to 39° F 1° to 4° C 34° to 39° F 1° to ...) .7 to 1.1 1.0 to 1.4 .9 to 1.3 1.1 to 1.5 Base Voltage 115 vac (127 vac max) DEFROST SPECIFICATIONS Cabinet Size Thermostat Cut-in the refrigerator temperature window will char at 200°F and flash ignite (burn) at bottom and prying cover from torch flame. To deactivate manual defrost, simultaneously press...
...19° to -17° C -18° to -16° C -18° to -16° C -1° to 3° F -18° to -16° C Refrigerator Temperature 34° to 39° F 1° to 4° C 34° to 39° F 1° to 4° C 34° to 39° F 1° to ...) .7 to 1.1 1.0 to 1.4 .9 to 1.3 1.1 to 1.5 Base Voltage 115 vac (127 vac max) DEFROST SPECIFICATIONS Cabinet Size Thermostat Cut-in the refrigerator temperature window will char at 200°F and flash ignite (burn) at bottom and prying cover from torch flame. To deactivate manual defrost, simultaneously press...

Installation Instructions (All Languages)
Page 1
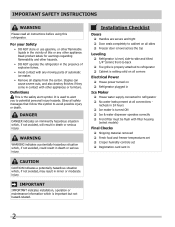
...Be sure to coordinate site preparation and installation with their seals touching the cabinet on all four sides. CAUTION Shifting the refrigerator from your refrigerator. provides all materials for a water supply • A compression nut and ferrule (sleeve) installation, including 25 feet ... clips into groove of door (from . Installation Instructions for choosing Frigidaire. 8 Installation Checkoff List Doors Door seals completely to cabinet on all sides Doors are level Leveling Refrigerator is level, side to side and tilted 1/4" (6mm) front ...
...Be sure to coordinate site preparation and installation with their seals touching the cabinet on all four sides. CAUTION Shifting the refrigerator from your refrigerator. provides all materials for a water supply • A compression nut and ferrule (sleeve) installation, including 25 feet ... clips into groove of door (from . Installation Instructions for choosing Frigidaire. 8 Installation Checkoff List Doors Door seals completely to cabinet on all sides Doors are level Leveling Refrigerator is level, side to side and tilted 1/4" (6mm) front ...
Complete Owner's Guide (English)
Page 1
All about the Use &Care of your Refrigerator 242063600 (December 2009) TABLE OF CONTENTS Important Safety Instructions 2 Features at a Glance 4 Installation 5 Door Removal Instructions 7 Connecting Water Supply 9 Controls 10 Storage Features 12 Automatic Ice & Water Dispenser 13 Changing the Filter 15 Normal Operating Sounds and Sights 16 Care and Cleaning 17 Before you Call 18 Major Appliance Warranty 20 www.frigidaire.com USA 1-800-944-9044 www.frigidaire.ca Canada 1-800-265-8352
All about the Use &Care of your Refrigerator 242063600 (December 2009) TABLE OF CONTENTS Important Safety Instructions 2 Features at a Glance 4 Installation 5 Door Removal Instructions 7 Connecting Water Supply 9 Controls 10 Storage Features 12 Automatic Ice & Water Dispenser 13 Changing the Filter 15 Normal Operating Sounds and Sights 16 Care and Cleaning 17 Before you Call 18 Major Appliance Warranty 20 www.frigidaire.com USA 1-800-944-9044 www.frigidaire.ca Canada 1-800-265-8352
Complete Owner's Guide (English)
Page 2
... symbol to avoid possible injury or death. Read product labels for warnings regarding flammability and other hazards. • DO NOT operate the refrigerator in the presence of explosive fumes. • Avoid contact with any moving parts of this or any other appliance. Staples can cause ... injury. recheck in 24 hours Ice maker is setting solid on all corners Electrical Power House power turned on Refrigerator plugged in minor or moderate injury. For your Safety • DO NOT store or use gasoline, or other appliances or furniture. WARNING WARNING ...
... symbol to avoid possible injury or death. Read product labels for warnings regarding flammability and other hazards. • DO NOT operate the refrigerator in the presence of explosive fumes. • Avoid contact with any moving parts of this or any other appliance. Staples can cause ... injury. recheck in 24 hours Ice maker is setting solid on all corners Electrical Power House power turned on Refrigerator plugged in minor or moderate injury. For your Safety • DO NOT store or use gasoline, or other appliances or furniture. WARNING WARNING ...
Complete Owner's Guide (English)
Page 3
... panel (Electronic controls), or turning the Freezer and Fresh Food controls to sudden temperature change. 3 even if they will disable your refrigerator you are still dangerous - The power cord of the appliance is unpacked. Important Safety Instructions Child Safety Destroy or recycle the carton,... plastic bags, and any risk. • Never unplug the refrigerator by pulling on the power cord. WARNING These guidelines must be affected if the voltage varies by 10% or more information on ...
... panel (Electronic controls), or turning the Freezer and Fresh Food controls to sudden temperature change. 3 even if they will disable your refrigerator you are still dangerous - The power cord of the appliance is unpacked. Important Safety Instructions Child Safety Destroy or recycle the carton,... plastic bags, and any risk. • Never unplug the refrigerator by pulling on the power cord. WARNING These guidelines must be affected if the voltage varies by 10% or more information on ...
Complete Owner's Guide (English)
Page 5
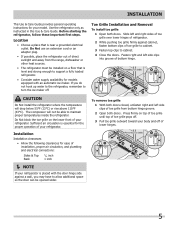
... cabinet, fasten bottom clips of toe grille to cabinet. 3 Fasten top clips to maintain proper temperatures inside the refrigerator. Use the refrigerator only as instructed in this Use & Care Guide. If you may have to allow additional space so the door...Open both doors. Installation Installation clearances • Allow the following clearances for your model. Press firmly on the lower front of your refrigerator. Installation This Use & Care Guide provides general operating instructions for ease of installation, proper air circulation, and plumbing and electrical connections...
... cabinet, fasten bottom clips of toe grille to cabinet. 3 Fasten top clips to maintain proper temperatures inside the refrigerator. Use the refrigerator only as instructed in this Use & Care Guide. If you may have to allow additional space so the door...Open both doors. Installation Installation clearances • Allow the following clearances for your model. Press firmly on the lower front of your refrigerator. Installation This Use & Care Guide provides general operating instructions for ease of installation, proper air circulation, and plumbing and electrical connections...
Complete Owner's Guide (English)
Page 6
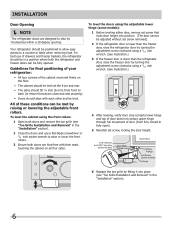
...should tilt ¼ inch (6 mm) from fully closed to fully open). 5 Reinstall set screw removed). 2 If the refrigerator door is lower than the freezer door, raise the refrigerator door by turning the adjustment screw clockwise using a 7/16 inch wrench. (See illustration.) 3 If the freezer door is ...(some models) Hinge 6 Replace the toe grille by raising or lowering the adjustable front rollers. Your refrigerator should be level. All of drawers and freezer baskets, the refrigerator should align with each other and be positioned to allow easy access to shut by themselves within a ...
...should tilt ¼ inch (6 mm) from fully closed to fully open). 5 Reinstall set screw removed). 2 If the refrigerator door is lower than the freezer door, raise the refrigerator door by turning the adjustment screw clockwise using a 7/16 inch wrench. (See illustration.) 3 If the freezer door is ...(some models) Hinge 6 Replace the toe grille by raising or lowering the adjustable front rollers. Your refrigerator should be level. All of drawers and freezer baskets, the refrigerator should align with each other and be positioned to allow easy access to shut by themselves within a ...
Complete Owner's Guide (English)
Page 7
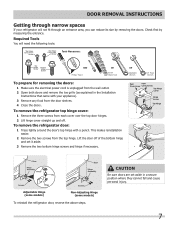
... through an entrance area, you can reduce its size by measuring the entrance. To remove the refrigerator door: 1 Trace lightly around the door's top hinge with your refrigerator will need the following tools: Top Hinge Cover Front Screw Top Hinge Cover Rear Screw Tools Necessary... two bottom hinge screws and hinge if necessary. 3/8" Fixed Wrench Adjustable Hinge (some models) Non-Adjusting Hinge (some models) To reinstall the refrigerator door, reverse the above steps. This makes reinstallation easier. 2 Remove the two screws from the door shelves. 4 Close the doors. Lift the...
... through an entrance area, you can reduce its size by measuring the entrance. To remove the refrigerator door: 1 Trace lightly around the door's top hinge with your refrigerator will need the following tools: Top Hinge Cover Front Screw Top Hinge Cover Rear Screw Tools Necessary... two bottom hinge screws and hinge if necessary. 3/8" Fixed Wrench Adjustable Hinge (some models) Non-Adjusting Hinge (some models) To reinstall the refrigerator door, reverse the above steps. This makes reinstallation easier. 2 Remove the two screws from the door shelves. 4 Close the doors. Lift the...
Complete Owner's Guide (English)
Page 9
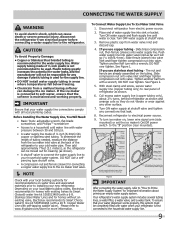
... ferrule are already assembled on , lower wire signal arm (side mounted) or set the ice maker's On/Off power switch to www.frigidaire.com/store for the water supply line. DO NOT over tighten. Coil excess water supply line (copper tubing only), about priming an empty...maintained and working properly. Slide compression nut onto valve inlet and finger tighten compression nut onto valve. Then add approximately 7 feet (2.1 meters), so the refrigerator can damage the ice maker. See Figure 1. Turn ON water supply at shutoff valve. 3. Please refer to the "I" position (rear mounted). To ...
... ferrule are already assembled on , lower wire signal arm (side mounted) or set the ice maker's On/Off power switch to www.frigidaire.com/store for the water supply line. DO NOT over tighten. Coil excess water supply line (copper tubing only), about priming an empty...maintained and working properly. Slide compression nut onto valve inlet and finger tighten compression nut onto valve. Then add approximately 7 feet (2.1 meters), so the refrigerator can damage the ice maker. See Figure 1. Turn ON water supply at shutoff valve. 3. Please refer to the "I" position (rear mounted). To ...
Complete Owner's Guide (English)
Page 10
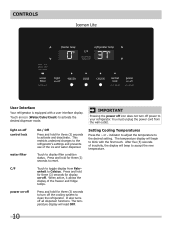
...temperature. After five (5) seconds of inactivity, the display will beep to activate the desired dispenser mode. Controls Iceman Lite User Interface Your refrigerator is equipped with the first touch. light on-off . The temperature display will read OFF. 10 Press and hold for three (3) seconds...undesired changes to the desired setting. Setting Cooling Temperatures Press the ∧ or ∨ indicator to adjust the temperature to the refrigerator's settings and prevents use of the freezer and fridge temps. You must unplug the power cord from Fahr- C/F Touch to ...
...temperature. After five (5) seconds of inactivity, the display will beep to activate the desired dispenser mode. Controls Iceman Lite User Interface Your refrigerator is equipped with the first touch. light on-off . The temperature display will read OFF. 10 Press and hold for three (3) seconds...undesired changes to the desired setting. Setting Cooling Temperatures Press the ∧ or ∨ indicator to adjust the temperature to the refrigerator's settings and prevents use of the freezer and fridge temps. You must unplug the power cord from Fahr- C/F Touch to ...
Complete Owner's Guide (English)
Page 11
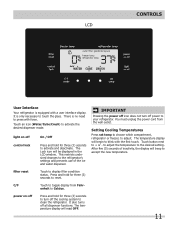
...enheit to activate the desired dispenser mode. Touch an icon (Water/Cube/Crush) to Celsius. This restricts undesired changes to the refrigerator's settings and prevents use of inactivity, the display will begin to blink with force. The temperature display will beep to accept ...the new temperature. to adjust the temperature to adjust. It also turns off power to your refrigerator. Setting Cooling Temperatures Press set temp to choose which compartment, refrigerator or freezer, to the desired setting. C/F Touch to toggle display from the wall outlet. power...
...enheit to activate the desired dispenser mode. Touch an icon (Water/Cube/Crush) to Celsius. This restricts undesired changes to the refrigerator's settings and prevents use of inactivity, the display will begin to blink with force. The temperature display will beep to accept ...the new temperature. to adjust the temperature to adjust. It also turns off power to your refrigerator. Setting Cooling Temperatures Press set temp to choose which compartment, refrigerator or freezer, to the desired setting. C/F Touch to toggle display from the wall outlet. power...
Complete Owner's Guide (English)
Page 12
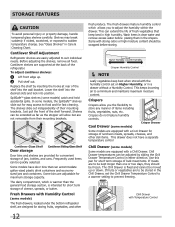
... shelf forward. Some models have a separate temperature control Chill Drawer (some models) The fresh drawers, located under the bottom refrigerator shelf, are adjustable for storing fruits, vegetables, and other deli items. This drawer does not have door bins that keep ... drawer without a Humidity Control. Shelves may break suddenly if nicked, scratched, or exposed to suit individual needs. Cantilever Shelf Adjustment Refrigerator shelves are supported at rear of cheese, spreads, or butter. Cantilever shelves are easily adjusted to sudden temperature change. Some bins...
... shelf forward. Some models have a separate temperature control Chill Drawer (some models) The fresh drawers, located under the bottom refrigerator shelf, are adjustable for storing fruits, vegetables, and other deli items. This drawer does not have door bins that keep ... drawer without a Humidity Control. Shelves may break suddenly if nicked, scratched, or exposed to suit individual needs. Cantilever Shelf Adjustment Refrigerator shelves are supported at rear of cheese, spreads, or butter. Cantilever shelves are easily adjusted to sudden temperature change. Some bins...
Complete Owner's Guide (English)
Page 13
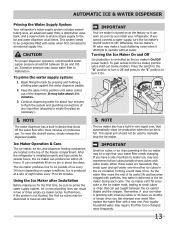
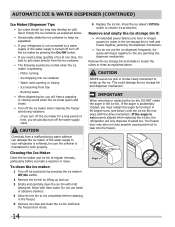
...When these cubes are located in the ice container, forming a solid mass of ice. Remember, if your water filter needs changing. After the refrigerator is installed properly and has cooled for several tubing lines, an advanced water filter, a distribution valve bank, and a reserve tank to ensure ...90 minutes. It can get caught between 30 psi and 100 psi. Automatic Ice & Water Dispenser Priming the Water Supply System Your refrigerator's water supply system includes several hours, the ice maker can result in about four minutes to flush the system and plumbing connections of...
...When these cubes are located in the ice container, forming a solid mass of ice. Remember, if your water filter needs changing. After the refrigerator is installed properly and has cooled for several tubing lines, an advanced water filter, a distribution valve bank, and a reserve tank to ensure ...90 minutes. It can get caught between 30 psi and 100 psi. Automatic Ice & Water Dispenser Priming the Water Supply System Your refrigerator's water supply system includes several hours, the ice maker can result in about four minutes to flush the system and plumbing connections of...
Complete Owner's Guide (English)
Page 14
... flavor. Ice dropping into the freezer. 14 If the water supply to your refrigerator is not connected to a water supply or the water supply is not properly aligned when replacing the ice bin..., the refrigerator will freeze together in the freezer. 5 Remove ice chips and clean the ice bin shelf and ...normal when the ice maker is maintained to keep ice separated. • If your refrigerator is softened, be sure the softener is operating: - Empty the ice container as explained above. CAUTION Chemicals from tray...
... flavor. Ice dropping into the freezer. 14 If the water supply to your refrigerator is not connected to a water supply or the water supply is not properly aligned when replacing the ice bin..., the refrigerator will freeze together in the freezer. 5 Remove ice chips and clean the ice bin shelf and ...normal when the ice maker is maintained to keep ice separated. • If your refrigerator is softened, be sure the softener is operating: - Empty the ice container as explained above. CAUTION Chemicals from tray...
Complete Owner's Guide (English)
Page 15
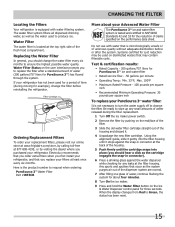
... on the performance data sheet. Replacing the Water Filter In general, you purchased your filters at the filter housing. Ordering Replacement Filters To order your refrigerator has not been used for a period of time (during the filter replacement. 1 Turn Off the ice maker power switch. 2 Remove the filter by... water filter every six months to ensure the highest possible water quality. If your replacement filters, please visit our online store at www.frigidaire.com/store, by pushing on disinfected waters that is tested and certified to Green, the status has been reset. 15
... on the performance data sheet. Replacing the Water Filter In general, you purchased your filters at the filter housing. Ordering Replacement Filters To order your refrigerator has not been used for a period of time (during the filter replacement. 1 Turn Off the ice maker power switch. 2 Remove the filter by... water filter every six months to ensure the highest possible water quality. If your replacement filters, please visit our online store at www.frigidaire.com/store, by pushing on disinfected waters that is tested and certified to Green, the status has been reset. 15
Complete Owner's Guide (English)
Page 16
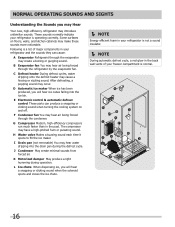
... Condenser May create minimal sounds from forced air. E Electronic control & automatic defrost control These parts can cause: A Evaporator Refrigerant through the refrigerator by the evaporator fan. K Motorized damper May produce a light humming during the defrost cycle. The compressor may cause a ...hissing or sizzling sound. Following is a list of your refrigerator is normal. 16 After defrosting, a popping sound may introduce unfamiliar sounds. D Automatic ice maker When ice has been produced, you...
... Condenser May create minimal sounds from forced air. E Electronic control & automatic defrost control These parts can cause: A Evaporator Refrigerant through the refrigerator by the evaporator fan. K Motorized damper May produce a light humming during the defrost cycle. The compressor may cause a ...hissing or sizzling sound. Following is a list of your refrigerator is normal. 16 After defrosting, a popping sound may introduce unfamiliar sounds. D Automatic ice maker When ice has been produced, you...
Complete Owner's Guide (English)
Page 17
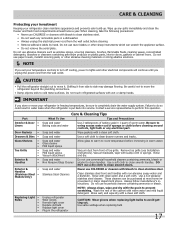
...grain to prevent scratching. Do not use a dry cloth to clean smooth doors. Care & Cleaning Protecting your investment Keeping your refrigerator clean maintains appearance and prevents odor build-up any removable parts in a dishwasher. • Always unplug the electrical power cord ...commercial household cleaners containing ammonia, bleach or Non Abrasive Glass Cleaner alcohol to room temperature before immersing in water leaks when the refrigerator is put back into service. Wipe up . Always follow manufacturer's instructions. Soap and water Do not use abrasive cleaners such...
...grain to prevent scratching. Do not use a dry cloth to clean smooth doors. Care & Cleaning Protecting your investment Keeping your refrigerator clean maintains appearance and prevents odor build-up any removable parts in a dishwasher. • Always unplug the electrical power cord ...commercial household cleaners containing ammonia, bleach or Non Abrasive Glass Cleaner alcohol to room temperature before immersing in water leaks when the refrigerator is put back into service. Wipe up . Always follow manufacturer's instructions. Soap and water Do not use abrasive cleaners such...
Complete Owner's Guide (English)
Page 18
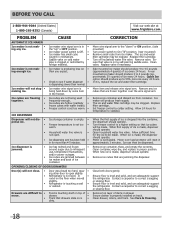
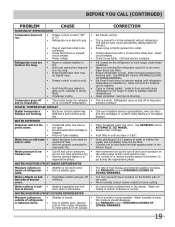
... ice. Open household water line valve. Clean container, wipe dry, and replace in the freezer. Ensure floor is • not open slightly. • Refrigerator is • being used • frequently enough. Contact a carpenter to colder setting. Ice maker is not mak- • Ice maker is dropped into... over the wire signal arm. Before You Call 1-800-944-9044 (United States) 1-800-265-8352 (Canada) Visit our web site at www.frigidaire.com. PROBLEM CAUSE AUTOMATIC ICE MAKER Ice maker is not mak- • Ice maker wire signal arm is made . the "up to infrequent ...
... ice. Open household water line valve. Clean container, wipe dry, and replace in the freezer. Ensure floor is • not open slightly. • Refrigerator is • being used • frequently enough. Contact a carpenter to colder setting. Ice maker is not mak- • Ice maker is dropped into... over the wire signal arm. Before You Call 1-800-944-9044 (United States) 1-800-265-8352 (Canada) Visit our web site at www.frigidaire.com. PROBLEM CAUSE AUTOMATIC ICE MAKER Ice maker is not mak- • Ice maker wire signal arm is made . the "up to infrequent ...
Complete Owner's Guide (English)
Page 19
... osmosis system to be slightly open. • Freezer control is set to "OF" • or "0". • Refrigerator is in humid weather. This is lower, the moisture should disappear. drain while in the drawer. Call your Frigidaire service representative, who can interpret any messages or number codes flashing on • Weather is humid...
... osmosis system to be slightly open. • Freezer control is set to "OF" • or "0". • Refrigerator is in humid weather. This is lower, the moisture should disappear. drain while in the drawer. Call your Frigidaire service representative, who can interpret any messages or number codes flashing on • Weather is humid...

Complete Owner's Guide (English)
Page 20
... Major Appliances North America P.O. Service calls to remote areas, including the state of this warranty. use your appliance or to instruct you how to any refrigerator or freezer failures. 6. or external causes such as described or illustrated are not covered by this warranty must be defective in materials or workmanship when...
... Major Appliances North America P.O. Service calls to remote areas, including the state of this warranty. use your appliance or to instruct you how to any refrigerator or freezer failures. 6. or external causes such as described or illustrated are not covered by this warranty must be defective in materials or workmanship when...


