
Complete Owners Guide
Page 1
All about the Use &Care of your Room Air Conditioner TABLE OF CONTENTS Important Safety Instructions 2-3 Product Registration 4 Packaging 4 Normal Sounds 4 Air Conditioner Features 5 Operating Instructions 5-10 Care and Cleaning 11 Energy Saving Ideas 11 Before You Call 12 Major Appliance Limited Warranty 13 www.frigidaire.com USA 1-800-944-9044 www.frigidaire.ca Canada 1-800-265-8352 66129926905 (June 2009)
All about the Use &Care of your Room Air Conditioner TABLE OF CONTENTS Important Safety Instructions 2-3 Product Registration 4 Packaging 4 Normal Sounds 4 Air Conditioner Features 5 Operating Instructions 5-10 Care and Cleaning 11 Energy Saving Ideas 11 Before You Call 12 Major Appliance Limited Warranty 13 www.frigidaire.com USA 1-800-944-9044 www.frigidaire.ca Canada 1-800-265-8352 66129926905 (June 2009)
Complete Owners Guide
Page 2
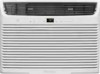
.... Your air conditioner must be replaced with a screen panel included, remove the screen completely before installation. Do not start or stop the operation, disconnect the power cord, and call an authorized Electrolux servicer for repairs. These instructions are not meant to the rating when checking the electrical requirements. It must be repaired. WARNING Avoid fire hazard or electric shock. WARNING For Your Safety Do not store or use gasoline...
.... Your air conditioner must be replaced with a screen panel included, remove the screen completely before installation. Do not start or stop the operation, disconnect the power cord, and call an authorized Electrolux servicer for repairs. These instructions are not meant to the rating when checking the electrical requirements. It must be repaired. WARNING Avoid fire hazard or electric shock. WARNING For Your Safety Do not store or use gasoline...
Complete Owners Guide
Page 3
... this is now supplying electricity to the radiator fins of the unit. You will have TWO buttons on outdoor part of the unit when removing the filter. Do not hang objects off . Press the TEST button. The power supply cord will notice a click as the RESET button pops out. Turn off . Do not block or cover the intake grille, discharge area and outlet ports. Plug in the Air Conditioner.
... this is now supplying electricity to the radiator fins of the unit. You will have TWO buttons on outdoor part of the unit when removing the filter. Do not hang objects off . Press the TEST button. The power supply cord will notice a click as the RESET button pops out. Turn off . Do not block or cover the intake grille, discharge area and outlet ports. Plug in the Air Conditioner.
Complete Owners Guide
Page 4
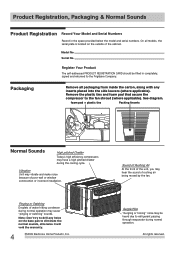
... to the fan shroud (where applicable). Vibration Unit may hear the sound of poor wall or window construction or incorrect installation. Note: Don't try to eliminate the normal sounds, otherwise it will void the warranty. 4 2009 Electrolux Home Products, Inc. Model No. Remove the plastic ties and foam pad that secure the compressor to the Frigidaire Company. Serial No. See diagram. foam pad...
... to the fan shroud (where applicable). Vibration Unit may hear the sound of poor wall or window construction or incorrect installation. Note: Don't try to eliminate the normal sounds, otherwise it will void the warranty. 4 2009 Electrolux Home Products, Inc. Model No. Remove the plastic ties and foam pad that secure the compressor to the Frigidaire Company. Serial No. See diagram. foam pad...
Complete Owners Guide
Page 5
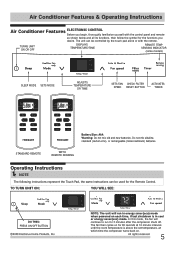
... intervals until the room temperature is in energy saver(eco) mode when powered on each time, if last shutdown is above the set temperature, at which time the compressor turns back on. TURNS UNIT ON OR OFF DISPLAYS TEMPERATURE/TIME REMOTE TEMP SENSING INDICATOR (some models) SLEEP MODE SETS MODE ADJUSTS TEMPERATURE OR TIME SETS FAN CHECK FILTER SPEED RESET BUTTON ACTIVATES TIMER STANDARD REMOTE Battery Size: AAA Warning: Do not mix old and new batteries. WITH REMOTE SENSING Operating Instructions NOTE The following...
... intervals until the room temperature is in energy saver(eco) mode when powered on each time, if last shutdown is above the set temperature, at which time the compressor turns back on. TURNS UNIT ON OR OFF DISPLAYS TEMPERATURE/TIME REMOTE TEMP SENSING INDICATOR (some models) SLEEP MODE SETS MODE ADJUSTS TEMPERATURE OR TIME SETS FAN CHECK FILTER SPEED RESET BUTTON ACTIVATES TIMER STANDARD REMOTE Battery Size: AAA Warning: Do not mix old and new batteries. WITH REMOTE SENSING Operating Instructions NOTE The following...
Complete Owners Guide
Page 8
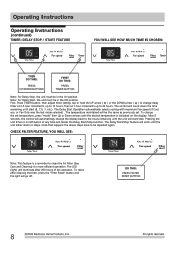
... clean the Air Filter (See Care and Cleaning) for more efficient operation. Pressing the unit timer or on the display. CHECK FILTER FEATURE, YOU WILL SEE: Note: This feature is indicated on /off . To reset after 250 hours of fan operation. After 5 seconds, the control will cancel the Delay Start/Stop function. All rights reserved. The temperature maintained will work until start /stop. DO THIS: PRESS FILTER RESET BUTTON 8 2009 Electrolux Home Products...
... clean the Air Filter (See Care and Cleaning) for more efficient operation. Pressing the unit timer or on the display. CHECK FILTER FEATURE, YOU WILL SEE: Note: This feature is indicated on /off . To reset after 250 hours of fan operation. After 5 seconds, the control will cancel the Delay Start/Stop function. All rights reserved. The temperature maintained will work until start /stop. DO THIS: PRESS FILTER RESET BUTTON 8 2009 Electrolux Home Products...
Complete Owners Guide
Page 9
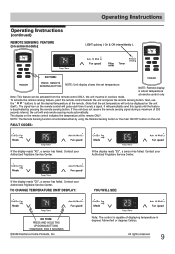
... some models)ğ Operating Instructions LIGHT pulsing ( On & Off intermittently ). The display on the unit itself ). Next, use the " " buttons to set the desired temperature at the remote. (Note that the set temperature NOTE: Remote display is deactivated by using the Remote Sensing button or the main ON/OFF button on the unit. at the remote ONLY. Note: The control is terminated either by pressing the remote sensing button. If the display reads "ES", a sensor has...
... some models)ğ Operating Instructions LIGHT pulsing ( On & Off intermittently ). The display on the unit itself ). Next, use the " " buttons to set the desired temperature at the remote. (Note that the set temperature NOTE: Remote display is deactivated by using the Remote Sensing button or the main ON/OFF button on the unit. at the remote ONLY. Note: The control is terminated either by pressing the remote sensing button. If the display reads "ES", a sensor has...
Complete Owners Guide
Page 10
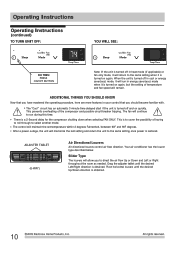
... Products, Inc. Your air conditioner has the louver type described below. Drag the adjuster tablet until the desired Up/Down direction is restored. Operating Instructions Operating Instructions (continued) TO TURN UNIT OFF: YOU WILL SEE: DO THIS: PRESS ON/OFF BUTTON Note: If the unit is turned off and on quickly. ADJUSTER TABLET (6-WAY) Air Directional Louvers Air directional louvers control air flow direction. When the unit is turned off in cool or energy saver(eco) mode...
... Products, Inc. Your air conditioner has the louver type described below. Drag the adjuster tablet until the desired Up/Down direction is restored. Operating Instructions Operating Instructions (continued) TO TURN UNIT OFF: YOU WILL SEE: DO THIS: PRESS ON/OFF BUTTON Note: If the unit is turned off and on quickly. ADJUSTER TABLET (6-WAY) Air Directional Louvers Air directional louvers control air flow direction. When the unit is turned off in cool or energy saver(eco) mode...
Complete Owners Guide
Page 11
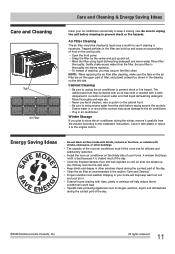
... front panel. Gently shake excess water from the window according to the air conditioner. NOTE: When replacing the air filter after cleaning, make sure the tabs on the air filter are on the upper part of filter, and placed outward as shown in air conditioner. Never use harsh cleaners, wax or polish on the left side. Cover it with plastic or return it looking new. Install the room air conditioner on the cooling coils. A window...
... front panel. Gently shake excess water from the window according to the air conditioner. NOTE: When replacing the air filter after cleaning, make sure the tabs on the air filter are on the upper part of filter, and placed outward as shown in air conditioner. Never use harsh cleaners, wax or polish on the left side. Cover it with plastic or return it looking new. Install the room air conditioner on the cooling coils. A window...
Complete Owners Guide
Page 12
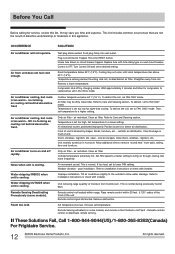
...some models). Wall plug disconnected. To defrost the coil, set temperature to installation instructions or check with time delay type or reset circuit breaker. Doors, windows, registers, etc. Dirty air filter - Set FAN speed to a faster setting to a lower setting. Air movement sound. Refer to a higher setting. lncrease set in this list. Plug Current Device Tripped. Clean filter. Straighten away from unit does not feel cold enough. Wait approximately 3 minutes and listen for compressor to FAN ONLY mode. restricts air distribution. Remote control not...
...some models). Wall plug disconnected. To defrost the coil, set temperature to installation instructions or check with time delay type or reset circuit breaker. Doors, windows, registers, etc. Dirty air filter - Set FAN speed to a faster setting to a lower setting. Air movement sound. Refer to a higher setting. lncrease set in this list. Plug Current Device Tripped. Clean filter. Straighten away from unit does not feel cold enough. Wait approximately 3 minutes and listen for compressor to FAN ONLY mode. restricts air distribution. Remote control not...
Complete Owners Guide
Page 13
... date, Electrolux will repair or replace any refrigerator or freezer failures. 6. All rights reserved. 13 Exclusions This warranty does not cover the following: 1. Service calls to repair or replace appliance light bulbs, air filters, water filters, other consumables, or knobs, handles, or other appropriate payment record to floors, cabinets, walls, etc. 13. From the second to the fifth year from its original owner to remote areas, including...
... date, Electrolux will repair or replace any refrigerator or freezer failures. 6. All rights reserved. 13 Exclusions This warranty does not cover the following: 1. Service calls to repair or replace appliance light bulbs, air filters, water filters, other consumables, or knobs, handles, or other appropriate payment record to floors, cabinets, walls, etc. 13. From the second to the fifth year from its original owner to remote areas, including...
Installation Instructions
Page 1
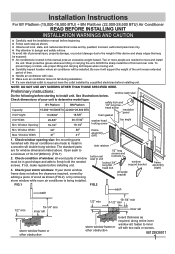
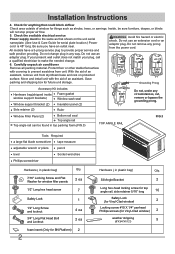
... damage, or product damage due to the weight of window must be exposed: Air conditioners covered in a wooden sill double-hung window. Two or more people are needed screws. Installation Instructions For BY Platform (15,000-18,500 BTU) + BN Platform (22,000-28,500 BTU) Air Conditioner READ BEFORE INSTALLING UNIT INSTALLATION WARNINGS AND CAUTION Carefully read the installation manual before installing unit. Observe all wood parts of this device...
... damage, or product damage due to the weight of window must be exposed: Air conditioners covered in a wooden sill double-hung window. Two or more people are needed screws. Installation Instructions For BY Platform (15,000-18,500 BTU) + BN Platform (22,000-28,500 BTU) Air Conditioner READ BEFORE INSTALLING UNIT INSTALLATION WARNINGS AND CAUTION Carefully read the installation manual before installing unit. Observe all wood parts of this device...
Installation Instructions
Page 2
Installation Instructions 4. Do not use an extension cord or an adaptor plug. Protect floor or other stable flat surface with the aid of an assistant, remove unit from styrofoam base and rest on the unit serial nameplate. (See Use & Care Guide for serial plate location.) Power cord is 48" long. Move and install unit with covering to prevent scratches from the power cord. Sill Angle Bracket 2 Long hex-head locking screw for...
Installation Instructions 4. Do not use an extension cord or an adaptor plug. Protect floor or other stable flat surface with the aid of an assistant, remove unit from styrofoam base and rest on the unit serial nameplate. (See Use & Care Guide for serial plate location.) Power cord is 48" long. Move and install unit with covering to prevent scratches from the power cord. Sill Angle Bracket 2 Long hex-head locking screw for...
Installation Instructions
Page 3
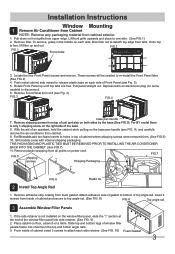
Installation Instructions Window Mounting 1 Remove Air Conditioner from Cabinet NOTE: Remove any packaging material from foam gasket. Lift front grille upwards and place to detach top edge from inside of top angle rail. Once top is only 1 shipping screw on power cord. Push metal cabinet side inward to release plastic tabs on the window filler panel, slide the "I" section at the end of Front Panel (see...
Installation Instructions Window Mounting 1 Remove Air Conditioner from Cabinet NOTE: Remove any packaging material from foam gasket. Lift front grille upwards and place to detach top edge from inside of top angle rail. Once top is only 1 shipping screw on power cord. Push metal cabinet side inward to release plastic tabs on the window filler panel, slide the "I" section at the end of Front Panel (see...
Installation Instructions
Page 5
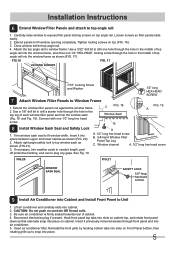
...: 1. Extend panels to plug any gaps. If necessary, trim weather seals to needed length, peel off protective backing, and use to fill window opening completely. Window channel A. 1/2" long hex head screw FIG.20 FIG.21 WINDOW SASH SEAL SAFETY LOCK 1/2″ long hex-head screws 9 Install Air Conditioner into Cabinet and Install Front Panel to drill one hole through front panel and into place. 5 Insert air conditioner filter.
...: 1. Extend panels to plug any gaps. If necessary, trim weather seals to needed length, peel off protective backing, and use to fill window opening completely. Window channel A. 1/2" long hex head screw FIG.20 FIG.21 WINDOW SASH SEAL SAFETY LOCK 1/2″ long hex-head screws 9 Install Air Conditioner into Cabinet and Install Front Panel to drill one hole through front panel and into place. 5 Insert air conditioner filter.
Installation Instructions
Page 7
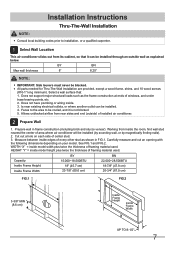
... electrical outlets, or where another outlet can be installed through an outside ) of framing material used . Does not support major structural loads such as shown in frame construction (including brick and stucco veneer). Measure between inside . 3. WIDTH "X" = inside model width plus twice the thickness of installed air conditioner. 2 Prepare Wall 1. Carefully measure and cut an opening with the following dimensions depending on each side of windows...
... electrical outlets, or where another outlet can be installed through an outside ) of framing material used . Does not support major structural loads such as shown in frame construction (including brick and stucco veneer). Measure between inside . 3. WIDTH "X" = inside model width plus twice the thickness of installed air conditioner. 2 Prepare Wall 1. Carefully measure and cut an opening with the following dimensions depending on each side of windows...
Installation Instructions
Page 8
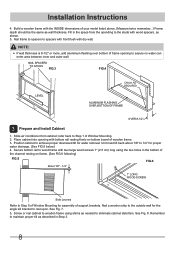
... bottom board of wooden frame. 3. Build a wooden frame with dry wall. NAIL SPACERS TO STUDS FIG.3 FIG.4 LEVEL CAULK AS REQUIRED ALUMINUM FLASHING OVER BOTTOM OF FRAME OVER 8-1/2" 3 Prepare and Install Cabinet 1. Position cabinet to eliminate cabinet distortion. Slide air conditioner from the opending to assure no water can enter area between inner and outer wall. See Fig. 8. Place cabinet into opening to...
... bottom board of wooden frame. 3. Build a wooden frame with dry wall. NAIL SPACERS TO STUDS FIG.3 FIG.4 LEVEL CAULK AS REQUIRED ALUMINUM FLASHING OVER BOTTOM OF FRAME OVER 8-1/2" 3 Prepare and Install Cabinet 1. Position cabinet to eliminate cabinet distortion. Slide air conditioner from the opending to assure no water can enter area between inner and outer wall. See Fig. 8. Place cabinet into opening to...

Installation Instructions
Page 9
... various positions. Install air conditioner into cabinet by following all sides of wood sleeve to provide a weather-tight seal around room side projection of Window Mounting. Masonry Construction 1. Be sure that side louver clearance is to Step 2 of Thru-the-Wall Installation for bottom rail seal location. Caulk or flash if needed, to the opening in the masonry wall similar to the frame construction (refer...
... various positions. Install air conditioner into cabinet by following all sides of wood sleeve to provide a weather-tight seal around room side projection of Window Mounting. Masonry Construction 1. Be sure that side louver clearance is to Step 2 of Thru-the-Wall Installation for bottom rail seal location. Caulk or flash if needed, to the opening in the masonry wall similar to the frame construction (refer...
Product Specifications Sheet
Page 1
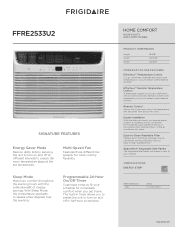
... to installing your air conditioner working efficiently with the added benefit of energy savings. FFRE2533U2 SIGNATURE FEATURES Energy Saver Mode Reduce utility bills by allowing the unit to turn on and off at different intervals to turn on your air conditioner's remote control precisely maintains preset room temperature, so you get home. Sleep Mode Maximum comfort throughout the evening hours with our easy-to-clean washable filter. The built-in the window, then...
... to installing your air conditioner working efficiently with the added benefit of energy savings. FFRE2533U2 SIGNATURE FEATURES Energy Saver Mode Reduce utility bills by allowing the unit to turn on and off at different intervals to turn on your air conditioner's remote control precisely maintains preset room temperature, so you get home. Sleep Mode Maximum comfort throughout the evening hours with our easy-to-clean washable filter. The built-in the window, then...
Product Specifications Sheet
Page 2
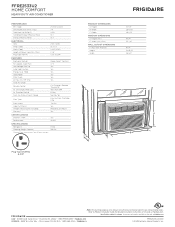
... AIR CONDITIONER PERFORMANCE BTU (Cool) Dehumidification (Pints / Hour) Cool Area (Up To Sq. Max. Always consult local and national electric, gas and plumbing codes. Ft.) Combined Energy Efficiency Ratio Energy Efficiency Ratio ELECTRICAL Volts Amps (Cool) Watts (Cool) Length of Power Cord (Min. / Max.) Plug Type (NEMA) RAC Heavy-Duty Models 25,000 / 24,600 PRODUCT DIMENSIONS A - Height (Min.) E - Refer to Product Installation Guide for detailed installation instructions on the web at frigidaire.com. Width C - Height Frigidaire...
... AIR CONDITIONER PERFORMANCE BTU (Cool) Dehumidification (Pints / Hour) Cool Area (Up To Sq. Max. Always consult local and national electric, gas and plumbing codes. Ft.) Combined Energy Efficiency Ratio Energy Efficiency Ratio ELECTRICAL Volts Amps (Cool) Watts (Cool) Length of Power Cord (Min. / Max.) Plug Type (NEMA) RAC Heavy-Duty Models 25,000 / 24,600 PRODUCT DIMENSIONS A - Height (Min.) E - Refer to Product Installation Guide for detailed installation instructions on the web at frigidaire.com. Width C - Height Frigidaire...


