Complete Owners Guide
Page 2
...cord. Do not drink any appliance. WARNING For Your Safety Do not store or use in the front of Current Device' for the model you have a qualified electrician install the proper receptacle. If the power cord is to persons when using your air conditioner, follow basic ...from the air conditioner. 2 2009 Electrolux Home Products, Inc. When handling the air conditioner, be careful to clean both sides of your model. Read product labels for your new room air conditioner is damaged, it should only be replaced with wet hands. WARNING Electrical Information The ...
...cord. Do not drink any appliance. WARNING For Your Safety Do not store or use in the front of Current Device' for the model you have a qualified electrician install the proper receptacle. If the power cord is to persons when using your air conditioner, follow basic ...from the air conditioner. 2 2009 Electrolux Home Products, Inc. When handling the air conditioner, be careful to clean both sides of your model. Read product labels for your new room air conditioner is damaged, it should only be replaced with wet hands. WARNING Electrical Information The ...
Complete Owners Guide
Page 4
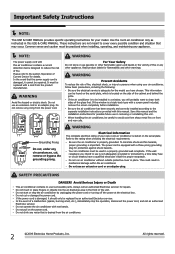
... unit, you may vibrate and make noise because of rushing air being moved by the fan. All rights reserved. Packaging Remove all models, the serial plate is located on the base pan to eliminate the normal sounds, otherwise it will void the warranty. 4 2009 ... operation may be filled in the space provided below the model and serial numbers. Model No. Product Registration, Packaging & Normal Sounds Product Registration Record Your Model and Serial Numbers Record in completely, signed and returned to the Frigidaire Company. See diagram. Serial No. Register Your Product The...
... unit, you may vibrate and make noise because of rushing air being moved by the fan. All rights reserved. Packaging Remove all models, the serial plate is located on the base pan to eliminate the normal sounds, otherwise it will void the warranty. 4 2009 ... operation may be filled in the space provided below the model and serial numbers. Model No. Product Registration, Packaging & Normal Sounds Product Registration Record Your Model and Serial Numbers Record in completely, signed and returned to the Frigidaire Company. See diagram. Serial No. Register Your Product The...
Complete Owners Guide
Page 5
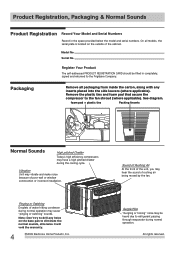
... same instructions can be used for 3 minutes after the compressor shuts off. TURNS UNIT ON OR OFF DISPLAYS TEMPERATURE/TIME REMOTE TEMP SENSING INDICATOR (some models) SLEEP MODE SETS MODE ADJUSTS TEMPERATURE OR TIME SETS FAN CHECK FILTER SPEED RESET BUTTON ACTIVATES TIMER STANDARD REMOTE Battery Size: AAA Warning: Do not...
... same instructions can be used for 3 minutes after the compressor shuts off. TURNS UNIT ON OR OFF DISPLAYS TEMPERATURE/TIME REMOTE TEMP SENSING INDICATOR (some models) SLEEP MODE SETS MODE ADJUSTS TEMPERATURE OR TIME SETS FAN CHECK FILTER SPEED RESET BUTTON ACTIVATES TIMER STANDARD REMOTE Battery Size: AAA Warning: Do not...
Complete Owners Guide
Page 7
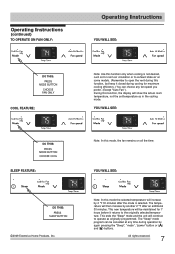
... Electrolux Home Products, Inc. YOU WILL SEE: DO THIS: PRESS MODE BUTTON CHOOSE COOL SLEEP FEATURE: Note: In this mode, the fan remains on some models. (Remember to the originally selected temperature. This ends the "Sleep" mode and the unit will continue to operate as for room air circulation or to...
... Electrolux Home Products, Inc. YOU WILL SEE: DO THIS: PRESS MODE BUTTON CHOOSE COOL SLEEP FEATURE: Note: In this mode, the fan remains on some models. (Remember to the originally selected temperature. This ends the "Sleep" mode and the unit will continue to operate as for room air circulation or to...
Complete Owners Guide
Page 9
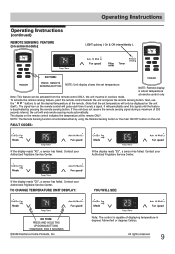
...: DO THIS: PRESS AND HOLD THE UP/DOWN BUTTONS TOGETHER FOR 3 SECONDS 2009 Electrolux Home Products, Inc. The display on some models)ğ Operating Instructions LIGHT pulsing ( On & Off intermittently ). lt will only be in degrees Fahrenheit or degrees Celsius. FAULT CODES:... a maximum of displaying temperature in cool/eco mode. If the display reads "CS", a sensor has failed. Contact your Authorized Frigidaire Service Center. Operating Instructions (continued) REMOTE SENSING FEATURE (on the remote control indicates the temperature at the remote ONLY. The signal...
...: DO THIS: PRESS AND HOLD THE UP/DOWN BUTTONS TOGETHER FOR 3 SECONDS 2009 Electrolux Home Products, Inc. The display on some models)ğ Operating Instructions LIGHT pulsing ( On & Off intermittently ). lt will only be in degrees Fahrenheit or degrees Celsius. FAULT CODES:... a maximum of displaying temperature in cool/eco mode. If the display reads "CS", a sensor has failed. Contact your Authorized Frigidaire Service Center. Operating Instructions (continued) REMOTE SENSING FEATURE (on the remote control indicates the temperature at the remote ONLY. The signal...
Complete Owners Guide
Page 12
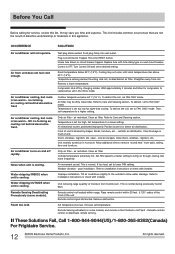
...low. If These Solutions Fail, Call 1-800-944-9044(US)/1-800-265-8352(Canada) For Frigidaire Service. 12 2009 Electrolux Home Products, Inc. Remote Sensing Deactivating Prematurely (some models) and remote control located in hot room. Room temperature below 60 OF (16 OC). OCCURRENCE... Place remote control within range. lncrease set FAN ONLY mode. Front of unit. Compressor shut-off rapidly. ice forming on some models). Temperature is set too high. Remove obstruction. Temperature is set too low for compressor to allow water drainage. open - cool ...
...low. If These Solutions Fail, Call 1-800-944-9044(US)/1-800-265-8352(Canada) For Frigidaire Service. 12 2009 Electrolux Home Products, Inc. Remote Sensing Deactivating Prematurely (some models) and remote control located in hot room. Room temperature below 60 OF (16 OC). OCCURRENCE... Place remote control within range. lncrease set FAN ONLY mode. Front of unit. Compressor shut-off rapidly. ice forming on some models). Temperature is set too high. Remove obstruction. Temperature is set too low for compressor to allow water drainage. open - cool ...
Installation Instructions
Page 1
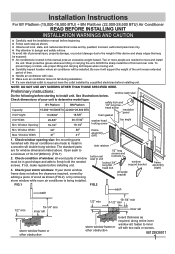
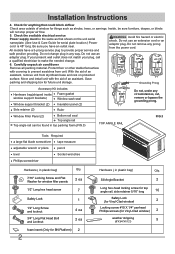
... sash seal Check dimensions of time. Window Width: 29" Max. Window Width: 41" 30" frame assembly 41" (left) 1. The standard parts are made to determine model type: BY Platform BN Platform Capacity: 15,000~18,500 BTU 22,000~28,500 BTU Unit Height: 17-25/32" 18-5/8" safety lock and...
... sash seal Check dimensions of time. Window Width: 29" Max. Window Width: 41" 30" frame assembly 41" (left) 1. The standard parts are made to determine model type: BY Platform BN Platform Capacity: 15,000~18,500 BTU 22,000~28,500 BTU Unit Height: 17-25/32" 18-5/8" safety lock and...
Installation Instructions
Page 2
... of window for anything that shown on protected 115V 15A 230V 15A 230V 20A surface. Inside, be the same as shrubs, trees, or awnings. All models have an outlet near. Do not use an extension cord or an adaptor plug. Do not use an adapter plug. Do not change . 6. Protect floor...
... of window for anything that shown on protected 115V 15A 230V 15A 230V 20A surface. Inside, be the same as shrubs, trees, or awnings. All models have an outlet near. Do not use an extension cord or an adaptor plug. Do not use an adapter plug. Do not change . 6. Protect floor...
Installation Instructions
Page 3
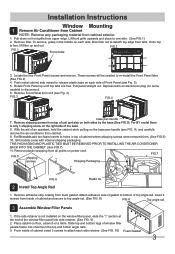
....2 FIG.1 Front Grille 3. Push metal cabinet side inward to detach top edge from cabinet. 9. Remove shipping screws from all points on some models) to one side. (See FIG.1) 2. Remove Front Panel from unit (see FIG. 4), and carefully remove the air conditioner from tabs....rail 3 Assemble Window Filler Panels 1. Rotate Front Panel up and out. Pull panel straight out. FIG.3 FIG.4 base pan handle 7. For BY model there is only 1 shipping screw on front grille from cabinet exterior. 1. With the aid of window filler panels frame into side retainer. (See FIG...
....2 FIG.1 Front Grille 3. Push metal cabinet side inward to detach top edge from cabinet. 9. Remove shipping screws from all points on some models) to one side. (See FIG.1) 2. Remove Front Panel from unit (see FIG. 4), and carefully remove the air conditioner from tabs....rail 3 Assemble Window Filler Panels 1. Rotate Front Panel up and out. Pull panel straight out. FIG.3 FIG.4 base pan handle 7. For BY model there is only 1 shipping screw on front grille from cabinet exterior. 1. With the aid of window filler panels frame into side retainer. (See FIG...
Installation Instructions
Page 7
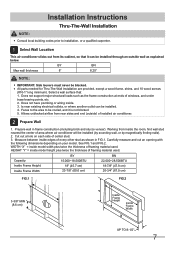
... 1. Working from rear sides and end (outside wall as explained below. Select a wall surface that it is not blocked. 5. HEIGHT "Y" = inside model height plus twice the thickness of windows, and under truss-bearing points, etc. 2. Prepare wall in FIG.1. Cut out a hole on your...and FIG.2. Does not support major structural loads such as shown in frame construction (including brick and stucco veneer). Allows unblocked airflow from inside model width plus twice the thickness of center stud. 3. WIDTH "X" = inside the room, find wall stud nearest the center of every other ...
... 1. Working from rear sides and end (outside wall as explained below. Select a wall surface that it is not blocked. 5. HEIGHT "Y" = inside model height plus twice the thickness of windows, and under truss-bearing points, etc. 2. Prepare wall in FIG.1. Cut out a hole on your...and FIG.2. Does not support major structural loads such as shown in frame construction (including brick and stucco veneer). Allows unblocked airflow from inside model width plus twice the thickness of center stud. 3. WIDTH "X" = inside the room, find wall stud nearest the center of every other ...
Installation Instructions
Page 8
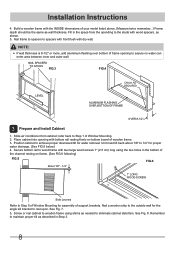
... to Step 5 of Window Mounting for proper water drainage. (See FIG.5 below.) 4. Fill in the bottom of the channel resting on bottom board of your model listed above. (Measure twice remember...) Frame depth should be the same as shown. 5. Nail a wooden strip to the studs with wood spacers, as wall thickness...
... to Step 5 of Window Mounting for proper water drainage. (See FIG.5 below.) 4. Fill in the bottom of the channel resting on bottom board of your model listed above. (Measure twice remember...) Frame depth should be the same as shown. 5. Nail a wooden strip to the studs with wood spacers, as wall thickness...
Product Specifications Sheet
Page 2
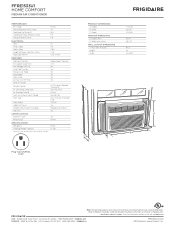
... CANADA • 5855 Terry Fox Way • Mississauga, ON L5V 3E4 • 1-800-265-8352 • frigidaire.ca FFRE1533U1 03/20 © 2018 Electrolux Home Products, Inc. Max. Height (Min.) E - Always consult local and national electric, gas and plumbing ...Energy Efficiency Ratio ELECTRICAL Volts Amps (Cool) Watts (Cool) Length of Power Cord (Min. / Max.) Plug Type (NEMA) RAC Median Models 15,000 PRODUCT DIMENSIONS A - FFRE1533U1 HOME COMFORT MEDIAN AIR CONDITIONER PERFORMANCE BTU (Cool) Dehumidification (Pints / Hour) Cool Area (Up To Sq. Specifications subject to -Clean ...
... CANADA • 5855 Terry Fox Way • Mississauga, ON L5V 3E4 • 1-800-265-8352 • frigidaire.ca FFRE1533U1 03/20 © 2018 Electrolux Home Products, Inc. Max. Height (Min.) E - Always consult local and national electric, gas and plumbing ...Energy Efficiency Ratio ELECTRICAL Volts Amps (Cool) Watts (Cool) Length of Power Cord (Min. / Max.) Plug Type (NEMA) RAC Median Models 15,000 PRODUCT DIMENSIONS A - FFRE1533U1 HOME COMFORT MEDIAN AIR CONDITIONER PERFORMANCE BTU (Cool) Dehumidification (Pints / Hour) Cool Area (Up To Sq. Specifications subject to -Clean ...
Energy Guide
Page 1
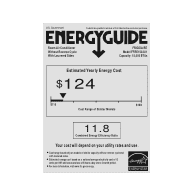
... energy cost based on a national average electricity cost of 13 cents per kWh and a seasonal use . Room Air Conditioner Without Reverse Cycle With Louvered Sides FRIGIDAIRE Model FFRE1533U1 Capacity: 15,000 BTUs Estimated Yearly Energy Cost $124 $115 $182 Cost Range of 8 hours a day over a 3 month period. For more information,visit www.ftc...
... energy cost based on a national average electricity cost of 13 cents per kWh and a seasonal use . Room Air Conditioner Without Reverse Cycle With Louvered Sides FRIGIDAIRE Model FFRE1533U1 Capacity: 15,000 BTUs Estimated Yearly Energy Cost $124 $115 $182 Cost Range of 8 hours a day over a 3 month period. For more information,visit www.ftc...


