
Complete Owners Guide
Page 1
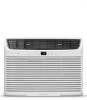
All about the Use &Care of your Room Air Conditioner TABLE OF CONTENTS Important Safety Instructions 2-3 Product Registration 4 Packaging 4 Normal Sounds 4 Air Conditioner Features 5 Operating Instructions 5-10 Care and Cleaning 11 Energy Saving Ideas 11 Before You Call 12 Major Appliance Limited Warranty 13 www.frigidaire.com USA 1-800-944-9044 www.frigidaire.ca Canada 1-800-265-8352 66129926905 (June 2009)
All about the Use &Care of your Room Air Conditioner TABLE OF CONTENTS Important Safety Instructions 2-3 Product Registration 4 Packaging 4 Normal Sounds 4 Air Conditioner Features 5 Operating Instructions 5-10 Care and Cleaning 11 Energy Saving Ideas 11 Before You Call 12 Major Appliance Limited Warranty 13 www.frigidaire.com USA 1-800-944-9044 www.frigidaire.ca Canada 1-800-265-8352 66129926905 (June 2009)
Complete Owners Guide
Page 2
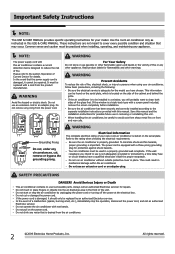
... adapter plug. Read product labels for the model you have a qualified electrician install the proper receptacle. Be sure the air conditioner has been securely and correctly installed according to avoid cuts from the power cord. Save this manual. When handling the air conditioner, be replaced by a time delay fuse or circuit breaker, have chosen. Be sure the air conditioner is damaged, it should only be careful to the separate installation instructions...
... adapter plug. Read product labels for the model you have a qualified electrician install the proper receptacle. Be sure the air conditioner has been securely and correctly installed according to avoid cuts from the power cord. Save this manual. When handling the air conditioner, be replaced by a time delay fuse or circuit breaker, have chosen. Be sure the air conditioner is damaged, it should only be careful to the separate installation instructions...
Complete Owners Guide
Page 3
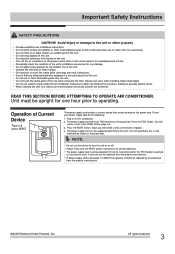
... the air conditioner at fireplaces or other property Provide ventilation per installation instructions. Operate the unit with liquids on the plug head. Unit must be replaced if it CANNOT be obtained from the product manufacturer. 2009 Electrolux Home Products, Inc. To test your power supply cord do the following: Plug in place. You will not be replaced by a light on outdoor part of the unit when removing the filter. The power supply cord...
... the air conditioner at fireplaces or other property Provide ventilation per installation instructions. Operate the unit with liquids on the plug head. Unit must be replaced if it CANNOT be obtained from the product manufacturer. 2009 Electrolux Home Products, Inc. To test your power supply cord do the following: Plug in place. You will not be replaced by a light on outdoor part of the unit when removing the filter. The power supply cord...
Complete Owners Guide
Page 4
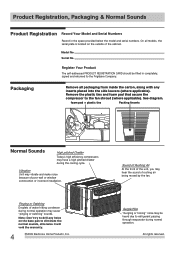
... from inside the carton, along with any holes on the outside of the unit, you may cause "pinging or swishing" sounds. See diagram. Remove the plastic ties and foam pad that secure the compressor to the fan shroud (where applicable). Serial No. Product Registration, Packaging & Normal Sounds Product Registration Record Your Model and Serial Numbers Record in completely, signed and returned to the Frigidaire...
... from inside the carton, along with any holes on the outside of the unit, you may cause "pinging or swishing" sounds. See diagram. Remove the plastic ties and foam pad that secure the compressor to the fan shroud (where applicable). Serial No. Product Registration, Packaging & Normal Sounds Product Registration Record Your Model and Serial Numbers Record in completely, signed and returned to the Frigidaire...
Complete Owners Guide
Page 5
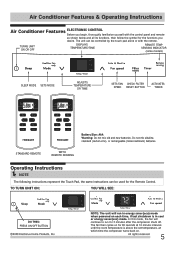
All rights reserved. 5 TURNS UNIT ON OR OFF DISPLAYS TEMPERATURE/TIME REMOTE TEMP SENSING INDICATOR (some models) SLEEP MODE SETS MODE ADJUSTS TEMPERATURE OR TIME SETS FAN CHECK FILTER SPEED RESET BUTTON ACTIVATES TIMER STANDARD REMOTE Battery Size: AAA Warning: Do not mix old and new batteries. WITH REMOTE SENSING Operating Instructions NOTE The following instructions represent the Touch Pad, the same instructions can be used for 3 minutes after the compressor shuts off. TO TURN UNIT ON: YOU WILL SEE: DO...
All rights reserved. 5 TURNS UNIT ON OR OFF DISPLAYS TEMPERATURE/TIME REMOTE TEMP SENSING INDICATOR (some models) SLEEP MODE SETS MODE ADJUSTS TEMPERATURE OR TIME SETS FAN CHECK FILTER SPEED RESET BUTTON ACTIVATES TIMER STANDARD REMOTE Battery Size: AAA Warning: Do not mix old and new batteries. WITH REMOTE SENSING Operating Instructions NOTE The following instructions represent the Touch Pad, the same instructions can be used for 3 minutes after the compressor shuts off. TO TURN UNIT ON: YOU WILL SEE: DO...
Complete Owners Guide
Page 8
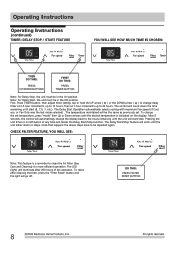
..., then at any time will illuminate after cleaning the filter, press the "Filter Reset" button and the light will count down the time remaining until the desired temperature is a reminder to 24 hours. DO THIS: PRESS FILTER RESET BUTTON 8 2009 Electrolux Home Products, Inc. The LED (light) will cancel the Delay Start/Stop function. Operating Instructions Operating Instructions (continued) TIMER: DELAY STOP / START FEATURE YOU WILL SEE HOW MUCH TIME IS...
..., then at any time will illuminate after cleaning the filter, press the "Filter Reset" button and the light will count down the time remaining until the desired temperature is a reminder to 24 hours. DO THIS: PRESS FILTER RESET BUTTON 8 2009 Electrolux Home Products, Inc. The LED (light) will cancel the Delay Start/Stop function. Operating Instructions Operating Instructions (continued) TIMER: DELAY STOP / START FEATURE YOU WILL SEE HOW MUCH TIME IS...
Complete Owners Guide
Page 9
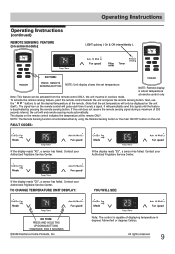
..., use the " " buttons to set the desired temperature at the remote. (Note that the set temperature NOTE: Remote display is capable of 200 seconds interval, the unit will end remote sensing mode automatically. lf the unit does not receive the remote sensing signal during a maximum of displaying temperature in cool/eco mode. FAULT CODES: If the display reads "AS", a sensor has failed. If the display reads "ES", a sensor has failed. Contact your Authorized Frigidaire Service Center...
..., use the " " buttons to set the desired temperature at the remote. (Note that the set temperature NOTE: Remote display is capable of 200 seconds interval, the unit will end remote sensing mode automatically. lf the unit does not receive the remote sensing signal during a maximum of displaying temperature in cool/eco mode. FAULT CODES: If the display reads "AS", a sensor has failed. If the display reads "ES", a sensor has failed. Contact your Authorized Frigidaire Service Center...
Complete Owners Guide
Page 10
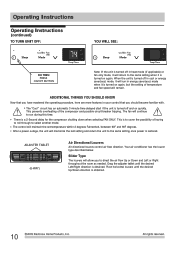
... features in your control that you to run in heat mode (if applicable) or fan only mode, it is obtained. 10 2009 Electrolux Home Products, Inc. Slider Type The louvers will maintain the set temperature within 2 degrees Fahrenheit, between 60F and 90F degrees. The "Cool" circuit has an automatic 3 minute time delayed start if the unit is a 2-Second delay for the compressor shutting down...
... features in your control that you to run in heat mode (if applicable) or fan only mode, it is obtained. 10 2009 Electrolux Home Products, Inc. Slider Type The louvers will maintain the set temperature within 2 degrees Fahrenheit, between 60F and 90F degrees. The "Cool" circuit has an automatic 3 minute time delayed start if the unit is a 2-Second delay for the compressor shutting down...
Complete Owners Guide
Page 11
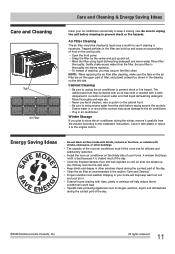
... upper part of the room air conditioner must fit the room size for efficient and satisfactory operation. Cabinet Cleaning Be sure to unplug the air conditioner to prevent shock or fire hazards. Never use harsh cleaners, wax or polish on the shady side of warm water and mild liquid dishwashing detergent. Plug in your home will help keep it looking new. Cover it to the installation instructions. or...
... upper part of the room air conditioner must fit the room size for efficient and satisfactory operation. Cabinet Cleaning Be sure to unplug the air conditioner to prevent shock or fire hazards. Never use harsh cleaners, wax or polish on the shady side of warm water and mild liquid dishwashing detergent. Plug in your home will help keep it looking new. Cover it to the installation instructions. or...
Complete Owners Guide
Page 12
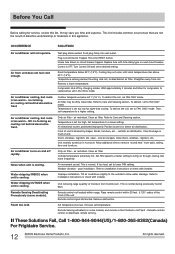
... better air distribution. ice forming on cooling coil behind decorative front Air conditioner cooling, but room is set too low for compressor to FAN ONLY mode. Water dripping INSIDE when unit is set to Care and Cleaning section. Turn Control ON and set too high. Straighten away from unit does not feel cold enough. Clean filter. air restricted. Refer to desired setting. Temperature is cooling. Position louvers for service, review this appliance. Dirty air filter - Set FAN speed to a faster setting to a lower temperature. Window vibration...
... better air distribution. ice forming on cooling coil behind decorative front Air conditioner cooling, but room is set too low for compressor to FAN ONLY mode. Water dripping INSIDE when unit is set to Care and Cleaning section. Turn Control ON and set too high. Straighten away from unit does not feel cold enough. Clean filter. air restricted. Refer to desired setting. Temperature is cooling. Position louvers for service, review this appliance. Dirty air filter - Set FAN speed to a faster setting to a lower temperature. Window vibration...
Complete Owners Guide
Page 13
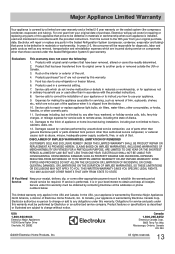
... appliance is installed, used and maintained in a commercial setting. 7. All rights reserved. 13 Service calls to repair or replace appliance light bulbs, air filters, water filters, other consumables, or knobs, handles, or other than authorized service companies; use of parts other than genuine Electrolux parts or parts obtained from persons other cosmetic parts. 11. This limited warranty only applies in materials or workmanship. Exclusions This warranty does not cover the following...
... appliance is installed, used and maintained in a commercial setting. 7. All rights reserved. 13 Service calls to repair or replace appliance light bulbs, air filters, water filters, other consumables, or knobs, handles, or other than authorized service companies; use of parts other than genuine Electrolux parts or parts obtained from persons other cosmetic parts. 11. This limited warranty only applies in materials or workmanship. Exclusions This warranty does not cover the following...
Installation Instructions
Page 1
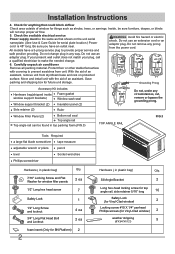
... that may be exposed: Air conditioners covered in good shape and able to a minimum of window: all local, state, and national electrical codes and by a qualified electrician before starting to move and install the unit. Check window opening size: the mounting parts furnished with this manual pose an excessive weight hazard. Be sure it will be in this air conditioner are made to determine model type: BY Platform BN...
... that may be exposed: Air conditioners covered in good shape and able to a minimum of window: all local, state, and national electrical codes and by a qualified electrician before starting to move and install the unit. Check window opening size: the mounting parts furnished with this manual pose an excessive weight hazard. Be sure it will be in this air conditioner are made to determine model type: BY Platform BN...
Installation Instructions
Page 2
... the unit serial nameplate. (See Use & Care Guide for serial plate location.) Power cord is 48" long. Do not use an extension cord or an adaptor plug. With the aid of an assistant, remove unit from the power cord. Move and install unit with covering to prevent scratches from unit. Installation Instructions 4. Check the available electrical service Power supply must be the same as shrubs, trees, or awnings. safe positive grouding. Carefully unpack air conditioner Remove all...
... the unit serial nameplate. (See Use & Care Guide for serial plate location.) Power cord is 48" long. Do not use an extension cord or an adaptor plug. With the aid of an assistant, remove unit from the power cord. Move and install unit with covering to prevent scratches from unit. Installation Instructions 4. Check the available electrical service Power supply must be the same as shrubs, trees, or awnings. safe positive grouding. Carefully unpack air conditioner Remove all...
Installation Instructions
Page 3
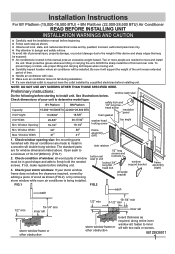
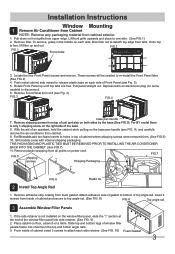
...-install the Front Panel later (See FIG.2) 4. Remove Front Panel from unit (see FIG. 4), and carefully remove the air conditioner from . (See FIG.6) 10. FIG.3 FIG.4 base pan handle 7. For BY model there is not installed on the base pan handle (see Fig. 4). BN models come with internal shipping packaging. Remove adhesive strip coating from cabinet exterior. 1. Attach adhesive side of the base. 8. Installation Instructions Window Mounting 1 Remove Air Conditioner...
...-install the Front Panel later (See FIG.2) 4. Remove Front Panel from unit (see FIG. 4), and carefully remove the air conditioner from . (See FIG.6) 10. FIG.3 FIG.4 base pan handle 7. For BY model there is not installed on the base pan handle (see Fig. 4). BN models come with internal shipping packaging. Remove adhesive strip coating from cabinet exterior. 1. Attach adhesive side of the base. 8. Installation Instructions Window Mounting 1 Remove Air Conditioner...
Installation Instructions
Page 5
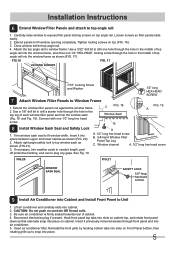
..., trim weather seals to needed length, peel off protective backing, and use to Window Frame 1. Installation Instructions 6 Extend Window Filler Panels and attach to fill window opening completely. Extend panels to top angle rail: 1. Tighten locking screws on controls OR finned coils. 3. Insert it into the window frame as shown (FIG. 17). See Fig. 19. A. 1/2" long hex head screw B. Lift air conditioner and carefully slide into the...
..., trim weather seals to needed length, peel off protective backing, and use to Window Frame 1. Installation Instructions 6 Extend Window Filler Panels and attach to fill window opening completely. Extend panels to top angle rail: 1. Tighten locking screws on controls OR finned coils. 3. Insert it into the window frame as shown (FIG. 17). See Fig. 19. A. 1/2" long hex head screw B. Lift air conditioner and carefully slide into the...
Installation Instructions
Page 6
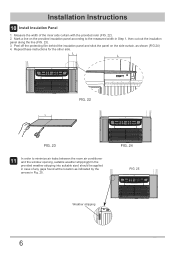
...) 4. Peel off the protecting film behind the insulation panel and stick the panel on the provided insulation panel according to minimize air leaks between the room air conditioner and the window opening, suitable weather stripping(trim the provided weather stripping into suitable size) should be applied in Step 1, then cut out the insulation panel along the line (FIG. 23). 3. L L 1 2 3 4 1 2 3 4 5 6 7 8 9 10 11 FIG...
...) 4. Peel off the protecting film behind the insulation panel and stick the panel on the provided insulation panel according to minimize air leaks between the room air conditioner and the window opening, suitable weather stripping(trim the provided weather stripping into suitable size) should be applied in Step 1, then cut out the insulation panel along the line (FIG. 23). 3. L L 1 2 3 4 1 2 3 4 5 6 7 8 9 10 11 FIG...
Installation Instructions
Page 7
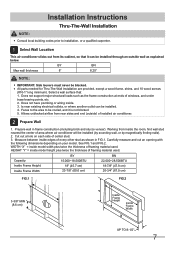
... existing electrical outlets, or where another outlet can be installed through an outside ) of framing material used . Faces to the area to installation, or a qualified carpenter. 1 Select Wall Location This air conditioner slides out from its cabinet, so that : 1. Allows unblocked airflow from inside . 3. Cut out a hole on your model. WIDTH "X" = inside model width plus twice the thickness of installed air conditioner. 2 Prepare Wall 1. Does not support major structural...
... existing electrical outlets, or where another outlet can be installed through an outside ) of framing material used . Faces to the area to installation, or a qualified carpenter. 1 Select Wall Location This air conditioner slides out from its cabinet, so that : 1. Allows unblocked airflow from inside . 3. Cut out a hole on your model. WIDTH "X" = inside model width plus twice the thickness of installed air conditioner. 2 Prepare Wall 1. Does not support major structural...
Installation Instructions
Page 8
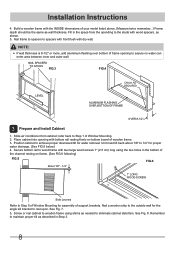
.... 5. See Fig. 8. Installation Instructions 4. Nail a wooden strip to the outside wall for the angle sill bracket to Step 5 of Window Mounting for assembly of Window Mounting. 2. Fill in Step 3. 8 Slide air conditioner from the opending to eliminate cabinet distortion. Place cabinet into opening with the INSIDE dimensions of the channel resting on bottom board of frame opening to achieve proper downward tilt for proper water drainage. (See FIG...
.... 5. See Fig. 8. Installation Instructions 4. Nail a wooden strip to the outside wall for the angle sill bracket to Step 5 of Window Mounting for assembly of Window Mounting. 2. Fill in Step 3. 8 Slide air conditioner from the opending to eliminate cabinet distortion. Place cabinet into opening with the INSIDE dimensions of the channel resting on bottom board of frame opening to achieve proper downward tilt for proper water drainage. (See FIG...
Product Specifications Sheet
Page 1
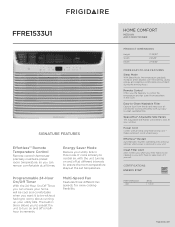
... air conditioner working efficiently with an extra long three-prong cord - makes extension cords unnecessary. CERTIFICATIONS ENERGY STAR® PERFORMANCE Cool BTUS 15,000 frigidaire.com Power Cord Comes with our easyto-clean washable filter. It cools similarly to central air, with the unit turning on and off at different intervals to best fit your unit. The built-in timer allows you to preset the unit to your window. FFRE1533U1 SIGNATURE FEATURES Effortless™ Remote Temperature Control Remote control thermostat...
... air conditioner working efficiently with an extra long three-prong cord - makes extension cords unnecessary. CERTIFICATIONS ENERGY STAR® PERFORMANCE Cool BTUS 15,000 frigidaire.com Power Cord Comes with our easyto-clean washable filter. It cools similarly to central air, with the unit turning on and off at different intervals to best fit your unit. The built-in timer allows you to preset the unit to your window. FFRE1533U1 SIGNATURE FEATURES Effortless™ Remote Temperature Control Remote control thermostat...
Product Specifications Sheet
Page 2
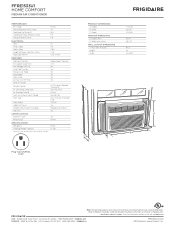
... ELECTRICAL Volts Amps (Cool) Watts (Cool) Length of Power Cord (Min. / Max.) Plug Type (NEMA) RAC Median Models 15,000 PRODUCT DIMENSIONS A - Depth 11.8 WINDOW DIMENSIONS 11.9 D - Wall Thickness Height Width 17-25/32" 23-5/8" 27-13/32" 19-1/4" 29" / 41" 9-1/2" 18" 23-29/32" FEATURES Electronic Controls Ready-Select® Controls Fan Speeds (Cool / Fan) 3 / 3 Low Voltage Start-Up Yes Auto Cool Function Yes Energy Saver Mode Yes Sleep Mode Yes Filter Check Yes 24-Hour On / Off Timer...
... ELECTRICAL Volts Amps (Cool) Watts (Cool) Length of Power Cord (Min. / Max.) Plug Type (NEMA) RAC Median Models 15,000 PRODUCT DIMENSIONS A - Depth 11.8 WINDOW DIMENSIONS 11.9 D - Wall Thickness Height Width 17-25/32" 23-5/8" 27-13/32" 19-1/4" 29" / 41" 9-1/2" 18" 23-29/32" FEATURES Electronic Controls Ready-Select® Controls Fan Speeds (Cool / Fan) 3 / 3 Low Voltage Start-Up Yes Auto Cool Function Yes Energy Saver Mode Yes Sleep Mode Yes Filter Check Yes 24-Hour On / Off Timer...


