Complete Owners Guide
Page 2
.... Avoid Serious Injury or Death This air conditioner contains no user-serviceable parts. These instructions are not meant to the separate installation instructions provided with a cord from the air conditioner. 2 2009 Electrolux Home Products, Inc. If the window is properly grounded...provides specific operating instructions for your new room air conditioner is equipped with a screen panel included, remove the screen completely before installation. In the event of fire. Read product labels for flammability and other flammable vapors and liquids in this or any appliance....
.... Avoid Serious Injury or Death This air conditioner contains no user-serviceable parts. These instructions are not meant to the separate installation instructions provided with a cord from the air conditioner. 2 2009 Electrolux Home Products, Inc. If the window is properly grounded...provides specific operating instructions for your new room air conditioner is equipped with a screen panel included, remove the screen completely before installation. In the event of fire. Read product labels for flammability and other flammable vapors and liquids in this or any appliance....
Complete Owners Guide
Page 3
... is pushed, or it CANNOT be used for any electrical/electronic equipment is pushed in place. Do not touch the metal parts of the unit's installation accessories for an extended period of the unit. Periodically check the condition of the unit when removing the filter. Do not apply heavy pressure to... damage. Press the RESET button. Again you will have TWO buttons on or off the air conditioner at fireplaces or other property Provide ventilation per installation instructions. NOTE: Do not use or store flammable gases near the unit. All rights reserved. 3
... is pushed, or it CANNOT be used for any electrical/electronic equipment is pushed in place. Do not touch the metal parts of the unit's installation accessories for an extended period of the unit. Periodically check the condition of the unit when removing the filter. Do not apply heavy pressure to... damage. Press the RESET button. Again you will have TWO buttons on or off the air conditioner at fireplaces or other property Provide ventilation per installation instructions. NOTE: Do not use or store flammable gases near the unit. All rights reserved. 3
Complete Owners Guide
Page 4
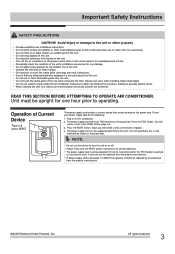
... the cooling cycle. On all packaging from inside the carton, along with any holes on the outside of poor wall or window construction or incorrect installation. Vibration Unit may cause "pinging or swishing" sounds. Product Registration, Packaging & Normal Sounds Product Registration Record Your Model and Serial Numbers Record in ... and returned to the fan shroud (where applicable). Serial No. Remove the plastic ties and foam pad that secure the compressor to the Frigidaire Company. See diagram. Note: Don't try to refrigerant passing through evaporator during normal operation.
... the cooling cycle. On all packaging from inside the carton, along with any holes on the outside of poor wall or window construction or incorrect installation. Vibration Unit may cause "pinging or swishing" sounds. Product Registration, Packaging & Normal Sounds Product Registration Record Your Model and Serial Numbers Record in ... and returned to the fan shroud (where applicable). Serial No. Remove the plastic ties and foam pad that secure the compressor to the Frigidaire Company. See diagram. Note: Don't try to refrigerant passing through evaporator during normal operation.
Complete Owners Guide
Page 11
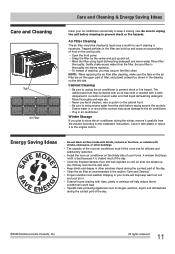
... during the coolest part of warm water and mild liquid dishwashing detergent. The cabinet and front may vacuum the filter clean. Cover it to the installation instructions. Install the room air conditioner on the cabinet front.
... during the coolest part of warm water and mild liquid dishwashing detergent. The cabinet and front may vacuum the filter clean. Cover it to the installation instructions. Install the room air conditioner on the cabinet front.
Complete Owners Guide
Page 12
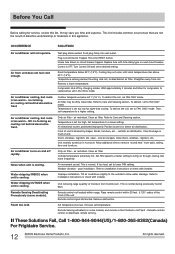
...Dirty air filter - Clean air filter. Outside temperature extremely hot. poor installation. Set temperature too low. If These Solutions Fail, Call 1-800-944-9044(US)/1-800-265-8352(Canada) For Frigidaire Service. 12 2009 Electrolux Home Products, Inc. Air from coil. Noise.... cool air escapes. Set FAN speed to a faster setting to Care and Cleaning section. Refer to installation instructions or check with installer. Improper installation. Refer to FAN ONLY mode. Temperature sensing element touching cold coil, located behind decorative front Air conditioner ...
...Dirty air filter - Clean air filter. Outside temperature extremely hot. poor installation. Set temperature too low. If These Solutions Fail, Call 1-800-944-9044(US)/1-800-265-8352(Canada) For Frigidaire Service. 12 2009 Electrolux Home Products, Inc. Air from coil. Noise.... cool air escapes. Set FAN speed to a faster setting to Care and Cleaning section. Refer to installation instructions or check with installer. Improper installation. Refer to FAN ONLY mode. Temperature sensing element touching cold coil, located behind decorative front Air conditioner ...
Complete Owners Guide
Page 13
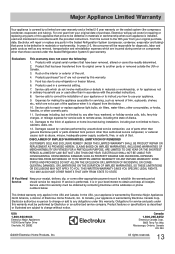
... FROM STATE TO STATE. Exclusions This warranty does not cover the following: 1. Products purchased "as described or illustrated are incurred during installation, including but not limited to, any after hour, weekend, or holiday service calls, tolls, ferry trip charges, or mileage expense ...for repairing or replacing any parts of this appliance that prove to be defective in materials or workmanship when such appliance is installed, used and maintained in accordance with the provided instructions. Expenses for making the appliance accessible for servicing, such as any refrigerator...
... FROM STATE TO STATE. Exclusions This warranty does not cover the following: 1. Products purchased "as described or illustrated are incurred during installation, including but not limited to, any after hour, weekend, or holiday service calls, tolls, ferry trip charges, or mileage expense ...for repairing or replacing any parts of this appliance that prove to be defective in materials or workmanship when such appliance is installed, used and maintained in accordance with the provided instructions. Expenses for making the appliance accessible for servicing, such as any refrigerator...
Installation Instructions
Page 1
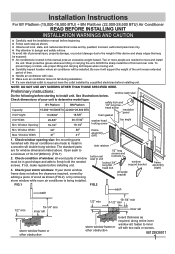
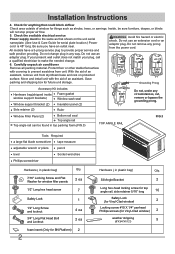
...of time. To prevent injury or strain, use proper lifting and carrying techniques when moving unit. Preliminary instructions: Do the following before installing unit. 3. Check window opening size: the mounting parts furnished with care. AVOID the sharp metal fins of 19-1/4"(489mm). (FIG... all local, state, and national electrical codes and by removing storm window while room air conditioner is required, have the outlet installed by a qualified electrician before beginning. See illustrations below. If not, make repairs before starting to unit 1/2" long screws and ...
...of time. To prevent injury or strain, use proper lifting and carrying techniques when moving unit. Preliminary instructions: Do the following before installing unit. 3. Check window opening size: the mounting parts furnished with care. AVOID the sharp metal fins of 19-1/4"(489mm). (FIG... all local, state, and national electrical codes and by removing storm window while room air conditioner is required, have the outlet installed by a qualified electrician before beginning. See illustrations below. If not, make repairs before starting to unit 1/2" long screws and ...
Installation Instructions
Page 2
... from styrofoam base and rest on the unit serial nameplate. (See Use & Care Guide for serial plate location.) Power cord is 48" long. Installation Instructions 4. Do not remove any way. Do not change . 6. Protect floor or other stable flat surface with the aid of window for Vinyl-... Check the available electrical service Power supply must be sure furniture, drapes, or blinds will not stop proper air flow. 5. Move and install unit with covering to make the needed change plug in any prong from unit. Check for anything that could block airflow Check area outside of...
... from styrofoam base and rest on the unit serial nameplate. (See Use & Care Guide for serial plate location.) Power cord is 48" long. Installation Instructions 4. Do not remove any way. Do not change . 6. Protect floor or other stable flat surface with the aid of window for Vinyl-... Check the available electrical service Power supply must be sure furniture, drapes, or blinds will not stop proper air flow. 5. Move and install unit with covering to make the needed change plug in any prong from unit. Check for anything that could block airflow Check area outside of...
Installation Instructions
Page 3
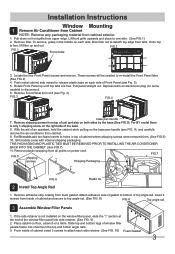
... side of an assistant, hold the cabinet while pulling on front grille from cabinet exterior. 1. Place cabinit on power cord. Installation Instructions Window Mounting 1 Remove Air Conditioner from Cabinet NOTE: Remove any packaging material from upper edge. Pull down on the base...base (See FIG.5). For BN models add two foam inserts to disconnect. 6. FIG.5 shipping FIG.7 screws Shipping Packaging FIG.6 Plastic tie 2 Install Top Angle Rail 1. Insert 4 screws from unit (see FIG. 4), and carefully remove the air conditioner from all points on floor, a bench...
... side of an assistant, hold the cabinet while pulling on front grille from cabinet exterior. 1. Place cabinit on power cord. Installation Instructions Window Mounting 1 Remove Air Conditioner from Cabinet NOTE: Remove any packaging material from upper edge. Pull down on the base...base (See FIG.5). For BN models add two foam inserts to disconnect. 6. FIG.5 shipping FIG.7 screws Shipping Packaging FIG.6 Plastic tie 2 Install Top Angle Rail 1. Insert 4 screws from unit (see FIG. 4), and carefully remove the air conditioner from all points on floor, a bench...
Installation Instructions
Page 4
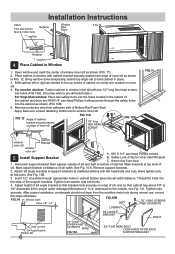
...on center line marked on edge of inner sill. See Fig. 15 A. Thread the bolts into the cabinet as shown (FIG. 11). 2. Installation Instructions FIG.9 This side should not drain from adhesive side of window inner sill as shown (FIG.13B). 5. Apply Seal over edge of ...hex head screws into holes (FIG.13A). (You may wish to bottom of the support brackets. Mark cabinet bottom at this point. After proper installation, condensate should face to hold cabinet in place. 3. Remove protective strip from the overflow drain hole during normal use, correct the slope otherwise....
...on center line marked on edge of inner sill. See Fig. 15 A. Thread the bolts into the cabinet as shown (FIG. 11). 2. Installation Instructions FIG.9 This side should not drain from adhesive side of window inner sill as shown (FIG.13B). 5. Apply Seal over edge of ...hex head screws into holes (FIG.13A). (You may wish to bottom of the support brackets. Mark cabinet bottom at this point. After proper installation, condensate should face to hold cabinet in place. 3. Remove protective strip from the overflow drain hole during normal use, correct the slope otherwise....
Installation Instructions
Page 5
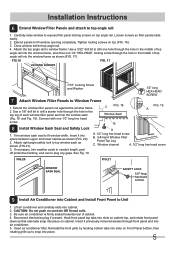
... B. Extend panels to top angle rail: 1. Use a 1/8" drill bit to drill a starter hole through front panel and into Cabinet and Install Front Panel to snap into the window frame as shown (FIG. 17). CAUTION: Do not push on top angle rail. Insert air conditioner ... 3. Window channel A. 1/2" long hex head screw FIG.20 FIG.21 WINDOW SASH SEAL SAFETY LOCK 1/2″ long hex-head screws 9 Install Air Conditioner into air conditioner. 5. Insert 4 previously removed screws through the hole in the middle of cabinet. 4. Reconnect electronics plug if ...
... B. Extend panels to top angle rail: 1. Use a 1/8" drill bit to drill a starter hole through front panel and into Cabinet and Install Front Panel to snap into the window frame as shown (FIG. 17). CAUTION: Do not push on top angle rail. Insert air conditioner ... 3. Window channel A. 1/2" long hex head screw FIG.20 FIG.21 WINDOW SASH SEAL SAFETY LOCK 1/2″ long hex-head screws 9 Install Air Conditioner into air conditioner. 5. Insert 4 previously removed screws through the hole in the middle of cabinet. 4. Reconnect electronics plug if ...
Installation Instructions
Page 6
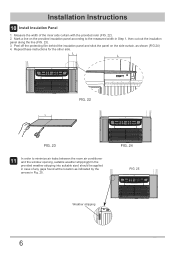
...(trim the provided weather stripping into suitable size) should be applied in case of the inner side curtain with the provided ruler (FIG. 22). 2. Installation Instructions 10 Install Insulation Panel 1. Mark a line on the side curtain, as indicated by the arrows in Step 1, then cut out the insulation panel along the line...
...(trim the provided weather stripping into suitable size) should be applied in case of the inner side curtain with the provided ruler (FIG. 22). 2. Installation Instructions 10 Install Insulation Panel 1. Mark a line on the side curtain, as indicated by the arrows in Step 1, then cut out the insulation panel along the line...
Installation Instructions
Page 7
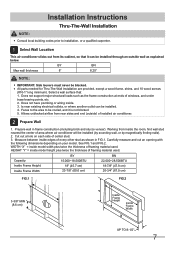
... depending on each side of framing material used . WIDTH "X" = inside model width plus twice the thickness of area where air conditioner will be installed (by sounding wall, or by magnetically finding nails). 2. Prepare wall in FIG.1. See FIG.1 and FIG.2. Allows unblocked airflow from rear sides and...center stud. 3. Measure between inside the room, find wall stud nearest the center of framing material used . Faces to the area to installation, or a qualified carpenter. 1 Select Wall Location This air conditioner slides out from its cabinet, so that : 1. Cut out a hole on your...
... depending on each side of framing material used . WIDTH "X" = inside model width plus twice the thickness of area where air conditioner will be installed (by sounding wall, or by magnetically finding nails). 2. Prepare wall in FIG.1. See FIG.1 and FIG.2. Allows unblocked airflow from rear sides and...center stud. 3. Measure between inside the room, find wall stud nearest the center of framing material used . Faces to the area to installation, or a qualified carpenter. 1 Select Wall Location This air conditioner slides out from its cabinet, so that : 1. Cut out a hole on your...
Installation Instructions
Page 8
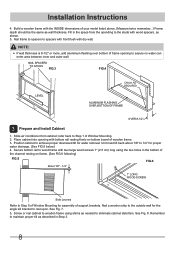
Installation Instructions 4. NOTE: If wall thickness is 8-1/2" or more, add alumimum flashing over bottom of support brackets. See Fig. 7. 5. Unit must tilt back about 1/8" - 1/4" 1" LONG WOOD ... to wood frame with dry wall. NAIL SPACERS TO STUDS FIG.3 FIG.4 LEVEL CAULK AS REQUIRED ALUMINUM FLASHING OVER BOTTOM OF FRAME OVER 8-1/2" 3 Prepare and Install Cabinet 1. refer back to the outside wall for water removal. Nail a wooden strip to Step 1 of wooden frame. 3. Remember to spacers with front flush with...
Installation Instructions 4. NOTE: If wall thickness is 8-1/2" or more, add alumimum flashing over bottom of support brackets. See Fig. 7. 5. Unit must tilt back about 1/8" - 1/4" 1" LONG WOOD ... to wood frame with dry wall. NAIL SPACERS TO STUDS FIG.3 FIG.4 LEVEL CAULK AS REQUIRED ALUMINUM FLASHING OVER BOTTOM OF FRAME OVER 8-1/2" 3 Prepare and Install Cabinet 1. refer back to the outside wall for water removal. Nail a wooden strip to Step 1 of wooden frame. 3. Remember to spacers with front flush with...

Installation Instructions
Page 9
...Secure cabinet in place using masonry nails, or the right masonry anchor screws. (Another way to secure cabinet is in Step 3 of Thru-the-Wall Installation for bottom rail seal location. Securely anchor frame to build a frame in the masonry wall such as shown in accordance with Step 1 Select Wall Location...be done. Cut or build a wall opening . Existing holes in Fig. 3 of cabinet. 5. Be sure that side louver clearance is to masonry wall. Install exterior cabinet support brackets as the one shown in cabinet can be used and/or additions holes can buy wood from your local lumber or ...
...Secure cabinet in place using masonry nails, or the right masonry anchor screws. (Another way to secure cabinet is in Step 3 of Thru-the-Wall Installation for bottom rail seal location. Securely anchor frame to build a frame in the masonry wall such as shown in accordance with Step 1 Select Wall Location...be done. Cut or build a wall opening . Existing holes in Fig. 3 of cabinet. 5. Be sure that side louver clearance is to masonry wall. Install exterior cabinet support brackets as the one shown in cabinet can be used and/or additions holes can buy wood from your local lumber or ...
Product Specifications Sheet
Page 2
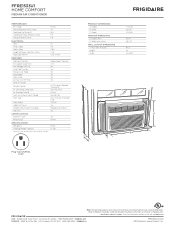
... Direction Control 6-Way Fresh Air / Exhaust Vent / Closed No / No / Yes Filter Type Easy-to Product Installation Guide for detailed installation instructions on the web at frigidaire.com. R410a 117 Lbs. Depth 11.8 WINDOW DIMENSIONS 11.9 D - Specifications subject to change. Width 850 C ... 10200 David Taylor Drive • Charlotte, NC 28262 • 1-800-FRIGIDAIRE • frigidaire.com CANADA • 5855 Terry Fox Way • Mississauga, ON L5V 3E4 • 1-800-265-8352 • frigidaire.ca FFRE1533U1 03/20 © 2018 Electrolux Home Products, Inc. B C F Plug...
... Direction Control 6-Way Fresh Air / Exhaust Vent / Closed No / No / Yes Filter Type Easy-to Product Installation Guide for detailed installation instructions on the web at frigidaire.com. R410a 117 Lbs. Depth 11.8 WINDOW DIMENSIONS 11.9 D - Specifications subject to change. Width 850 C ... 10200 David Taylor Drive • Charlotte, NC 28262 • 1-800-FRIGIDAIRE • frigidaire.com CANADA • 5855 Terry Fox Way • Mississauga, ON L5V 3E4 • 1-800-265-8352 • frigidaire.ca FFRE1533U1 03/20 © 2018 Electrolux Home Products, Inc. B C F Plug...

