Complete Owners Guide
Page 2
... a triple-track type with a screen panel included, remove the screen completely before installation. Avoid Serious Injury or Death This air conditioner contains no user-serviceable parts. Always call an authorized Electrolux servicer. All rights reserved. NOTE: The power supply cord with this manual. Do not use an extension cord or an...
... a triple-track type with a screen panel included, remove the screen completely before installation. Avoid Serious Injury or Death This air conditioner contains no user-serviceable parts. Always call an authorized Electrolux servicer. All rights reserved. NOTE: The power supply cord with this manual. Do not use an extension cord or an...

Complete Owners Guide
Page 3
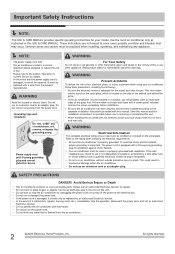
... it cannot be repaired. Press the TEST button. All rights reserved. 3 Do not apply heavy pressure to turn the unit on outdoor part of the unit's installation accessories for correct operation. Do not block or cover the intake grille, discharge area and outlet ports. Unit must... be replaced if it fails to the power cord. Important Safety Instructions SAFETY PRECAUTIONS CAUTION! Do not touch the metal parts of the unit. Periodically check the condition of the unit. You will have TWO buttons on the unit. Always make units run ...
... it cannot be repaired. Press the TEST button. All rights reserved. 3 Do not apply heavy pressure to turn the unit on outdoor part of the unit's installation accessories for correct operation. Do not block or cover the intake grille, discharge area and outlet ports. Unit must... be replaced if it fails to the power cord. Important Safety Instructions SAFETY PRECAUTIONS CAUTION! Do not touch the metal parts of the unit. Periodically check the condition of the unit. You will have TWO buttons on the unit. Always make units run ...
Complete Owners Guide
Page 11
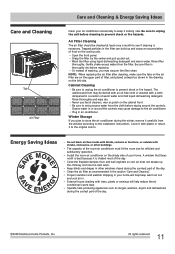
... replacing the air filter after cleaning, make sure the tabs on the air filter are on the upper part of filter, and placed outward as ranges, washers, dryers and dishwashers during the sunniest part of frost on the left side. Plug in the drawing on the cooling coils. Proper insulation and weather... looking new. The capacity of the day. 2009 Electrolux Home Products, Inc. External house shading with shrubs, enclosures, or other windows closed during the coolest part of the room air conditioner must fit the room size for efficient and satisfactory operation.
... replacing the air filter after cleaning, make sure the tabs on the air filter are on the upper part of filter, and placed outward as ranges, washers, dryers and dishwashers during the sunniest part of frost on the left side. Plug in the drawing on the cooling coils. Proper insulation and weather... looking new. The capacity of the day. 2009 Electrolux Home Products, Inc. External house shading with shrubs, enclosures, or other windows closed during the coolest part of the room air conditioner must fit the room size for efficient and satisfactory operation.
Complete Owners Guide
Page 13
...or replace appliance light bulbs, air filters, water filters, other consumables, or knobs, handles, or other than genuine Electrolux parts or parts obtained from your appliance. 9. DISCLAIMER OF IMPLIED WARRANTIES; ELECTROLUX SHALL NOT BE LIABLE FOR CONSEQUENTIAL OR INCIDENTAL DAMAGES SUCH AS... provided instructions. Products purchased "as described or illustrated are not covered by unauthorized service companies; Food loss due to any parts in the Sealed Refrigeration System (compressor, condenser, evaporator and tubing) that has been transferred from your original purchase date, ...
...or replace appliance light bulbs, air filters, water filters, other consumables, or knobs, handles, or other than genuine Electrolux parts or parts obtained from your appliance. 9. DISCLAIMER OF IMPLIED WARRANTIES; ELECTROLUX SHALL NOT BE LIABLE FOR CONSEQUENTIAL OR INCIDENTAL DAMAGES SUCH AS... provided instructions. Products purchased "as described or illustrated are not covered by unauthorized service companies; Food loss due to any parts in the Sealed Refrigeration System (compressor, condenser, evaporator and tubing) that has been transferred from your original purchase date, ...
Installation Instructions
Page 2
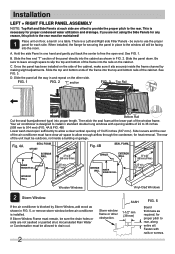
... top and bottom ends of the frame into proper length. Installation LEFT + RIGHT FILLER PANEL ASSEMBLY NOTE: Top Rail and Side Panels at the lower part of the window frame. If you are not caulked or painted shut. Be sure to leave enough space to 914mm) 13.25" min (337 mm...
... top and bottom ends of the frame into proper length. Installation LEFT + RIGHT FILLER PANEL ASSEMBLY NOTE: Top Rail and Side Panels at the lower part of the window frame. If you are not caulked or painted shut. Be sure to leave enough space to 914mm) 13.25" min (337 mm...
Installation Instructions
Page 5
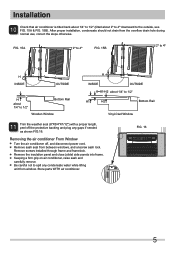
... the protective backing and plug any condensate water while lifting unit from window. Remove the insulation panel and close (slide) side panels into frame. Store parts WITH air conditioner. FIG. 16 5 FIG. 15A 2º to 4º FIG. 15B 2º to 4º H INSIDE OUTSIDE H about 1/4" to 1/2" Bottom Rail Wooden Window H INSIDE OUTSIDE...
... the protective backing and plug any condensate water while lifting unit from window. Remove the insulation panel and close (slide) side panels into frame. Store parts WITH air conditioner. FIG. 16 5 FIG. 15A 2º to 4º FIG. 15B 2º to 4º H INSIDE OUTSIDE H about 1/4" to 1/2" Bottom Rail Wooden Window H INSIDE OUTSIDE...


