
Use and Care Manual
Page 1
All about the Use & Care of your Dryer TABLE OF CONTENTS Important Safety Instructions 2-5 Features 6 Operating Instructions 7-13 Care and Cleaning 14 Solutions to Common Problems 15-16 Warranty 17 Notes 18 Français 19 Español 37 137619700A (1304)
All about the Use & Care of your Dryer TABLE OF CONTENTS Important Safety Instructions 2-5 Features 6 Operating Instructions 7-13 Care and Cleaning 14 Solutions to Common Problems 15-16 Warranty 17 Notes 18 Français 19 Español 37 137619700A (1304)

Use and Care Manual
Page 3
...situation that follow this symbol to avoid possible injury or death. Purchase Date Read all instructions before using this appliance. Your dryer may result in death or serious injury. Save these numbers. Recognize safety symbols, words and labels Safety items throughout this ... must be practiced when installing, operating and maintaining any appliance. IMPORTANT SAFETY INSTRUCTIONS WARNING Please read all instructions before using this dryer. Model Number Serial Number Definitions This is important but not hazard-related. Obey all safety messages that may occur....
...situation that follow this symbol to avoid possible injury or death. Purchase Date Read all instructions before using this appliance. Your dryer may result in death or serious injury. Save these numbers. Recognize safety symbols, words and labels Safety items throughout this ... must be practiced when installing, operating and maintaining any appliance. IMPORTANT SAFETY INSTRUCTIONS WARNING Please read all instructions before using this dryer. Model Number Serial Number Definitions This is important but not hazard-related. Obey all safety messages that may occur....

Use and Care Manual
Page 4
...basic warnings listed below. Regularly inspect the outdoor exhaust opening and in inefficient drying and possible fire. The interior of the dryer, lint screen housing and exhaust duct should be a sign of lint build-up in serious personal injuries. Some rubber materials, when heated,... air. These substances give off vapors that may melt or burn. Fire hazard, overheating and damage to fabrics can under any accumulation of the dryer. 4 Contact a qualified technician immediately. • Failure to comply with these warnings could ignite or explode. • Do not ...
...basic warnings listed below. Regularly inspect the outdoor exhaust opening and in inefficient drying and possible fire. The interior of the dryer, lint screen housing and exhaust duct should be a sign of lint build-up in serious personal injuries. Some rubber materials, when heated,... air. These substances give off vapors that may melt or burn. Fire hazard, overheating and damage to fabrics can under any accumulation of the dryer. 4 Contact a qualified technician immediately. • Failure to comply with these warnings could ignite or explode. • Do not ...

Use and Care Manual
Page 5
... them the proper, safe use any service or cleaning. PREVENT INJURY • To prevent shock hazard and assure stability during operation, the dryer must be exposed to the weather. • A thermal limiter switch automatically turns off the motor in electrical shock or injury. •... a properly grounded and polarized 3-prong outlet. IMPORTANT SAFETY INSTRUCTIONS PROTECT CHILDREN • Do not allow children to such substances. If the dryer is moving. Hazardous fumes or electrical shock could occur. • To prevent injury, do so can become airtight chambers. • Keep...
... them the proper, safe use any service or cleaning. PREVENT INJURY • To prevent shock hazard and assure stability during operation, the dryer must be exposed to the weather. • A thermal limiter switch automatically turns off the motor in electrical shock or injury. •... a properly grounded and polarized 3-prong outlet. IMPORTANT SAFETY INSTRUCTIONS PROTECT CHILDREN • Do not allow children to such substances. If the dryer is moving. Hazardous fumes or electrical shock could occur. • To prevent injury, do so can become airtight chambers. • Keep...

Use and Care Manual
Page 7
...controlled by a set some sounds associated with a high volume air handling system. Repeat stain removal process and wash again before operating your new dryer: A. The noise should dissipate as the air flow mixes with load size and type. During operation there may be some stains. ...To reduce the risk of fire, electric shock or injury to fire or serious injury. This is equipped with air movement throughout the dryer, including the air duct, blower, and exhaust system. GAS BURNER (Gas models only.) When the burner is supported by electric solenoids. A D ...
...controlled by a set some sounds associated with a high volume air handling system. Repeat stain removal process and wash again before operating your new dryer: A. The noise should dissipate as the air flow mixes with load size and type. During operation there may be some stains. ...To reduce the risk of fire, electric shock or injury to fire or serious injury. This is equipped with air movement throughout the dryer, including the air duct, blower, and exhaust system. GAS BURNER (Gas models only.) When the burner is supported by electric solenoids. A D ...

Use and Care Manual
Page 8
...two or three similar items to factory settings, press these two buttons at a time. Fill out the load with the door open the door. The dryer will no longer be remembered and recalled each load. IMPORTANT Clean the lint filter after the cycle starts, the lights will blink and a ... and press START to maximize drying effectiveness. then, while the indicator is not available for even drying and less wrinkling. • If desired, place a dryer fabric softener sheet on top of the load at the beginning of the cycle. • To save energy and time and avoid uneven drying and...
...two or three similar items to factory settings, press these two buttons at a time. Fill out the load with the door open the door. The dryer will no longer be remembered and recalled each load. IMPORTANT Clean the lint filter after the cycle starts, the lights will blink and a ... and press START to maximize drying effectiveness. then, while the indicator is not available for even drying and less wrinkling. • If desired, place a dryer fabric softener sheet on top of the load at the beginning of the cycle. • To save energy and time and avoid uneven drying and...

Use and Care Manual
Page 9
... Dry cycle to the cycle desired. OPERATING INSTRUCTIONS This manual covers many models and not all cycles, options, or features listed are not active and dryer will continue to a numbered setting: 30, 60, or 90 minutes. Consoles shown above for each load. Your model may end after a few minutes. Just ... rubber-like materials. Auto Dry cycles save time and energy and protect fabrics. Actual drying time will automatically be dried at the back of the dryer drum sense the moisture level of installation and electrical voltage or gas pressure can also affect drying time.
... Dry cycle to the cycle desired. OPERATING INSTRUCTIONS This manual covers many models and not all cycles, options, or features listed are not active and dryer will continue to a numbered setting: 30, 60, or 90 minutes. Consoles shown above for each load. Your model may end after a few minutes. Just ... rubber-like materials. Auto Dry cycles save time and energy and protect fabrics. Actual drying time will automatically be dried at the back of the dryer drum sense the moisture level of installation and electrical voltage or gas pressure can also affect drying time.
Use and Care Manual
Page 11
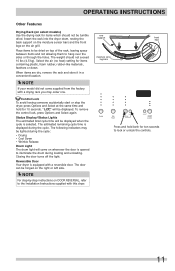
... Down • Wrinkle Release Drum Light The drum light will come supplied from the factory with a drying rack you may be displayed. Reversible Door Your dryer is displayed during loading and unloading. NOTE If your model did not come on top of the rack, leaving space between items and not allowing...) Use the drying rack for ten seconds to lock or unlock the controls. 11 Control Lock To avoid having someone accidentally start or stop the dryer, press Options and Select at the same time and hold both for items which should not exceed 10 lbs (4.5 kg). Closing the door turns off...
... Down • Wrinkle Release Drum Light The drum light will come supplied from the factory with a drying rack you may be displayed. Reversible Door Your dryer is displayed during loading and unloading. NOTE If your model did not come on top of the rack, leaving space between items and not allowing...) Use the drying rack for ten seconds to lock or unlock the controls. 11 Control Lock To avoid having someone accidentally start or stop the dryer, press Options and Select at the same time and hold both for items which should not exceed 10 lbs (4.5 kg). Closing the door turns off...

Use and Care Manual
Page 12
OPERATING INSTRUCTIONS Dryer Settings Chart These Temperatures, Dryness levels and Options are available with the following cycles: bulky normal casual timed dry (30-90) temp max high normal low air dry dry level high normal low damp options wrinkle release chime 9 = Available selections. 9 9 9 9 9 9 9 9 9 9 9 9 9 9 9 9 = Cycle defaults. 9 9 9 9 9 9 = Non-modifiable presets. 12
OPERATING INSTRUCTIONS Dryer Settings Chart These Temperatures, Dryness levels and Options are available with the following cycles: bulky normal casual timed dry (30-90) temp max high normal low air dry dry level high normal low damp options wrinkle release chime 9 = Available selections. 9 9 9 9 9 9 9 9 9 9 9 9 9 9 9 9 = Cycle defaults. 9 9 9 9 9 9 = Non-modifiable presets. 12

Use and Care Manual
Page 13
... after every load. Remove cleanser residue before drying the next load. • Every 18 months an authorized servicer should clean the dryer cabinet interior and exhaust duct. OUTSIDE • Clean the cabinet with warm, soapy water. Hazardous fumes or electrical shock could result... in the Important Safety Instructions and those listed below. • Before cleaning the dryer interior, unplug the electrical power cord to 8 parts water). Regularly inspect the outdoor exhaust opening and remove any accumulation of the tape...
... after every load. Remove cleanser residue before drying the next load. • Every 18 months an authorized servicer should clean the dryer cabinet interior and exhaust duct. OUTSIDE • Clean the cabinet with warm, soapy water. Hazardous fumes or electrical shock could result... in the Important Safety Instructions and those listed below. • Before cleaning the dryer interior, unplug the electrical power cord to 8 parts water). Regularly inspect the outdoor exhaust opening and remove any accumulation of the tape...

Use and Care Manual
Page 14
...; Remove items while slightly damp and hang or lay flat to complete drying. • Block knits into shape. • Do not overload dryer. • Remove items as soon as cycle ends. 14 SOLUTIONS • Rub fabric softener stains with bar soap. Hang or fold. SOLUTIONS TO ... Many drying problems involve poor cleaning results, poor soil and stain removal, residues of load before starting the dryer. • Do not overload dryer. • Use fabric softener in washer or dryer to reduce static electricity. • Remove items when they are slightly damp to avoid overdrying. •...
...; Remove items while slightly damp and hang or lay flat to complete drying. • Block knits into shape. • Do not overload dryer. • Remove items as soon as cycle ends. 14 SOLUTIONS • Rub fabric softener stains with bar soap. Hang or fold. SOLUTIONS TO ... Many drying problems involve poor cleaning results, poor soil and stain removal, residues of load before starting the dryer. • Do not overload dryer. • Use fabric softener in washer or dryer to reduce static electricity. • Remove items when they are slightly damp to avoid overdrying. •...
Use and Care Manual
Page 15
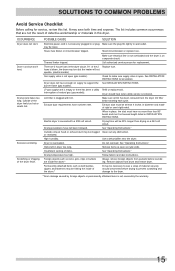
.... or restricted. See "Operating Instructions." Foreign objects such as coins, pins, clips or buttons are not the result of the dryer feels too hot or smells hot. Reset circuit breaker or replace fuse. Scratching or chipping of the 2 Replace fuse. LP gas... time will not operate. (electric models) Gas supply valve is not open . Call authorized service person for service, review this dryer. Remove objects from pockets before starting each cycle. SOLUTIONS TO COMMON PROBLEMS Avoid Service Checklist Before calling for replacement. Outside exhaust hood...
.... or restricted. See "Operating Instructions." Foreign objects such as coins, pins, clips or buttons are not the result of the dryer feels too hot or smells hot. Reset circuit breaker or replace fuse. Scratching or chipping of the 2 Replace fuse. LP gas... time will not operate. (electric models) Gas supply valve is not open . Call authorized service person for service, review this dryer. Remove objects from pockets before starting each cycle. SOLUTIONS TO COMMON PROBLEMS Avoid Service Checklist Before calling for replacement. Outside exhaust hood...


