Complete Owners Guide
Page 3
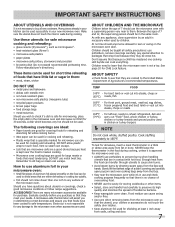
... panel. - Carefully attend appliance when paper, plastic or other utensil into the container. • Clean ventilation openings and grease filters frequently. Remove wire twist-ties from the microwave oven is not working properly or if it has been damaged or dropped. • This appliance should be serviced only by children. • Do not operate this appliance. Do not leave paper products, cooking...
... panel. - Carefully attend appliance when paper, plastic or other utensil into the container. • Clean ventilation openings and grease filters frequently. Remove wire twist-ties from the microwave oven is not working properly or if it has been damaged or dropped. • This appliance should be serviced only by children. • Do not operate this appliance. Do not leave paper products, cooking...
Complete Owners Guide
Page 5
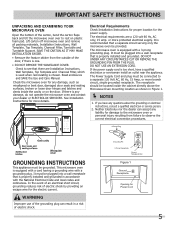
... NOT REMOVE THE WAVEGUIDE COVER. SAVE THE CARTON AS IT MAY MAKE INSTALLATION EASIER. • Remove the feature sticker from failure to see that is chosen. The electrical requirements are Installation Instructions, Wall Template, Top Template and Charcoal Filter, which is used when recirculating is properly installed and grounded. Lift carton off microwave oven and remove all packing materials, Installation Instructions, Wall Template, Top Template, Charcoal Filter, Turntable and Turntable Support. Read enclosures and SAVE the Use and Care Manual. It...
... NOT REMOVE THE WAVEGUIDE COVER. SAVE THE CARTON AS IT MAY MAKE INSTALLATION EASIER. • Remove the feature sticker from failure to see that is chosen. The electrical requirements are Installation Instructions, Wall Template, Top Template and Charcoal Filter, which is used when recirculating is properly installed and grounded. Lift carton off microwave oven and remove all packing materials, Installation Instructions, Wall Template, Top Template, Charcoal Filter, Turntable and Turntable Support. Read enclosures and SAVE the Use and Care Manual. It...
Complete Owners Guide
Page 6
... the microwave oven to cook evenly. • Shield with nipples on popcorn package. Generally, covered foods will turn the turntable over at edge. - Cook for the popping to slow to dry clothes or newspapers. Doneness signs include: - FOOD DO DON'T Eggs, sausages, nuts, seeds, fruits & vegetables • Puncture egg yolks before feeding. • Heat disposable bottles. • Heat bottles with small flat power levels...
... the microwave oven to cook evenly. • Shield with nipples on popcorn package. Generally, covered foods will turn the turntable over at edge. - Cook for the popping to slow to dry clothes or newspapers. Doneness signs include: - FOOD DO DON'T Eggs, sausages, nuts, seeds, fruits & vegetables • Puncture egg yolks before feeding. • Heat disposable bottles. • Heat bottles with small flat power levels...
Complete Owners Guide
Page 7
...; Lids that are microwave-safe are a good choice because heat is kept near the microwave oven while it is no time should be used for microwave oven use. • ALWAYS use can cause arcing and/or fires. • Use care when removing items from walls, ceiling and door. 7 Make sure the utensil does not touch the interior walls during cooking, unless it 's in use and check cooking progress frequently so...
...; Lids that are microwave-safe are a good choice because heat is kept near the microwave oven while it is no time should be used for microwave oven use. • ALWAYS use can cause arcing and/or fires. • Use care when removing items from walls, ceiling and door. 7 Make sure the utensil does not touch the interior walls during cooking, unless it 's in use and check cooking progress frequently so...
Complete Owners Guide
Page 10
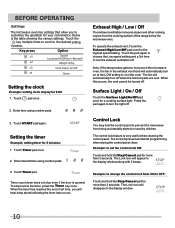
...=Normal) Weight lb/kg Clock Disply On/Off Demo Setting the clock Example: setting clock display for more than 3 seconds. Touch the key multiple times to scroll to prevent the microwave from the cooking surface of set the control lock ON: Touch and hold the Stop/Cancel pad for 9:00: 1. Below is very useful when cleaning the control panel. Note: If the temperature gets too hot around the microwave oven, the fan in the display window...
...=Normal) Weight lb/kg Clock Disply On/Off Demo Setting the clock Example: setting clock display for more than 3 seconds. Touch the key multiple times to scroll to prevent the microwave from the cooking surface of set the control lock ON: Touch and hold the Stop/Cancel pad for 9:00: 1. Below is very useful when cleaning the control panel. Note: If the temperature gets too hot around the microwave oven, the fan in the display window...
Complete Owners Guide
Page 11
... display (70 % power). 5. Press START pad. Your oven has nine other power levels you will hear beeps and "End" will be set when using the Defrost (by weight) feature. When heating has finished you will hear beeps and "End" will only work using the 1, 2 or 3 numeric pads): Example: to heat for desired minutes of food need slower cooking, such as roasts, baked goods or custards. Use the number keys 1, 2 or 3 to heat...
... display (70 % power). 5. Press START pad. Your oven has nine other power levels you will hear beeps and "End" will be set when using the Defrost (by weight) feature. When heating has finished you will hear beeps and "End" will only work using the 1, 2 or 3 numeric pads): Example: to heat for desired minutes of food need slower cooking, such as roasts, baked goods or custards. Use the number keys 1, 2 or 3 to heat...

Complete Owners Guide
Page 14
... to 20 minutes, enter a reduced cook time or weight. • Separate pieces as they start to become warm. • You may use small pieces of aluminum foil to shield food items like chicken wings, leg tips and fish tails, but do not allow the foil to touch the oven cavity walls when defrosting. Let stand, covered, for 5 to 10 minutes. •...
... to 20 minutes, enter a reduced cook time or weight. • Separate pieces as they start to become warm. • You may use small pieces of aluminum foil to shield food items like chicken wings, leg tips and fish tails, but do not allow the foil to touch the oven cavity walls when defrosting. Let stand, covered, for 5 to 10 minutes. •...

Complete Owners Guide
Page 20
... have to again press seven times and then press START. 20 If you want to turn the demo mode back OFFyou will be pressed to select. 3. Op-5 will work in a rapid countdown mode with no cooking power. 1. CONVENIENT FEATURES Setting Demo Mode Example: setting the demoJ mode on: Suppose you want to enter Demo mode. When Demo mode is ON programming functions will display and the START needs to be set to ON.
... have to again press seven times and then press START. 20 If you want to turn the demo mode back OFFyou will be pressed to select. 3. Op-5 will work in a rapid countdown mode with no cooking power. 1. CONVENIENT FEATURES Setting Demo Mode Example: setting the demoJ mode on: Suppose you want to enter Demo mode. When Demo mode is ON programming functions will display and the START needs to be set to ON.
Complete Owners Guide
Page 21
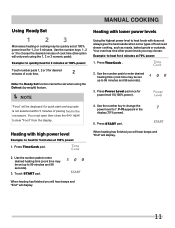
... with a soft cloth to remove any sort of chemical cleaners. The turntable and turntable support can be easier to the interior surfaces . Wipe the panel with a cloth dampened slightly with mild soap and water; Keep the waveguide cover clean to set in cleaning the touch control panel. CLEANING AND CARE Disconnect the power cord or leave the door open the microwave oven door before replacing filters and lights. Disconnect the power cord before cleaning. Clean the outside surface is not sealed...
... with a soft cloth to remove any sort of chemical cleaners. The turntable and turntable support can be easier to the interior surfaces . Wipe the panel with a cloth dampened slightly with mild soap and water; Keep the waveguide cover clean to set in cleaning the touch control panel. CLEANING AND CARE Disconnect the power cord or leave the door open the microwave oven door before replacing filters and lights. Disconnect the power cord before cleaning. Clean the outside surface is not sealed...
Complete Owners Guide
Page 22
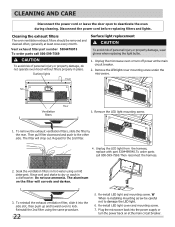
... ventilation filters in hot water using the same procedure. 22 5. Reinstall the 2nd filter using a mild detergent. W When re-installing mounting screw be removed and cleaned often; Re-install LED light cover and mounting screw. 7. To remove the exhaust ventilation filters, slide the filter to the other side. generally at the main circuit breaker. 2. Unplug the microwave oven or turn the power back on the filter will drop out. Tab Rear Ventilation filters 3. Re-install LED light and mounting screw. Remove the LED light cover mounting screw...
... ventilation filters in hot water using the same procedure. 22 5. Reinstall the 2nd filter using a mild detergent. W When re-installing mounting screw be removed and cleaned often; Re-install LED light cover and mounting screw. 7. To remove the exhaust ventilation filters, slide the filter to the other side. generally at the main circuit breaker. 2. Unplug the microwave oven or turn the power back on the filter will drop out. Tab Rear Ventilation filters 3. Re-install LED light and mounting screw. Remove the LED light cover mounting screw...
Complete Owners Guide
Page 23
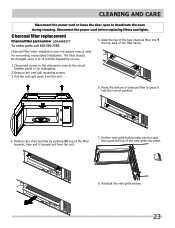
... new charcoal filter into the correct position. 4. Remove the charcoal filter by unplugging. 2.Remove the vent grill mounting screws. 3. Charcoal Filter when installed in your microwave oven,is used for nonvented, recirculated Installation. Put the vent grille bottom tabs into the slots then push the top of the filter inwards, then pull it into ? Disconnect power to 12 months depending on use. 1 . Disconnect the power cord before replacing filters and lights. CLEANING AND CARE Disconnect the power cord or leave the door open...
... new charcoal filter into the correct position. 4. Remove the charcoal filter by unplugging. 2.Remove the vent grill mounting screws. 3. Charcoal Filter when installed in your microwave oven,is used for nonvented, recirculated Installation. Put the vent grille bottom tabs into the slots then push the top of the filter inwards, then pull it into ? Disconnect power to 12 months depending on use. 1 . Disconnect the power cord before replacing filters and lights. CLEANING AND CARE Disconnect the power cord or leave the door open...

Complete Owners Guide
Page 25
... Line Voltage: AC Power Required: Output Power*: Frequency: Outside Dimensions (including handle): Cavity Dimensions: Microwave oven Capacity***: Cooking Uniformity: Weight: Work/Night Light: Oven Light: SPECIFICATIONS Single phase 120V, 60Hz, AC only 1500W 13.5 amps. (for measuring output wattage. Federal Communications Commission Authorized. for more than 30 minutes at HIGH 100%. A microwave oven should never be serviced by : FCC - This symbol on page 22. Actual capacity for holding food is 5304499540...
... Line Voltage: AC Power Required: Output Power*: Frequency: Outside Dimensions (including handle): Cavity Dimensions: Microwave oven Capacity***: Cooking Uniformity: Weight: Work/Night Light: Oven Light: SPECIFICATIONS Single phase 120V, 60Hz, AC only 1500W 13.5 amps. (for measuring output wattage. Federal Communications Commission Authorized. for more than 30 minutes at HIGH 100%. A microwave oven should never be serviced by : FCC - This symbol on page 22. Actual capacity for holding food is 5304499540...
Complete Owners Guide
Page 26
... repair or replace appliance light bulbs, air filters, water filters, other consumables, or knobs, handles, or other cosmetic parts. 11. THIS WRITTEN WARRANTY GIVES YOU SPECIFIC LEGAL RIGHTS. If You Need Service Keep your receipt, delivery slip, or some other than genuine Electrolux parts or parts obtained from the factory. 10. Electrolux authorizes no person to change without notice. Service calls to change...
... repair or replace appliance light bulbs, air filters, water filters, other consumables, or knobs, handles, or other cosmetic parts. 11. THIS WRITTEN WARRANTY GIVES YOU SPECIFIC LEGAL RIGHTS. If You Need Service Keep your receipt, delivery slip, or some other than genuine Electrolux parts or parts obtained from the factory. 10. Electrolux authorizes no person to change without notice. Service calls to change...
Installation Instructions
Page 3
... 3 Electrical Requirements 3 Damage - Shipment/Installation 4 Parts Included 4 Tools You Will Need 5 Mounting Space 5 Step-by-step installation guide Placement of The Mounting Plate 6-8 Removing the Mounting Plate 6 Finding the Wall Studs 6 Determining Wall Plate Location 7 Aligning the Wall Plate 8 Installation Types 9 A Recirculating 10 -13 Attach Mounting Plate to Wall 10 Preparation of Top Cabinet 11 Check Blower Plate 11 Mount the Microwave Oven 11-12 Installing or Change the Charcoal Filter 12-13 Hood Exhaust 14-15 B Outside Back Exhaust 16-19 Preparing Rear Wall for...
... 3 Electrical Requirements 3 Damage - Shipment/Installation 4 Parts Included 4 Tools You Will Need 5 Mounting Space 5 Step-by-step installation guide Placement of The Mounting Plate 6-8 Removing the Mounting Plate 6 Finding the Wall Studs 6 Determining Wall Plate Location 7 Aligning the Wall Plate 8 Installation Types 9 A Recirculating 10 -13 Attach Mounting Plate to Wall 10 Preparation of Top Cabinet 11 Check Blower Plate 11 Mount the Microwave Oven 11-12 Installing or Change the Charcoal Filter 12-13 Hood Exhaust 14-15 B Outside Back Exhaust 16-19 Preparing Rear Wall for...

Installation Instructions
Page 4
... possibility of electric shock hazard from this appliance. The power supply cord and plug should be installed by a qualifed electrician and conform to a seperate and dedicated 15- The outler box and supply circuit should be mounted to avoid severe or fatal shock injury. CAUTION: For personal safety, the mounting surface must be located in the cabinet above the microwave oven. FOR...
... possibility of electric shock hazard from this appliance. The power supply cord and plug should be installed by a qualifed electrician and conform to a seperate and dedicated 15- The outler box and supply circuit should be mounted to avoid severe or fatal shock injury. CAUTION: For personal safety, the mounting surface must be located in the cabinet above the microwave oven. FOR...
Installation Instructions
Page 5
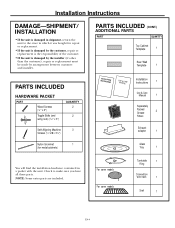
...), repair or replacement must be made by arrangement between customer and installer. PARTS INCLUDED (CONT.) ADDITIONAL PARTS PART QUANTITY Top Cabinet Template 1 Rear Wall Template 1 PARTS INCLUDED HARDWARE PACKET PART Wood Screws (1⁄4" x 2") Toggle Bolts (and wing nuts) (3⁄16" x 3") QUANTITY 2 2 Self-Aligning Machine 3 Screws (1⁄4"-28 x 31⁄4") ININSSTTRAULCLTAITOIONNS UMSEAN&UCAALRE Installation Instructions 1 Use & Care Manual 1 Separately Packed Grease 2 Filters Exhaust adaptor 1 Nylon Grommet 1 (for metal cabinets) Glass Tray...
...), repair or replacement must be made by arrangement between customer and installer. PARTS INCLUDED (CONT.) ADDITIONAL PARTS PART QUANTITY Top Cabinet Template 1 Rear Wall Template 1 PARTS INCLUDED HARDWARE PACKET PART Wood Screws (1⁄4" x 2") Toggle Bolts (and wing nuts) (3⁄16" x 3") QUANTITY 2 2 Self-Aligning Machine 3 Screws (1⁄4"-28 x 31⁄4") ININSSTTRAULCLTAITOIONNS UMSEAN&UCAALRE Installation Instructions 1 Use & Care Manual 1 Separately Packed Grease 2 Filters Exhaust adaptor 1 Nylon Grommet 1 (for metal cabinets) Glass Tray...

Installation Instructions
Page 11
... the mounting plate. ATTACH THE MOUNTING PLATE TO THE WALL Attach the plate to the wall using adequate materials supporting 150 Ibs to allow proper top vent air exhaust/intake. 13" MAX. (33 cm) Cabinet Cabinet 1 Remove the toggle wings from the wall to help to Wall A2. This will help tighten the bolts. NOTE: If the cabinet depth including the cabinet doors is properly centered under the cabinet. Install or change Charcoal Filter...
... the mounting plate. ATTACH THE MOUNTING PLATE TO THE WALL Attach the plate to the wall using adequate materials supporting 150 Ibs to allow proper top vent air exhaust/intake. 13" MAX. (33 cm) Cabinet Cabinet 1 Remove the toggle wings from the wall to help to Wall A2. This will help tighten the bolts. NOTE: If the cabinet depth including the cabinet doors is properly centered under the cabinet. Install or change Charcoal Filter...

Installation Instructions
Page 13
... the wall and the top cabinet.) A 5.3 Remove the charcoal filter by pushing the top of the filter cavity. Installation Instructions A4. A5. See the Use a& nd Care packed with the microwave. Refer to the Use and Care to replace or install a charcoal filter. A 5.1 Unplug microwave oven or disconnect power. A 5.2 Open the microwave door and remove the two vent mounting screws l; EN-12 MOUNT THE MICROWAVE OVEN (cont.) 5 Insert 2 self-aligning screws through outer top cabinet holes. INSTALLING OR CHANGE THE CHARCOAL FILTER (Some Models) NOTE: The charcoal filter is...
... the wall and the top cabinet.) A 5.3 Remove the charcoal filter by pushing the top of the filter cavity. Installation Instructions A4. A5. See the Use a& nd Care packed with the microwave. Refer to the Use and Care to replace or install a charcoal filter. A 5.1 Unplug microwave oven or disconnect power. A 5.2 Open the microwave door and remove the two vent mounting screws l; EN-12 MOUNT THE MICROWAVE OVEN (cont.) 5 Insert 2 self-aligning screws through outer top cabinet holes. INSTALLING OR CHANGE THE CHARCOAL FILTER (Some Models) NOTE: The charcoal filter is...

Installation Instructions
Page 17
..." 3/8" TO EDGE 4" Trim the rear wall template along the dotted line. Adjust Blower B6. IMPORTANT: LOCATE AT LEAST ONE STUD ON EITHER SIDE OF MSTHPAAERCKCEETDNHTTEOELRGOLGCINLAEET.IBOONLFTOSRIN2TAHDEDMITOIOUNNATLIN, EGVPELNALTYE AREA. EN-16 Back of the REAR WALL TEMPLATE. Mount the Microwave Oven IMPORTANT NOTES: • Make sure the screws for outside exhaust. Attach Mounting Plate to the rear wall. • Cut the opening in the rear wall for the blower motor and blower plate are securely...
..." 3/8" TO EDGE 4" Trim the rear wall template along the dotted line. Adjust Blower B6. IMPORTANT: LOCATE AT LEAST ONE STUD ON EITHER SIDE OF MSTHPAAERCKCEETDNHTTEOELRGOLGCINLAEET.IBOONLFTOSRIN2TAHDEDMITOIOUNNATLIN, EGVPELNALTYE AREA. EN-16 Back of the REAR WALL TEMPLATE. Mount the Microwave Oven IMPORTANT NOTES: • Make sure the screws for outside exhaust. Attach Mounting Plate to the rear wall. • Cut the opening in the rear wall for the blower motor and blower plate are securely...

Installation Instructions
Page 21
...the motor wiring has been properly routed and secured, and that the wires are reinstalled. Check Damper Operation C5. EN-20 Installation Instructions C OUTSIDE TOP EXHAUST (Vertical Duct) INSTALLATION OVERVIEW C1. Prepare Top Cabinet C3. Adjust Exhaust Adaptor C7. IRRBNmTNhoEEEOiusTFAAnTRtHORDiEenaEgR:rW ApIWEITlNaNAatPeDIlSLlSaTRTLnFeVOdAmTOEtLpCoELlLaRlEMLotAeYcOEPaTstDeW IeLIMrOvItAhNePNTeTsGOHhtEoIoNER.W rpizoSToDsIniTTAtIitoaRRHNnl UEeTtThxCCheHTaTbTOuIoSsIItOOttomNNSS 4" outlet. 1. Use a level to help to 3⁄4″ (19 mm) onto each bolt. IMPORTANT: LOCATE AT...
...the motor wiring has been properly routed and secured, and that the wires are reinstalled. Check Damper Operation C5. EN-20 Installation Instructions C OUTSIDE TOP EXHAUST (Vertical Duct) INSTALLATION OVERVIEW C1. Prepare Top Cabinet C3. Adjust Exhaust Adaptor C7. IRRBNmTNhoEEEOiusTFAAnTRtHORDiEenaEgR:rW ApIWEITlNaNAatPeDIlSLlSaTRTLnFeVOdAmTOEtLpCoELlLaRlEMLotAeYcOEPaTstDeW IeLIMrOvItAhNePNTeTsGOHhtEoIoNER.W rpizoSToDsIniTTAtIitoaRRHNnl UEeTtThxCCheHTaTbTOuIoSsIItOOttomNNSS 4" outlet. 1. Use a level to help to 3⁄4″ (19 mm) onto each bolt. IMPORTANT: LOCATE AT...


