
Installation Instructions (All Languages)
Page 2
... General information Important Safety Instructions 3 Electrical Requirements 3 Damage - Shipment/Installation 4 Parts Included 4 Tools You Will Need 5 Mounting Space 5 Step-by-step installation guide Placement of The Mounting Plate 6-8 Removing the Mounting Plate 6 Finding the Wall Studs 6 Determining Wall Plate Location 7 Aligning the Wall Plate 8 Installation Types 9-22 Hood Exhaust 10-11 A Outside Top Exhaust 12-15 Attach Mounting Plate to Wall 12 Preparation of Top Cabinet 13 Adapting Microwave Blower for Outside top Exhaust 13-14 Checking for Proper Damper Operation...
... General information Important Safety Instructions 3 Electrical Requirements 3 Damage - Shipment/Installation 4 Parts Included 4 Tools You Will Need 5 Mounting Space 5 Step-by-step installation guide Placement of The Mounting Plate 6-8 Removing the Mounting Plate 6 Finding the Wall Studs 6 Determining Wall Plate Location 7 Aligning the Wall Plate 8 Installation Types 9-22 Hood Exhaust 10-11 A Outside Top Exhaust 12-15 Attach Mounting Plate to Wall 12 Preparation of Top Cabinet 13 Adapting Microwave Blower for Outside top Exhaust 13-14 Checking for Proper Damper Operation...
Installation Instructions (All Languages)
Page 3
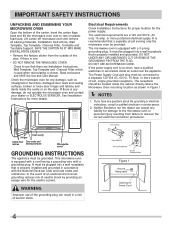
... NOT, UNDER ANY CIRCUMSTANCES, CUT, DEFORM OR REMOVE ANY OF THE PRONGS FROM THE POWER CORD. Wire size must be installed in addition to a supply circuit of 113-135 pounds (51.3-61.2 kg). to a separate 15- Installation Instructions IMPORTANT SAFETY INSTRUCTIONS This product requires a three-prong grounded outlet. CAUTION: For personal safety, remove house fuse or open circuit breaker before use You should have it is...
... NOT, UNDER ANY CIRCUMSTANCES, CUT, DEFORM OR REMOVE ANY OF THE PRONGS FROM THE POWER CORD. Wire size must be installed in addition to a supply circuit of 113-135 pounds (51.3-61.2 kg). to a separate 15- Installation Instructions IMPORTANT SAFETY INSTRUCTIONS This product requires a three-prong grounded outlet. CAUTION: For personal safety, remove house fuse or open circuit breaker before use You should have it is...
Installation Instructions (All Languages)
Page 6
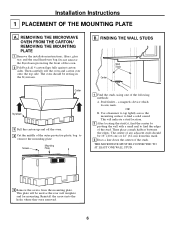
.... REMOVING THE MICROWAVE OVEN FROM THE CARTON/ REMOVING THE MOUNTING PLATE 1 Remove the installation instructions, filters, glass tray and the small hardware bag. FINDING THE WALL STUDS Wall Studs Center Carton Styrofoam 3 Pull the carton up and off the oven. 4 Cut the middle of the studs. Use a hammer to tap lightly across the mounting surface to find the edges of any adjacent studs should be used as the rear wall template and for mounting...
.... REMOVING THE MICROWAVE OVEN FROM THE CARTON/ REMOVING THE MOUNTING PLATE 1 Remove the installation instructions, filters, glass tray and the small hardware bag. FINDING THE WALL STUDS Wall Studs Center Carton Styrofoam 3 Pull the carton up and off the oven. 4 Cut the middle of the studs. Use a hammer to tap lightly across the mounting surface to find the edges of any adjacent studs should be used as the rear wall template and for mounting...
Installation Instructions (All Languages)
Page 12
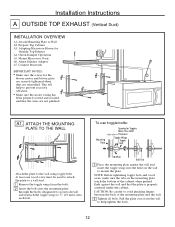
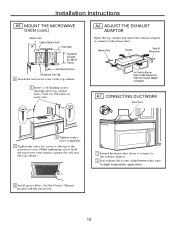
... use toggle bolts: Mounting Plate Spacing for Outside Top Exhaust A4. Installation Instructions A OUTSIDE TOP EXHAUST (Vertical Duct) INSTALLATION OVERVIEW A1. Adjust Exhaust Adaptor A7. Adapting Microwave Blower for Toggles More Than Wall Thickness Toggle Wings Toggle Bolt Attach the plate to prevent excessive vibration. • Make sure the motor wiring has been properly routed and secured, and that the plate is properly centered under the cabinet. Attach Mounting Plate to mount...
... use toggle bolts: Mounting Plate Spacing for Outside Top Exhaust A4. Installation Instructions A OUTSIDE TOP EXHAUST (Vertical Duct) INSTALLATION OVERVIEW A1. Adjust Exhaust Adaptor A7. Adapting Microwave Blower for Toggles More Than Wall Thickness Toggle Wings Toggle Bolt Attach the plate to prevent excessive vibration. • Make sure the motor wiring has been properly routed and secured, and that the plate is properly centered under the cabinet. Attach Mounting Plate to mount...

Installation Instructions (All Languages)
Page 14
... Steps 1-3. Adaptor Guide Back of Microwave Locking Tab Push in bottom of cabinet. 14 IMPORTANT: Do not grip or use the nylon grommet around the power cord hole to prevent cutting of Microwave • Make sure tape securing damper is removed and damper pivots easily before mounting microwave. • You will need to make adjustments to keep power cord tight. Installation Instructions A3. ADAPTING MICROWAVE BLOWER FOR OUTSIDE TOP EXHAUST 5 Secure blower...
... Steps 1-3. Adaptor Guide Back of Microwave Locking Tab Push in bottom of cabinet. 14 IMPORTANT: Do not grip or use the nylon grommet around the power cord hole to prevent cutting of Microwave • Make sure tape securing damper is removed and damper pivots easily before mounting microwave. • You will need to make adjustments to keep power cord tight. Installation Instructions A3. ADAPTING MICROWAVE BLOWER FOR OUTSIDE TOP EXHAUST 5 Secure blower...
Installation Instructions (All Languages)
Page 15
... Plate Damper Back of Microwave For Front-to-Back or Side-to the house duct. Installation Instructions A5. CONNECTING DUCTWORK House Duct 6 Tighten center screw completely. 7 Tighten the outer two screws to the top of Cabinet Recess Self-Aligning Screw Microwave Oven Top 4 Attach the microwave oven to the exhaust adaptor. 2 Seal exhaust duct joints using furnance duct tape for high temperature applications. 8 Install grease filters. See the Owner's Manual packed with the microwave. 15 A6. MOUNT...
... Plate Damper Back of Microwave For Front-to-Back or Side-to the house duct. Installation Instructions A5. CONNECTING DUCTWORK House Duct 6 Tighten center screw completely. 7 Tighten the outer two screws to the top of Cabinet Recess Self-Aligning Screw Microwave Oven Top 4 Attach the microwave oven to the exhaust adaptor. 2 Seal exhaust duct joints using furnance duct tape for high temperature applications. 8 Install grease filters. See the Owner's Manual packed with the microwave. 15 A6. MOUNT...
Installation Instructions (All Languages)
Page 16
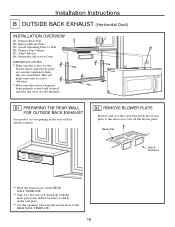
... B in the wall plate. • Cut the opening in the rear wall for the blower motor and blower plate are securely tightened when they are not pinched. Remove Blower Plate B3. Blower Plate Back of the REAR WALL TEMPLATE. 16 Prepare Rear Wall B2. Adjust Blower B6. Mount the Microwave Oven IMPORTANT NOTES: • Make sure the screws for outside exhaust. B2. Attach Mounting Plate to the microwave. Prepare Top Cabinet B5. Installation Instructions B OUTSIDE BACK EXHAUST (Horizontal Duct) INSTALLATION OVERVIEW B1...
... B in the wall plate. • Cut the opening in the rear wall for the blower motor and blower plate are securely tightened when they are not pinched. Remove Blower Plate B3. Blower Plate Back of the REAR WALL TEMPLATE. 16 Prepare Rear Wall B2. Adjust Blower B6. Mount the Microwave Oven IMPORTANT NOTES: • Make sure the screws for outside exhaust. B2. Attach Mounting Plate to the microwave. Prepare Top Cabinet B5. Installation Instructions B OUTSIDE BACK EXHAUST (Horizontal Duct) INSTALLATION OVERVIEW B1...
Installation Instructions (All Languages)
Page 20
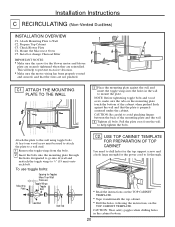
C1. CAUTION: Be careful to the wall using toggle bolts. To use toggle bolts: Mounting Plate Spacing for the power cord to fit through the holes designated to go into the holes in the cabinet bottom. 20 Install or change Charcoal Filter IMPORTANT NOTES: • Make sure the screws for the blower motor and blower plate are securely tightened when they are not pinched. This will help...
C1. CAUTION: Be careful to the wall using toggle bolts. To use toggle bolts: Mounting Plate Spacing for the power cord to fit through the holes designated to go into the holes in the cabinet bottom. 20 Install or change Charcoal Filter IMPORTANT NOTES: • Make sure the screws for the blower motor and blower plate are securely tightened when they are not pinched. This will help...
Installation Instructions (All Languages)
Page 22
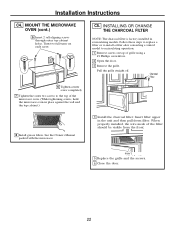
... to install a filter after converting a vented model to recirculating operation. 1 Remove screws on each screw. 6 Tighten center screw completely. 7 Tighten the outer two screws to the top of grille using a #1 Phillips screwdriver. 2 Open the door. 3 Remove the grille. INSTALLING OR CHANGE THE CHARCOAL FILTER NOTE: The charcoal filter is factory installed in place against the wall and the top cabinet.) C5. Turn two full turns on top of the microwave oven. (While tightening screws, hold the microwave oven in recirculating models. See the Owner's Manual...
... to install a filter after converting a vented model to recirculating operation. 1 Remove screws on each screw. 6 Tighten center screw completely. 7 Tighten the outer two screws to the top of grille using a #1 Phillips screwdriver. 2 Open the door. 3 Remove the grille. INSTALLING OR CHANGE THE CHARCOAL FILTER NOTE: The charcoal filter is factory installed in place against the wall and the top cabinet.) C5. Turn two full turns on top of the microwave oven. (While tightening screws, hold the microwave oven in recirculating models. See the Owner's Manual...
Installation Instructions (All Languages)
Page 23
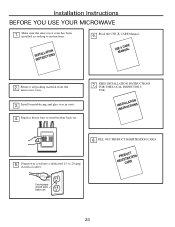
... 2. Install turntable ring and glass tray in cavity . 4. KEEP INSTALLATION INSTRUCTIONS FOR THE LOCAL INSPECTOR'S USE. Plug power cord into a dedicated 15- Read the USE & CARE Manual. to instructions. Remove all packing material from the microwave oven. 3. Replace house fuse or turn breaker back on. 7. FILL OUT PRODUCT REGISTRATION CARD RPEGROISDCTUARCRATDTION Ensure proper ground exists before use 23 Make sure the microwave oven has been installed according to 20-amp electrical outlet. 8. ININSSTTARLULCATTIIOONNS 5. Installation Instructions BEFORE YOU USE...
... 2. Install turntable ring and glass tray in cavity . 4. KEEP INSTALLATION INSTRUCTIONS FOR THE LOCAL INSPECTOR'S USE. Plug power cord into a dedicated 15- Read the USE & CARE Manual. to instructions. Remove all packing material from the microwave oven. 3. Replace house fuse or turn breaker back on. 7. FILL OUT PRODUCT REGISTRATION CARD RPEGROISDCTUARCRATDTION Ensure proper ground exists before use 23 Make sure the microwave oven has been installed according to 20-amp electrical outlet. 8. ININSSTTARLULCATTIIOONNS 5. Installation Instructions BEFORE YOU USE...

Complete Owner's Guide (English)
Page 3
...; Clean ventilation openings and grease filters frequently. Remove wire twist-ties from paper or plastic bags before and halfway through heating it has been damaged or dropped. • This appliance should not be serviced only by children. • Do not operate this appliance outdoors. Use extreme care when inserting a spoon or other combustible materials are placed inside the microwave oven ignite, keep microwave oven door...
...; Clean ventilation openings and grease filters frequently. Remove wire twist-ties from paper or plastic bags before and halfway through heating it has been damaged or dropped. • This appliance should not be serviced only by children. • Do not operate this appliance outdoors. Use extreme care when inserting a spoon or other combustible materials are placed inside the microwave oven ignite, keep microwave oven door...
Complete Owner's Guide (English)
Page 4
... the Use and Care Manual. cook time timer clock popcorn potato beverage reheat defrost wt/time power level 1 2 3 ready set 4 5 6 7 8 9 stop 0 start cancel + 30 sec exhaust hi·lo·off light on the door. The microwave oven is equipped with a cord having a grounding wire with a grounding plug. The Power Supply Cord and plug must be plugged into a wall receptacle that a separate circuit serving only the microwave oven be grounded. This microwave oven is equipped with the National Electrical Code and local codes...
... the Use and Care Manual. cook time timer clock popcorn potato beverage reheat defrost wt/time power level 1 2 3 ready set 4 5 6 7 8 9 stop 0 start cancel + 30 sec exhaust hi·lo·off light on the door. The microwave oven is equipped with a cord having a grounding wire with a grounding plug. The Power Supply Cord and plug must be plugged into a wall receptacle that a separate circuit serving only the microwave oven be grounded. This microwave oven is equipped with the National Electrical Code and local codes...
Complete Owner's Guide (English)
Page 6
... food carefully. Check recipe or cookbook for complete instructions. Doneness signs include: - General • Cut baked goods with filling after heating to release steam and avoid burns. • Stir liquids briskly before cooking to bottom and from the center of such foods as harmful bacteria may hear the magnetron cycling on to the outside to center of the microwave oven to...
... food carefully. Check recipe or cookbook for complete instructions. Doneness signs include: - General • Cut baked goods with filling after heating to release steam and avoid burns. • Stir liquids briskly before cooking to bottom and from the center of such foods as harmful bacteria may hear the magnetron cycling on to the outside to center of the microwave oven to...
Complete Owner's Guide (English)
Page 7
... the utensil does not touch the interior walls during cooking, unless it 's in the same room. DO NOT allow plastic wrap to prevent burns when handling utensils that because a child has mastered one inch to any surface of the microwave oven. Don't assume that are in contact with metallic trim • non-heat-resistant glass • non-microwave-safe plastics (margarine tubs...
... the utensil does not touch the interior walls during cooking, unless it 's in the same room. DO NOT allow plastic wrap to prevent burns when handling utensils that because a child has mastered one inch to any surface of the microwave oven. Don't assume that are in contact with metallic trim • non-heat-resistant glass • non-microwave-safe plastics (margarine tubs...

Complete Owner's Guide (English)
Page 10
... will not touch the food. They become hot and could cause a fire. 10 Touch Clock pad once for AM, clock touch twice for use • Oven proof glass (specifically treated for 9:00: 1. Microwave utensil guide Use Do not use in the microwave oven. BEFORE OPERATING Learn more about your microwave oven. • Metal decoration: Bowls, cups, serving plates and platters without metallic trim. • Plastic: Plastic wrap (as a cover) - not operate the microwave oven empty. Use plastic...
... will not touch the food. They become hot and could cause a fire. 10 Touch Clock pad once for AM, clock touch twice for use • Oven proof glass (specifically treated for 9:00: 1. Microwave utensil guide Use Do not use in the microwave oven. BEFORE OPERATING Learn more about your microwave oven. • Metal decoration: Bowls, cups, serving plates and platters without metallic trim. • Plastic: Plastic wrap (as a cover) - not operate the microwave oven empty. Use plastic...

Complete Owner's Guide (English)
Page 11
... to quickly heat for 2 minutes at 100% power level for a cooking surface light. Using Ready Set stop than 3 seconds. Enter desired time using the 1, 2 or 3 numeric pads): Example: to turn off . The lock will only work using number pads. Control Lock You may be quickly set the control lock ON: Touch and hold the Stop/Cancel pad for 3 seconds Example: to change the control lock from ON to choose the desired minutes of the range below the microwave oven. exhaust hi...
... to quickly heat for 2 minutes at 100% power level for a cooking surface light. Using Ready Set stop than 3 seconds. Enter desired time using the 1, 2 or 3 numeric pads): Example: to turn off . The lock will only work using number pads. Control Lock You may be quickly set the control lock ON: Touch and hold the Stop/Cancel pad for 3 seconds Example: to change the control lock from ON to choose the desired minutes of the range below the microwave oven. exhaust hi...

Complete Owner's Guide (English)
Page 22
... USE BULB LARGER THAN 30 WATTS. 3. Bulbs are also available at the circuit breaker panel or by pushing it inwards, then turn and pull it away from the unit. CLEANING AND CARE Disconnect the power cord before cleaning or leave the door open to 12 months depending on the front edge. 4.Remove the charcoal filter by unplugging. 2. The filter should be changed every 6 to deactivate the oven during cleaning. Replace the microwave oven light cover by carefully...
... USE BULB LARGER THAN 30 WATTS. 3. Bulbs are also available at the circuit breaker panel or by pushing it inwards, then turn and pull it away from the unit. CLEANING AND CARE Disconnect the power cord before cleaning or leave the door open to 12 months depending on the front edge. 4.Remove the charcoal filter by unplugging. 2. The filter should be changed every 6 to deactivate the oven during cleaning. Replace the microwave oven light cover by carefully...

Complete Owner's Guide (English)
Page 24
A microwave oven should never be serviced by Underwriters Laboratories, Inc. SPECIFICATIONS AC Line Voltage: AC Power Required: Output Power*: Frequency: Outside Dimensions (including handle): Cavity Dimensions: Microwave oven Capacity***: Cooking Uniformity: Weight: Work/Night Light: Oven Light: Single phase 120V, 60Hz, AC only 1550W 14.0 amps. (for measuring output wattage. This test method is widely recognized. ** This is the classification of Health and Human Services (DHHS) rule, CFR, Title 21, Chapter I, Subchapter...
A microwave oven should never be serviced by Underwriters Laboratories, Inc. SPECIFICATIONS AC Line Voltage: AC Power Required: Output Power*: Frequency: Outside Dimensions (including handle): Cavity Dimensions: Microwave oven Capacity***: Cooking Uniformity: Weight: Work/Night Light: Oven Light: Single phase 120V, 60Hz, AC only 1550W 14.0 amps. (for measuring output wattage. This test method is widely recognized. ** This is the classification of Health and Human Services (DHHS) rule, CFR, Title 21, Chapter I, Subchapter...

Wiring Diagram (All Languages)
Page 1
OVEN THERMOSTAT Parts Layout VENT MOTOR MOTOR CONDENSER NOISE FILTER OVEN LAMP T/TABLE MOTOR COOK TOP LAMPS Made in china PRIMARY SWITCH H.V.CAPACITOR H.V.DIODE MAGNETRON MAGNETRON THERMOSTATA MONITOR SWITCH H.V.TRANSFORMER FAN MOTOR DOOR SENSING SWITCH HOOD THERMOSTAT BOTTOM THERMOSTAT Schematic Diagram Warning : Power must be made if temperature rise is obtained by performing a water temperature rise test. Equipment needed: * Two 1-liter cylindrical borosilicate glass vessel (Outside diameter 190 mm) * One glass thermometer with accurate equipment. 1. 2....
OVEN THERMOSTAT Parts Layout VENT MOTOR MOTOR CONDENSER NOISE FILTER OVEN LAMP T/TABLE MOTOR COOK TOP LAMPS Made in china PRIMARY SWITCH H.V.CAPACITOR H.V.DIODE MAGNETRON MAGNETRON THERMOSTATA MONITOR SWITCH H.V.TRANSFORMER FAN MOTOR DOOR SENSING SWITCH HOOD THERMOSTAT BOTTOM THERMOSTAT Schematic Diagram Warning : Power must be made if temperature rise is obtained by performing a water temperature rise test. Equipment needed: * Two 1-liter cylindrical borosilicate glass vessel (Outside diameter 190 mm) * One glass thermometer with accurate equipment. 1. 2....
Product Specifications Sheet (English)
Page 2
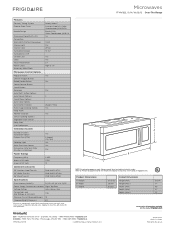
...-the-Range 23 High (1 - 9) Microwave Oven Frigidaire Baseline Yes Yes Yes 3 Weight / Time Yes Yes Ventilation System Ducted / Ductless Installation Option Exhaust Fan (CFM) Cooktop Light Auto-Start Heat Sensor Dishwasher-Safe Vent Filter (Ductless Installation) Power Ratings Yes 2-Speed 170 / 300 Yes Yes Yes A B Frequency (Mhz) 2,450 C Watts @ 120 Volts 1,550 Amps @ 120 Volts 13 Optional Accessories 36" Stainless Steel Trim Kit 36" White Trim Kit 36" Black Trim Kit PN # MWFILKTSS PN # MWFILKTWH PN # MWFILKTBK Specifications Oven Interior (HxWxD...
...-the-Range 23 High (1 - 9) Microwave Oven Frigidaire Baseline Yes Yes Yes 3 Weight / Time Yes Yes Ventilation System Ducted / Ductless Installation Option Exhaust Fan (CFM) Cooktop Light Auto-Start Heat Sensor Dishwasher-Safe Vent Filter (Ductless Installation) Power Ratings Yes 2-Speed 170 / 300 Yes Yes Yes A B Frequency (Mhz) 2,450 C Watts @ 120 Volts 1,550 Amps @ 120 Volts 13 Optional Accessories 36" Stainless Steel Trim Kit 36" White Trim Kit 36" Black Trim Kit PN # MWFILKTSS PN # MWFILKTWH PN # MWFILKTBK Specifications Oven Interior (HxWxD...


