

Complete Owner's Guide (English)
Page 1
Use & Care Manual Visit the Frigidaire Web Site at: http://www.frigidaire.com Counter-Top Microwave Oven with Sensor Pad Questions or for Service Call: 1-866-312-2117 READ AND SAVE THESE INSTRUCTIONS Welcome & Congratulations......2 Important Safety Instructions...3 Features & Specifications.........7 Before Operating 8 Manual Operation 9 Sensor Operations 12 Cooking Charts 14 Care & Cleaning 18 Before You Call 19 Warranty 20 P/n 31649509-1
Use & Care Manual Visit the Frigidaire Web Site at: http://www.frigidaire.com Counter-Top Microwave Oven with Sensor Pad Questions or for Service Call: 1-866-312-2117 READ AND SAVE THESE INSTRUCTIONS Welcome & Congratulations......2 Important Safety Instructions...3 Features & Specifications.........7 Before Operating 8 Manual Operation 9 Sensor Operations 12 Cooking Charts 14 Care & Cleaning 18 Before You Call 19 Warranty 20 P/n 31649509-1
Complete Owner's Guide (English)
Page 2
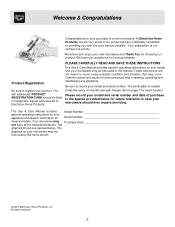
... filled in completely, signed and returned to providing you consider us for exact location. Be sure to register your purchase of a new microwave! Your microwave may not look exactly like those shown. © 2007 Electrolux Home Products, Inc. All rights reserved. 2 Welcome & Congratulations Congratulations... for Model Number Serial Number several models. We hope you with the best service possible. Use your microwave only as instructed in case your microwave should be practiced when installing, operating and maintaining any appliance. We know you'll enjoy your new...
... filled in completely, signed and returned to providing you consider us for exact location. Be sure to register your purchase of a new microwave! Your microwave may not look exactly like those shown. © 2007 Electrolux Home Products, Inc. All rights reserved. 2 Welcome & Congratulations Congratulations... for Model Number Serial Number several models. We hope you with the best service possible. Use your microwave only as instructed in case your microwave should be practiced when installing, operating and maintaining any appliance. We know you'll enjoy your new...
Complete Owner's Guide (English)
Page 3
...or conditions you do not understand. Immediate hazards which COULD result in minor personal injury. When cooking with an unbroken yolk using microwave energy. SAVE THESE INSTRUCTIONS 3 Popcorn will scorch or burn. Food or liquid could melt and cause paper to ignite. 11....use . Pierce or open container or bag before cooking. 12. Fat could overheat and be exercised when installing, maintaining or operating a microwave. continue to oven. 7. deep fat fry in oven. heat sealed containers or plastic bags in oven. Popping time varies depending on ...
...or conditions you do not understand. Immediate hazards which COULD result in minor personal injury. When cooking with an unbroken yolk using microwave energy. SAVE THESE INSTRUCTIONS 3 Popcorn will scorch or burn. Food or liquid could melt and cause paper to ignite. 11....use . Pierce or open container or bag before cooking. 12. Fat could overheat and be exercised when installing, maintaining or operating a microwave. continue to oven. 7. deep fat fry in oven. heat sealed containers or plastic bags in oven. Popping time varies depending on ...
Complete Owner's Guide (English)
Page 4
... in their use. The plug mus be plugged into a separate 60 hertz circuit with the manufacturer's instructions, may vary when the microwave oven is exercised in a particular installation. If this equipment does cause interference to radio or television reception, which are not completely understood...is used properly, that is equippe with a cord having a grounding wire with respect to comply with other equipment, an increase in or the microwave oven and the receiver are on different tripping over , snagged, or pulled on . wire cord. 3. This oven is properly installed and ...
... in their use. The plug mus be plugged into a separate 60 hertz circuit with the manufacturer's instructions, may vary when the microwave oven is exercised in a particular installation. If this equipment does cause interference to radio or television reception, which are not completely understood...is used properly, that is equippe with a cord having a grounding wire with respect to comply with other equipment, an increase in or the microwave oven and the receiver are on different tripping over , snagged, or pulled on . wire cord. 3. This oven is properly installed and ...
Complete Owner's Guide (English)
Page 5
...IS DISTURBED OR A UTENSIL IS INSERTED INTO THE LIQUID. When there is particularly important that the oven door close properly and that microwave oven and receiver are able to be overheated beyond the boiling point without appearing to be reduced or eliminated by anyone except properly...inserting a spoon or other utensils into a di erent outlet so that there is damaged. Radio Interference 1. door (bent), 2. Operation of the microwave oven may be boiling due to persons: 1. Visible bubbling or boiling when the container is not always present. It is important not to defeat ...
...IS DISTURBED OR A UTENSIL IS INSERTED INTO THE LIQUID. When there is particularly important that the oven door close properly and that microwave oven and receiver are able to be overheated beyond the boiling point without appearing to be reduced or eliminated by anyone except properly...inserting a spoon or other utensils into a di erent outlet so that there is damaged. Radio Interference 1. door (bent), 2. Operation of the microwave oven may be boiling due to persons: 1. Visible bubbling or boiling when the container is not always present. It is important not to defeat ...
Complete Owner's Guide (English)
Page 6
..., cooking utensils or food in the cavity when not in water. DO NOT use this oven cavity for household use only. SAVE THESE INSTRUCTIONS 6 MICROWAVE ENERGY" on Page 4 4. See GROUNDING INSTRUCTIONS found on page 5. DO NOT use this oven for industrial or laboratory use. oven. 20. IMPORTANT...ONLY by CHILDREN or INFIRM PERSONS to be built into a cabinet structure, but not for example, near water -for use adjacent to excessive microwave energy. Install or locate this Use & Care Manual. DO NOT use corrosive chemicals or vapors in this oven ONLY in accordance with any...
..., cooking utensils or food in the cavity when not in water. DO NOT use this oven cavity for household use only. SAVE THESE INSTRUCTIONS 6 MICROWAVE ENERGY" on Page 4 4. See GROUNDING INSTRUCTIONS found on page 5. DO NOT use this oven for industrial or laboratory use. oven. 20. IMPORTANT...ONLY by CHILDREN or INFIRM PERSONS to be built into a cabinet structure, but not for example, near water -for use adjacent to excessive microwave energy. Install or locate this Use & Care Manual. DO NOT use corrosive chemicals or vapors in this oven ONLY in accordance with any...
Complete Owner's Guide (English)
Page 7
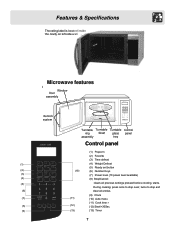
twice to stop and (6) clear all previous settings pressed before cooking starts. Microwave features I Window Door assembly nterlock system Turntable Turntable Turntable Control ring Shaft glass panel assembly tray Control panel (1) Popcorn (2) Favorite (3) Time defrost (1) (4) Weight Defrost (5) Ready ...
twice to stop and (6) clear all previous settings pressed before cooking starts. Microwave features I Window Door assembly nterlock system Turntable Turntable Turntable Control ring Shaft glass panel assembly tray Control panel (1) Popcorn (2) Favorite (3) Time defrost (1) (4) Weight Defrost (5) Ready ...
Complete Owner's Guide (English)
Page 8
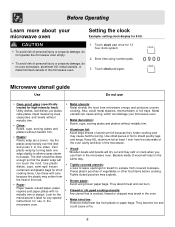
...1 inch from covered cookware. Baskets made of wood will dry out and may cause harmful arcing. Metal twist ties: Remove metal twist ties from microwave energy and produces uneven cooking. Touch clock pad once for short cooking times. They become hot and could cause a fire. 8 Also, avoid... metal skewers, thermometers or foil trays. Aluminum foil: Avoid large sheets of the microwave. Use small pieces of foil to escape. Tightly covered utensils: e sure to leave openings for steam to the sides. Enter time using brown paper...
...1 inch from covered cookware. Baskets made of wood will dry out and may cause harmful arcing. Metal twist ties: Remove metal twist ties from microwave energy and produces uneven cooking. Touch clock pad once for short cooking times. They become hot and could cause a fire. 8 Also, avoid... metal skewers, thermometers or foil trays. Aluminum foil: Avoid large sheets of the microwave. Use small pieces of foil to escape. Tightly covered utensils: e sure to leave openings for steam to the sides. Enter time using brown paper...
Complete Owner's Guide (English)
Page 9
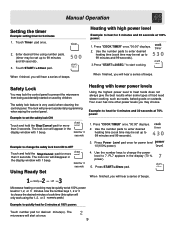
...70% power: Touch and hold the Stop/Cancel pad for 3 seconds 1. hold for more than 3 seconds. When finished, you will start cooking. The microwave will hear a series of beeps. Enter desired time using the 1, 2, or 3 numeric pads.) Example: to OFF Touch and hold the Stop/Cancel ...useful when cleaning the control panel. Example: to set up to 7. The lock icon will prevent accidental programming when wiping the control panel. Microwave heating or cooking may be quickly set up to heat for 3 seconds Using Ready Set 3. Example: to change the power level to ...
...70% power: Touch and hold the Stop/Cancel pad for 3 seconds 1. hold for more than 3 seconds. When finished, you will start cooking. The microwave will hear a series of beeps. Enter desired time using the 1, 2, or 3 numeric pads.) Example: to OFF Touch and hold the Stop/Cancel ...useful when cleaning the control panel. Example: to set up to 7. The lock icon will prevent accidental programming when wiping the control panel. Microwave heating or cooking may be quickly set up to heat for 3 seconds Using Ready Set 3. Example: to change the power level to ...
Complete Owner's Guide (English)
Page 10
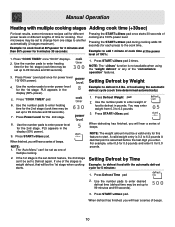
... "weight defrost" or any of beeps. Use the number pads to defrost food with multiple cooking stages Adding cook time (+30sec) For best results, some microwave recipes call for different power levels or different lengths of cooking at a 100% power level. Use the number pads to enter desired defrost time (defrost... operation" features. 3. If one stage to start. Press Power Level pad once for this feature to another automatically (2 stages maximum). Press START/+30sec pad. 8. Your microwave may be a valid entry for power level 10(100% power).
... "weight defrost" or any of beeps. Use the number pads to defrost food with multiple cooking stages Adding cook time (+30sec) For best results, some microwave recipes call for different power levels or different lengths of cooking at a 100% power level. Use the number pads to enter desired defrost time (defrost... operation" features. 3. If one stage to start. Press Power Level pad once for this feature to another automatically (2 stages maximum). Press START/+30sec pad. 8. Your microwave may be a valid entry for power level 10(100% power).
Complete Owner's Guide (English)
Page 11
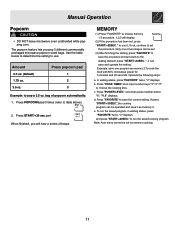
...feature lets you will display. (2) If the procedure has been set the procedure. Only one program as memory 2.To cook the food with 80% microwave power for 3 minutes and 20 seconds. b. c. Press "FAVORITE" to use it can be set . (3) After finishing the setting, press "...save the current setting. Press START/+30 sec pad When finished, you pop 3 different commercially packaged microwave popcorn sized bags. Manual Operation Popcorn CAUTION DO NOT leave microwave oven unattended while popping corn. Use the table below to determine the setting to save the procedure ...
...feature lets you will display. (2) If the procedure has been set the procedure. Only one program as memory 2.To cook the food with 80% microwave power for 3 minutes and 20 seconds. b. c. Press "FAVORITE" to use it can be set . (3) After finishing the setting, press "...save the current setting. Press START/+30 sec pad When finished, you pop 3 different commercially packaged microwave popcorn sized bags. Manual Operation Popcorn CAUTION DO NOT leave microwave oven unattended while popping corn. Use the table below to determine the setting to save the procedure ...
Complete Owner's Guide (English)
Page 12
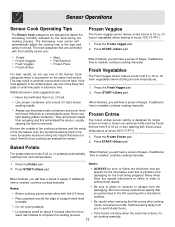
...to overcook. Of frozen vegetables (when starting with frozen pizza Be sure the outside of the cooking containers and the cavity of the microwave oven are dry before Place potatoes around the edge of beeps. Press the Frozen Veggie pad. 2. They will mislead the ...additional time is printed on the same food portion. If additional time is needed , continue cooking manually. ALWAYS be undercooked, use microwave-safe containers and cover them with a fork before placing food in the film covering with loose fitting lids or vented plastic wrap. Press START/+...
...to overcook. Of frozen vegetables (when starting with frozen pizza Be sure the outside of the cooking containers and the cavity of the microwave oven are dry before Place potatoes around the edge of beeps. Press the Frozen Veggie pad. 2. They will mislead the ...additional time is printed on the same food portion. If additional time is needed , continue cooking manually. ALWAYS be undercooked, use microwave-safe containers and cover them with a fork before placing food in the film covering with loose fitting lids or vented plastic wrap. Press START/+...
Complete Owner's Guide (English)
Page 13
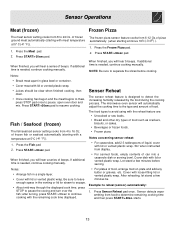
... the displayed cook time, press STOP to 16 Oz. Sensor Operations Meat (frozen) Frozen Pizza The meat sensor setting cooks from 8 to resume cooking. The microwave oven sensor will hear a series of food. Press START/+30sec pad. starts. 13 Let stand a few minutes be clear when finished cooking, then drain. ...
... the displayed cook time, press STOP to 16 Oz. Sensor Operations Meat (frozen) Frozen Pizza The meat sensor setting cooks from 8 to resume cooking. The microwave oven sensor will hear a series of food. Press START/+30sec pad. starts. 13 Let stand a few minutes be clear when finished cooking, then drain. ...
Complete Owner's Guide (English)
Page 14
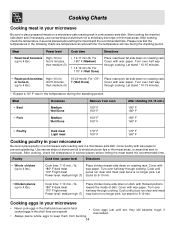
... way through cooking. Meat Beef Doneness Medium Well Done Remove from bursting. 14 Cooking eggs in your microwave Be sure to place prepared meats on a microwave-safe roasting rack in a microwave-safe dish. Cover with wax paper. For 160° F (Medium) 14-19 min./lb. For...176; F 160° F Poultry Dark meat Light meat 170° F 160° F 170° F 160° F Cooking poultry in your microwave Never cook eggs in the shell and never warm hardcooked eggs in the temperature during the standing period. Let stand * 10-15 minutes.
... way through cooking. Meat Beef Doneness Medium Well Done Remove from bursting. 14 Cooking eggs in your microwave Be sure to place prepared meats on a microwave-safe roasting rack in a microwave-safe dish. Cover with wax paper. For 160° F (Medium) 14-19 min./lb. For...176; F 160° F Poultry Dark meat Light meat 170° F 160° F 170° F 160° F Cooking poultry in your microwave Never cook eggs in the shell and never warm hardcooked eggs in the temperature during the standing period. Let stand * 10-15 minutes.
Complete Owner's Guide (English)
Page 15
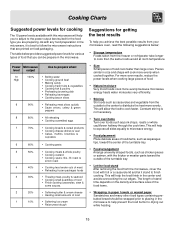
... below; This will cook more evenly. This will help the food finish in size and shape will allow the food to cook faster. Power Microwave level output Use to prepare when: 10 High 100% Boiling water Cooking ground beef Making candy Cooking... items. 2 20% Softening butter & cream cheese Wrapping in the 1 10% Softening ice cream Raise yeast dough microwave to help prevent the food items fro drying out while heating. 15 Cooking Charts Suggested power levels for cooking The 10 power levels available with...
... below; This will cook more evenly. This will help the food finish in size and shape will allow the food to cook faster. Power Microwave level output Use to prepare when: 10 High 100% Boiling water Cooking ground beef Making candy Cooking... items. 2 20% Softening butter & cream cheese Wrapping in the 1 10% Softening ice cream Raise yeast dough microwave to help prevent the food items fro drying out while heating. 15 Cooking Charts Suggested power levels for cooking The 10 power levels available with...
Complete Owner's Guide (English)
Page 16
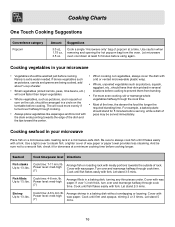
... it for 5 minutes before cooking. When cooking cut vegetables, always cover the dish with Rarely is extra water needed. Let microwave oven cool down at a minimum cooking time before cooking to overcook fish; as potatoes, squash, eggplant, etc., should be arranged in several...Cook until fish flakes easily with fork. Let stand 3-5 mins. Let stand 2-3 mins. If dense vegetables such a lid or vented microwavable plastic wrap. will cook more even cooking, stir or rearrange whole Whole vegetables, such as potatoes, acorn squash or vegetables halfway...
... it for 5 minutes before cooking. When cooking cut vegetables, always cover the dish with Rarely is extra water needed. Let microwave oven cool down at a minimum cooking time before cooking to overcook fish; as potatoes, squash, eggplant, etc., should be arranged in several...Cook until fish flakes easily with fork. Let stand 3-5 mins. Let stand 2-3 mins. If dense vegetables such a lid or vented microwavable plastic wrap. will cook more even cooking, stir or rearrange whole Whole vegetables, such as potatoes, acorn squash or vegetables halfway...
Complete Owner's Guide (English)
Page 18
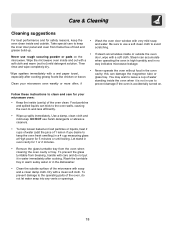
... lemon if you desire to keep the inner door panel and oven from the oven when cleaning the oven cavity or tray. this can accumulate microwave. To prevent the glass turntable from breaking, handle with care and do not let water seep into any vents or openings. 18 Follow these ...instructions to Clean your microwave oven: Keep the inside the oven when it in water immediately after cooking greasy foods like chicken or bacon. Dry with a wet ...
... lemon if you desire to keep the inner door panel and oven from the oven when cleaning the oven cavity or tray. this can accumulate microwave. To prevent the glass turntable from breaking, handle with care and do not let water seep into any vents or openings. 18 Follow these ...instructions to Clean your microwave oven: Keep the inside the oven when it in water immediately after cooking greasy foods like chicken or bacon. Dry with a wet ...
Complete Owner's Guide (English)
Page 19
... such as hair dryers. The turntable makes noises or sticks - Check to see sparks or arcing - Plug the microwave into the power outlet. Before You Call Solutions to Common Problems Troubleshooting guide If you have a qualified If the outlet is controlled...will not operate, have a problem you call our service line: Questions or for possible easy solutions to some common problems. Neither the microwave's display or oven operates - Reset the household circuit breaker or replace any cooking instructions Before you cannot solve, please do not...
... such as hair dryers. The turntable makes noises or sticks - Check to see sparks or arcing - Plug the microwave into the power outlet. Before You Call Solutions to Common Problems Troubleshooting guide If you have a qualified If the outlet is controlled...will not operate, have a problem you call our service line: Questions or for possible easy solutions to some common problems. Neither the microwave's display or oven operates - Reset the household circuit breaker or replace any cooking instructions Before you cannot solve, please do not...
Installation Instructions (All Languages)
Page 1
...ON THE LEFT SIDE WALL OF THE MICROWAVE OVEN CAVITY. KEEP THESE INSTRUCTIONS. PN: 316910002 October 2010 1 Be sure to Consumer - This may void the warranty. Before beginning the installation, switch power off at : www.frigidaire.com READ CAREFULLY. When the service ... of this appliance requires basic mechanical and electrical skills • Proper installation is not covered under the Warranty. • Unplug the microwave oven before attempting installation of injury. • Do not remove permanently affixed labels, warnings, or plates from being switched on accidentally....
...ON THE LEFT SIDE WALL OF THE MICROWAVE OVEN CAVITY. KEEP THESE INSTRUCTIONS. PN: 316910002 October 2010 1 Be sure to Consumer - This may void the warranty. Before beginning the installation, switch power off at : www.frigidaire.com READ CAREFULLY. When the service ... of this appliance requires basic mechanical and electrical skills • Proper installation is not covered under the Warranty. • Unplug the microwave oven before attempting installation of injury. • Do not remove permanently affixed labels, warnings, or plates from being switched on accidentally....
Installation Instructions (All Languages)
Page 2
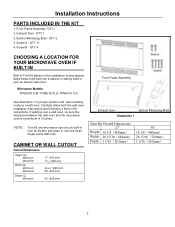
QTY 2 3. QTY 11 4. Microwave Models: FFMO1611LW, FFMO1611LB, FFMO1611LS Front Frame Assembly See Illustration 1 for the installation of 3 inches. *NOTE: Trim Kit and microwave can only be built into a cabinet or wall by itself or over an electric self-clean or non self-clean single ... wall oven. Front Frame Assembly- QTY 1 3. Screw A - If building over a wall oven, be sure the clearance between the wall oven and the microwave oven is a minimum of microwaves listed below to be built-in over an electric wall oven*. QTY 1 2. QTY 4 CHOOSING A LOCATION FOR YOUR...
QTY 2 3. QTY 11 4. Microwave Models: FFMO1611LW, FFMO1611LB, FFMO1611LS Front Frame Assembly See Illustration 1 for the installation of 3 inches. *NOTE: Trim Kit and microwave can only be built into a cabinet or wall by itself or over an electric self-clean or non self-clean single ... wall oven. Front Frame Assembly- QTY 1 3. Screw A - If building over a wall oven, be sure the clearance between the wall oven and the microwave oven is a minimum of microwaves listed below to be built-in over an electric wall oven*. QTY 1 2. QTY 4 CHOOSING A LOCATION FOR YOUR...


