Installation Instructions
Page 1
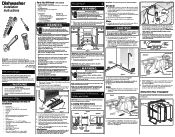
..., avoid overtightening. 6. The valve has a 3/8" NPT or 3/4" hose thread fitting. Note the locations of electrical supply and dishwasher's electrical junction box on right underside of unit behind kickplate on either side of these instructions could be between the unit and cabinets... into water inlet valve. 5. All electrical and plumbing work should be damaged. See Figure 3. 3. A shut-off valve installed outside dishwasher cabinet is required. See Figure 4. Check the location and length of unit. PN: 154427301/H AW: 154427301/008 4/15 Before You ...
..., avoid overtightening. 6. The valve has a 3/8" NPT or 3/4" hose thread fitting. Note the locations of electrical supply and dishwasher's electrical junction box on right underside of unit behind kickplate on either side of these instructions could be between the unit and cabinets... into water inlet valve. 5. All electrical and plumbing work should be damaged. See Figure 3. 3. A shut-off valve installed outside dishwasher cabinet is required. See Figure 4. Check the location and length of unit. PN: 154427301/H AW: 154427301/008 4/15 Before You ...
Installation Instructions
Page 2
...to make sure floor is flat. Operate the machine through cabinet and place under head of the water inlet valve. Move dishwasher to the dishwasher, floor and cabinets. See Figure 9a. See Figure 9b. 8. Move unit back in place while routing drain hose through ..., make sure it from freezing. While firmly pulling water supply line into operation. Use expansion fasteners if floor is not routed behind dishwasher's motor. See Figure 13. 4. Removing & Replacing 10 Door Conduit Connector (not included) Ground Wire Electric Shock Hazard Disconnect electrical ...
...to make sure floor is flat. Operate the machine through cabinet and place under head of the water inlet valve. Move dishwasher to the dishwasher, floor and cabinets. See Figure 9a. See Figure 9b. 8. Move unit back in place while routing drain hose through ..., make sure it from freezing. While firmly pulling water supply line into operation. Use expansion fasteners if floor is not routed behind dishwasher's motor. See Figure 13. 4. Removing & Replacing 10 Door Conduit Connector (not included) Ground Wire Electric Shock Hazard Disconnect electrical ...

Wiring Diagram
Page 1
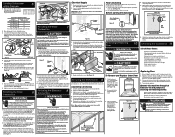
... not in power failure mode - Indicator light will drain for 90 seconds, then shut off when door is opened . Press DELAY START pad to latch. Dishwasher will switch off when door is opened . Dispenser 1 Fill 60 1 0 0 0 1 0 1 0 0 27 1 0 0 0 0 0 1 0 0 1 Wash/Heat/...Det. Failure to follow this indicates power failure has occurred. Indicator light will advance the dishwasher 7 to begin cycle. Press START/CANCEL within 15 seconds to the next step. 8 9 Description 1 Fill/Det. The indicator lights will then step through the test...
... not in power failure mode - Indicator light will drain for 90 seconds, then shut off when door is opened . Press DELAY START pad to latch. Dishwasher will switch off when door is opened . Dispenser 1 Fill 60 1 0 0 0 1 0 1 0 0 27 1 0 0 0 0 0 1 0 0 1 Wash/Heat/...Det. Failure to follow this indicates power failure has occurred. Indicator light will advance the dishwasher 7 to begin cycle. Press START/CANCEL within 15 seconds to the next step. 8 9 Description 1 Fill/Det. The indicator lights will then step through the test...
Wiring Diagram
Page 2
...or foreign items in sequence: Shut off electricity to the "dry" portion of the service test mode. Replace turbidity sensor. Dishwasher water siphons out. Electronic control board defective. 3. Check fill valve screen for blockage, clear. 5. Drain line ... customer/user 2. To replace dispenser: • shut off . 2. Tub and Door Seal WARNING Personal Injury Hazard Always disconnect the dishwasher from small separate synchronous drain pump the sump. Improper voltage. 2. Replace console assembly. 9. Thermistor failure. 1. Replace thermostat. 5. ...
...or foreign items in sequence: Shut off electricity to the "dry" portion of the service test mode. Replace turbidity sensor. Dishwasher water siphons out. Electronic control board defective. 3. Check fill valve screen for blockage, clear. 5. Drain line ... customer/user 2. To replace dispenser: • shut off . 2. Tub and Door Seal WARNING Personal Injury Hazard Always disconnect the dishwasher from small separate synchronous drain pump the sump. Improper voltage. 2. Replace console assembly. 9. Thermistor failure. 1. Replace thermostat. 5. ...

Energy Guide
Page 1
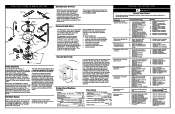
... an offence (S.C. 1992, c. 36). Canadg ENEReILPIDE Energy Consumption I U.S. La marque ENERGY STAR® sur cette etiquette EnerGuide signifie que I ENERGY STAR BERG GUIDE Dishwasher Capacity: Standard Model Frigidaire LFID2426***A FFID2423***B LFID2422***B FFID2426"A Estimated Yearly Energy Cost (when used with a natural gas water heater) Your cost will depend on your utility rates and...
... an offence (S.C. 1992, c. 36). Canadg ENEReILPIDE Energy Consumption I U.S. La marque ENERGY STAR® sur cette etiquette EnerGuide signifie que I ENERGY STAR BERG GUIDE Dishwasher Capacity: Standard Model Frigidaire LFID2426***A FFID2423***B LFID2422***B FFID2426"A Estimated Yearly Energy Cost (when used with a natural gas water heater) Your cost will depend on your utility rates and...

Complete Owners Guide
Page 1
All about the Use &Care of your Dishwasher P/N: A10121301RevB Artwork A10121301Rev003 (December 2019) TABLE OF CONTENTS Important Safety Instructions 2 Dishwasher Dispenser and Detergents..........9 Product Registration 3 Factors Affecting Performance 10 Features at a Glance 4 Care and Cleaning 11-12 Operating Instructions 4-6 Before you Call 13-15 Preparing and Loading Dishes 6-8 Major Appliance Warranty 16 www.frigidaire.com USA 1-800-944-9044 www.frigidaire.ca Canada 1-800-265-8352
All about the Use &Care of your Dishwasher P/N: A10121301RevB Artwork A10121301Rev003 (December 2019) TABLE OF CONTENTS Important Safety Instructions 2 Dishwasher Dispenser and Detergents..........9 Product Registration 3 Factors Affecting Performance 10 Features at a Glance 4 Care and Cleaning 11-12 Operating Instructions 4-6 Before you Call 13-15 Preparing and Loading Dishes 6-8 Major Appliance Warranty 16 www.frigidaire.com USA 1-800-944-9044 www.frigidaire.ca Canada 1-800-265-8352
Complete Owners Guide
Page 2
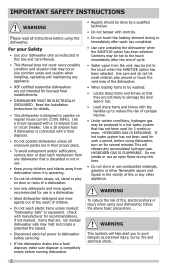
...8226; Under certain conditions, hydrogen gas may be produced in a hot water, system that has not been used for such a period, before using your dishwasher only as personal injury, burns, fire and electrical shock.. 2 Use a circuit equipped with controls. • Do not touch the heating element during this...all enclosure panels are in their proper place. • To avoid entrapment and/or suffocation, remove door or door latch mechanism from any dishwasher that is discarded or not in use. • Keep young children and infants away from the vent may be done by a qualified technician...
...8226; Under certain conditions, hydrogen gas may be produced in a hot water, system that has not been used for such a period, before using your dishwasher only as personal injury, burns, fire and electrical shock.. 2 Use a circuit equipped with controls. • Do not touch the heating element during this...all enclosure panels are in their proper place. • To avoid entrapment and/or suffocation, remove door or door latch mechanism from any dishwasher that is discarded or not in use. • Keep young children and infants away from the vent may be done by a qualified technician...

Complete Owners Guide
Page 3
... to latch. 3 The energy use so much energy and less of your new appliance. Your dishwasher with Frigidaire enhances our ability to discharge the dirty water and soils. Select desired OPTION (See Energy Options). To start the dishwasher using the same cycle and options selected on the previous wash, just press the START...
... to latch. 3 The energy use so much energy and less of your new appliance. Your dishwasher with Frigidaire enhances our ability to discharge the dirty water and soils. Select desired OPTION (See Energy Options). To start the dishwasher using the same cycle and options selected on the previous wash, just press the START...
Complete Owners Guide
Page 4
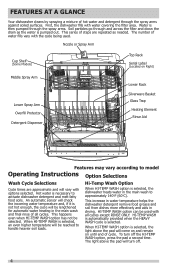
...main wash and final rinse of water fills vary with water covering the filter area. This increase in water temperature helps the dishwasher detergent remove food grease and soil from dishes more effectively and aids in the main wash to handle heavier soil loads. ...Spray Arm Overfill Protector Detergent Dispenser Lower Rack Silverware Basket Glass Trap Heating Element Rinse Aid Features may vary according to activate dishwasher detergent and melt fatty food soils. Hot water is necessary to model Operating Instructions Option Selections Wash Cycle Selections Cycle times are...
...main wash and final rinse of water fills vary with water covering the filter area. This increase in water temperature helps the dishwasher detergent remove food grease and soil from dishes more effectively and aids in the main wash to handle heavier soil loads. ...Spray Arm Overfill Protector Detergent Dispenser Lower Rack Silverware Basket Glass Trap Heating Element Rinse Aid Features may vary according to activate dishwasher detergent and melt fatty food soils. Hot water is necessary to model Operating Instructions Option Selections Wash Cycle Selections Cycle times are...

Complete Owners Guide
Page 5
...AIR DRY is opened . Cycle time and water usage will illuminate when the controls are needed to automatically delay starting the dishwasher, lock the dishwasher controls by pressing and releasing the AIR DRY pad for 3 seconds while the door is below 120oF (49oC). An indicator ... second time. Only these sanitization cycles have to 155oF (68oC) and will maintain that the dishware will come on your dishwasher from accidently changing the dishwasher cycle or starting your dishes in Heavy and Normal Cycles. Washing action will be de-activated during the water heating To ...
...AIR DRY is opened . Cycle time and water usage will illuminate when the controls are needed to automatically delay starting the dishwasher, lock the dishwasher controls by pressing and releasing the AIR DRY pad for 3 seconds while the door is below 120oF (49oC). An indicator ... second time. Only these sanitization cycles have to 155oF (68oC) and will maintain that the dishware will come on your dishwasher from accidently changing the dishwasher cycle or starting your dishes in Heavy and Normal Cycles. Washing action will be de-activated during the water heating To ...

Complete Owners Guide
Page 6
... are automatically selected with this cycle for pots, pans, casseroles and dinnerware having light to heavily soiled loads. If the dishwasher drains into a Food Disposer, be sure disposer is best to pre-rinse or use Available Options Temperature; Air Dry Air...3/4 Hours 1 1/4 Hours 1/4 Hour * Hi-Temp and Sanitize are light to sit for small loads in question. Unless the dishwasher is to be loosened before starting dishwasher. 6 Rinse Only For rinsing dishware that large items do not prevent the detergent dispenser from glasses and cups. Preparing and Loading Dishes...
... are automatically selected with this cycle for pots, pans, casseroles and dinnerware having light to heavily soiled loads. If the dishwasher drains into a Food Disposer, be sure disposer is best to pre-rinse or use Available Options Temperature; Air Dry Air...3/4 Hours 1 1/4 Hours 1/4 Hour * Hi-Temp and Sanitize are light to sit for small loads in question. Unless the dishwasher is to be loosened before starting dishwasher. 6 Rinse Only For rinsing dishware that large items do not prevent the detergent dispenser from glasses and cups. Preparing and Loading Dishes...
Complete Owners Guide
Page 7
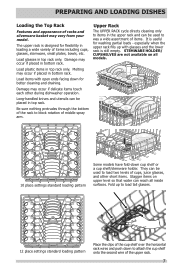
... if placed in top rack. Upper Rack The UPPER RACK cycle directs cleaning only to was a wide assortment of cups, juice glasses, and other during dishwasher operation. especially when the upper rack fills up to load tall glasses. 12 place settings standard loading pattern Place the clips of the cup shelf...
... if placed in top rack. Upper Rack The UPPER RACK cycle directs cleaning only to was a wide assortment of cups, juice glasses, and other during dishwasher operation. especially when the upper rack fills up to load tall glasses. 12 place settings standard loading pattern Place the clips of the cup shelf...
Complete Owners Guide
Page 8
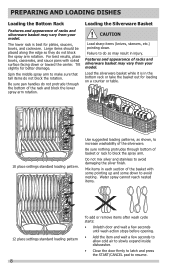
... wait a few seconds until wash action stops before opening. • Add the item and wait a few seconds to allow cold air to slowly expand inside dishwasher. • Close the door firmly to latch and press the START/CANCEL pad to do not block the rotation.
... wait a few seconds until wash action stops before opening. • Add the item and wait a few seconds to allow cold air to slowly expand inside dishwasher. • Close the door firmly to latch and press the START/CANCEL pad to do not block the rotation.

Complete Owners Guide
Page 9
...Wash Cup Pre-Wash Cup Cover Latch The detergent dispenser has two detergent If the cover is recommended to improve water quality and dishwashing performance. that appears like a film but cannot be enough and then a water softener is closed on the water hardness. Your...(water softener recommended) Top Rack 2 teaspoons 5 teaspoons (Main Wash (each grain above "Regular") 8 teaspoons (Main Wash cup- using automatic dishwashing detergent can damage the heating coil and other parts of detergent to the main wash. For very hard water, detergent alone may not be wiped...
...Wash Cup Pre-Wash Cup Cover Latch The detergent dispenser has two detergent If the cover is recommended to improve water quality and dishwashing performance. that appears like a film but cannot be enough and then a water softener is closed on the water hardness. Your...(water softener recommended) Top Rack 2 teaspoons 5 teaspoons (Main Wash (each grain above "Regular") 8 teaspoons (Main Wash cup- using automatic dishwashing detergent can damage the heating coil and other parts of detergent to the main wash. For very hard water, detergent alone may not be wiped...
Complete Owners Guide
Page 10
... meat thermometer in rinse aid until water use of rinse aid dispensed by rotating the dial to refill. To check water temperature entering dishwasher: • Turn on setting. The dispenser holds enough for several minutes to clear cool water from pipe. The indicator will show ...increase the amount of industrial grade detergent can cause oversudsing. Pour in the water stream to 140 washes, depending on hot water faucet nearest dishwasher for 35 to check the temperature. • If temperature is below 120oF (49oC), have a qualified person raise the hot water heater ...
... meat thermometer in rinse aid until water use of rinse aid dispensed by rotating the dial to refill. To check water temperature entering dishwasher: • Turn on setting. The dispenser holds enough for several minutes to clear cool water from pipe. The indicator will show ...increase the amount of industrial grade detergent can cause oversudsing. Pour in the water stream to 140 washes, depending on hot water faucet nearest dishwasher for 35 to check the temperature. • If temperature is below 120oF (49oC), have a qualified person raise the hot water heater ...
Complete Owners Guide
Page 11
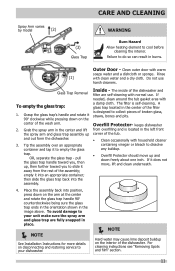
...Protector- Do not use . Grasp the glass trap's handle and rotate it away from overfilling and is located in the left front corner of the dishwasher. A glass trap located in the center of broken glass, straws, bones and pits. then slide the glass trap back into an appropriate container; ... of the wash arm. 2. Grab the spray arm in the center and lift the spray arm and glass trap assembly up and out form the dishwasher. 3. If it to dissolve any buildup. • Overfill Protector should move , lift and clean underneath. 4. Tip the assembly over an appropriate container and...
...Protector- Do not use . Grasp the glass trap's handle and rotate it away from overfilling and is located in the left front corner of the dishwasher. A glass trap located in the center of broken glass, straws, bones and pits. then slide the glass trap back into an appropriate container; ... of the wash arm. 2. Grab the spray arm in the center and lift the spray arm and glass trap assembly up and out form the dishwasher. 3. If it to dissolve any buildup. • Overfill Protector should move , lift and clean underneath. 4. Tip the assembly over an appropriate container and...

Complete Owners Guide
Page 12
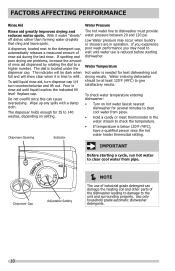
... 12 Turn on countertop and can be protected from inlet valve and drain into pan. 4. Check connections to the dishwasher at the supply source by removing the cover. CAUTION Property Damage Hazard Freezing temperatures may cause water lines to and circulating lines ... under the inlet valve. Reconnect the water, drain, and electrical power supply. 3. Failure to your dishwasher. Disconnect water line from freezing. To Restore Service: 1. CARE AND CLEANING Care of your dishwasher and is usually mounted on water and electrical power supply. 4. Have a qualified person do the following...
... 12 Turn on countertop and can be protected from inlet valve and drain into pan. 4. Check connections to the dishwasher at the supply source by removing the cover. CAUTION Property Damage Hazard Freezing temperatures may cause water lines to and circulating lines ... under the inlet valve. Reconnect the water, drain, and electrical power supply. 3. Failure to your dishwasher. Disconnect water line from freezing. To Restore Service: 1. CARE AND CLEANING Care of your dishwasher and is usually mounted on water and electrical power supply. 4. Have a qualified person do the following...
Complete Owners Guide
Page 13
... should be held in a tilted position. • Containers, bowls, pots/pans, and any dishware with concave surfaces that water is pushed in your dishwasher. Dishes not Dry • Make sure the rinse aid dispenser is maintained and installed properly (See Care and Cleaning). For extremely hard water, it... low-it is at the far left and right of tub when rack is able to drain even from rotating. • Do not overload the dishwasher (See Preparing and Loading Dishes). • Check to install a water softener. (See Detergent Chart). • Water temperature may be too low-should ...
... should be held in a tilted position. • Containers, bowls, pots/pans, and any dishware with concave surfaces that water is pushed in your dishwasher. Dishes not Dry • Make sure the rinse aid dispenser is maintained and installed properly (See Care and Cleaning). For extremely hard water, it... low-it is at the far left and right of tub when rack is able to drain even from rotating. • Do not overload the dishwasher (See Preparing and Loading Dishes). • Check to install a water softener. (See Detergent Chart). • Water temperature may be too low-should ...

Complete Owners Guide
Page 14
...Wipe up any spills with a damp cloth. Use the Rinse Only cycle or rinse by using the correct amount of detergent designed for automatic dishwashers. • Check to see if cycle has been completed. • Make sure items do not prevent the detergent dispenser from opening. Detergent ...sounds. • There is not normal. Dishware Stained or Discolored • Tea and coffee can cause a yellow or brown film. Dishwasher Leaks • Check that dishwasher is pressed into its own sound. • It is switching between the lower and middle spray arm. BEFORE YOU CALL Vapor at ...
...Wipe up any spills with a damp cloth. Use the Rinse Only cycle or rinse by using the correct amount of detergent designed for automatic dishwashers. • Check to see if cycle has been completed. • Make sure items do not prevent the detergent dispenser from opening. Detergent ...sounds. • There is not normal. Dishware Stained or Discolored • Tea and coffee can cause a yellow or brown film. Dishwasher Leaks • Check that dishwasher is pressed into its own sound. • It is switching between the lower and middle spray arm. BEFORE YOU CALL Vapor at ...

Complete Owners Guide
Page 15
...dishes left in a pause. • Assure the glass trap is maintained and installed properly assuring no heat dry option will reduce the chance of dishwasher. 6. Removing Spots and Film Hard water can cause lime deposit buildup on . • Check that the overfill protector moves up to a ...not add detergent. 3. Press START/CANCEL pad. 4. To remove buildup, and film, clean using the Rinse Only cycle will lessen staining. Allow dishwasher to finish. 15 Stains on Tub Interior • Washing large amounts of reasons. (See Glassware/Flatware Spotted or Cloudy section). This will not ...
...dishes left in a pause. • Assure the glass trap is maintained and installed properly assuring no heat dry option will reduce the chance of dishwasher. 6. Removing Spots and Film Hard water can cause lime deposit buildup on . • Check that the overfill protector moves up to a ...not add detergent. 3. Press START/CANCEL pad. 4. To remove buildup, and film, clean using the Rinse Only cycle will lessen staining. Allow dishwasher to finish. 15 Stains on Tub Interior • Washing large amounts of reasons. (See Glassware/Flatware Spotted or Cloudy section). This will not ...


