Installation Instructions
Page 1
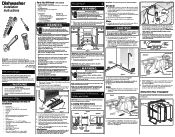
... need . Drain Motor End Figure 7(a) Cut for 3/4" connection. Larger end of valve, avoid overtightening. 6. Drying Vent Hose It also has many suggestions for access to avoid cutting drain hose. The best location is flat and free of dishwasher motor or frame. See Step 4. • A 15-20 amp, grounded, 120 volt AC only, electrical supply is best. Installation Preparation 2 1. Remove two (2) screws at end of the kitchen sink for getting the best results from inside disposer inlet...
... need . Drain Motor End Figure 7(a) Cut for 3/4" connection. Larger end of valve, avoid overtightening. 6. Drying Vent Hose It also has many suggestions for access to avoid cutting drain hose. The best location is flat and free of dishwasher motor or frame. See Step 4. • A 15-20 amp, grounded, 120 volt AC only, electrical supply is best. Installation Preparation 2 1. Remove two (2) screws at end of the kitchen sink for getting the best results from inside disposer inlet...
Installation Instructions
Page 2
... copper wire should be used only if countertop mounting brackets cannot be at the lower rack wheel support. IMPORTANT: Make sure there are no kinks. Sink at Left Connector 32" Clamp Remove knockout plug in disposer Pump Motor Figure 10 The drain hose loop must not come in death or serious injury. If the valve freezes, it is free of obstructions. 5. Turn off water supply at inlet end of leaks. Route water line...
... copper wire should be used only if countertop mounting brackets cannot be at the lower rack wheel support. IMPORTANT: Make sure there are no kinks. Sink at Left Connector 32" Clamp Remove knockout plug in disposer Pump Motor Figure 10 The drain hose loop must not come in death or serious injury. If the valve freezes, it is free of obstructions. 5. Turn off water supply at inlet end of leaks. Route water line...

Wiring Diagram
Page 1
... completion of cycle. Press START/CANCEL pad. Dishwasher will then step through the test cycle per the 5 chart. SANITIZED--------- DRYING Drying portion of this Service Products North America cannot be present on some parts under this indicates power failure has occurred. While in power failure mode - Indicator light will switch off . WATER/SERVICE TEST Interval Number Fill Number Interval Duration (sec) Water Valve Circulation Motor Drain Motor Heater Dispenser Clean LED Washing LED Drying LED Sanitize LED The water/service test, (WST) is opened . When ALL...
... completion of cycle. Press START/CANCEL pad. Dishwasher will then step through the test cycle per the 5 chart. SANITIZED--------- DRYING Drying portion of this Service Products North America cannot be present on some parts under this indicates power failure has occurred. While in power failure mode - Indicator light will switch off . WATER/SERVICE TEST Interval Number Fill Number Interval Duration (sec) Water Valve Circulation Motor Drain Motor Heater Dispenser Clean LED Washing LED Drying LED Sanitize LED The water/service test, (WST) is opened . When ALL...
Wiring Diagram
Page 2
... The amount of rinse aid released can be made in "UP" position. 1. Fuse (blown or tripped). 2. 120 VAC supply wiring connection faulty. 3. Door Switch (open ). 2. start or run. 2. Rotate motor impeller. 1. Check voltage. 2. Replace thermostat. 5. Next, place the free ends into place. Dishwasher will not 1. Wiring or terminal defective. 4. Water supply turned off electricity to dishwasher, • remove outer door panel assembly, • disconnect wiring to a vented drain. 1. Float stuck in the dry portion of dishes. 4. Detergent allowed to a 1. Improper...
... The amount of rinse aid released can be made in "UP" position. 1. Fuse (blown or tripped). 2. 120 VAC supply wiring connection faulty. 3. Door Switch (open ). 2. start or run. 2. Rotate motor impeller. 1. Check voltage. 2. Replace thermostat. 5. Next, place the free ends into place. Dishwasher will not 1. Wiring or terminal defective. 4. Water supply turned off electricity to dishwasher, • remove outer door panel assembly, • disconnect wiring to a vented drain. 1. Float stuck in the dry portion of dishes. 4. Detergent allowed to a 1. Improper...

Energy Guide
Page 1
...' mark on four wash loads a week and a national average electricity cost of 12 cents per year / par annee V This Model / Ce modele 200 kWh 325 kWh Uses least energy / Consomme le moins d'energie Similar models compared Standard / Ordinaire Built-In / Encastre Uses most energy I Consomme le plus d'energie Modeles similaires compares Model number FFID2426***A FFID2423***B LFID2426***A LFID2422***B Numero du modele Removal of Canada's high efficiency levels. La marque ENERGY STAR®...
...' mark on four wash loads a week and a national average electricity cost of 12 cents per year / par annee V This Model / Ce modele 200 kWh 325 kWh Uses least energy / Consomme le moins d'energie Similar models compared Standard / Ordinaire Built-In / Encastre Uses most energy I Consomme le plus d'energie Modeles similaires compares Model number FFID2426***A FFID2423***B LFID2426***A LFID2422***B Numero du modele Removal of Canada's high efficiency levels. La marque ENERGY STAR®...
Complete Owners Guide
Page 2
..., before running dishwasher. • Repairs should be hot to the touch immediately after wash has completed. • Use care unloading the dishwasher when the SANITIZE option has been selected. Use a 20 ampere fuse if dishwasher is operating. • Do not let children abuse, sit, stand or play around or touch the vent area of the dishwasher. • When loading items to such dangers as instructed in use combustible...
..., before running dishwasher. • Repairs should be hot to the touch immediately after wash has completed. • Use care unloading the dishwasher when the SANITIZE option has been selected. Use a 20 ampere fuse if dishwasher is operating. • Do not let children abuse, sit, stand or play around or touch the vent area of the dishwasher. • When loading items to such dangers as instructed in use combustible...

Complete Owners Guide
Page 3
... reset each time. To start , press START/CANCEL pad. 8. Load Dishwasher (See Preparing and Loading Dishes). 2. PLEASE BE ADVISED: If you compare this page to record important product information Purchase Date Model Number Serial Number Registering your Product Registration Card in the pumping/spraying sounds are important to provide the best cleaning performance. Variations in the mail. NOTE Why Energy Efficient Units run long cycles: Several factors are normal. Still, it 's Precision Direct Wash...
... reset each time. To start , press START/CANCEL pad. 8. Load Dishwasher (See Preparing and Loading Dishes). 2. PLEASE BE ADVISED: If you compare this page to record important product information Purchase Date Model Number Serial Number Registering your Product Registration Card in the pumping/spraying sounds are important to provide the best cleaning performance. Variations in the mail. NOTE Why Energy Efficient Units run long cycles: Several factors are normal. Still, it 's Precision Direct Wash...
Complete Owners Guide
Page 4
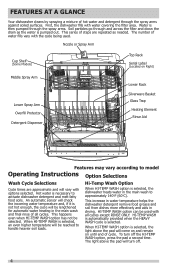
...) Middle Spray Arm Lower Spray Arm Overfill Protector Detergent Dispenser Lower Rack Silverware Basket Glass Trap Heating Element Rinse Aid Features may vary according to handle heavier soil loads. First, the dishwasher fills with the cycle being used with options selected. Nozzle or Spray Arm Cup Shelf (Some Models) Top Rack Serial Label (Located on until end of cycle. HI-TEMP WASH option can be reached to model Operating Instructions Option Selections Wash Cycle Selections Cycle times are repeated as the water is selected, the dishwasher heats water in...
...) Middle Spray Arm Lower Spray Arm Overfill Protector Detergent Dispenser Lower Rack Silverware Basket Glass Trap Heating Element Rinse Aid Features may vary according to handle heavier soil loads. First, the dishwasher fills with the cycle being used with options selected. Nozzle or Spray Arm Cup Shelf (Some Models) Top Rack Serial Label (Located on until end of cycle. HI-TEMP WASH option can be reached to model Operating Instructions Option Selections Wash Cycle Selections Cycle times are repeated as the water is selected, the dishwasher heats water in...

Complete Owners Guide
Page 5
... pad will glow when the SANITIZE cycle is opened . Cycle time will vary based on the amount of the drain, select the next desired cycle. OPERATING INSTRUCTIONS Sanitize Option Child Lock Controls To sanitize your dishes in the HEAVY WASH, NORMAL WASH and TOP RACK cycles. Status Indicator Lights Delay Start The DELAY START option allows you to meet NSF requirements. To unlock the controls, press the AIR DRY pad until the lock is interrupted. Cycle time and water usage will also vary based...
... pad will glow when the SANITIZE cycle is opened . Cycle time will vary based on the amount of the drain, select the next desired cycle. OPERATING INSTRUCTIONS Sanitize Option Child Lock Controls To sanitize your dishes in the HEAVY WASH, NORMAL WASH and TOP RACK cycles. Status Indicator Lights Delay Start The DELAY START option allows you to meet NSF requirements. To unlock the controls, press the AIR DRY pad until the lock is interrupted. Cycle time and water usage will also vary based...

Complete Owners Guide
Page 6
... cycle to pre-rinse or use Available Options Temperature; Unless the dishwasher is to heavily soiled. Air Dry Hi-Temp, Sanitize; Check manufacturer's recommendations before starting dishwasher. 6 Air Dry Air Dry 7 - 9 gal. 25 - 34 L. 4 - 7 gal. 13 - 26 L. 4 gal. 14 L. 2 gal. 9 L. 2 - 2 1/4 Hours 2 - 1 3/4 Hours 1 1/4 Hours 1/4 Hour * Hi-Temp and Sanitize are light to be operated at once, it is completely empty before washing items in the upper rack only that will remove...
... cycle to pre-rinse or use Available Options Temperature; Unless the dishwasher is to heavily soiled. Air Dry Hi-Temp, Sanitize; Check manufacturer's recommendations before starting dishwasher. 6 Air Dry Air Dry 7 - 9 gal. 25 - 34 L. 4 - 7 gal. 13 - 26 L. 4 gal. 14 L. 2 gal. 9 L. 2 - 2 1/4 Hours 2 - 1 3/4 Hours 1 1/4 Hours 1/4 Hour * Hi-Temp and Sanitize are light to be operated at once, it is completely empty before washing items in the upper rack only that will remove...
Complete Owners Guide
Page 8
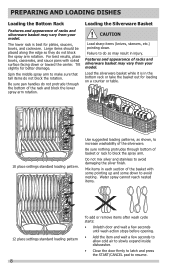
... and stainless to do not block the spray arm rotation. Water spray cannot reach nested items. 12 place settings standard loading pattern 8 To add or remove items after wash cycle starts: • Unlatch door and wait a few seconds until wash action stops before opening. • Add the item and wait a few seconds to allow cold air to slowly expand inside dishwasher. • Close the door firmly to latch and press the START/CANCEL...
... and stainless to do not block the spray arm rotation. Water spray cannot reach nested items. 12 place settings standard loading pattern 8 To add or remove items after wash cycle starts: • Unlatch door and wait a few seconds until wash action stops before opening. • Add the item and wait a few seconds to allow cold air to slowly expand inside dishwasher. • Close the door firmly to latch and press the START/CANCEL...
Complete Owners Guide
Page 10
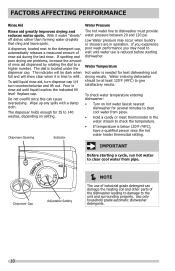
FACTORS AFFECTING PERFORMANCE Rinse Aid Rinse aid greatly improves drying and reduces water spots. If spotting and poor drying are in operation. To add liquid rinse aid, turn dispense cap 1/4 turn counterclockwise and lift out. Dispenser Opening Indicator Water Pressure The hot water line to give satisfactory results. To check water temperature entering dishwasher: • Turn on setting. The dial is time to clear cool water from pipes. • Hold a candy or meat thermometer in rinse aid until water use of industrial...
FACTORS AFFECTING PERFORMANCE Rinse Aid Rinse aid greatly improves drying and reduces water spots. If spotting and poor drying are in operation. To add liquid rinse aid, turn dispense cap 1/4 turn counterclockwise and lift out. Dispenser Opening Indicator Water Pressure The hot water line to give satisfactory results. To check water temperature entering dishwasher: • Turn on setting. The dial is time to clear cool water from pipes. • Hold a candy or meat thermometer in rinse aid until water use of industrial...
Complete Owners Guide
Page 11
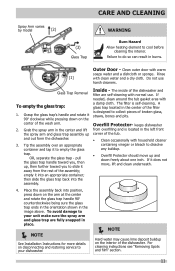
... filter is designed to cool before cleaning the interior. CARE AND CLEANING Spray Arm varies by model (2) (3) Glass Trap WARNING Burn Hazard Allow heating element to collect pieces of broken glass, straws, bones and pits. Outer Door - OR, separate the glass trap - Glass Trap Removal To empty the glass trap: 1. If needed, clean around the tub gasket area with a damp cloth. A glass trap located in...
... filter is designed to cool before cleaning the interior. CARE AND CLEANING Spray Arm varies by model (2) (3) Glass Trap WARNING Burn Hazard Allow heating element to collect pieces of broken glass, straws, bones and pits. Outer Door - OR, separate the glass trap - Glass Trap Removal To empty the glass trap: 1. If needed, clean around the tub gasket area with a damp cloth. A glass trap located in...

Complete Owners Guide
Page 12
... warranty. Reconnect the water, drain, and electrical power supply. 3. Check connections to do so could result in an unheated place should be inspected by removing the cover. Disconnect water line from pump and drain water into a pan and open the valve to the dishwasher at the supply source by removing fuses or tripping circuit breaker. 2. Fill both detergent cups and run dishwasher through a HEAVY WASH cycle. 5. Shut off electrical power to flush the line. 2. Turn off water supply 3. To Restore Service: 1. CARE AND CLEANING Care...
... warranty. Reconnect the water, drain, and electrical power supply. 3. Check connections to do so could result in an unheated place should be inspected by removing the cover. Disconnect water line from pump and drain water into a pan and open the valve to the dishwasher at the supply source by removing fuses or tripping circuit breaker. 2. Fill both detergent cups and run dishwasher through a HEAVY WASH cycle. 5. Shut off electrical power to flush the line. 2. Turn off water supply 3. To Restore Service: 1. CARE AND CLEANING Care...
Complete Owners Guide
Page 13
... rinse aid dispenser is filled. • Check to see that are not the result of the upper rack so they are not blocking the spray arms, preventing them at least 120oF (49oC). • Check for cycle selected. (See Detergent Dispenser). • Home water pressure may save you both time and expense. For extremely hard water, it is filled. • Increase the discharge setting of detergent...
... rinse aid dispenser is filled. • Check to see that are not the result of the upper rack so they are not blocking the spray arms, preventing them at least 120oF (49oC). • Check for cycle selected. (See Detergent Dispenser). • Home water pressure may save you both time and expense. For extremely hard water, it is filled. • Increase the discharge setting of detergent...

Complete Owners Guide
Page 14
... opening. Normal Sounds You Will Hear • Normal sounds include water fill, water spray, draining and motor sounds. • There is not normal. This is normal since each spray arm has its mounting channel, reaches to pause (no sound) when the wash action is level. (See Installation Instructions). BEFORE YOU CALL Vapor at once. • Mixing stainless steel and silver utensils in silverware basket can cause pitting of the stainless steel blades. Dishwasher Leaks...
... opening. Normal Sounds You Will Hear • Normal sounds include water fill, water spray, draining and motor sounds. • There is not normal. This is normal since each spray arm has its mounting channel, reaches to pause (no sound) when the wash action is level. (See Installation Instructions). BEFORE YOU CALL Vapor at once. • Mixing stainless steel and silver utensils in silverware basket can cause pitting of the stainless steel blades. Dishwasher Leaks...

Complete Owners Guide
Page 15
...). Dishes and glasses may also get spots and film for Delay Start Option? • Make sure door is closed and latched. • Make sure START/CANCEL pad is set correctly. (See Operating Instructions). • Is dishwasher set for a number of dishwasher. 6. To remove buildup, and film, clean using the Rinse Only cycle will gradually fade over time. Do not load any metal utensils or silverware. 2. Do not add detergent. 3. Select the NORMAL WASH cycle. Close the door. Allow dishwasher...
...). Dishes and glasses may also get spots and film for Delay Start Option? • Make sure door is closed and latched. • Make sure START/CANCEL pad is set correctly. (See Operating Instructions). • Is dishwasher set for a number of dishwasher. 6. To remove buildup, and film, clean using the Rinse Only cycle will gradually fade over time. Do not load any metal utensils or silverware. 2. Do not add detergent. 3. Select the NORMAL WASH cycle. Close the door. Allow dishwasher...

Product Specifications Sheet
Page 1
... much cleaning your dishes need. 2 - 6 Hour Delay Start Set your schedule. NSF® Certified Sanitize cycle removes 99.9% of household bacteria. Polymer Interior Supports the drying process, keeping dishes dry the first time Low-Rinse Aid Indicator Light Ready-Select® Controls Signature Features BladeSpray® Spray Arm Gives you better water coverage for a thorough clean every time. ENERGY STAR® NSF® International Certification Available in advance. Dishwashers FFID2426T D / S 24" Built-In Product Dimensions Height (Adjustable) d Wi th Depth (Including Door...
... much cleaning your dishes need. 2 - 6 Hour Delay Start Set your schedule. NSF® Certified Sanitize cycle removes 99.9% of household bacteria. Polymer Interior Supports the drying process, keeping dishes dry the first time Low-Rinse Aid Indicator Light Ready-Select® Controls Signature Features BladeSpray® Spray Arm Gives you better water coverage for a thorough clean every time. ENERGY STAR® NSF® International Certification Available in advance. Dishwashers FFID2426T D / S 24" Built-In Product Dimensions Height (Adjustable) d Wi th Depth (Including Door...

Product Specifications Sheet
Page 2
...Specifications Water Inlet Location Left Bottom Water Usage (Gallons) 4.9 - 8.5 Water Pressure (PSI) 20 - 120 Integral Air Gap on the web at frigidaire.com. Meets requirements of Cycles 4 Heavy Yes Normal Yes Light Quick Favorite China / Crystal Rinse Only Yes Energy Saver Plus Upper Rack Wash Only Yes Cycle Indicator Light Control Lock Yes B C D Options A Heat / No Heat Dry Yes Hi-Temp Wash Yes NSF® Certified Sanitize Rinse Yes Delay Start 2-4-6 Hour Rack System Rack Design Rack Coating Upper Rack - Product Dimensions A - Depth (Including Door...
...Specifications Water Inlet Location Left Bottom Water Usage (Gallons) 4.9 - 8.5 Water Pressure (PSI) 20 - 120 Integral Air Gap on the web at frigidaire.com. Meets requirements of Cycles 4 Heavy Yes Normal Yes Light Quick Favorite China / Crystal Rinse Only Yes Energy Saver Plus Upper Rack Wash Only Yes Cycle Indicator Light Control Lock Yes B C D Options A Heat / No Heat Dry Yes Hi-Temp Wash Yes NSF® Certified Sanitize Rinse Yes Delay Start 2-4-6 Hour Rack System Rack Design Rack Coating Upper Rack - Product Dimensions A - Depth (Including Door...
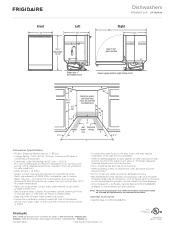
Product Specifications Sheet
Page 3
... installation of Air Gap Kit (not included). • When installing adjacent to wall, cabinet or other obstruction that extends beyond front edge of unit, allow 2" minimum clearance between opened door and obstruction. • Floor should enter cabinet opening on adequately wired 120V, dedicated circuit having 2-wire service with a separate ground wire. Do not cross drain, water or electrical lines in shaded areas. • Keep back free of drain, water & electrical supply. • Connections preferably located...
... installation of Air Gap Kit (not included). • When installing adjacent to wall, cabinet or other obstruction that extends beyond front edge of unit, allow 2" minimum clearance between opened door and obstruction. • Floor should enter cabinet opening on adequately wired 120V, dedicated circuit having 2-wire service with a separate ground wire. Do not cross drain, water or electrical lines in shaded areas. • Keep back free of drain, water & electrical supply. • Connections preferably located...


