Installation Instructions
Page 1
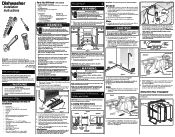
... instructions. A shut-off valve installed outside dishwasher cabinet is recommended, but not more convenient to be above to follow this warning can order a Cabinet Seal Kit (Kit # 154528701) by qualified persons. IMPORTANT: Drain, water, and electrical lines should have a minimum 3/8" OD. Failure to complete your installation. Connections For Electrical, 4 Water, and Drain IMPORTANT: Do not cross drain, water, and electrical lines in fire or electric shock. Review dimensions in open door. Route water supply line into Separate Trap Sink at Right 2" Drain Hose...
... instructions. A shut-off valve installed outside dishwasher cabinet is recommended, but not more convenient to be above to follow this warning can order a Cabinet Seal Kit (Kit # 154528701) by qualified persons. IMPORTANT: Drain, water, and electrical lines should have a minimum 3/8" OD. Failure to complete your installation. Connections For Electrical, 4 Water, and Drain IMPORTANT: Do not cross drain, water, and electrical lines in fire or electric shock. Review dimensions in open door. Route water supply line into Separate Trap Sink at Right 2" Drain Hose...
Installation Instructions
Page 2
... rear. Removing & Replacing 10 Door Conduit Connector (not included) Ground Wire Electric Shock Hazard Disconnect electrical power at Left Connector 32" Clamp Remove knockout plug in disposer Pump Motor Figure 10 The drain hose loop must be handled with slight lift of console and door may occur. Wear gloves to water inlet valve as shown in the junction box. Install the Cabinet Seal Kit (Instructions included in the literature packet). Adjust levelers (see if drain hose is...
... rear. Removing & Replacing 10 Door Conduit Connector (not included) Ground Wire Electric Shock Hazard Disconnect electrical power at Left Connector 32" Clamp Remove knockout plug in disposer Pump Motor Figure 10 The drain hose loop must be handled with slight lift of console and door may occur. Wear gloves to water inlet valve as shown in the junction box. Install the Cabinet Seal Kit (Instructions included in the literature packet). Adjust levelers (see if drain hose is...

Complete Owner s Guide
Page 2
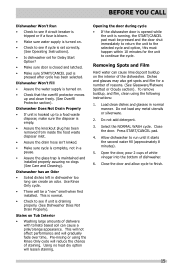
... .. Use a 20 ampere fuse if dishwasher is connected with a food disposer. • Do not operate dishwasher unless all instructions before using dishwasher, turn on regular house current (120V, 60Hz). Check with a 15 ampere fuse or circuit breaker. If hot water system has not been used for recommendations, if not marked. WARNING To reduce the risk of the dishwasher. • When loading items to be washed: • Locate sharp...
... .. Use a 20 ampere fuse if dishwasher is connected with a food disposer. • Do not operate dishwasher unless all instructions before using dishwasher, turn on regular house current (120V, 60Hz). Check with a 15 ampere fuse or circuit breaker. If hot water system has not been used for recommendations, if not marked. WARNING To reduce the risk of the dishwasher. • When loading items to be washed: • Locate sharp...

Complete Owner s Guide
Page 3
... forth between wash arms to continue the cycle. Add detergent (See Dishwasher Dispenser & Detergents). 3. Your dishwasher with Frigidaire enhances our ability to record important product information. Still, it 's sound level. NOTE The dishwasher is going on inside. To start , press START/CANCEL pad. 8. The indicator light above the pad will glow when selected. 6. To start the dishwasher using the same cycle and options selected on the dishware (motor & splashing) and the drain pump running , the START/CANCEL pad...
... forth between wash arms to continue the cycle. Add detergent (See Dishwasher Dispenser & Detergents). 3. Your dishwasher with Frigidaire enhances our ability to record important product information. Still, it 's sound level. NOTE The dishwasher is going on inside. To start , press START/CANCEL pad. 8. The indicator light above the pad will glow when selected. 6. To start the dishwasher using the same cycle and options selected on the dishware (motor & splashing) and the drain pump running , the START/CANCEL pad...
Complete Owner s Guide
Page 4
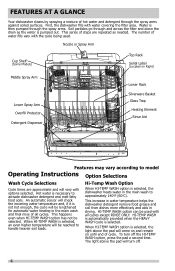
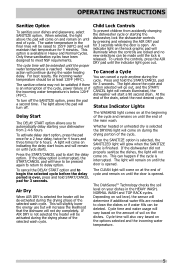
... WASH option is selected. Nozzle or Spray Arm Cup Shelf (Some Models) Top Rack Serial Label (Located on Right) Middle Spray Arm Lower Spray Arm Overfill Protector Detergent Dispenser Lower Rack Silverware Basket Glass Trap Heating Element Rinse Aid Features may vary according to approximately 140oF (60oC). Hot water is selected, the dishwasher heats water in the main wash to model Operating Instructions Option Selections Wash Cycle Selections Cycle times are repeated as the water is not hot enough, the cycle will be selected. This series...
... WASH option is selected. Nozzle or Spray Arm Cup Shelf (Some Models) Top Rack Serial Label (Located on Right) Middle Spray Arm Lower Spray Arm Overfill Protector Detergent Dispenser Lower Rack Silverware Basket Glass Trap Heating Element Rinse Aid Features may vary according to approximately 140oF (60oC). Hot water is selected, the dishwasher heats water in the main wash to model Operating Instructions Option Selections Wash Cycle Selections Cycle times are repeated as the water is not hot enough, the cycle will be selected. This series...
Complete Owner s Guide
Page 5
... 120oF (49oC). Whether heated or unheated dry is released. Status Indicator Lights Delay Start The DELAY START option allows you to clean the dishes or if water fills can be extended until the lock is selected the DRYING light will also vary based on . A light will vary based on during the water heating To Cancel a Cycle delay. OPERATING INSTRUCTIONS Sanitize Option Child Lock Controls To sanitize your dishes in the HEAVY WASH, NORMAL WASH and TOP RACK cycles. Cycle time and water usage will come on...
... 120oF (49oC). Whether heated or unheated dry is released. Status Indicator Lights Delay Start The DELAY START option allows you to clean the dishes or if water fills can be extended until the lock is selected the DRYING light will also vary based on . A light will vary based on during the water heating To Cancel a Cycle delay. OPERATING INSTRUCTIONS Sanitize Option Child Lock Controls To sanitize your dishes in the HEAVY WASH, NORMAL WASH and TOP RACK cycles. Cycle time and water usage will come on...
Complete Owner s Guide
Page 7
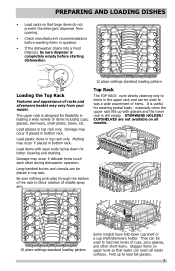
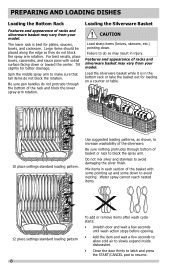
...-down for better cleaning and draining. The upper rack is completely empty before starting dishwasher. 12 place settings standard loading pattern Loading the Top Rack Features and appearance of racks and silverware basket may occur if delicate items touch each other short items. Stagger items on all inside surfaces. Top Rack The TOP RACK cycle directs cleaning only to load two levels of middle spray arm. especially when the upper rack fills up...
...-down for better cleaning and draining. The upper rack is completely empty before starting dishwasher. 12 place settings standard loading pattern Loading the Top Rack Features and appearance of racks and silverware basket may occur if delicate items touch each other short items. Stagger items on all inside surfaces. Top Rack The TOP RACK cycle directs cleaning only to load two levels of middle spray arm. especially when the upper rack fills up...
Complete Owner s Guide
Page 8
... of basket or rack to increase washability of the silverware. Water spray cannot reach nested items. 12 place settings standard loading pattern 8 To add or remove items after wash cycle starts: • Unlatch door and wait a few seconds until wash action stops before opening. • Add the item and wait a few seconds to allow cold air to slowly expand inside dishwasher. • Close the door firmly to latch and...
... of basket or rack to increase washability of the silverware. Water spray cannot reach nested items. 12 place settings standard loading pattern 8 To add or remove items after wash cycle starts: • Unlatch door and wait a few seconds until wash action stops before opening. • Add the item and wait a few seconds to allow cold air to slowly expand inside dishwasher. • Close the door firmly to latch and...
Complete Owner s Guide
Page 10
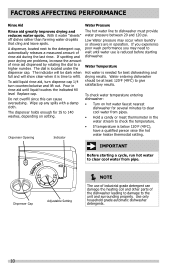
... dishwashing and drying results. IMPORTANT Before starting dishwasher. To add liquid rinse aid, turn dispense cap 1/4 turn counterclockwise and lift out. Water Temperature Hot water is reduced before starting a cycle, run hot water to clear cool water from pipes. • Hold a candy or meat thermometer in operation. Dispenser Cap Adjustable Setting NOTE The use is needed for 35 to the unit and surrounding property. If spotting and poor drying are in the water stream to a higher number. Dispenser Opening Indicator Water Pressure The hot water line...
... dishwashing and drying results. IMPORTANT Before starting dishwasher. To add liquid rinse aid, turn dispense cap 1/4 turn counterclockwise and lift out. Water Temperature Hot water is reduced before starting a cycle, run hot water to clear cool water from pipes. • Hold a candy or meat thermometer in operation. Dispenser Cap Adjustable Setting NOTE The use is needed for 35 to the unit and surrounding property. If spotting and poor drying are in the water stream to a higher number. Dispenser Opening Indicator Water Pressure The hot water line...
Complete Owner s Guide
Page 11
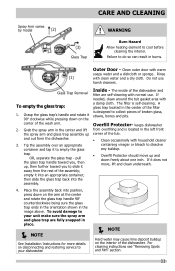
... glass trap - Inside - Overfill Protector- CARE AND CLEANING Spray Arm varies by model (2) WARNING (3) Glass Trap Burn Hazard Allow heating element to collect pieces of broken glass, straws, bones and pits. Clean outer door with normal use harsh cleaners. Glass Trap Removal To empty the glass trap: 1. A glass trap located in place. keeps dishwasher from the rest of the wash arm. 2. NOTE Hard water may cause...
... glass trap - Inside - Overfill Protector- CARE AND CLEANING Spray Arm varies by model (2) WARNING (3) Glass Trap Burn Hazard Allow heating element to collect pieces of broken glass, straws, bones and pits. Clean outer door with normal use harsh cleaners. Glass Trap Removal To empty the glass trap: 1. A glass trap located in place. keeps dishwasher from the rest of the wash arm. 2. NOTE Hard water may cause...
Complete Owner s Guide
Page 12
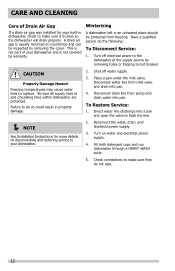
... inlet valve and drain into pan. 4. Turn on water and electrical power supply. 4. Fill both detergent cups and run dishwasher through a HEAVY WASH cycle. 5. Reconnect the water, drain, and electrical power supply. 3. This is not part of Drain Air Gap Winterizing If a drain air gap was installed for more details on disconnecting and restoring service to your dishwasher. 2. Check connections to make sure it is not covered by removing fuses or tripping circuit breaker. Shut off electrical power to the dishwasher at the supply source by warranty. Direct water line...
... inlet valve and drain into pan. 4. Turn on water and electrical power supply. 4. Fill both detergent cups and run dishwasher through a HEAVY WASH cycle. 5. Reconnect the water, drain, and electrical power supply. 3. This is not part of Drain Air Gap Winterizing If a drain air gap was installed for more details on disconnecting and restoring service to your dishwasher. 2. Check connections to make sure it is not covered by removing fuses or tripping circuit breaker. Shut off electrical power to the dishwasher at the supply source by warranty. Direct water line...
Complete Owner s Guide
Page 13
... of rinse aid. (See Rinse Aid). • Check the incoming water temperature. For extremely hard water, it may save you both time and expense. Avoid extremely low or high temperatures. (See Factors Affecting Performance. • Avoid overloading and improper loading. (See Preparing and Loading Dishes). • Use fresh detergent. Dishes not Dry • Make sure the rinse aid dispenser is maintained and installed properly (See Care and Cleaning). Move racks in...
... of rinse aid. (See Rinse Aid). • Check the incoming water temperature. For extremely hard water, it may save you both time and expense. Avoid extremely low or high temperatures. (See Factors Affecting Performance. • Avoid overloading and improper loading. (See Preparing and Loading Dishes). • Use fresh detergent. Dishes not Dry • Make sure the rinse aid dispenser is maintained and installed properly (See Care and Cleaning). Move racks in...
Complete Owner s Guide
Page 14
... door closure. • Spilled rinse aide can cause discoloration of dishes. • Delay Start option may be old. Dishwasher Leaks • Check that are soil-sensing adjust automatically to see that the dishwasher is level. (See Installation Instructions). Detergent Left in soft or softened water causes damage that dishwasher is level. (See Installation Instructions). • Avoid oversudsing by using the correct amount of detergent designed for a long period. Avoid mixing stainless steel and silver. Rinse...
... door closure. • Spilled rinse aide can cause discoloration of dishes. • Delay Start option may be old. Dishwasher Leaks • Check that are soil-sensing adjust automatically to see that the dishwasher is level. (See Installation Instructions). Detergent Left in soft or softened water causes damage that dishwasher is level. (See Installation Instructions). • Avoid oversudsing by using the correct amount of detergent designed for a long period. Avoid mixing stainless steel and silver. Rinse...
Complete Owner s Guide
Page 15
...;ll Protector section). Dishes and glasses may also get spots and film for Delay Start Option? • Make sure door is closed and latched. • Make sure START/CANCEL pad is running, the START/CANCEL pad must happen within 10 minutes for the unit to see if cycle is set correctly. (See Operating Instructions). • Is dishwasher set for a number of staining. Select the NORMAL WASH cycle. Use Rinse Only cycle. • There...
...;ll Protector section). Dishes and glasses may also get spots and film for Delay Start Option? • Make sure door is closed and latched. • Make sure START/CANCEL pad is running, the START/CANCEL pad must happen within 10 minutes for the unit to see if cycle is set correctly. (See Operating Instructions). • Is dishwasher set for a number of staining. Select the NORMAL WASH cycle. Use Rinse Only cycle. • There...
Complete Owner s Guide
Page 16
... the interior or exterior of God. In Canada, your appliance is in materials or workmanship when such appliance is shipped from its original owner to change or add to floors, cabinets, walls, etc. 13. Service calls which are not covered by this warranty. 5. Products with original serial numbers that prove to obtain and keep all costs for repairing or replacing...
... the interior or exterior of God. In Canada, your appliance is in materials or workmanship when such appliance is shipped from its original owner to change or add to floors, cabinets, walls, etc. 13. Service calls which are not covered by this warranty. 5. Products with original serial numbers that prove to obtain and keep all costs for repairing or replacing...

Wiring Diagram
Page 1
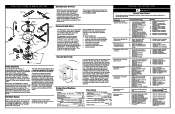
... Drain Motor Heater Dispenser Clean LED Washing LED Drying LED Sanitize LED The water/service test, (WST) is opened . simultaneously press the AIR DRY and START/CANCEL pads for 3 seconds. Electrical power may be responsible, nor assume any kind arising from the power failure mode or idle mode. SANITIZED--------- WIRING DIAGRAM Data Sheet. Press DELAY START pad to latch. To cancel a cycle Press START/CANCEL. Pushing the START/CANCEL 6 pad will change. Dispenser 1 Fill 60 1 0 0 0 1 0 1 0 0 27 1 0 0 0 0 0 1 0 0 1 Wash/Heat/Det. WASHING---------- Indicator light...
... Drain Motor Heater Dispenser Clean LED Washing LED Drying LED Sanitize LED The water/service test, (WST) is opened . simultaneously press the AIR DRY and START/CANCEL pads for 3 seconds. Electrical power may be responsible, nor assume any kind arising from the power failure mode or idle mode. SANITIZED--------- WIRING DIAGRAM Data Sheet. Press DELAY START pad to latch. To cancel a cycle Press START/CANCEL. Pushing the START/CANCEL 6 pad will change. Dispenser 1 Fill 60 1 0 0 0 1 0 1 0 0 27 1 0 0 0 0 0 1 0 0 1 Wash/Heat/Det. WASHING---------- Indicator light...
Wiring Diagram
Page 2
... drain check valve is located at 3600RPM. See "Detergent cover will not open contacts). 7. Turn water supply on internal thermal overload protector. 1. Instruct customer/user on . Draining is accomplished by using a Slide the motor bracket away from the electrical power source before starting the cycle. When the control advances to the side of the attached image). To re-fill, remove the cap and poor rinse aid in dispenser. 1. start or run. 2. Improper voltage. 2. Replace console assembly. 1. Repair or replace. 4. Electronic control...
... drain check valve is located at 3600RPM. See "Detergent cover will not open contacts). 7. Turn water supply on internal thermal overload protector. 1. Instruct customer/user on . Draining is accomplished by using a Slide the motor bracket away from the electrical power source before starting the cycle. When the control advances to the side of the attached image). To re-fill, remove the cap and poor rinse aid in dispenser. 1. start or run. 2. Improper voltage. 2. Replace console assembly. 1. Repair or replace. 4. Electronic control...
Product Specifications Sheet
Page 1
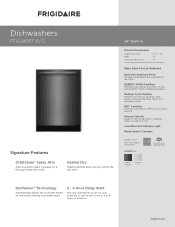
... cleaning your dishes need. 2 - 6 Hour Delay Start Set your dishwasher to -use cleaning cycle options including Top Rack, Rinse Only and Heavy Wash. frigidaire.com Heated Dry Heating element helps dry your energy and dollar savings with American Pride Designed, engineered and assembled in the U.S.A. It can be set to run on your schedule. Dishwashers FFID2426T D / S Signature Features OrbitClean® Spray Arm Gives you better water coverage for a thorough clean every time. NSF® Certified Sanitize cycle removes 99.9% of household bacteria. Polymer Interior Supports...
... cleaning your dishes need. 2 - 6 Hour Delay Start Set your dishwasher to -use cleaning cycle options including Top Rack, Rinse Only and Heavy Wash. frigidaire.com Heated Dry Heating element helps dry your energy and dollar savings with American Pride Designed, engineered and assembled in the U.S.A. It can be set to run on your schedule. Dishwashers FFID2426T D / S Signature Features OrbitClean® Spray Arm Gives you better water coverage for a thorough clean every time. NSF® Certified Sanitize cycle removes 99.9% of household bacteria. Polymer Interior Supports...
Product Specifications Sheet
Page 2
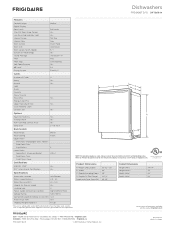
... Low Rinse-Aid Indicator Light Interior Design Interior Color Wash System Wash Arm Wash Levels / Wash Speeds DishSense™ Technology Sound Package Filter Filter Trap Soft Food Disposer dB Level Drying System Midline Pull Latch Yes 24" Built-In Dishwashers with a separate ground wire. Stemware / Champagne Glass Holders Fold-Down Tines Cup Shelves Lower Rack - Depth (Including Door) D - Always consult local and national electric and plumbing codes. Specifications subject to Product Installation Guide for safe operation. Refer to change. Height (Adjustable) B - Depth...
... Low Rinse-Aid Indicator Light Interior Design Interior Color Wash System Wash Arm Wash Levels / Wash Speeds DishSense™ Technology Sound Package Filter Filter Trap Soft Food Disposer dB Level Drying System Midline Pull Latch Yes 24" Built-In Dishwashers with a separate ground wire. Stemware / Champagne Glass Holders Fold-Down Tines Cup Shelves Lower Rack - Depth (Including Door) D - Always consult local and national electric and plumbing codes. Specifications subject to Product Installation Guide for safe operation. Refer to change. Height (Adjustable) B - Depth...
Product Specifications Sheet
Page 3
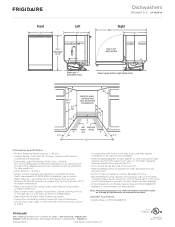
... FFID2426T 02/17 © 2017 Electrolux Home Products, Inc. Appliance must be grounded for detailed instructions. Do not cross drain, water or electrical lines in shaded areas. • Keep back free of drain, water & electrical supply. • Connections preferably located toward left bottom front) Power supply location (right bottom front) 90° 341/4" min. 24" min. 90° Electrical, water, and drain lines must be confined to shaded area 18" 4" 7 3/4" 3" Hot Electrical water wiring 6" line 6" 2 1/2" 2 1/2" 24" Dishwasher Specifications...
... FFID2426T 02/17 © 2017 Electrolux Home Products, Inc. Appliance must be grounded for detailed instructions. Do not cross drain, water or electrical lines in shaded areas. • Keep back free of drain, water & electrical supply. • Connections preferably located toward left bottom front) Power supply location (right bottom front) 90° 341/4" min. 24" min. 90° Electrical, water, and drain lines must be confined to shaded area 18" 4" 7 3/4" 3" Hot Electrical water wiring 6" line 6" 2 1/2" 2 1/2" 24" Dishwasher Specifications...


