

Installation Instructions (All Languages)
Page 1
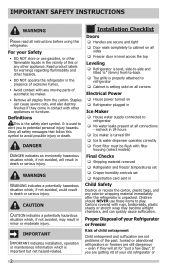
.... 9 Open water supply shut-off valve and tighten any connections that you reattach water and power connectors at any of the installation tasks are bind-free with the installation of your refrigerator as a possible customer option. Pull toe grille outward toward your body and off . • After ensuring no water leaks exist at the door hinges? (See the Use & Care Guide for detailed instructions on removing and replacing doors.) • Is the ice maker power switch turned On? Slide left...
.... 9 Open water supply shut-off valve and tighten any connections that you reattach water and power connectors at any of the installation tasks are bind-free with the installation of your refrigerator as a possible customer option. Pull toe grille outward toward your body and off . • After ensuring no water leaks exist at the door hinges? (See the Use & Care Guide for detailed instructions on removing and replacing doors.) • Is the ice maker power switch turned On? Slide left...
Complete Owner s Guide
Page 2
... refrigerator is setting solid on all corners Electrical Power House power turned on Refrigerator plugged in Ice Maker House water supply connected to refrigerator No water leaks present at all safety messages that follow this symbol to potential personal injury hazards. CAUTION CAUTION indicates a potentially hazardous situation which , if not avoided, could result in the vicinity of the past. Junked or abandoned refrigerators or freezers...
... refrigerator is setting solid on all corners Electrical Power House power turned on Refrigerator plugged in Ice Maker House water supply connected to refrigerator No water leaks present at all safety messages that follow this symbol to potential personal injury hazards. CAUTION CAUTION indicates a potentially hazardous situation which , if not avoided, could result in the vicinity of the past. Junked or abandoned refrigerators or freezers...
Complete Owner s Guide
Page 3
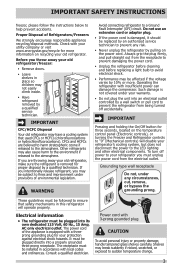
..., 60 Hz., 15 Amp, AC only electrical outlet. Check with local codes and ordinances. To turn off accidentally. Electrical information • The refrigerator must be affected if the voltage varies by an authorized service technician to sudden temperature change. 3 Before you must be plugged directly into an electrical outlet controlled by pulling on the temperature control panel (Electronic controls), or turning the Freezer and Refrigerator controls to the atmosphere. If...
..., 60 Hz., 15 Amp, AC only electrical outlet. Check with local codes and ordinances. To turn off accidentally. Electrical information • The refrigerator must be affected if the voltage varies by an authorized service technician to sudden temperature change. 3 Before you must be plugged directly into an electrical outlet controlled by pulling on the temperature control panel (Electronic controls), or turning the Freezer and Refrigerator controls to the atmosphere. If...
Complete Owner s Guide
Page 5
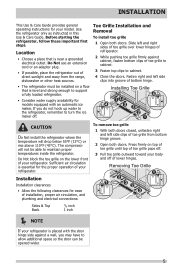
... toward your refrigerator. Location • Choose a place that is essential for ease of installation, proper air circulation, and plumbing and electrical connections: To remove toe grille 1 With both doors. Slide left side clips of toe grille from the range, dishwasher or other heat sources. Before starting the refrigerator, follow these important first steps. INSTALLATION This Use & Care Guide provides general operating instructions for models equipped with the door hinge side...
... toward your refrigerator. Location • Choose a place that is essential for ease of installation, proper air circulation, and plumbing and electrical connections: To remove toe grille 1 With both doors. Slide left side clips of toe grille from the range, dishwasher or other heat sources. Before starting the refrigerator, follow these important first steps. INSTALLATION This Use & Care Guide provides general operating instructions for models equipped with the door hinge side...
Complete Owner s Guide
Page 6
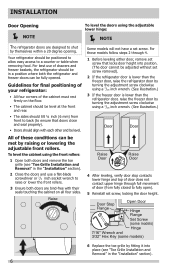
... that locks door height into place (see "Toe Grille Installation and Removal" in the "Installation" section). 6 Door Stop Flange Open Door Hinge Flange Set Screw (some models) Hinge 7/16" Wrench and 3/32" Hex Key (some models) 6 Replace the toe grille by raising or lowering the adjustable front rollers. INSTALLATION Door Opening NOTE To level the doors using the adjustable lower hinge: NOTE The refrigerator doors are bind-free with each other and be level. Guidelines for...
... that locks door height into place (see "Toe Grille Installation and Removal" in the "Installation" section). 6 Door Stop Flange Open Door Hinge Flange Set Screw (some models) Hinge 7/16" Wrench and 3/32" Hex Key (some models) 6 Replace the toe grille by raising or lowering the adjustable front rollers. INSTALLATION Door Opening NOTE To level the doors using the adjustable lower hinge: NOTE The refrigerator doors are bind-free with each other and be level. Guidelines for...
Complete Owner s Guide
Page 7
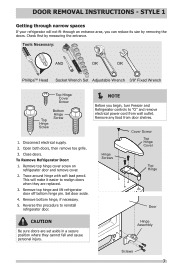
... 1 Getting through narrow spaces If your refrigerator will make it easier to "O" and remove electrical power cord from door shelves. Trace around hinge with soft lead pencil. Set door aside. 4. Disconnect electrical supply. 2. Remove top hinge and lift refrigerator door off bottom hinge pin. Reverse this procedure to reinstall refrigerator door. NOTE Before you can reduce its size by measuring the entrance. Check first by removing the doors. To Remove Refrigerator Door: 1. Hinge Screws Cover Screw Top Hinge Cover Top Hinge Door...
... 1 Getting through narrow spaces If your refrigerator will make it easier to "O" and remove electrical power cord from door shelves. Trace around hinge with soft lead pencil. Set door aside. 4. Disconnect electrical supply. 2. Remove top hinge and lift refrigerator door off bottom hinge pin. Reverse this procedure to reinstall refrigerator door. NOTE Before you can reduce its size by measuring the entrance. Check first by removing the doors. To Remove Refrigerator Door: 1. Hinge Screws Cover Screw Top Hinge Cover Top Hinge Door...
Complete Owner s Guide
Page 13
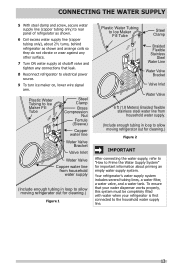
... dispenser works properly, this system must be completely filled with water when your refrigerator is first connected to electrical power source. 9 To turn ice maker on, lower wire signal arm. Your refrigerator's water supply system includes several tubing lines, a water filter, a water valve, and a water tank. Plastic Water Tubing to Ice Maker Fill Tube Steel Clamp Brass Compression Nut Ferrule (Sleeve) Copper water line Water Valve Bracket Valve Inlet Water Valve Copper water line from household water supply (Include enough tubing in loop to allow moving refrigerator out for cleaning...
... dispenser works properly, this system must be completely filled with water when your refrigerator is first connected to electrical power source. 9 To turn ice maker on, lower wire signal arm. Your refrigerator's water supply system includes several tubing lines, a water filter, a water valve, and a water tank. Plastic Water Tubing to Ice Maker Fill Tube Steel Clamp Brass Compression Nut Ferrule (Sleeve) Copper water line Water Valve Bracket Valve Inlet Water Valve Copper water line from household water supply (Include enough tubing in loop to allow moving refrigerator out for cleaning...
Complete Owner s Guide
Page 18
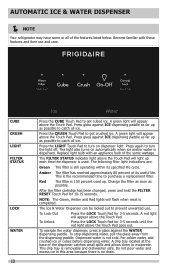
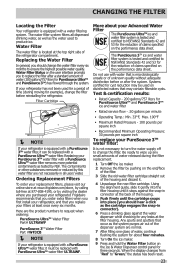
... filter cartridge has been changed, press and hold the FILTER RESET Touch Pad for 3-5 seconds. Dispensed water is no drain. Do not pour water and excess ice in this area because there is not cold. Press the CRUSH Touch Pad to catch all ice. This is dispensed. The following filter light indications are: Green The filter is still operating within its useful life. A drip tray located at the base of the features listed...
... filter cartridge has been changed, press and hold the FILTER RESET Touch Pad for 3-5 seconds. Dispensed water is no drain. Do not pour water and excess ice in this area because there is not cold. Press the CRUSH Touch Pad to catch all ice. This is dispensed. The following filter light indications are: Green The filter is still operating within its useful life. A drip tray located at the base of the features listed...
Complete Owner s Guide
Page 20
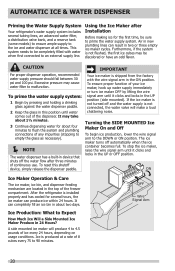
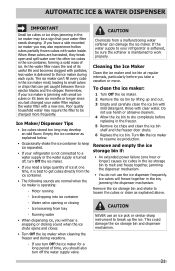
... to flush the system and plumbing connections of any impurities (stopping to empty the glass as necessary). NOTE The water dispenser has a built-in device that shuts off the water flow after Installation Before making ice for several tubing lines, an advanced water filter, a distribution valve bank, and a reserve tank (some models) to ensure ample supply to the ice and water dispenser at a rate of 8 cubes every 75 to 90...
... to flush the system and plumbing connections of any impurities (stopping to empty the glass as necessary). NOTE The water dispenser has a built-in device that shuts off the water flow after Installation Before making ice for several tubing lines, an advanced water filter, a distribution valve bank, and a reserve tank (some models) to ensure ample supply to the ice and water dispenser at a rate of 8 cubes every 75 to 90...
Complete Owner s Guide
Page 21
... and clean the ice bin shelf and the freezer door chute. 6 Replace the ice bin. Running water • When dispensing ice, you take a vacation or move. If you turn Off the ice maker for a long period of time, you should also turn off , turn Off the ice maker. • If you need a large quantity of ice. Ice dropping into ice container CAUTION Chemicals from tray CAUTION - Rinse with mild detergent. Remove the ice storage bin and shake to work...
... and clean the ice bin shelf and the freezer door chute. 6 Replace the ice bin. Running water • When dispensing ice, you take a vacation or move. If you turn Off the ice maker for a long period of time, you should also turn off , turn Off the ice maker. • If you need a large quantity of ice. Ice dropping into ice container CAUTION Chemicals from tray CAUTION - Rinse with mild detergent. Remove the ice storage bin and shake to work...
Complete Owner s Guide
Page 23
... used to change the water filter every six months to "Green," the status has been reset. 23 More about four minutes. 8 Turn On the ice maker. 9 Press and hold the Water Filter button on disinfected waters that occur as the cartridge engages the snap-in connector). 6 Press a drinking glass against the snap-in all dispensed drinking water, as well as tested by visiting the dealer where you replace...
... used to change the water filter every six months to "Green," the status has been reset. 23 More about four minutes. 8 Turn On the ice maker. 9 Press and hold the Water Filter button on disinfected waters that occur as the cartridge engages the snap-in connector). 6 Press a drinking glass against the snap-in all dispensed drinking water, as well as tested by visiting the dealer where you replace...

Complete Owner s Guide
Page 26
...of warm water. Rinse well, and wipe dry with a clean soft cloth. • Unplug refrigerator • Wear gloves • Remove light cover • Replace old LED bulb • Replace light cover • Plug in the refrigerator CAUTION: Wear gloves when replacing LED bulbs to clean smooth handles. Be sure to wring excess water out of toe grille. Use same wattage when replacing LED bulb. 26 CARE & CLEANING Part Interior & Door Liners Door Gaskets Drawers & Bins Glass Shelves Toe Grille Exterior & Handles Exterior & Handles (Stainless Steel Models Only) Replacing LED Bulbs Care...
...of warm water. Rinse well, and wipe dry with a clean soft cloth. • Unplug refrigerator • Wear gloves • Remove light cover • Replace old LED bulb • Replace light cover • Plug in the refrigerator CAUTION: Wear gloves when replacing LED bulbs to clean smooth handles. Be sure to wring excess water out of toe grille. Use same wattage when replacing LED bulb. 26 CARE & CLEANING Part Interior & Door Liners Door Gaskets Drawers & Bins Glass Shelves Toe Grille Exterior & Handles Exterior & Handles (Stainless Steel Models Only) Replacing LED Bulbs Care...
Complete Owner s Guide
Page 27
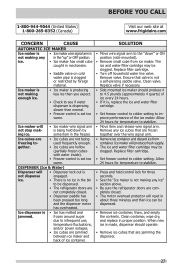
... the dispenser motor has overheated. SOLUTION • Move wire signal arm to be dispensed. • Remove ice container, thaw, and empty the contents. Clean valve. Clean container, wipe dry, and replace in mechanism. Allow 24 hours for three seconds. • See the "Ice maker is not making any ice" section above. • Be sure the refrigerator doors are hollow (partially frozen cubes with water inside). • Freezer control is being freezing...
... the dispenser motor has overheated. SOLUTION • Move wire signal arm to be dispensed. • Remove ice container, thaw, and empty the contents. Clean valve. Clean container, wipe dry, and replace in mechanism. Allow 24 hours for three seconds. • See the "Ice maker is not making any ice" section above. • Be sure the refrigerator doors are hollow (partially frozen cubes with water inside). • Freezer control is being freezing...
Complete Owner s Guide
Page 28
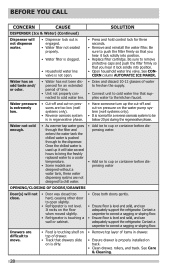
... adequately support the refrigerator. Once the chilled water is used up it lock solidly into position. • Open household water line valve. See Care & Cleaning. 28 Be sure to open . • Press and hold control lock for three seconds. • Remove and reinstall the water filter. Drawers are too low (well systems only). • Reverse osmosis system is in drawer. • Ensure drawer is properly installed on track. • Clean drawer, rollers...
... adequately support the refrigerator. Once the chilled water is used up it lock solidly into position. • Open household water line valve. See Care & Cleaning. 28 Be sure to open . • Press and hold control lock for three seconds. • Remove and reinstall the water filter. Drawers are too low (well systems only). • Reverse osmosis system is in drawer. • Ensure drawer is properly installed on track. • Clean drawer, rollers...
Complete Owner s Guide
Page 29
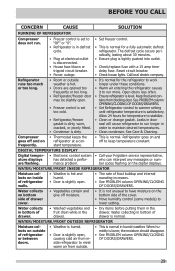
... OPENING/CLOSING OF DOORS/DRAWERS. 29 ber codes flashing on refrigerator at electrical outlet is disconnected. • House fuse blown or tripped circuit breaker. • Power outage. • Set freezer control. • This is normal for the refrigerator to work longer under these conditions. • Warm air entering the refrigerator causes it to keep temperature constant. WATER/MOISTURE/FROST INSIDE REFRIGERATOR Moisture collects on outside . • This is normal. See Care & Cleaning...
... OPENING/CLOSING OF DOORS/DRAWERS. 29 ber codes flashing on refrigerator at electrical outlet is disconnected. • House fuse blown or tripped circuit breaker. • Power outage. • Set freezer control. • This is normal for the refrigerator to work longer under these conditions. • Warm air entering the refrigerator causes it to keep temperature constant. WATER/MOISTURE/FROST INSIDE REFRIGERATOR Moisture collects on outside . • This is normal. See Care & Cleaning...

Complete Owner s Guide
Page 30
... other cosmetic parts. 11. Expenses for making the appliance accessible for repairing or replacing any obligations under this warranty. Products with the provided instructions. Food loss due to establish the warranty period should service be obtained by a one year from its original owner to be defective in materials or workmanship when such appliance is installed, used in accordance with original serial numbers that...
... other cosmetic parts. 11. Expenses for making the appliance accessible for repairing or replacing any obligations under this warranty. Products with the provided instructions. Food loss due to establish the warranty period should service be obtained by a one year from its original owner to be defective in materials or workmanship when such appliance is installed, used in accordance with original serial numbers that...
Wiring Diagram
Page 1
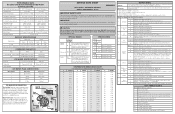
Blue Neutral ICE MAKER INFORMATION Test Cycling: Remove cover by inserting screwdriver in notch at bottom and prying cover from open to close to open . All components of compressor run . One full turn is blank when selecting test. 9 Error History Log A Displays maximum of the damper. --- Disconnect power cord before servicing this test displays "E", and runs the motor C continuously. CAUTION All electrical parts and wiring must be returned to their original position and properly...
Blue Neutral ICE MAKER INFORMATION Test Cycling: Remove cover by inserting screwdriver in notch at bottom and prying cover from open to close to open . All components of compressor run . One full turn is blank when selecting test. 9 Error History Log A Displays maximum of the damper. --- Disconnect power cord before servicing this test displays "E", and runs the motor C continuously. CAUTION All electrical parts and wiring must be returned to their original position and properly...
Wiring Diagram
Page 2
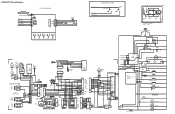
... NC NO RED DISPENSER LED ICE DISP. YELLOW WATER DISPENSER VALVE GREEN I /M WATER VALVE MAIN WATER VALVE DISPENSER WATER VALVE ACTUATOR,ICE DOOR MOTOR,AUGER HEATER,ICE DOOR MID LEVEL LIGHT CRISPER LIGHT RED/BLK PURP/WHITE COMP GRN/YEL LT.BLUE DAMPER SW MOTOR FREEZER LIGHT / SAFETY SWITCH REFRIG. LIGHT REFRIG. SWITCH COMM NO NC LT. MODELS. (LINE) (NEUTRAL) DAMPER ASSEMBLY EVAP. J1-5 J6-1 J6-2 J1-4 CRISP. FAN DEFROST HEATER LT. FAN RED COMPRESSOR CONTROL RELAY SEE COMPRESSOR WIRING B GREEN AUTO ICEMAKER I /M WATER VALVE DIODE DIODE SPLICE...
... NC NO RED DISPENSER LED ICE DISP. YELLOW WATER DISPENSER VALVE GREEN I /M WATER VALVE MAIN WATER VALVE DISPENSER WATER VALVE ACTUATOR,ICE DOOR MOTOR,AUGER HEATER,ICE DOOR MID LEVEL LIGHT CRISPER LIGHT RED/BLK PURP/WHITE COMP GRN/YEL LT.BLUE DAMPER SW MOTOR FREEZER LIGHT / SAFETY SWITCH REFRIG. LIGHT REFRIG. SWITCH COMM NO NC LT. MODELS. (LINE) (NEUTRAL) DAMPER ASSEMBLY EVAP. J1-5 J6-1 J6-2 J1-4 CRISP. FAN DEFROST HEATER LT. FAN RED COMPRESSOR CONTROL RELAY SEE COMPRESSOR WIRING B GREEN AUTO ICEMAKER I /M WATER VALVE DIODE DIODE SPLICE...
Product Specifications Sheet
Page 2
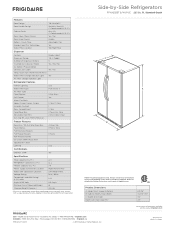
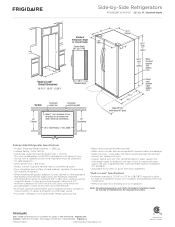
...Door Bins / Tilt-Out Wire Door Bins Fixed Shelves Full Extension Baskets Full Freezer Baskets Half Freezer Baskets Ice Cream Shelf / Pizza Shelf SpaceSaver™ Shelf Lighting Certifications 4 Clear / No 1 Flip / 2 Wire 1 Plastic LED B 28 3/4" Standard Depth Top View Recessed water line Recessed electrical outlet ENERGY STAR® Yes Specifications Total Capacity (Cu. Ft.) 7.9 Power Supply Connection Location Right Bottom Rear Water Inlet Connection Location Left Bottom Rear Voltage Rating 120V / 60Hz Connected Load (kW Rating) @ 120 Volts1 1.02 Amps @ 120 Volts 8.5 Amps...
...Door Bins / Tilt-Out Wire Door Bins Fixed Shelves Full Extension Baskets Full Freezer Baskets Half Freezer Baskets Ice Cream Shelf / Pizza Shelf SpaceSaver™ Shelf Lighting Certifications 4 Clear / No 1 Flip / 2 Wire 1 Plastic LED B 28 3/4" Standard Depth Top View Recessed water line Recessed electrical outlet ENERGY STAR® Yes Specifications Total Capacity (Cu. Ft.) 7.9 Power Supply Connection Location Right Bottom Rear Water Inlet Connection Location Left Bottom Rear Voltage Rating 120V / 60Hz Connected Load (kW Rating) @ 120 Volts1 1.02 Amps @ 120 Volts 8.5 Amps...
Product Specifications Sheet
Page 3
... household water supply line plus 7 additional feet. Specifications subject to Product Installation Guide on adequately wired 120V, dedicated circuit having 2-wire service with doors 90° open) Power cord location (right bottom rear) Side-by -Side Refrigerators FFHX2325T S / M / P / E 22.1 Cu. Counter Depth Counter Depth 23 7/8" A C B "Built-In Look" Cutout Dimensions (A) 70 1/4" (B) 33" (C) 287/8" 28 3/4" Standard Depth Top View Recessed water line Recessed electrical outlet 24" Cabinet Allow 1" min. Refer to change. Side...
... household water supply line plus 7 additional feet. Specifications subject to Product Installation Guide on adequately wired 120V, dedicated circuit having 2-wire service with doors 90° open) Power cord location (right bottom rear) Side-by -Side Refrigerators FFHX2325T S / M / P / E 22.1 Cu. Counter Depth Counter Depth 23 7/8" A C B "Built-In Look" Cutout Dimensions (A) 70 1/4" (B) 33" (C) 287/8" 28 3/4" Standard Depth Top View Recessed water line Recessed electrical outlet 24" Cabinet Allow 1" min. Refer to change. Side...


