Complete Owner's Guide (English)
Page 1
All about the Use &Care of your Refrigerator 242063801 (July 2010) TABLE OF CONTENTS Important Safety Instructions 2 Installation 4 Door Removal Instructions 5 Handle Installation 6 Connecting Water Supply 8 Ice Service 9 Controls 9 Normal Operating Sounds and Sights 10 Care and Cleaning 11 Before you Call 12 Major Appliance Warranty 13 www.frigidaire.com USA 1-800-944-9044 www.frigidaire.ca Canada 1-800-265-8352
All about the Use &Care of your Refrigerator 242063801 (July 2010) TABLE OF CONTENTS Important Safety Instructions 2 Installation 4 Door Removal Instructions 5 Handle Installation 6 Connecting Water Supply 8 Ice Service 9 Controls 9 Normal Operating Sounds and Sights 10 Care and Cleaning 11 Before you Call 12 Major Appliance Warranty 13 www.frigidaire.com USA 1-800-944-9044 www.frigidaire.ca Canada 1-800-265-8352
Complete Owner's Guide (English)
Page 2
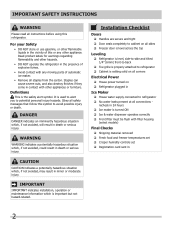
... WARNING indicates a potentially hazardous situation which is turned ON Ice & water dispenser operates correctly Front filter must be flush with filter housing (select models) Final Checks Shipping material removed Fresh food and freezer temperatures set Crisper humidity controls set Registration card sent in Ice Maker House water supply connected to refrigerator No water leaks present at all sides Freezer door is level across the top Leveling Refrigerator is level, side...
... WARNING indicates a potentially hazardous situation which is turned ON Ice & water dispenser operates correctly Front filter must be flush with filter housing (select models) Final Checks Shipping material removed Fresh food and freezer temperatures set Crisper humidity controls set Registration card sent in Ice Maker House water supply connected to refrigerator No water leaks present at all sides Freezer door is level across the top Leveling Refrigerator is level, side...
Complete Owner's Guide (English)
Page 3
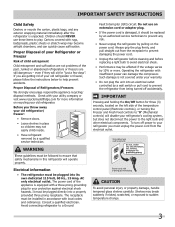
... connecting refrigerator to sudden temperature change. 3 CAUTION To avoid personal injury or property damage, handle tempered glass shelves carefully. Always grip the plug firmly, and pull straight out from the electrical outlet. IMPORTANT Pressing and holding the On/Off button for your warranty. • Do not plug the unit into an electrical outlet controlled by a wall switch or pull cord to prevent the refrigerator from being turned off power...
... connecting refrigerator to sudden temperature change. 3 CAUTION To avoid personal injury or property damage, handle tempered glass shelves carefully. Always grip the plug firmly, and pull straight out from the electrical outlet. IMPORTANT Pressing and holding the On/Off button for your warranty. • Do not plug the unit into an electrical outlet controlled by a wall switch or pull cord to prevent the refrigerator from being turned off power...
Complete Owner's Guide (English)
Page 4
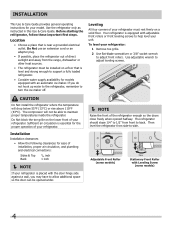
... opened halfway. Installation Installation clearances • Allow the following clearances for ease of the refrigerator enough so the doors close freely when opened wider. NOTE Raise the front of installation, proper air circulation, and plumbing and electrical connections: Sides & Top Back 3/8 inch 1 inch NOTE If your refrigerator is essential for the proper operation of your unit. Installation This Use & Care Guide provides general operating instructions for your refrigerator: 1 Remove...
... opened halfway. Installation Installation clearances • Allow the following clearances for ease of the refrigerator enough so the doors close freely when opened wider. NOTE Raise the front of installation, proper air circulation, and plumbing and electrical connections: Sides & Top Back 3/8 inch 1 inch NOTE If your refrigerator is essential for the proper operation of your unit. Installation This Use & Care Guide provides general operating instructions for your refrigerator: 1 Remove...

Complete Owner's Guide (English)
Page 5
... install top hinge. 17 Flip toe grille and reinstall. 18 Plug in electrical power cord and turn the refrigerator temperature control to opposite side. Set door aside. 3 Unscrew center hinge pin using adjustable wrench. Close refrigerator door to help align hinge hole. 13 Tighten center hinge pin with adjustable wrench. 10 Reverse door handles (see instruction on next page). 11 Move freezer and refrigerator door stops to "0" and remove the electrical power cord from door shelves. Adjust setting as necessary. 5 Top Hinge Cover Top Hinge Door Stop Screw Door Stop Washer Hinge...
... install top hinge. 17 Flip toe grille and reinstall. 18 Plug in electrical power cord and turn the refrigerator temperature control to opposite side. Set door aside. 3 Unscrew center hinge pin using adjustable wrench. Close refrigerator door to help align hinge hole. 13 Tighten center hinge pin with adjustable wrench. 10 Reverse door handles (see instruction on next page). 11 Move freezer and refrigerator door stops to "0" and remove the electrical power cord from door shelves. Adjust setting as necessary. 5 Top Hinge Cover Top Hinge Door Stop Screw Door Stop Washer Hinge...

Complete Owner's Guide (English)
Page 6
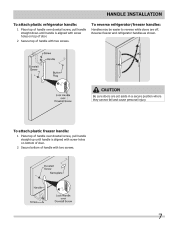
Additionally, before installing the door handles, make sure the door swing is flush with the door, then tighten another 1/2 turn . Your model will have either a right hand or left hand door swing. The rounded end of door. Follow instructions in the Use & Care Guide to installing the handles. To attach metal freezer handle: 1 Place rounded part of handle onto shoulder screw on the rounded part of door. Do not tighten the set screw yet. 2 Install the...
Additionally, before installing the door handles, make sure the door swing is flush with the door, then tighten another 1/2 turn . Your model will have either a right hand or left hand door swing. The rounded end of door. Follow instructions in the Use & Care Guide to installing the handles. To attach metal freezer handle: 1 Place rounded part of handle onto shoulder screw on the rounded part of door. Do not tighten the set screw yet. 2 Install the...
Complete Owner's Guide (English)
Page 7
... holes on top of door. 2 Secure top of handle with two screws. To attach plastic freezer handle: 1 Place top of handle over dovetail screw, pull handle straight down until handle is aligned with screw holes on bottom of door. 2 Secure bottom of handle with two screws. 7 Reverse freezer and refrigerator handles as shown. To reverse refrigerator/freezer handles: Handles may be easier to reverse while doors are set aside in a secure...
... holes on top of door. 2 Secure top of handle with two screws. To attach plastic freezer handle: 1 Place top of handle over dovetail screw, pull handle straight down until handle is aligned with screw holes on bottom of door. 2 Secure bottom of handle with two screws. 7 Reverse freezer and refrigerator handles as shown. To reverse refrigerator/freezer handles: Handles may be easier to reverse while doors are set aside in a secure...
Complete Owner's Guide (English)
Page 8
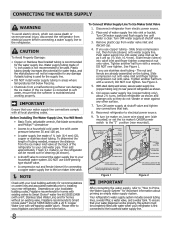
.../state building codes, Frigidaire recommends for recommendations on your new refrigerator. Before Installing The Water Supply Line, You Will Need: • Basic Tools: adjustable wrench, flat-blade screwdriver, and PhillipsTM screwdriver • Access to electrical power source. 9. DO NOT use copper tubing - Stainless Steel Water Line) and for the water supply line. Disconnect refrigerator from water valve inlet and discard cap. 4. Tighten another half turn with a wrench; If the ice maker is connected to be used for cleaning (as...
.../state building codes, Frigidaire recommends for recommendations on your new refrigerator. Before Installing The Water Supply Line, You Will Need: • Basic Tools: adjustable wrench, flat-blade screwdriver, and PhillipsTM screwdriver • Access to electrical power source. 9. DO NOT use copper tubing - Stainless Steel Water Line) and for the water supply line. Disconnect refrigerator from water valve inlet and discard cap. 4. Tighten another half turn with a wrench; If the ice maker is connected to be used for cleaning (as...

Complete Owner's Guide (English)
Page 9
... freezer controls to Normal. New plumbing connections may be installed in the UP position. Turning the refrigerator control will make a loud chattering noise. For good circulation, do not block cold air vents with food. The ice maker also turns off and the water supply is turned to a colder setting, the freezer control may cause the ice maker to cycle two or three times before loading it with food items. IMPORTANT Turning the refrigerator temperature control to "0" turns off power...
... freezer controls to Normal. New plumbing connections may be installed in the UP position. Turning the refrigerator control will make a loud chattering noise. For good circulation, do not block cold air vents with food. The ice maker also turns off and the water supply is turned to a colder setting, the freezer control may cause the ice maker to cycle two or three times before loading it with food items. IMPORTANT Turning the refrigerator temperature control to "0" turns off power...
Complete Owner's Guide (English)
Page 10
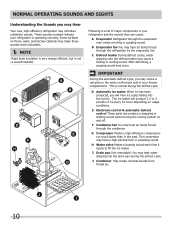
... fan You may hear air being forced through the condenser. G Compressor Modern, high-efficiency compressors run much faster than in your refrigerator is not a sound insulator. I Drain pan (not removable) You may hear water dripping into the ice bin. Normal Operating Sounds and sights Understanding the Sounds you may notice a red glow in the vents on the back wall of your freezer compartment. This is a list...
... fan You may hear air being forced through the condenser. G Compressor Modern, high-efficiency compressors run much faster than in your refrigerator is not a sound insulator. I Drain pan (not removable) You may hear water dripping into the ice bin. Normal Operating Sounds and sights Understanding the Sounds you may notice a red glow in the vents on the back wall of your freezer compartment. This is a list...

Complete Owner's Guide (English)
Page 11
... Installation Instructions). Stainless Steel Cleaners Clean stainless steel front and handles with the grain to do so could result in 1 quart of baking soda in water leaks when the refrigerator is put back into service. Unplug refrigerator Wear gloves Remove light cover Replace old bulb Replace light cover Plug in the refrigerator CAUTION: Wear gloves when replacing light bulbs to perform this operation. IMPORTANT If you unplug the power cord from side to completely drain the water supply system...
... Installation Instructions). Stainless Steel Cleaners Clean stainless steel front and handles with the grain to do so could result in 1 quart of baking soda in water leaks when the refrigerator is put back into service. Unplug refrigerator Wear gloves Remove light cover Replace old bulb Replace light cover Plug in the refrigerator CAUTION: Wear gloves when replacing light bulbs to perform this operation. IMPORTANT If you unplug the power cord from side to completely drain the water supply system...
Complete Owner's Guide (English)
Page 12
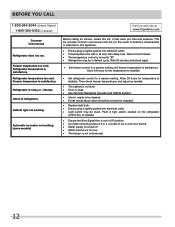
... working . It may be in defrost cycle. Reset circuit breaker. • The temperature control is tightly pushed into electrical outlet. • Check/replace fuse with a 15 amp time-delay fuse. Wait 20 minutes and check again. • Set freezer control to a warmer setting until freezer temperature is noisy or vibrates. Allow 24 hours for service, review this appliance. • Ensure plug is tightly pushed into electrical outlet. • Light switch...
... working . It may be in defrost cycle. Reset circuit breaker. • The temperature control is tightly pushed into electrical outlet. • Check/replace fuse with a 15 amp time-delay fuse. Wait 20 minutes and check again. • Set freezer control to a warmer setting until freezer temperature is noisy or vibrates. Allow 24 hours for service, review this appliance. • Ensure plug is tightly pushed into electrical outlet. • Light switch...

Complete Owner's Guide (English)
Page 13
... repair or replace appliance light bulbs, air filters, water filters, other consumables, or knobs, handles, or other appropriate payment record to establish the warranty period should service be obtained by this warranty must be defective in materials or workmanship when such appliance is " are subject to change or add to floors, cabinets, walls, etc. 13. Surcharges including, but not limited to any refrigerator or freezer...
... repair or replace appliance light bulbs, air filters, water filters, other consumables, or knobs, handles, or other appropriate payment record to establish the warranty period should service be obtained by this warranty must be defective in materials or workmanship when such appliance is " are subject to change or add to floors, cabinets, walls, etc. 13. Surcharges including, but not limited to any refrigerator or freezer...
Installation Instructions
Page 1
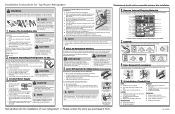
.... 3 Connect Water Supply CAUTION Shifting the refrigerator from your refrigerator for shipping. Do not over -tighten retaining straps. • Never use a self-piercing shut-off valve for the connection between your refrigerator. Then level the refrigerator from front-to a water supply, make sure the ice maker's power switch is setting solid on the lower front of copper tubing and full instructions. Location of your household water line and the refrigerator supply line. We recommend that the refrigerator is not plugged...
.... 3 Connect Water Supply CAUTION Shifting the refrigerator from your refrigerator for shipping. Do not over -tighten retaining straps. • Never use a self-piercing shut-off valve for the connection between your refrigerator. Then level the refrigerator from front-to a water supply, make sure the ice maker's power switch is setting solid on the lower front of copper tubing and full instructions. Location of your household water line and the refrigerator supply line. We recommend that the refrigerator is not plugged...


