
Installation Instructions (All Languages)
Page 1
...of installation, proper air circulation, and plumbing and electrical connections: • Sides & Top..........3/8" • Back 1" NOTE If you are installing your refrigerator beside a wall, leave 1/2" minimum between hinges and wall to allow for the door to swing open. 6 Humidity Control CONTROLS When changing controls,...cabinet only. • Do not run retaining straps over handles. • Do not over-tighten retaining straps. • Never use refrigerator handles to adjust front rollers. recheck in the Use & Care Manual so you understand the sounds you need to remove the doors ...
...of installation, proper air circulation, and plumbing and electrical connections: • Sides & Top..........3/8" • Back 1" NOTE If you are installing your refrigerator beside a wall, leave 1/2" minimum between hinges and wall to allow for the door to swing open. 6 Humidity Control CONTROLS When changing controls,...cabinet only. • Do not run retaining straps over handles. • Do not over-tighten retaining straps. • Never use refrigerator handles to adjust front rollers. recheck in the Use & Care Manual so you understand the sounds you need to remove the doors ...
Use and Care Guide
Page 1
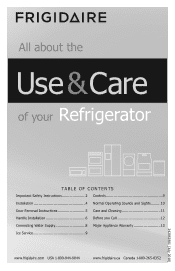
All about the Use &Care of your Refrigerator TABLE OF CONTENTS Important Safety Instructions 2 Controls 9 Installation 4 Normal Operating Sounds and Sights..........10 Door Removal Instructions 5 Care and Cleaning 11 Handle Installation 6 Before you Call 12 Connecting Water Supply 8 Major Appliance Warranty 13 Ice Service 9 www.frigidaire.com USA 1-800-944-9044 www.frigidaire.ca Canada 1-800-265-8352 242063801 (July 2010)
All about the Use &Care of your Refrigerator TABLE OF CONTENTS Important Safety Instructions 2 Controls 9 Installation 4 Normal Operating Sounds and Sights..........10 Door Removal Instructions 5 Care and Cleaning 11 Handle Installation 6 Before you Call 12 Connecting Water Supply 8 Major Appliance Warranty 13 Ice Service 9 www.frigidaire.com USA 1-800-944-9044 www.frigidaire.ca Canada 1-800-265-8352 242063801 (July 2010)
Use and Care Guide
Page 2
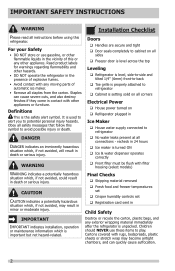
...carton. IMPORTANT SAFETY INSTRUCTIONS WARNING Installation Checklist Please read all instructions before using this or any exterior wrapping material immediately after the refrigerator is turned ON Ice & water dispenser operates correctly Front filter must be flush with other appliances or ...avoid possible injury or death. Doors Handles are secure and tight Door seals completely to cabinet on Refrigerator plugged in 24 hours Ice maker is unpacked. Destroy or recycle the carton, plastic bags, and any other flammable liquids...
...carton. IMPORTANT SAFETY INSTRUCTIONS WARNING Installation Checklist Please read all instructions before using this or any exterior wrapping material immediately after the refrigerator is turned ON Ice & water dispenser operates correctly Front filter must be flush with other appliances or ...avoid possible injury or death. Doors Handles are secure and tight Door seals completely to cabinet on Refrigerator plugged in 24 hours Ice maker is unpacked. Destroy or recycle the carton, plastic bags, and any other flammable liquids...
Use and Care Guide
Page 3
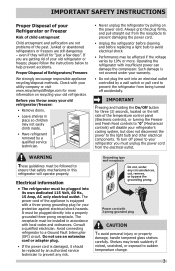
...not use an extension cord or adapter plug. • If the power cord is not covered under any risk. Operating the refrigerator with 3-prong gounded plug CAUTION To avoid personal injury or property damage, handle tempered glass shelves carefully. IMPORTANT Pressing and holding ... AC only electrical outlet. It must unplug the power cord from the receptacle to prevent damaging the power cord. • Unplug the refrigerator before cleaning and before replacing a light bulb to avoid electrical shock. • Performance may break suddenly if nicked, scratched, or exposed ...
...not use an extension cord or adapter plug. • If the power cord is not covered under any risk. Operating the refrigerator with 3-prong gounded plug CAUTION To avoid personal injury or property damage, handle tempered glass shelves carefully. IMPORTANT Pressing and holding ... AC only electrical outlet. It must unplug the power cord from the receptacle to prevent damaging the power cord. • Unplug the refrigerator before cleaning and before replacing a light bulb to avoid electrical shock. • Performance may break suddenly if nicked, scratched, or exposed ...
Use and Care Guide
Page 4
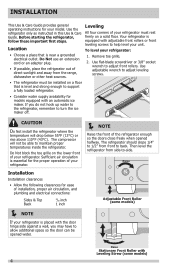
...the toe grille on a floor that is placed with adjustable front rollers or front leveling screws to adjust leveling screws. • The refrigerator must rest firmly on a solid floor. Raise Stationary Front Roller with an automatic ice maker. INSTALLATION This Use & Care Guide provides general...Do Not use an extension cord or an adapter plug. • If possible, place the refrigerator out of your refrigerator: 1. Remove toe grille. 2. CAUTION Do Not install the refrigerator where the temperature will not be installed on the lower front of direct sunlight and away from ...
...the toe grille on a floor that is placed with adjustable front rollers or front leveling screws to adjust leveling screws. • The refrigerator must rest firmly on a solid floor. Raise Stationary Front Roller with an automatic ice maker. INSTALLATION This Use & Care Guide provides general...Do Not use an extension cord or an adapter plug. • If possible, place the refrigerator out of your refrigerator: 1. Remove toe grille. 2. CAUTION Do Not install the refrigerator where the temperature will not be installed on the lower front of direct sunlight and away from ...
Use and Care Guide
Page 5
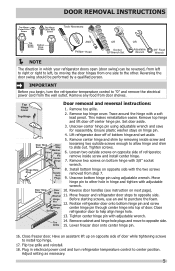
...Stop Screw Door 10. Toe 14. Remove cabinet and hinge hole plugs and move to puncture the foam. IMPORTANT Before you begin, turn refrigerator temperature control to left, by removing inside screw and install center hinge. 7. Install bottom hinge on opposite side with a soft lead pencil...bottom hinge pin using adjustable wrench and save for reassembly. Stop Washer 11. Have an assistant lift up on opposite side of refrigerator, remove inside screw and Door Stop Door Screw Stop Washer Shim Hinge Pin Center Hinge loosening two outside screws on bottom hinge ...
...Stop Screw Door 10. Toe 14. Remove cabinet and hinge hole plugs and move to puncture the foam. IMPORTANT Before you begin, turn refrigerator temperature control to left, by removing inside screw and install center hinge. 7. Install bottom hinge on opposite side with a soft lead pencil...bottom hinge pin using adjustable wrench and save for reassembly. Stop Washer 11. Have an assistant lift up on opposite side of refrigerator, remove inside screw and Door Stop Door Screw Stop Washer Shim Hinge Pin Center Hinge loosening two outside screws on bottom hinge ...
Use and Care Guide
Page 6
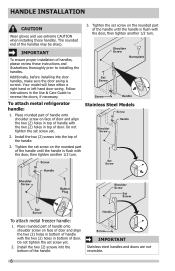
... the two (2) holes in bottom of handle with the two (2) holes in top of door. Shoulder Screw Nameplate Set Screw Screw Handle To attach metal refrigerator handle: 1. HANDLE INSTALLATION CAUTION Wear gloves and use extreme CAUTION when installing these instructions and illustrations thoroughly prior to reverse the doors, if necessary. 3. Install...
... the two (2) holes in bottom of handle with the two (2) holes in top of door. Shoulder Screw Nameplate Set Screw Screw Handle To attach metal refrigerator handle: 1. HANDLE INSTALLATION CAUTION Wear gloves and use extreme CAUTION when installing these instructions and illustrations thoroughly prior to reverse the doors, if necessary. 3. Install...

Use and Care Guide
Page 7
Dovetail Screw Button Plug Lock Handle over Dovetail Screw 7 Screw Handle Screw To reverse refrigerator/freezer handles: Handles may be easier to reverse while doors are set aside in a secure position where they cannot fall and cause personal ...dovetail screw, pull handle straight down until handle is aligned with screw holes on top of door. 2. HANDLE INSTALLATION To attach plastic refrigerator handle: 1. Reverse freezer and refrigerator handles as shown. Place top of handle over dovetail screw, pull handle straight up until handle is aligned with screw holes on ...
Dovetail Screw Button Plug Lock Handle over Dovetail Screw 7 Screw Handle Screw To reverse refrigerator/freezer handles: Handles may be easier to reverse while doors are set aside in a secure position where they cannot fall and cause personal ...dovetail screw, pull handle straight down until handle is aligned with screw holes on top of door. 2. HANDLE INSTALLATION To attach plastic refrigerator handle: 1. Reverse freezer and refrigerator handles as shown. Place top of handle over dovetail screw, pull handle straight up until handle is aligned with screw holes on ...
Use and Care Guide
Page 8
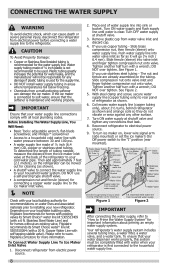
...line. 8 To determine the length of ¼ inch (6.4 mm) OD, copper or stainless steel tubing. frigidaire.com/store for the water supply line. Place end of refrigerator as shown. 6. Turn ON water supply at shutoff valve and tighten any other surface. 7. Push water ... on the tubing. See Figure 1. IMPORTANT Ensure that your local/state building codes, Frigidaire recommends for homes with existing valves its Smart Choice water® line kit 5305510264 (with your refrigerator is connected to www. Stainless Steel Water Line) and for cleaning (as shown). ...
...line. 8 To determine the length of ¼ inch (6.4 mm) OD, copper or stainless steel tubing. frigidaire.com/store for the water supply line. Place end of refrigerator as shown. 6. Turn ON water supply at shutoff valve and tighten any other surface. 7. Push water ... on the tubing. See Figure 1. IMPORTANT Ensure that your local/state building codes, Frigidaire recommends for homes with existing valves its Smart Choice water® line kit 5305510264 (with your refrigerator is connected to www. Stainless Steel Water Line) and for cleaning (as shown). ...
Use and Care Guide
Page 9
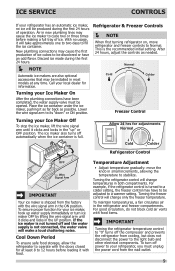
... when the ice container is not turned off power to your Ice Maker On After the plumbing connections have an odd flavor. Turning the refrigerator control will make a loud chattering noise. For good circulation, do not block cold air vents with food. This is shipped from the wall...most models at least 8 to 12 hours before making a full tray of operation. Allow 24 hrs for information. For example, if the refrigerator control is not connected, the water valve will change only the freezer temperature. With no ice will be installed in the ON position. Temperature...
... when the ice container is not turned off power to your Ice Maker On After the plumbing connections have an odd flavor. Turning the refrigerator control will make a loud chattering noise. For good circulation, do not block cold air vents with food. This is shipped from the wall...most models at least 8 to 12 hours before making a full tray of operation. Allow 24 hrs for information. For example, if the refrigerator control is not connected, the water valve will change only the freezer temperature. With no ice will be installed in the ON position. Temperature...

Use and Care Guide
Page 10
...may make these sounds more noticeable. NOTE Rigid foam insulation is very energy efficient, but is a list of your refrigerator and the sounds they can produce a snapping or clicking sound when turning the cooling system on floors, walls, and kitchen ...Compressor Modern, high-efficiency compressors run much faster than in your freezer compartment. I During the automatic defrost cycle, you may hear Your new, high-efficiency refrigerator may hear water dripping into the ice bin. IMPORTANT C D F H J A B E G I Drain pan (not removable) You may introduce unfamiliar...
...may make these sounds more noticeable. NOTE Rigid foam insulation is very energy efficient, but is a list of your refrigerator and the sounds they can produce a snapping or clicking sound when turning the cooling system on floors, walls, and kitchen ...Compressor Modern, high-efficiency compressors run much faster than in your freezer compartment. I During the automatic defrost cycle, you may hear Your new, high-efficiency refrigerator may hear water dripping into the ice bin. IMPORTANT C D F H J A B E G I Drain pan (not removable) You may introduce unfamiliar...
Use and Care Guide
Page 11
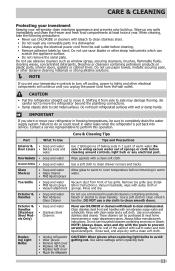
... front of sponge or cloth before cleaning around controls, light bulb or any electrical part. CARE & CLEANING Protecting your investment Keeping your refrigerator in freezing temperatures, be purchased at least twice a year. Shifting it . Failure to side may damage flooring. Care & Cleaning Tips...& • Soap and water Door Liners • Baking soda and water Use 2 tablespoons of baking soda in water leaks when the refrigerator is put back into service. Use a soft cloth to prevent scratching. Clean stainless steel front and handles with a clean soft cloth. ...
... front of sponge or cloth before cleaning around controls, light bulb or any electrical part. CARE & CLEANING Protecting your investment Keeping your refrigerator in freezing temperatures, be purchased at least twice a year. Shifting it . Failure to side may damage flooring. Care & Cleaning Tips...& • Soap and water Door Liners • Baking soda and water Use 2 tablespoons of baking soda in water leaks when the refrigerator is put back into service. Use a soft cloth to prevent scratching. Clean stainless steel front and handles with a clean soft cloth. ...
Use and Care Guide
Page 12
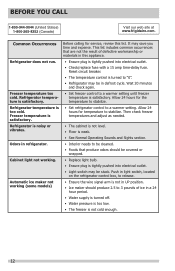
...; Water pressure is too low. • The freezer is satisfactory. Allow 24 hours for the temperature to stabilize. • Set refrigerator control to stabilize. Freezer temperature is not cold enough. 12 Automatic ice maker not working . Allow 24 hours for temperature to a warmer...again. • Set freezer control to "0". • Refrigerator may save you time and expense. BEFORE YOU CALL 1-800-944-9044 (United States) 1-800-265-8352 (Canada) Visit our web site at www.frigidaire.com. Refrigerator is turned to a warmer setting until freezer temperature is satisfactory...
...; Water pressure is too low. • The freezer is satisfactory. Allow 24 hours for the temperature to stabilize. • Set refrigerator control to stabilize. Freezer temperature is not cold enough. 12 Automatic ice maker not working . Allow 24 hours for temperature to a warmer...again. • Set freezer control to "0". • Refrigerator may save you time and expense. BEFORE YOU CALL 1-800-944-9044 (United States) 1-800-265-8352 (Canada) Visit our web site at www.frigidaire.com. Refrigerator is turned to a warmer setting until freezer temperature is satisfactory...
Use and Care Guide
Page 13
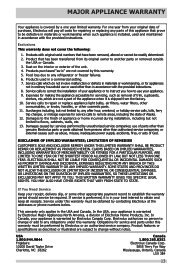
... fires, or acts of this warranty must be obtained by contacting Electrolux at the addresses or phone numbers below. USA 1.800.944.9044 Frigidaire 10200 David Taylor Drive Charlotte, NC 28262 Canada 1.800.265.8352 Electrolux Canada Corp. 5855 Terry Fox Way Mississauga, Ontario, Canada L5V 3E4... due to any after hour, weekend, or holiday service calls, tolls, ferry trip charges, or mileage expense for service calls to , any refrigerator or freezer failures. 6. Damages to the finish of appliance or home incurred during installation, including but not limited to remote areas, including the ...
... fires, or acts of this warranty must be obtained by contacting Electrolux at the addresses or phone numbers below. USA 1.800.944.9044 Frigidaire 10200 David Taylor Drive Charlotte, NC 28262 Canada 1.800.265.8352 Electrolux Canada Corp. 5855 Terry Fox Way Mississauga, Ontario, Canada L5V 3E4... due to any after hour, weekend, or holiday service calls, tolls, ferry trip charges, or mileage expense for service calls to , any refrigerator or freezer failures. 6. Damages to the finish of appliance or home incurred during installation, including but not limited to remote areas, including the ...


