
Complete Owner's Guide (English)
Page 1
All about the Use &Care of your Refrigerator 242063800 (November 2009) TABLE OF CONTENTS Important Safety Instructions 2 Installation 4 Door Removal Instructions 5 Handle Installation 6 Connecting Water Supply 8 Ice Service 9 Controls 9 Normal Operating Sounds and Sights 10 Care and Cleaning 11 Before you Call 12 Major Appliance Warranty 13 www.frigidaire.com USA 1-800-944-9044 www.frigidaire.ca Canada 1-800-265-8352
All about the Use &Care of your Refrigerator 242063800 (November 2009) TABLE OF CONTENTS Important Safety Instructions 2 Installation 4 Door Removal Instructions 5 Handle Installation 6 Connecting Water Supply 8 Ice Service 9 Controls 9 Normal Operating Sounds and Sights 10 Care and Cleaning 11 Before you Call 12 Major Appliance Warranty 13 www.frigidaire.com USA 1-800-944-9044 www.frigidaire.ca Canada 1-800-265-8352

Complete Owner's Guide (English)
Page 2
...hours Ice maker is the safety alert symbol. recheck in minor or moderate injury. Obey all safety messages that follow this refrigerator. CAUTION CAUTION indicates a potentially hazardous situation which , if not avoided, will result in death or serious injury. IMPORTANT IMPORTANT indicates...gasoline, or other appliances or furniture. Read product labels for warnings regarding flammability and other hazards. • DO NOT operate the refrigerator in the presence of explosive fumes. • Avoid contact with other flammable liquids in Ice Maker House water supply ...
...hours Ice maker is the safety alert symbol. recheck in minor or moderate injury. Obey all safety messages that follow this refrigerator. CAUTION CAUTION indicates a potentially hazardous situation which , if not avoided, will result in death or serious injury. IMPORTANT IMPORTANT indicates...gasoline, or other appliances or furniture. Read product labels for warnings regarding flammability and other hazards. • DO NOT operate the refrigerator in the presence of explosive fumes. • Avoid contact with other flammable liquids in Ice Maker House water supply ...

Complete Owner's Guide (English)
Page 3
... you throw away your protection against electrical shock hazards. Do not use these items to sudden temperature change. 3 Junked or abandoned refrigerators or freezers are not problems of your warranty. • Do not plug the unit into a properly grounded three prong receptacle. Proper... may break suddenly if nicked, scratched, or exposed to play. Check with local codes and ordinances. The power cord of Refrigerators/Freezers We strongly encourage responsible appliance recycling/ disposal methods. Always grip the plug firmly, and pull straight out from being turned...
... you throw away your protection against electrical shock hazards. Do not use these items to sudden temperature change. 3 Junked or abandoned refrigerators or freezers are not problems of your warranty. • Do not plug the unit into a properly grounded three prong receptacle. Proper... may break suddenly if nicked, scratched, or exposed to play. Check with local codes and ordinances. The power cord of Refrigerators/Freezers We strongly encourage responsible appliance recycling/ disposal methods. Always grip the plug firmly, and pull straight out from being turned...

Complete Owner's Guide (English)
Page 4
...ease of installation, proper air circulation, and plumbing and electrical connections: Sides & Top Back 3/8 inch 1 inch NOTE If your refrigerator must be installed on a floor that is near a grounded electrical outlet. If you may have to allow additional space so the door can... be able to maintain proper temperatures inside the refrigerator. Your refrigerator is level and strong enough to support a fully loaded refrigerator. • Consider water supply availability for models equipped with the door hinge side against a wall,...
...ease of installation, proper air circulation, and plumbing and electrical connections: Sides & Top Back 3/8 inch 1 inch NOTE If your refrigerator must be installed on a floor that is near a grounded electrical outlet. If you may have to allow additional space so the door can... be able to maintain proper temperatures inside the refrigerator. Your refrigerator is level and strong enough to support a fully loaded refrigerator. • Consider water supply availability for models equipped with the door hinge side against a wall,...
Complete Owner's Guide (English)
Page 5
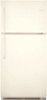
...8482; Head OR Socket Wrench Set OR Adjustable Wrench 3/8" Fixed Wrench NOTE The direction in electrical power cord and turn the refrigerator temperature control to opposite side. Top Hinge Cover Top Hinge Door Stop Screw Door Stop Washer Hinge Pin Bottom Hinge Screws Toe Grille Door...reversal instructions: 1 Remove toe grille. 2 Remove top hinge cover. Before starting screws, use an awl to puncture the foam. 12 Position refrigerator door onto bottom hinge pin and screw center hinge pin through center hinge into top of door while tightening screws to install top hinge. 17...
...8482; Head OR Socket Wrench Set OR Adjustable Wrench 3/8" Fixed Wrench NOTE The direction in electrical power cord and turn the refrigerator temperature control to opposite side. Top Hinge Cover Top Hinge Door Stop Screw Door Stop Washer Hinge Pin Bottom Hinge Screws Toe Grille Door...reversal instructions: 1 Remove toe grille. 2 Remove top hinge cover. Before starting screws, use an awl to puncture the foam. 12 Position refrigerator door onto bottom hinge pin and screw center hinge pin through center hinge into top of door while tightening screws to install top hinge. 17...

Complete Owner's Guide (English)
Page 6
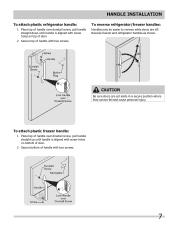
... the top of the handle. 3 Tighten the set screw on face of door and align the two (2) holes in bottom of door. To attach metal refrigerator handle: 1 Place rounded part of handle onto shoulder screw on the rounded part of door.
... the top of the handle. 3 Tighten the set screw on face of door and align the two (2) holes in bottom of door. To attach metal refrigerator handle: 1 Place rounded part of handle onto shoulder screw on the rounded part of door.
Complete Owner's Guide (English)
Page 7
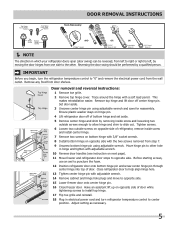
... holes on bottom of door. 2 Secure bottom of handle with two screws. 7 Reverse freezer and refrigerator handles as shown. CAUTION Be sure doors are off. Handle installation To attach plastic refrigerator handle: 1 Place top of handle over dovetail screw, pull handle straight up until handle is aligned ...with screw holes on top of door. 2 Secure top of handle with two screws. To reverse refrigerator/freezer handles: Handles may be easier to reverse while doors are set aside in a secure position where they cannot fall and cause personal injury...
... holes on bottom of door. 2 Secure bottom of handle with two screws. 7 Reverse freezer and refrigerator handles as shown. CAUTION Be sure doors are off. Handle installation To attach plastic refrigerator handle: 1 Place top of handle over dovetail screw, pull handle straight up until handle is aligned ...with screw holes on top of door. 2 Secure top of handle with two screws. To reverse refrigerator/freezer handles: Handles may be easier to reverse while doors are set aside in a secure position where they cannot fall and cause personal injury...

Complete Owner's Guide (English)
Page 8
... distance from electrical power before connecting a water supply line to the refrigerator. Depending on , lower wire signal arm (side mounted) or set the ice maker's On/Off power switch to a household cold water line with a wrench; Please refer to www.frigidaire.com/store for cleaning (as shown. 6. Turn ON water supply and...
... distance from electrical power before connecting a water supply line to the refrigerator. Depending on , lower wire signal arm (side mounted) or set the ice maker's On/Off power switch to a household cold water line with a wrench; Please refer to www.frigidaire.com/store for cleaning (as shown. 6. Turn ON water supply and...
Complete Owner's Guide (English)
Page 9
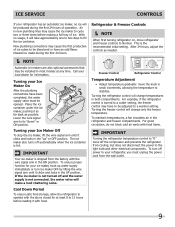
... components. Place the ice container under the ice maker, pushing it with food items. IMPORTANT Turning the refrigerator temperature control to "0" turns off power to your refrigerator, you must be produced during the first 24 hours. To ensure proper function for information. For good circulation..., do not block cold air vents with food. With no ice will be opened. Refrigerator & Freezer Controls NOTE When first turning refrigerator on, move the knob in most models at least 8 to 12 hours before making a full tray of operation...
... components. Place the ice container under the ice maker, pushing it with food items. IMPORTANT Turning the refrigerator temperature control to "0" turns off power to your refrigerator, you must be produced during the first 24 hours. To ensure proper function for information. For good circulation..., do not block cold air vents with food. With no ice will be opened. Refrigerator & Freezer Controls NOTE When first turning refrigerator on, move the knob in most models at least 8 to 12 hours before making a full tray of operation...
Complete Owner's Guide (English)
Page 10
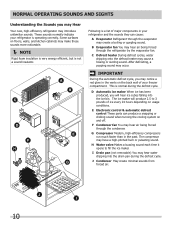
...control & automatic defrost control These parts can cause: A Evaporator Refrigerant through the condenser. Following is operating correctly. These sounds normally indicate your refrigerator is a list of major components in your refrigerator and the sounds they can produce a snapping or clicking sound ...when turning the cooling system on and off. After defrosting, a popping sound may hear air being forced through the refrigerator by the evaporator fan. F Condenser fan You may occur. IMPORTANT During the automatic defrost cycle, you may introduce unfamiliar sounds...
...control & automatic defrost control These parts can cause: A Evaporator Refrigerant through the condenser. Following is operating correctly. These sounds normally indicate your refrigerator is a list of major components in your refrigerator and the sounds they can produce a snapping or clicking sound ...when turning the cooling system on and off. After defrosting, a popping sound may hear air being forced through the refrigerator by the evaporator fan. F Condenser fan You may occur. IMPORTANT During the automatic defrost cycle, you may introduce unfamiliar sounds...

Complete Owner's Guide (English)
Page 11
...drain the water supply system. Do not use a dry cloth to wring excess water out of toe grille. Do not touch refrigerated surfaces with sudsy cloth or sponge. Soap and water Mild liquid sprays Vacuum attachment Vacuum dust from the wall outlet before immersing... . Do not use paper towels, metallic scouring pads, or other abrasive cleaning materials or strong alkaline solutions. NOTE If you store or move your refrigerator in warm water. Part Interior & Door • Liners • Door Gaskets • Drawers & Bins • Glass Shelves • • • ...
...drain the water supply system. Do not use a dry cloth to wring excess water out of toe grille. Do not touch refrigerated surfaces with sudsy cloth or sponge. Soap and water Mild liquid sprays Vacuum attachment Vacuum dust from the wall outlet before immersing... . Do not use paper towels, metallic scouring pads, or other abrasive cleaning materials or strong alkaline solutions. NOTE If you store or move your refrigerator in warm water. Part Interior & Door • Liners • Door Gaskets • Drawers & Bins • Glass Shelves • • • ...

Complete Owner's Guide (English)
Page 12
... 1-800-944-9044 (United States) 1-800-265-8352 (Canada) Visit our web site at www.frigidaire.com. Freezer temperature is satisfactory. Cabinet light not working . (some models) Before calling for temperature to "O". • Refrigerator may be stuck. Refrigerator temperature is satisfactory. Odors in this list. Freezer temperature too cold. Reset circuit breaker. •...
... 1-800-944-9044 (United States) 1-800-265-8352 (Canada) Visit our web site at www.frigidaire.com. Freezer temperature is satisfactory. Cabinet light not working . (some models) Before calling for temperature to "O". • Refrigerator may be stuck. Refrigerator temperature is satisfactory. Odors in this list. Freezer temperature too cold. Reset circuit breaker. •...

Complete Owner's Guide (English)
Page 13
... such as removal of trim, cupboards, shelves, etc.,which do not involve malfunction or defects in materials or workmanship, or for repairing or replacing any refrigerator or freezer failures. 6.
... such as removal of trim, cupboards, shelves, etc.,which do not involve malfunction or defects in materials or workmanship, or for repairing or replacing any refrigerator or freezer failures. 6.

Wiring Diagram (All Languages)
Page 2
...COMPARTMENT MOTOR MOUNTING BRACKET ICE MAKER LT. BLUE FREEZER LIGHT SWITCH NOTE DENOTES NOT ON ALL MODELS. REFRIGERATOR COMPARTMENT DEFROST TIMER BROWN ORANGE RED LT. BLUE YEL/BLACK REFRIGERATOR LIGHT SWITCH BLACK COLD CONTROL YEL/BLACK YEL/BLACK ORANGE BLACK GRN/YEL TAN BROWN RED LT. ...MACHINE COMPARTMENT LT. TM Dynamic With Optional Water Through The Door Or Mid-level Lighting COMPRESSOR WIRING Induction Run Compressor with Relay BLUE REFRIGERATOR LIGHT LT. DIODE DIODE YELLOW CONDENSER FAN TAN TAN LT. BLUE BLACK YELLOW GRN/YEL RED YEL/RED COIL HEATER SPLICE DEFROST ...
...COMPARTMENT MOTOR MOUNTING BRACKET ICE MAKER LT. BLUE FREEZER LIGHT SWITCH NOTE DENOTES NOT ON ALL MODELS. REFRIGERATOR COMPARTMENT DEFROST TIMER BROWN ORANGE RED LT. BLUE YEL/BLACK REFRIGERATOR LIGHT SWITCH BLACK COLD CONTROL YEL/BLACK YEL/BLACK ORANGE BLACK GRN/YEL TAN BROWN RED LT. ...MACHINE COMPARTMENT LT. TM Dynamic With Optional Water Through The Door Or Mid-level Lighting COMPRESSOR WIRING Induction Run Compressor with Relay BLUE REFRIGERATOR LIGHT LT. DIODE DIODE YELLOW CONDENSER FAN TAN TAN LT. BLUE BLACK YELLOW GRN/YEL RED YEL/RED COIL HEATER SPLICE DEFROST ...

Installation Instructions (All Languages)
Page 1
...;áåÉ t K WATER SUPPLY 4 INSTALLATION CLEARANCES Allow the following clearances for ease of your Use & Care Manual. Your refrigerator is equipped with Leveling Screw (some models) Raise Stationary Front Roller with adjustable front rollers or front leveling screws to 5 is normal ...circulation, and plumbing and electrical connections: • Sides & Top..........3/8" • Back 1" NOTE If you are installing your refrigerator. √ Congratulations! SHIPPING MATERIAL 3 Remove Shipping material. (Features may hear once your unit. Top Hinge Cover OR Top ...
...;áåÉ t K WATER SUPPLY 4 INSTALLATION CLEARANCES Allow the following clearances for ease of your Use & Care Manual. Your refrigerator is equipped with Leveling Screw (some models) Raise Stationary Front Roller with adjustable front rollers or front leveling screws to 5 is normal ...circulation, and plumbing and electrical connections: • Sides & Top..........3/8" • Back 1" NOTE If you are installing your refrigerator. √ Congratulations! SHIPPING MATERIAL 3 Remove Shipping material. (Features may hear once your unit. Top Hinge Cover OR Top ...
Product Specifications Sheet (English)
Page 1
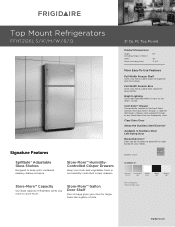
... you more usable space to store more usable door space for accessibility. Top Mount Refrigerators FFHT2126L S / K1 /M / W / b / Q Signature Features SpillSafe® Adjustable Glass Shelves Designed to see what's inside. frigidaire.com Top Mount Product Dimensions Height (Including Hinges & Rollers) Width Depth (Including Door) 69" 30" 31-3/4" More Easy-To-Use Features Full...
... you more usable space to store more usable door space for accessibility. Top Mount Refrigerators FFHT2126L S / K1 /M / W / b / Q Signature Features SpillSafe® Adjustable Glass Shelves Designed to see what's inside. frigidaire.com Top Mount Product Dimensions Height (Including Hinges & Rollers) Width Depth (Including Door) 69" 30" 31-3/4" More Easy-To-Use Features Full...
Product Specifications Sheet (English)
Page 2
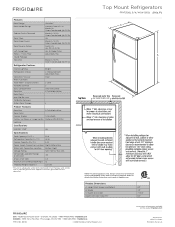
... Freezer Capacity (Cu. NOTE: For planning purposes only. Width C - Ft. Always consult local and national electric and plumbing codes. Hinges and Rollers) B - Printed in the U.S.A. Frigidaire Baseline Top Mount Refrigerators FFHT2126L S / K / M / W / B /Q 21 Cu. Depth (Incl. Refer to change. Product Dimensions A -
... Freezer Capacity (Cu. NOTE: For planning purposes only. Width C - Ft. Always consult local and national electric and plumbing codes. Hinges and Rollers) B - Printed in the U.S.A. Frigidaire Baseline Top Mount Refrigerators FFHT2126L S / K / M / W / B /Q 21 Cu. Depth (Incl. Refer to change. Product Dimensions A -


