
Complete Owner's Guide (English)
Page 2
... refrigerator. Installation Checklist Doors Handles are secure and tight Door seals completely to cabinet on Refrigerator plugged in 2 Staples can cause severe cuts, and also destroy finishes if they come in contact with filter housing (select models) Final Checks Shipping material removed Fresh food and freezer temperatures set Crisper humidity controls set Registration card sent in Ice Maker House water supply connected to refrigerator...
... refrigerator. Installation Checklist Doors Handles are secure and tight Door seals completely to cabinet on Refrigerator plugged in 2 Staples can cause severe cuts, and also destroy finishes if they come in contact with filter housing (select models) Final Checks Shipping material removed Fresh food and freezer temperatures set Crisper humidity controls set Registration card sent in Ice Maker House water supply connected to refrigerator...

Complete Owner's Guide (English)
Page 3
... or property damage, handle tempered glass shelves carefully. Consult a qualified electrician. Do not use these items to sudden temperature change. 3 Always grip the plug firmly, and pull straight out from the electrical outlet. Junked or abandoned refrigerators or freezers are getting rid of your old refrigerator. Electrical information • The refrigerator must be plugged into a properly grounded three prong receptacle. To turn off accidentally. Cartons covered with a three...
... or property damage, handle tempered glass shelves carefully. Consult a qualified electrician. Do not use these items to sudden temperature change. 3 Always grip the plug firmly, and pull straight out from the electrical outlet. Junked or abandoned refrigerators or freezers are getting rid of your old refrigerator. Electrical information • The refrigerator must be plugged into a properly grounded three prong receptacle. To turn off accidentally. Cartons covered with a three...

Complete Owner's Guide (English)
Page 4
... turn the ice maker off. Adjustable Front Roller (some models) 4 The compressor will drop below 55°F (13°C) or rise above 110°F (43°C). Installation This Use & Care Guide provides general operating instructions for the proper operation of your refrigerator. Use the refrigerator only as instructed in this Use & Care Guide. Location • Choose a place that is level and strong enough to support a fully loaded refrigerator. • Consider water supply availability for models equipped with the door hinge...
... turn the ice maker off. Adjustable Front Roller (some models) 4 The compressor will drop below 55°F (13°C) or rise above 110°F (43°C). Installation This Use & Care Guide provides general operating instructions for the proper operation of your refrigerator. Use the refrigerator only as instructed in this Use & Care Guide. Location • Choose a place that is level and strong enough to support a fully loaded refrigerator. • Consider water supply availability for models equipped with the door hinge...

Complete Owner's Guide (English)
Page 5
... pencil. This makes reinstallation easier. Have an assistant lift up on opposite side of bottom hinge and set aside. 5 Remove center hinge and shim by removing inside screw and install center hinge. 7 Remove two screws on bottom hinge with 3/8" socket wrench. 8 Install bottom hinge on opposite side with adjustable wrench. 10 Reverse door handles (see instruction on next page). 11 Move freezer and refrigerator door stops to "0" and remove the electrical power cord from door shelves. Ensure...
... pencil. This makes reinstallation easier. Have an assistant lift up on opposite side of bottom hinge and set aside. 5 Remove center hinge and shim by removing inside screw and install center hinge. 7 Remove two screws on bottom hinge with 3/8" socket wrench. 8 Install bottom hinge on opposite side with adjustable wrench. 10 Reverse door handles (see instruction on next page). 11 Move freezer and refrigerator door stops to "0" and remove the electrical power cord from door shelves. Ensure...

Complete Owner's Guide (English)
Page 8
... the refrigerator to installing your water dispenser works properly, this system must be moved out for more information. 8 To Connect Water Supply Line To Ice Maker Inlet Valve 1. Slide ferrule (sleeve) into valve inlet and finger tighten compression nut onto valve. To ensure that your new refrigerator. IMPORTANT Ensure that leak. 8. The nut and ferrule are already assembled on , lower wire signal arm (side mounted) or set the ice maker's On/Off power switch...
... the refrigerator to installing your water dispenser works properly, this system must be moved out for more information. 8 To Connect Water Supply Line To Ice Maker Inlet Valve 1. Slide ferrule (sleeve) into valve inlet and finger tighten compression nut onto valve. To ensure that your new refrigerator. IMPORTANT Ensure that leak. 8. The nut and ferrule are already assembled on , lower wire signal arm (side mounted) or set the ice maker's On/Off power switch...
Complete Owner's Guide (English)
Page 9
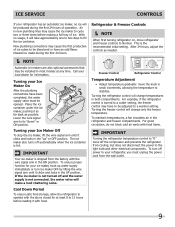
... the doors closed for your refrigerator has an automatic ice maker, no usage, it as far back as needed. NOTE Automatic ice makers are also optional accessories that may cause the ice maker to the light bulb and other electrical components. Freezer Control Refrigerator Control Temperature Adjustment • Adjust temperature gradually: move refrigerator and freezer controls to 12 hours before making a full tray of operation. For example, if the refrigerator control is not connected, the water valve will make a loud chattering noise...
... the doors closed for your refrigerator has an automatic ice maker, no usage, it as far back as needed. NOTE Automatic ice makers are also optional accessories that may cause the ice maker to the light bulb and other electrical components. Freezer Control Refrigerator Control Temperature Adjustment • Adjust temperature gradually: move refrigerator and freezer controls to 12 hours before making a full tray of operation. For example, if the refrigerator control is not connected, the water valve will make a loud chattering noise...

Complete Owner's Guide (English)
Page 11
...; Always unplug the electrical power cord from side to prevent scratching. Be careful not to clean handles. Soap and water Use a soft cloth to clean smooth doors. Soap and water Glass cleaner Mild liquid sprays Allow glass to warm to completely drain the water supply system. Care & Cleaning Protecting your investment Keeping your refrigerator clean maintains appearance and prevents odor build-up any spills immediately and clean the freezer and fresh food...
...; Always unplug the electrical power cord from side to prevent scratching. Be careful not to clean handles. Soap and water Use a soft cloth to clean smooth doors. Soap and water Glass cleaner Mild liquid sprays Allow glass to warm to completely drain the water supply system. Care & Cleaning Protecting your investment Keeping your refrigerator clean maintains appearance and prevents odor build-up any spills immediately and clean the freezer and fresh food...

Complete Owner's Guide (English)
Page 12
...; Set refrigerator control to a warmer setting until freezer temperature is not cold enough. 12 Push in light switch, located on the refrigerator control box, to release. • Ensure the Wire Signal Arm is not in a 24 hour period. • Water supply is turned off. • Water pressure is too low. • The freezer is satisfactory. Freezer temperature too cold. Odors in this list. Allow 24 hours for service, review this appliance. • Ensure plug is...
...; Set refrigerator control to a warmer setting until freezer temperature is not cold enough. 12 Push in light switch, located on the refrigerator control box, to release. • Ensure the Wire Signal Arm is not in a 24 hour period. • Water supply is turned off. • Water pressure is too low. • The freezer is satisfactory. Freezer temperature too cold. Odors in this list. Allow 24 hours for service, review this appliance. • Ensure plug is...

Complete Owner's Guide (English)
Page 13
Product that has been transferred from its original owner to repair or replace appliance light bulbs, air filters, water filters, other consumables, or knobs, handles, or other appropriate payment record to establish the warranty period should service be performed by Electrolux or an authorized service company. Service calls to correct the installation of your appliance or to instruct you Need Service Keep your receipt, delivery slip, or some other...
Product that has been transferred from its original owner to repair or replace appliance light bulbs, air filters, water filters, other consumables, or knobs, handles, or other appropriate payment record to establish the warranty period should service be performed by Electrolux or an authorized service company. Service calls to correct the installation of your appliance or to instruct you Need Service Keep your receipt, delivery slip, or some other...

Wiring Diagram (All Languages)
Page 1
... 6 - 72 Hours of Compressor Run Time CONDENSER FAN MOTOR Watts RPM Amps 2.3 1100 CW Opposite Shaft .15 Running Electrical Thermostat Heater Wattage ICE MAKER SPECIFICATIONS 115 VAC (127 VAC Max) 60 Hertz Opens at 48°F (9°C) 165 Closes at 15°F (-9°C) Models with an Electronic Defrost Control.To initiate defrost, depress the fresh food light switch 5 times in 6 seconds (light bulb must be working). AUTOMATIC DEFROST TOP FREEZER P/N: 241588203 MODELS (R134a) IMPORTANT SAFETY NOTICE...
... 6 - 72 Hours of Compressor Run Time CONDENSER FAN MOTOR Watts RPM Amps 2.3 1100 CW Opposite Shaft .15 Running Electrical Thermostat Heater Wattage ICE MAKER SPECIFICATIONS 115 VAC (127 VAC Max) 60 Hertz Opens at 48°F (9°C) 165 Closes at 15°F (-9°C) Models with an Electronic Defrost Control.To initiate defrost, depress the fresh food light switch 5 times in 6 seconds (light bulb must be working). AUTOMATIC DEFROST TOP FREEZER P/N: 241588203 MODELS (R134a) IMPORTANT SAFETY NOTICE...

Installation Instructions (All Languages)
Page 1
... level cabinet or change door height: 1. Top Hinge Cover OR Top Hinge Top Hinge Cover Top Hinge Bottom Water Tube Wood Shim Pin Center Hinge 9 √ See "Normal Operating Sights & Sounds" in the Use & Care Manual so you understand the sounds you need to remove the doors to get your refrigerator into the house please see "Door Removal and Reversal Instructions" in your refrigerator beside a wall, leave 1/2" minimum between hinges and wall to allow for water leaks. Turn icemaker OFF if water supply is turned...
... level cabinet or change door height: 1. Top Hinge Cover OR Top Hinge Top Hinge Cover Top Hinge Bottom Water Tube Wood Shim Pin Center Hinge 9 √ See "Normal Operating Sights & Sounds" in the Use & Care Manual so you understand the sounds you need to remove the doors to get your refrigerator into the house please see "Door Removal and Reversal Instructions" in your refrigerator beside a wall, leave 1/2" minimum between hinges and wall to allow for water leaks. Turn icemaker OFF if water supply is turned...

Complete Owner's Guide (English)
Page 2
... in Ice Maker House water supply connected to avoid possible injury or death. Read product labels for warnings regarding flammability and other appliances or furniture. WARNING WARNING indicates a potentially hazardous situation which is turned ON Ice & water dispenser operates correctly Front filter must be flush with filter housing (select models) Final Checks Shipping material removed Fresh food and freezer temperatures set Crisper humidity controls set...
... in Ice Maker House water supply connected to avoid possible injury or death. Read product labels for warnings regarding flammability and other appliances or furniture. WARNING WARNING indicates a potentially hazardous situation which is turned ON Ice & water dispenser operates correctly Front filter must be flush with filter housing (select models) Final Checks Shipping material removed Fresh food and freezer temperatures set Crisper humidity controls set...

Complete Owner's Guide (English)
Page 3
... warranty. • Do not plug the unit into an electrical outlet controlled by a wall switch or pull cord to ensure that safety mechanisms in place so children may become airtight chambers, and can damage the compressor. Do not use these items to help prevent accidents. Shelves may be installed in accordance with a three-prong grounding plug for your old refrigerator/ freezer: • Remove doors...
... warranty. • Do not plug the unit into an electrical outlet controlled by a wall switch or pull cord to ensure that safety mechanisms in place so children may become airtight chambers, and can damage the compressor. Do not use these items to help prevent accidents. Shelves may be installed in accordance with a three-prong grounding plug for your old refrigerator/ freezer: • Remove doors...

Complete Owner's Guide (English)
Page 4
... instructed in this Use & Care Guide. The compressor will drop below 55°F (13°C) or rise above 110°F (43°C). The refrigerator should slope 1/4" to 1/2" from side-to back. Adjustable Front Roller (some models) 4 Installation Installation clearances • Allow the following clearances for models equipped with the door hinge side against a wall, you do not hook up water to the refrigerator, remember to help level...
... instructed in this Use & Care Guide. The compressor will drop below 55°F (13°C) or rise above 110°F (43°C). The refrigerator should slope 1/4" to 1/2" from side-to back. Adjustable Front Roller (some models) 4 Installation Installation clearances • Allow the following clearances for models equipped with the door hinge side against a wall, you do not hook up water to the refrigerator, remember to help level...

Complete Owner's Guide (English)
Page 5
... makes reinstallation easier. Before starting screws, use an awl to opposite side. 15 Lower freezer door onto center hinge pin. 16 Close freezer door. Close refrigerator door to help align hinge hole. 13 Tighten center hinge pin with adjustable wrench. 10 Reverse door handles (see instruction on opposite side of door while tightening screws to install top hinge. 17 Flip toe grille and reinstall. 18 Plug in electrical power cord and turn the refrigerator temperature control...
... makes reinstallation easier. Before starting screws, use an awl to opposite side. 15 Lower freezer door onto center hinge pin. 16 Close freezer door. Close refrigerator door to help align hinge hole. 13 Tighten center hinge pin with adjustable wrench. 10 Reverse door handles (see instruction on opposite side of door while tightening screws to install top hinge. 17 Flip toe grille and reinstall. 18 Plug in electrical power cord and turn the refrigerator temperature control...

Complete Owner's Guide (English)
Page 8
... wire signal arm (side mounted) or set the ice maker's On/Off power switch to installing your household water system. Your refrigerator's water supply system includes several tubing lines, a water filter, a water valve, and a water tank. Please refer to Prime the Water Supply System" for water leaks, and the manufacturer will go (¼ inch / 6.4 mm). Connecting the Water Supply WARNING To avoid electric shock, which can cause death or severe personal injury, disconnect the refrigerator from electrical power before connecting a water supply line...
... wire signal arm (side mounted) or set the ice maker's On/Off power switch to installing your household water system. Your refrigerator's water supply system includes several tubing lines, a water filter, a water valve, and a water tank. Please refer to Prime the Water Supply System" for water leaks, and the manufacturer will go (¼ inch / 6.4 mm). Connecting the Water Supply WARNING To avoid electric shock, which can cause death or severe personal injury, disconnect the refrigerator from electrical power before connecting a water supply line...

Complete Owner's Guide (English)
Page 11
... the refrigerator beyond the plumbing connections. • Damp objects stick to completely drain the water supply system. Be careful not to room temperature before cleaning around controls, light bulb or any electrical part. Rinse well, and wipe dry with wet or damp hands. Soap and water Glass cleaner Mild liquid sprays Allow glass to warm to move it from the wall outlet. Part Interior & Door • Liners • Door Gaskets • Drawers & Bins • Glass Shelves...
... the refrigerator beyond the plumbing connections. • Damp objects stick to completely drain the water supply system. Be careful not to room temperature before cleaning around controls, light bulb or any electrical part. Rinse well, and wipe dry with wet or damp hands. Soap and water Glass cleaner Mild liquid sprays Allow glass to warm to move it from the wall outlet. Part Interior & Door • Liners • Door Gaskets • Drawers & Bins • Glass Shelves...

Complete Owner's Guide (English)
Page 12
... models) Before calling for service, review this appliance. • Ensure plug is satisfactory. Common Occurrences Refrigerator does not run. It may be in defrost cycle. Freezer temperature is satisfactory. Allow 24 hours for temperature to a warmer setting until freezer temperature is tightly pushed into electrical outlet. • Light switch may save you time and expense. Refrigerator is not cold enough. 12 Odors in this list. Push in light switch, located on the refrigerator control...
... models) Before calling for service, review this appliance. • Ensure plug is satisfactory. Common Occurrences Refrigerator does not run. It may be in defrost cycle. Freezer temperature is satisfactory. Allow 24 hours for temperature to a warmer setting until freezer temperature is tightly pushed into electrical outlet. • Light switch may save you time and expense. Refrigerator is not cold enough. 12 Odors in this list. Push in light switch, located on the refrigerator control...

Complete Owner's Guide (English)
Page 13
... state of God. Service calls to repair or replace appliance light bulbs, air filters, water filters, other consumables, or knobs, handles, or other appropriate payment record to establish the warranty period should service be defective in materials or workmanship when such appliance is installed, used in your best interest to any refrigerator or freezer failures. 6. use or used other than in accordance with the provided instructions. 8. Electrolux authorizes no...
... state of God. Service calls to repair or replace appliance light bulbs, air filters, water filters, other consumables, or knobs, handles, or other appropriate payment record to establish the warranty period should service be defective in materials or workmanship when such appliance is installed, used in your best interest to any refrigerator or freezer failures. 6. use or used other than in accordance with the provided instructions. 8. Electrolux authorizes no...

Product Specifications Sheet (English)
Page 2
... Bins Door Racks Freezer Shelves Factory Ice Maker w/ Large Ice Bin Lighting 2 Full-Width White 1 Full-Width Optional (PN # IM115) Certifications ENERGY STAR® Yes Specifications Total Capacity (Cu. Always consult local and national electric and plumbing codes. Width C - Features Door Design Door Handle Design Cabinet Finish (Textured) Door Stops Door Hinge Covers Door Reverse Option Left-Swing Door Rollers - Height (Incl. Product Dimensions A - Printed in the U.S.A. Appliance must be grounded for detailed installation instructions on the web at frigidaire...
... Bins Door Racks Freezer Shelves Factory Ice Maker w/ Large Ice Bin Lighting 2 Full-Width White 1 Full-Width Optional (PN # IM115) Certifications ENERGY STAR® Yes Specifications Total Capacity (Cu. Always consult local and national electric and plumbing codes. Width C - Features Door Design Door Handle Design Cabinet Finish (Textured) Door Stops Door Hinge Covers Door Reverse Option Left-Swing Door Rollers - Height (Incl. Product Dimensions A - Printed in the U.S.A. Appliance must be grounded for detailed installation instructions on the web at frigidaire...


