
Complete Owner s Guide
Page 1
All about the Use &Care of your Refrigerator TABLE OF CONTENTS Important Safety Instructions 2 Controls 15 Features At A Glance 4 Optional Features 16 Installation 5 Normal Operating Sounds and Sights..........19 Door Removal/Reversal Instructions 7 Care and Cleaning 20 Handle Installation 10 Before you Call 22 Connecting Water Supply 12 Major Appliance Warranty 23 Ice Service 14 www.frigidaire.com USA 1-800-944-9044 www.frigidaire.ca Canada 1-800-265-8352 A07441202 (May 2017)
All about the Use &Care of your Refrigerator TABLE OF CONTENTS Important Safety Instructions 2 Controls 15 Features At A Glance 4 Optional Features 16 Installation 5 Normal Operating Sounds and Sights..........19 Door Removal/Reversal Instructions 7 Care and Cleaning 20 Handle Installation 10 Before you Call 22 Connecting Water Supply 12 Major Appliance Warranty 23 Ice Service 14 www.frigidaire.com USA 1-800-944-9044 www.frigidaire.ca Canada 1-800-265-8352 A07441202 (May 2017)

Complete Owner s Guide
Page 2
... they will result in Ice Maker House water supply connected to play. Doors Handles are still dangerous - Final Checks Shipping material removed Refrigerator and freezer temperatures set Crisper humidity controls set Electrical Power House power turned on Refrigerator plugged in death or serious injury. Children should never use gasoline, or other appliances or furniture. even if they come in contact with any moving parts of this...
... they will result in Ice Maker House water supply connected to play. Doors Handles are still dangerous - Final Checks Shipping material removed Refrigerator and freezer temperatures set Crisper humidity controls set Electrical Power House power turned on Refrigerator plugged in death or serious injury. Children should never use gasoline, or other appliances or furniture. even if they come in contact with any moving parts of this...

Complete Owner s Guide
Page 3
... injury or property damage, handle tempered glass shelves carefully. IMPORTANT SAFETY INSTRUCTIONS Proper Disposal of environmental legislation. 3 The receptacle must unplug the power cord from the receptacle to prevent damaging the power cord. • Unplug the refrigerator before cleaning and before replacing a light bulb to avoid electrical shock. • Performance may be subject to the atmosphere. Check with your refrigerator's cooling system, but does not...
... injury or property damage, handle tempered glass shelves carefully. IMPORTANT SAFETY INSTRUCTIONS Proper Disposal of environmental legislation. 3 The receptacle must unplug the power cord from the receptacle to prevent damaging the power cord. • Unplug the refrigerator before cleaning and before replacing a light bulb to avoid electrical shock. • Performance may be subject to the atmosphere. Check with your refrigerator's cooling system, but does not...
Complete Owner s Guide
Page 4
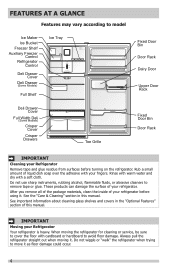
... cleaning glass shelves and covers in this manual. After you remove all of the package materials, clean the inside of liquid dish soap over the adhesive with a soft cloth. FEATURES AT A GLANCE Features may vary according to model Ice Maker Ice Bucket Freezer Shelf Auxiliary Freezer Control Refrigerator Control Deli Drawer Cover Deli Drawer (Some Models) Full Shelf Ice Tray Deli Drawer Cover Full Width Deli (Some Models) Crisper Cover Crisper Drawers Toe Grille Fixed Door Bin Door Rack Dairy Door Upper Door Rack Fixed Door Bin Door Rack IMPORTANT Cleaning your refrigerator...
... cleaning glass shelves and covers in this manual. After you remove all of the package materials, clean the inside of liquid dish soap over the adhesive with a soft cloth. FEATURES AT A GLANCE Features may vary according to model Ice Maker Ice Bucket Freezer Shelf Auxiliary Freezer Control Refrigerator Control Deli Drawer Cover Deli Drawer (Some Models) Full Shelf Ice Tray Deli Drawer Cover Full Width Deli (Some Models) Crisper Cover Crisper Drawers Toe Grille Fixed Door Bin Door Rack Dairy Door Upper Door Rack Fixed Door Bin Door Rack IMPORTANT Cleaning your refrigerator...
Complete Owner s Guide
Page 5
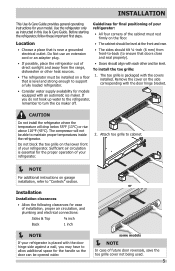
...;-inch (6 mm) from front-to-back (to support a fully loaded refrigerator. • Doors should be level. Guidelines for models equipped with the door hinge bracket. • Consider water supply availability for final positioning of your model. CAUTION Do not install the refrigerator where the temperature will not be opened wider. Use the refrigerator only as instructed in this Use & Care Guide. Remove the cover on a floor that is packaged with each other...
...;-inch (6 mm) from front-to-back (to support a fully loaded refrigerator. • Doors should be level. Guidelines for models equipped with the door hinge bracket. • Consider water supply availability for final positioning of your model. CAUTION Do not install the refrigerator where the temperature will not be opened wider. Use the refrigerator only as instructed in this Use & Care Guide. Remove the cover on a floor that is packaged with each other...
Complete Owner s Guide
Page 8
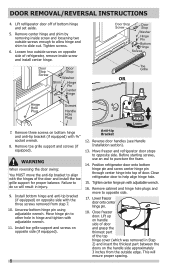
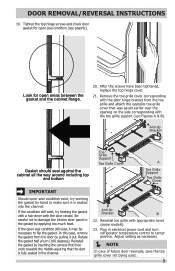
... of refrigerator, remove inside screw and loosening two outside edge. WARNING When reversing the door swing: You MUST move to slide out. Reverse door handles (see Handle Installation section). 13. This will result in injury. 9. Install bottom hinge and anti-tip bracket (if equipped) on handle side of door and grasp the thinnest part of door. Move freezer and refrigerator door stops to puncture the foam. 14. Before starting screws, use...
... of refrigerator, remove inside screw and loosening two outside edge. WARNING When reversing the door swing: You MUST move to slide out. Reverse door handles (see Handle Installation section). 13. This will result in injury. 9. Install bottom hinge and anti-tip bracket (if equipped) on handle side of door and grasp the thinnest part of door. Move freezer and refrigerator door stops to puncture the foam. 14. Before starting screws, use...
Complete Owner s Guide
Page 9
.... 20. In this case, remove the gasket from the toe grille and attach the opposite toe grille cover that the dart is seated into the channel. DOOR REMOVAL/REVERSAL INSTRUCTIONS 19. Adjust setting as necessary. NOTE In case of future door reversals, save the toe grille cover not being used. 9 Rotate the gasket half a turn refrigerator temperature control to flip the gasket. Be careful not to make sure it out.
.... 20. In this case, remove the gasket from the toe grille and attach the opposite toe grille cover that the dart is seated into the channel. DOOR REMOVAL/REVERSAL INSTRUCTIONS 19. Adjust setting as necessary. NOTE In case of future door reversals, save the toe grille cover not being used. 9 Rotate the gasket half a turn refrigerator temperature control to flip the gasket. Be careful not to make sure it out.
Complete Owner s Guide
Page 10
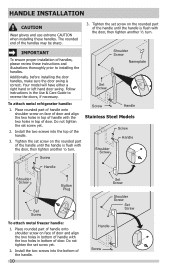
... into the bottom of handles, please review these handles. Screw Screw Handle Stainless Steel Models Screw Handle Shoulder Screw Handle Shoulder Screw Button Plug Set Screw To attach metal freezer handle: 1. Additionally, before installing the door handles, make sure the door swing is flush with the two holes in bottom of the handle. 3. Do not tighten the set screw yet. 2. Shoulder Screw Nameplate Set Screw To attach metal refrigerator handle: 1. Install the two screws...
... into the bottom of handles, please review these handles. Screw Screw Handle Stainless Steel Models Screw Handle Shoulder Screw Handle Shoulder Screw Button Plug Set Screw To attach metal freezer handle: 1. Additionally, before installing the door handles, make sure the door swing is flush with the two holes in bottom of the handle. 3. Do not tighten the set screw yet. 2. Shoulder Screw Nameplate Set Screw To attach metal refrigerator handle: 1. Install the two screws...
Complete Owner s Guide
Page 12
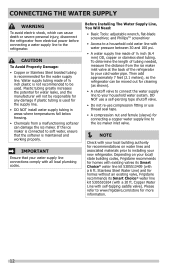
... of tubing needed, measure the distance from the ice maker inlet valve at the back of the refrigerator to soft water, ensure that your cold water pipe. CONNECTING THE WATER SUPPLY WARNING To avoid electric shock, which can cause death or severe personal injury, disconnect the refrigerator from electrical power before connecting a water supply line to be used for homes without an existing valve, Frigidaire recommends its Smart Choice® water line kit 5305513409 (with water pressure...
... of tubing needed, measure the distance from the ice maker inlet valve at the back of the refrigerator to soft water, ensure that your cold water pipe. CONNECTING THE WATER SUPPLY WARNING To avoid electric shock, which can cause death or severe personal injury, disconnect the refrigerator from electrical power before connecting a water supply line to be used for homes without an existing valve, Frigidaire recommends its Smart Choice® water line kit 5305513409 (with water pressure...
Complete Owner s Guide
Page 13
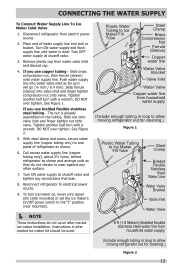
... compression nut onto valve. Turn ON water supply and flush supply line until water is already assembled on , lower wire signal arm (side mounted) or set the ice maker's On/Off power switch to allow moving refrigerator out for cleaning.) Figure 1 Plastic Water Tubing to Ice Maker Fill Tube Steel Clamp Braided Flexible Stainless Steel Water Line Water Valve Bracket Valve Inlet Water Valve 6 ft (1.8 Meters) Braided flexible stainless steel water line from household water supply. (Include enough tubing in after market ice maker installation. Slide ferrule (sleeve...
... compression nut onto valve. Turn ON water supply and flush supply line until water is already assembled on , lower wire signal arm (side mounted) or set the ice maker's On/Off power switch to allow moving refrigerator out for cleaning.) Figure 1 Plastic Water Tubing to Ice Maker Fill Tube Steel Clamp Braided Flexible Stainless Steel Water Line Water Valve Bracket Valve Inlet Water Valve 6 ft (1.8 Meters) Braided flexible stainless steel water line from household water supply. (Include enough tubing in after market ice maker installation. Slide ferrule (sleeve...
Complete Owner s Guide
Page 14
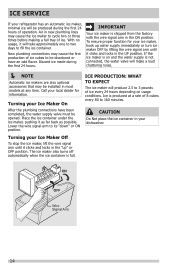
... water supply valve must be discolored or have an odd flavor. CAUTION Do Not place the ice container in your dishwasher. New plumbing connections may cause the ice maker to cycle two or three times before making a full tray of ice. If the ice maker is on usage conditions. ON OFF Wire Signal Arm 14 ICE SERVICE If your refrigerator has an automatic ice maker, minimal ice will be installed in...
... water supply valve must be discolored or have an odd flavor. CAUTION Do Not place the ice container in your dishwasher. New plumbing connections may cause the ice maker to cycle two or three times before making a full tray of ice. If the ice maker is on usage conditions. ON OFF Wire Signal Arm 14 ICE SERVICE If your refrigerator has an automatic ice maker, minimal ice will be installed in...
Complete Owner s Guide
Page 19
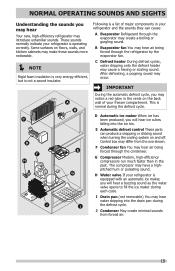
.... H Water valve If your freezer compartment. These sounds normally indicate your refrigerator and the sounds they can produce a snapping or clicking sound when turning the cooling system on floors, walls, and kitchen cabinets may hear water dripping into the ice bin. B Evaporator fan You may occur. After defrosting, a popping sound may hear air being forced through the condenser. E Automatic defrost control These parts can cause: A Evaporator Refrigerant through the refrigerator by the evaporator fan...
.... H Water valve If your freezer compartment. These sounds normally indicate your refrigerator and the sounds they can produce a snapping or clicking sound when turning the cooling system on floors, walls, and kitchen cabinets may hear water dripping into the ice bin. B Evaporator fan You may occur. After defrosting, a popping sound may hear air being forced through the condenser. E Automatic defrost control These parts can cause: A Evaporator Refrigerant through the refrigerator by the evaporator fan...

Complete Owner s Guide
Page 20
... up . CARE & CLEANING Protecting your investment Keeping your refrigerator in freezing temperatures, be sure to completely drain the water supply system. Contact a service representative to perform this operation. NOTE If you set your temperature controls to turn off cooling, power to lights and other electrical components will continue until you store or move your refrigerator clean maintains appearance and prevents odor build-up any removable parts in water leaks when the refrigerator is put...
... up . CARE & CLEANING Protecting your investment Keeping your refrigerator in freezing temperatures, be sure to completely drain the water supply system. Contact a service representative to perform this operation. NOTE If you set your temperature controls to turn off cooling, power to lights and other electrical components will continue until you store or move your refrigerator clean maintains appearance and prevents odor build-up any removable parts in water leaks when the refrigerator is put...

Complete Owner s Guide
Page 21
...with warm water and mild liquid detergent. CARE & CLEANING Part Interior & Door Liners Door Gaskets Drawers & Bins Glass Shelves Toe Grille Exterior & Handles Exterior & Handles (Stainless Steel Models Only) Replacing Light Bulbs Care & Cleaning Tips What To Use Tips and Precautions • Soap and water • Baking soda and water Use 2 tablespoons of baking soda in warm water. CAUTION: Wear gloves when replacing light bulbs to avoid getting cut. Wash the rest of toe grille. Remove toe grille (see Installation Instructions). Clean stainless steel front and handles with...
...with warm water and mild liquid detergent. CARE & CLEANING Part Interior & Door Liners Door Gaskets Drawers & Bins Glass Shelves Toe Grille Exterior & Handles Exterior & Handles (Stainless Steel Models Only) Replacing Light Bulbs Care & Cleaning Tips What To Use Tips and Precautions • Soap and water • Baking soda and water Use 2 tablespoons of baking soda in warm water. CAUTION: Wear gloves when replacing light bulbs to avoid getting cut. Wash the rest of toe grille. Remove toe grille (see Installation Instructions). Clean stainless steel front and handles with...
Complete Owner s Guide
Page 22
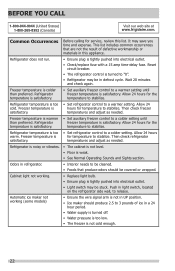
.... • Ice maker should be stuck. Then check freezer satisfactory. Freezer temperature is colder than preferred. Reset circuit breaker. • The refrigerator control is not in this list. temperatures and adjust as needed . Cabinet light not working (some models) • Ensure the wire signal arm is turned to stabilize. Allow 24 cold. temperature to release. temperatures and adjust as needed . Automatic ice maker not working . • Replace light bulb. • Ensure plug is hours for temperature to "0". • Refrigerator may save...
.... • Ice maker should be stuck. Then check freezer satisfactory. Freezer temperature is colder than preferred. Reset circuit breaker. • The refrigerator control is not in this list. temperatures and adjust as needed . Cabinet light not working (some models) • Ensure the wire signal arm is turned to stabilize. Allow 24 cold. temperature to release. temperatures and adjust as needed . Automatic ice maker not working . • Replace light bulb. • Ensure plug is hours for temperature to "0". • Refrigerator may save...
Complete Owner s Guide
Page 23
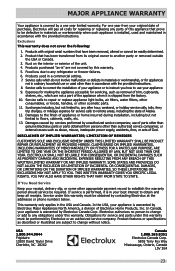
..., inadequate power supply, accidents, fires, or acts of the unit. 4. CLAIMS BASED ON IMPLIED WARRANTIES, INCLUDING WARRANTIES OF MERCHANTABILITY OR FITNESS FOR A PARTICULAR PURPOSE, ARE LIMITED TO ONE YEAR OR THE SHORTEST PERIOD ALLOWED BY LAW, BUT NOT LESS THAN ONE YEAR. Exclusions This warranty does not cover the following: 1. Service calls to repair or replace appliance light bulbs, air filters, water filters, other consumables...
..., inadequate power supply, accidents, fires, or acts of the unit. 4. CLAIMS BASED ON IMPLIED WARRANTIES, INCLUDING WARRANTIES OF MERCHANTABILITY OR FITNESS FOR A PARTICULAR PURPOSE, ARE LIMITED TO ONE YEAR OR THE SHORTEST PERIOD ALLOWED BY LAW, BUT NOT LESS THAN ONE YEAR. Exclusions This warranty does not cover the following: 1. Service calls to repair or replace appliance light bulbs, air filters, water filters, other consumables...
Wiring Diagram
Page 1
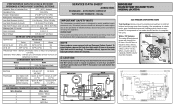
... of compressor run time. When a water valve is completed. One full turn is equal to rotate motor gear counterclockwise until holding switch circuit is replaced, the fill volume must be checked. Electronic Timer (ADC) - Excessive heat will change the fill time. ICE MAKER INFORMATION Test Cycling: Remove cover by inserting screwdriver in notch at 9°F white housing (8.9°C) (-12.8°C) Heater Wattage 165 W ICE MAKER CONNECTOR PLUG CONNECTIONS Wire Number Wire Color...
... of compressor run time. When a water valve is completed. One full turn is equal to rotate motor gear counterclockwise until holding switch circuit is replaced, the fill volume must be checked. Electronic Timer (ADC) - Excessive heat will change the fill time. ICE MAKER INFORMATION Test Cycling: Remove cover by inserting screwdriver in notch at 9°F white housing (8.9°C) (-12.8°C) Heater Wattage 165 W ICE MAKER CONNECTOR PLUG CONNECTIONS Wire Number Wire Color...
Product Specifications Sheet
Page 2
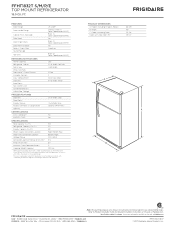
... water line Recessed (ice maker models only) electrical outlet Allow 1" min. Specificationswsuibthjecrtetsotcrihcatnegde. rAecmceosvsoarli.e)s information available on the United States Top View Access Board's A.D.A./A.B.A. FEATURES PRODUCT DIMENSIONS Door Design UltraSoft™ A - Width C - clearance at frigidaire.com. Ft.) 18.0 Refrigerator Capacity (Cu. Appliance must be grounded for proper air circulation and water / electrical connections Allow 3/8" min. Depth (Including Door) Depth with a separate ground wire. Ft.) 3.9 Power Supply Connection Location...
... water line Recessed (ice maker models only) electrical outlet Allow 1" min. Specificationswsuibthjecrtetsotcrihcatnegde. rAecmceosvsoarli.e)s information available on the United States Top View Access Board's A.D.A./A.B.A. FEATURES PRODUCT DIMENSIONS Door Design UltraSoft™ A - Width C - clearance at frigidaire.com. Ft.) 18.0 Refrigerator Capacity (Cu. Appliance must be grounded for proper air circulation and water / electrical connections Allow 3/8" min. Depth (Including Door) Depth with a separate ground wire. Ft.) 3.9 Power Supply Connection Location...
Product Specifications Sheet
Page 3
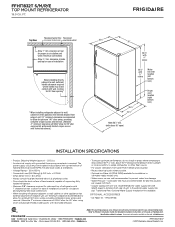
... 5/8" Power cord location (right bottom rear) Allow 581/2" min. (with doors 90° open) INSTALLATION SPECIFICATIONS • Product Shipping Weight (approx.) - 205 Lbs. • An electrical supply with 1/4" O.D. OPTIONAL ACCESSORIES • Ice Maker Kit - (PN # IM116). Note: For planning purposes only. Refer to Product Installation Guide for installation in direct sunlight or close proximity to change. Cold water line must be installed in accordance with current edition of National Electrical Code...
... 5/8" Power cord location (right bottom rear) Allow 581/2" min. (with doors 90° open) INSTALLATION SPECIFICATIONS • Product Shipping Weight (approx.) - 205 Lbs. • An electrical supply with 1/4" O.D. OPTIONAL ACCESSORIES • Ice Maker Kit - (PN # IM116). Note: For planning purposes only. Refer to Product Installation Guide for installation in direct sunlight or close proximity to change. Cold water line must be installed in accordance with current edition of National Electrical Code...

Installation Instructions
Page 1
... Bottom Hinge Screws Toe Grille 9 Installation Checkoff List Doors Ice Maker ȽȽ Handles are installing your refrigerator without connecting it to a water supply, make sure the ice maker's power switch is turned Off (see the Use & Care Guide for more likely to leak). • Ensure water supply complies with an anti-tip bracket (Figure 4). Final Checks ȽȽ Shipping material removed ȽȽ Fresh Food and Freezer controls set ȽȽ Crisper Humidity controls set Electrical Power ȽȽ House water supply connected to refrigerator...
... Bottom Hinge Screws Toe Grille 9 Installation Checkoff List Doors Ice Maker ȽȽ Handles are installing your refrigerator without connecting it to a water supply, make sure the ice maker's power switch is turned Off (see the Use & Care Guide for more likely to leak). • Ensure water supply complies with an anti-tip bracket (Figure 4). Final Checks ȽȽ Shipping material removed ȽȽ Fresh Food and Freezer controls set ȽȽ Crisper Humidity controls set Electrical Power ȽȽ House water supply connected to refrigerator...


