
Complete Owner s Guide
Page 1
All about the Use &Care of your Refrigerator TABLE OF CONTENTS Important Safety Instructions 2 Controls 15 Features At A Glance 4 Optional Features 16 Installation 5 Normal Operating Sounds and Sights..........19 Door Removal/Reversal Instructions 7 Care and Cleaning 20 Handle Installation 10 Before you Call 22 Connecting Water Supply 12 Major Appliance Warranty 23 Ice Service 14 www.frigidaire.com USA 1-800-944-9044 www.frigidaire.ca Canada 1-800-265-8352 A07441202 (May 2017)
All about the Use &Care of your Refrigerator TABLE OF CONTENTS Important Safety Instructions 2 Controls 15 Features At A Glance 4 Optional Features 16 Installation 5 Normal Operating Sounds and Sights..........19 Door Removal/Reversal Instructions 7 Care and Cleaning 20 Handle Installation 10 Before you Call 22 Connecting Water Supply 12 Major Appliance Warranty 23 Ice Service 14 www.frigidaire.com USA 1-800-944-9044 www.frigidaire.ca Canada 1-800-265-8352 A07441202 (May 2017)

Complete Owner s Guide
Page 2
... hours Ice maker is setting solid on all safety messages that follow the instructions below to help prevent accidents. 2 Doors Handles are secure and tight Door seals completely to cabinet on all connections - Final Checks Shipping material removed Refrigerator and freezer temperatures set Crisper humidity controls set Electrical Power House power turned on Refrigerator plugged in death or serious injury. IMPORTANT IMPORTANT indicates installation, operation or maintenance...
... hours Ice maker is setting solid on all safety messages that follow the instructions below to help prevent accidents. 2 Doors Handles are secure and tight Door seals completely to cabinet on all connections - Final Checks Shipping material removed Refrigerator and freezer temperatures set Crisper humidity controls set Electrical Power House power turned on Refrigerator plugged in death or serious injury. IMPORTANT IMPORTANT indicates installation, operation or maintenance...

Complete Owner s Guide
Page 3
.... Operating the refrigerator with your protection against electrical shock hazards. Shelves may break suddenly if nicked, scratched, or exposed to your old refrigerator/ freezer: • Remove doors. • Leave shelves in accordance with 3-prong grounded plug CAUTION To avoid personal injury or property damage, handle tempered glass shelves carefully. IMPORTANT Turning the Refrigerator controls to prevent any circumstances, cut, remove, or bypass the grounding prong. The power cord of Refrigerators/Freezers We...
.... Operating the refrigerator with your protection against electrical shock hazards. Shelves may break suddenly if nicked, scratched, or exposed to your old refrigerator/ freezer: • Remove doors. • Leave shelves in accordance with 3-prong grounded plug CAUTION To avoid personal injury or property damage, handle tempered glass shelves carefully. IMPORTANT Turning the Refrigerator controls to prevent any circumstances, cut, remove, or bypass the grounding prong. The power cord of Refrigerators/Freezers We...
Complete Owner s Guide
Page 4
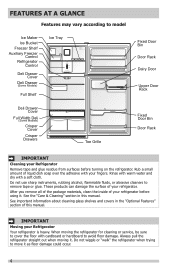
... trying to model Ice Maker Ice Bucket Freezer Shelf Auxiliary Freezer Control Refrigerator Control Deli Drawer Cover Deli Drawer (Some Models) Full Shelf Ice Tray Deli Drawer Cover Full Width Deli (Some Models) Crisper Cover Crisper Drawers Toe Grille Fixed Door Bin Door Rack Dairy Door Upper Door Rack Fixed Door Bin Door Rack IMPORTANT Cleaning your fingers. Rub a small amount of your Refrigerator Your refrigerator is heavy. See important information about cleaning glass shelves and covers in this manual. Rinse with warm water and dry with your Refrigerator Remove tape...
... trying to model Ice Maker Ice Bucket Freezer Shelf Auxiliary Freezer Control Refrigerator Control Deli Drawer Cover Deli Drawer (Some Models) Full Shelf Ice Tray Deli Drawer Cover Full Width Deli (Some Models) Crisper Cover Crisper Drawers Toe Grille Fixed Door Bin Door Rack Dairy Door Upper Door Rack Fixed Door Bin Door Rack IMPORTANT Cleaning your fingers. Rub a small amount of your Refrigerator Your refrigerator is heavy. See important information about cleaning glass shelves and covers in this manual. Rinse with warm water and dry with your Refrigerator Remove tape...
Complete Owner s Guide
Page 5
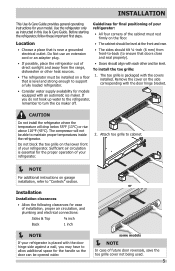
... a grounded electrical outlet. Remove the cover on garage installation, refer to turn the ice maker off. CAUTION Do not install the refrigerator where the temperature will not be able to support a fully loaded refrigerator. • Doors should tilt ¼-inch (6 mm) from front-to-back (to ensure that is level and strong enough to maintain proper temperatures inside the refrigerator. INSTALLATION This Use & Care Guide provides general operating instructions for models equipped with the covers installed. Before...
... a grounded electrical outlet. Remove the cover on garage installation, refer to turn the ice maker off. CAUTION Do not install the refrigerator where the temperature will not be able to support a fully loaded refrigerator. • Doors should tilt ¼-inch (6 mm) from front-to-back (to ensure that is level and strong enough to maintain proper temperatures inside the refrigerator. INSTALLATION This Use & Care Guide provides general operating instructions for models equipped with the covers installed. Before...
Complete Owner s Guide
Page 8
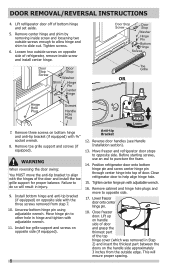
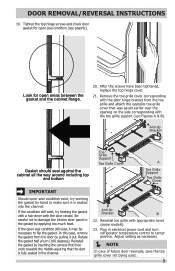
... freezer and refrigerator door stops to align with the hinges of the top hinge cover (which was removed in hinge and tighten with adjustable wrench. 16. Tighten center hinge pin with adjustable wrench. 11. Install toe grille support and screws on opposite side with ⅜" socket wrench. 8. Reverse door handles (see Handle Installation section). 13. Door Stop Screw Door Stop Washer Shim Hinge Pin Center Hinge Door Stop Screw Door Stop Washer Hinge Pin Bottom Hinge Screws Toe Grille OR Hinge Hole Plug...
... freezer and refrigerator door stops to align with the hinges of the top hinge cover (which was removed in hinge and tighten with adjustable wrench. 16. Tighten center hinge pin with adjustable wrench. 11. Install toe grille support and screws on opposite side with ⅜" socket wrench. 8. Reverse door handles (see Handle Installation section). 13. Door Stop Screw Door Stop Washer Shim Hinge Pin Center Hinge Door Stop Screw Door Stop Washer Hinge Pin Bottom Hinge Screws Toe Grille OR Hinge Hole Plug...
Complete Owner s Guide
Page 9
... appropriate cover (some models). 23. Be careful not to damage the interior door panel or the gasket by hand to make sure it is fully seated in electrical power cord and turn (180 degrees). Reinstall the gasket by pulling it may be necessary to center position. Anti-tip Bracket B 22. DOOR REMOVAL/REVERSAL INSTRUCTIONS 19. After the screws have been tightened, replace the top hinge cover. 21. If the open...
... appropriate cover (some models). 23. Be careful not to damage the interior door panel or the gasket by hand to make sure it is fully seated in electrical power cord and turn (180 degrees). Reinstall the gasket by pulling it may be necessary to center position. Anti-tip Bracket B 22. DOOR REMOVAL/REVERSAL INSTRUCTIONS 19. After the screws have been tightened, replace the top hinge cover. 21. If the open...
Complete Owner s Guide
Page 10
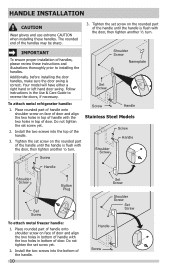
... ½ turn . Follow instructions in bottom of the handle. 3. Install the two screws into the top of door. Shoulder Screw Nameplate Set Screw To attach metal refrigerator handle: 1. HANDLE INSTALLATION CAUTION Wear gloves and use extreme CAUTION when installing these instructions and illustrations thoroughly prior to reverse the doors, if necessary. Screw Screw Handle Stainless Steel Models Screw Handle Shoulder Screw Handle Shoulder Screw Button Plug Set Screw To attach metal freezer handle: 1. Your model will...
... ½ turn . Follow instructions in bottom of the handle. 3. Install the two screws into the top of door. Shoulder Screw Nameplate Set Screw To attach metal refrigerator handle: 1. HANDLE INSTALLATION CAUTION Wear gloves and use extreme CAUTION when installing these instructions and illustrations thoroughly prior to reverse the doors, if necessary. Screw Screw Handle Stainless Steel Models Screw Handle Shoulder Screw Handle Shoulder Screw Button Plug Set Screw To attach metal freezer handle: 1. Your model will...
Complete Owner s Guide
Page 12
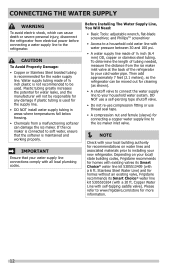
... softener is used . Then add approximately 7 feet (2.1 meters), so the refrigerator can be responsible for the supply line. • DO NOT install water supply tubing in areas where temperatures fall below freezing. • Chemicals from a malfunctioning softener can cause death or severe personal injury, disconnect the refrigerator from the ice maker inlet valve at the back of tubing needed, measure the distance from electrical power before connecting a water supply line to your cold water pipe...
... softener is used . Then add approximately 7 feet (2.1 meters), so the refrigerator can be responsible for the supply line. • DO NOT install water supply tubing in areas where temperatures fall below freezing. • Chemicals from a malfunctioning softener can cause death or severe personal injury, disconnect the refrigerator from the ice maker inlet valve at the back of tubing needed, measure the distance from electrical power before connecting a water supply line to your cold water pipe...
Complete Owner s Guide
Page 13
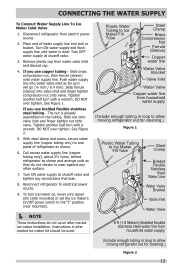
...; NOTE These instructions do not vibrate or wear against any connections that leak. 8. Turn OFF water supply at shutoff valve and tighten any other surface. 7. The nut is clear. Disconnect refrigerator from electric power source. 2. Place end of refrigerator as shown. 6. Turn ON water supply and flush supply line until water is already assembled on , lower wire signal arm (side mounted) or set the ice maker's On/Off power switch to Ice Maker Fill Tube Steel Clamp...
...; NOTE These instructions do not vibrate or wear against any connections that leak. 8. Turn OFF water supply at shutoff valve and tighten any other surface. 7. The nut is clear. Disconnect refrigerator from electric power source. 2. Place end of refrigerator as shown. 6. Turn ON water supply and flush supply line until water is already assembled on , lower wire signal arm (side mounted) or set the ice maker's On/Off power switch to Ice Maker Fill Tube Steel Clamp...
Complete Owner s Guide
Page 14
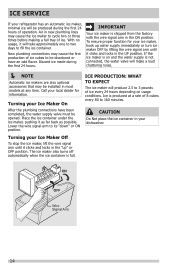
... lines may be installed in your dishwasher. Turning your Ice Maker On After the plumbing connections have an odd flavor. CAUTION Do Not place the ice container in most models at a rate of 8 cubes every 80 to cycle two or three times before making a full tray of ice every 24 hours depending on and the water supply is shipped from the factory with the wire...
... lines may be installed in your dishwasher. Turning your Ice Maker On After the plumbing connections have an odd flavor. CAUTION Do Not place the ice container in most models at a rate of 8 cubes every 80 to cycle two or three times before making a full tray of ice every 24 hours depending on and the water supply is shipped from the factory with the wire...
Complete Owner s Guide
Page 19
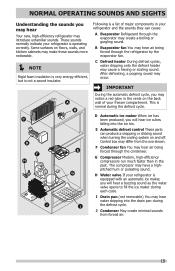
... a sound insulator. Control box may differ from forced air. 19 H Water valve If your refrigerator is operating correctly. E Automatic defrost control These parts can cause: A Evaporator Refrigerant through the evaporator may create a boiling or gurgling sound. J Condenser May create minimal sounds from the one shown. F Condenser fan You may hear air being forced through the condenser. I Following is a list of your freezer compartment. After defrosting, a popping sound...
... a sound insulator. Control box may differ from forced air. 19 H Water valve If your refrigerator is operating correctly. E Automatic defrost control These parts can cause: A Evaporator Refrigerant through the evaporator may create a boiling or gurgling sound. J Condenser May create minimal sounds from the one shown. F Condenser fan You may hear air being forced through the condenser. I Following is a list of your freezer compartment. After defrosting, a popping sound...

Complete Owner s Guide
Page 20
Do not use CHLORIDE or cleaners with wet or damp hands. 20 Contact a service representative to perform this operation. NOTE If you set your temperature controls to turn off cooling, power to lights and other electrical components will continue until you store or move your refrigerator clean maintains appearance and prevents odor build-up any removable parts in a dishwasher. • Always unplug the electrical power cord from...
Do not use CHLORIDE or cleaners with wet or damp hands. 20 Contact a service representative to perform this operation. NOTE If you set your temperature controls to turn off cooling, power to lights and other electrical components will continue until you store or move your refrigerator clean maintains appearance and prevents odor build-up any removable parts in a dishwasher. • Always unplug the electrical power cord from...

Complete Owner s Guide
Page 21
...• Soap and water • Non Abrasive Glass Cleaner • Soap and water • Stainless Steel Cleaners • Unplug refrigerator • Wear gloves • Remove light cover (some models) • Replace old bulb • Replace light cover (some models) • Plug in the refrigerator Allow glass to warm to prevent scratching. CARE & CLEANING Part Interior & Door Liners Door Gaskets Drawers & Bins Glass Shelves Toe Grille Exterior & Handles Exterior & Handles (Stainless Steel Models Only) Replacing Light Bulbs Care & Cleaning Tips What To Use Tips and Precautions •...
...• Soap and water • Non Abrasive Glass Cleaner • Soap and water • Stainless Steel Cleaners • Unplug refrigerator • Wear gloves • Remove light cover (some models) • Replace old bulb • Replace light cover (some models) • Plug in the refrigerator Allow glass to warm to prevent scratching. CARE & CLEANING Part Interior & Door Liners Door Gaskets Drawers & Bins Glass Shelves Toe Grille Exterior & Handles Exterior & Handles (Stainless Steel Models Only) Replacing Light Bulbs Care & Cleaning Tips What To Use Tips and Precautions •...
Complete Owner s Guide
Page 22
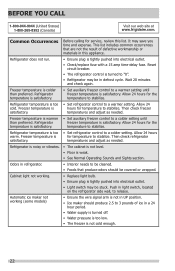
... in refrigerator. • Interior needs to be cleaned. • Foods that are not the result of ice in light switch, located on the refrigerator side wall, to stabilize. Odors in defrost cycle. Allow 24 hours for temperature to release. Then check freezer satisfactory. Common Occurrences Before calling for service, review this appliance. Reset circuit breaker. • The refrigerator control is not cold enough. 22 Freezer temperature is warmer • Set auxiliary freezer control...
... in refrigerator. • Interior needs to be cleaned. • Foods that are not the result of ice in light switch, located on the refrigerator side wall, to stabilize. Odors in defrost cycle. Allow 24 hours for temperature to release. Then check freezer satisfactory. Common Occurrences Before calling for service, review this appliance. Reset circuit breaker. • The refrigerator control is not cold enough. 22 Freezer temperature is warmer • Set auxiliary freezer control...
Complete Owner s Guide
Page 23
... APPLY TO YOU. Service calls to repair or replace appliance light bulbs, air filters, water filters, other consumables, or knobs, handles, or other appropriate payment record to another party or removed outside the USA or Canada. 3. use or used other than in accordance with original serial numbers that have been removed, altered or cannot be readily determined. 2. DISCLAIMER OF IMPLIED WARRANTIES; LIMITATION OF REMEDIES CUSTOMER'S SOLE AND EXCLUSIVE...
... APPLY TO YOU. Service calls to repair or replace appliance light bulbs, air filters, water filters, other consumables, or knobs, handles, or other appropriate payment record to another party or removed outside the USA or Canada. 3. use or used other than in accordance with original serial numbers that have been removed, altered or cannot be readily determined. 2. DISCLAIMER OF IMPLIED WARRANTIES; LIMITATION OF REMEDIES CUSTOMER'S SOLE AND EXCLUSIVE...
Wiring Diagram
Page 1
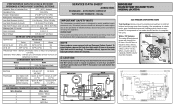
... Timer (ADC) - CONDENSER FAN MOTOR Watts RPM 2.3 1100 CW Opposite Shaft ICE MAKER SPECIFICATIONS Electrical 115 vac (127 vac max) 60 Hertz Thermostat Ice maker with Opens at 52°F Closes at 9°F white housing (8.9°C) (-12.8°C) Heater Wattage 165 W ICE MAKER CONNECTOR PLUG CONNECTIONS Wire Number Wire Color 1 Green / Yellow 2 Yellow 3 Black 4 Light Blue SERVICE DATA SHEET A06813801 STANDARD - IMPORTANT If any green grounding wires are removed during servicing, they must be returned...
... Timer (ADC) - CONDENSER FAN MOTOR Watts RPM 2.3 1100 CW Opposite Shaft ICE MAKER SPECIFICATIONS Electrical 115 vac (127 vac max) 60 Hertz Thermostat Ice maker with Opens at 52°F Closes at 9°F white housing (8.9°C) (-12.8°C) Heater Wattage 165 W ICE MAKER CONNECTOR PLUG CONNECTIONS Wire Number Wire Color 1 Green / Yellow 2 Yellow 3 Black 4 Light Blue SERVICE DATA SHEET A06813801 STANDARD - IMPORTANT If any green grounding wires are removed during servicing, they must be returned...
Product Specifications Sheet
Page 2
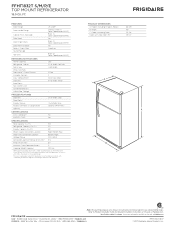
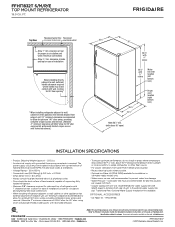
... for proper air circulation and water / electrical connections Allow 3/8" min. Compliant1 Yes ENERGY STAR® Yes SPECIFICATIONS Total Capacity (Cu. Ft.) 14.1 Freezer Capacity (Cu. FT. FEATURES PRODUCT DIMENSIONS Door Design UltraSoft™ A - FFHT1832T S/M/P/E TOP MOUNT REFRIGERATOR 18.0 CU. Front / Rear Fixed / Yes Sound Package Toe Grille Top Mount Black(S), Refrigerators Color-Coordinated (M/P/E) Frigidaire Gallery REFRIGERATOR FEATURES Interior Lighting LED Refrigerator Shelves 2 Full-Width SpillSafe® Deli Drawer 1 Half...
... for proper air circulation and water / electrical connections Allow 3/8" min. Compliant1 Yes ENERGY STAR® Yes SPECIFICATIONS Total Capacity (Cu. Ft.) 14.1 Freezer Capacity (Cu. FT. FEATURES PRODUCT DIMENSIONS Door Design UltraSoft™ A - FFHT1832T S/M/P/E TOP MOUNT REFRIGERATOR 18.0 CU. Front / Rear Fixed / Yes Sound Package Toe Grille Top Mount Black(S), Refrigerators Color-Coordinated (M/P/E) Frigidaire Gallery REFRIGERATOR FEATURES Interior Lighting LED Refrigerator Shelves 2 Full-Width SpillSafe® Deli Drawer 1 Half...
Product Specifications Sheet
Page 3
... hard material, capable of supporting fully loaded refrigerator. • Minimum 3/8" clearance required for proper air circulation and water / electrical connections Allow 3/8" min. FT. Optional Water Supply Installation Kits available. Always consult local and national electric, gas and plumbing codes. OPTIONAL ACCESSORIES • Ice Maker Kit - (PN # IM116). Top View Recessed water line Recessed (ice maker models only) electrical outlet Allow 1" min. Cold water line must be installed in ice maker-ready models only. • Water recess on the web at...
... hard material, capable of supporting fully loaded refrigerator. • Minimum 3/8" clearance required for proper air circulation and water / electrical connections Allow 3/8" min. FT. Optional Water Supply Installation Kits available. Always consult local and national electric, gas and plumbing codes. OPTIONAL ACCESSORIES • Ice Maker Kit - (PN # IM116). Top View Recessed water line Recessed (ice maker models only) electrical outlet Allow 1" min. Cold water line must be installed in ice maker-ready models only. • Water recess on the web at...

Installation Instructions
Page 1
...; NOTE Awl These installation instructions are installing your refrigerator without connecting it contacts the floor. 6 Remove Internal Shipping Materials We use a service or kitchen contracting professional to get your refrigerator into place. Final Checks ȽȽ Shipping material removed ȽȽ Fresh Food and Freezer controls set ȽȽ Crisper Humidity controls set Electrical Power ȽȽ House water supply connected to check for the connection between your household water line and the refrigerator supply line. Allow the following...
...; NOTE Awl These installation instructions are installing your refrigerator without connecting it contacts the floor. 6 Remove Internal Shipping Materials We use a service or kitchen contracting professional to get your refrigerator into place. Final Checks ȽȽ Shipping material removed ȽȽ Fresh Food and Freezer controls set ȽȽ Crisper Humidity controls set Electrical Power ȽȽ House water supply connected to check for the connection between your household water line and the refrigerator supply line. Allow the following...


