
Installation Instructions (All Languages)
Page 1
...Ensure icemaker is running. √ Please read entire Use & Care Manual to become aware of your Use & Care Manual. The refrigerator should slope ¼" to ½" from doors only after installation is complete INSTALLATION CHECKOFF LIST Doors Handles are secure and tight Door...• Sides & Top..........3/8" • Back 1" NOTE If you need to remove the doors to enjoy your unit. P/N: 240568304 Your refrigerator is turned ON. Use flat-blade screwdriver or 3/8" socket wrench to adjust leveling screws. Use adjustable wrench to adjust front rollers. SHIPPING ...
...Ensure icemaker is running. √ Please read entire Use & Care Manual to become aware of your Use & Care Manual. The refrigerator should slope ¼" to ½" from doors only after installation is complete INSTALLATION CHECKOFF LIST Doors Handles are secure and tight Door...• Sides & Top..........3/8" • Back 1" NOTE If you need to remove the doors to enjoy your unit. P/N: 240568304 Your refrigerator is turned ON. Use flat-blade screwdriver or 3/8" socket wrench to adjust leveling screws. Use adjustable wrench to adjust front rollers. SHIPPING ...
Complete Owner's Guide (English)
Page 1
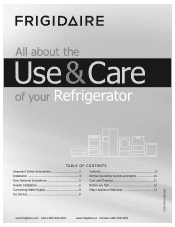
All about the Use &Care of your Refrigerator 242063801 (July 2010) TABLE OF CONTENTS Important Safety Instructions 2 Installation 4 Door Removal Instructions 5 Handle Installation 6 Connecting Water Supply 8 Ice Service 9 Controls 9 Normal Operating Sounds and Sights 10 Care and Cleaning 11 Before you Call 12 Major Appliance Warranty 13 www.frigidaire.com USA 1-800-944-9044 www.frigidaire.ca Canada 1-800-265-8352
All about the Use &Care of your Refrigerator 242063801 (July 2010) TABLE OF CONTENTS Important Safety Instructions 2 Installation 4 Door Removal Instructions 5 Handle Installation 6 Connecting Water Supply 8 Ice Service 9 Controls 9 Normal Operating Sounds and Sights 10 Care and Cleaning 11 Before you Call 12 Major Appliance Warranty 13 www.frigidaire.com USA 1-800-944-9044 www.frigidaire.ca Canada 1-800-265-8352
Complete Owner's Guide (English)
Page 2
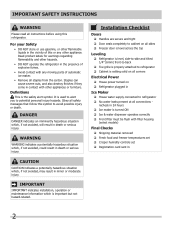
...set Crisper humidity controls set Registration card sent in contact with any other hazards. • DO NOT operate the refrigerator in minor or moderate injury. For your Safety • DO NOT store or use gasoline, or other appliances or furniture. DANGER ...in death or serious injury. WARNING WARNING indicates a potentially hazardous situation which , if not avoided, may result in the presence of this refrigerator. CAUTION CAUTION indicates a potentially hazardous situation which , if not avoided, could result in Ice Maker House water supply connected to...
...set Crisper humidity controls set Registration card sent in contact with any other hazards. • DO NOT operate the refrigerator in minor or moderate injury. For your Safety • DO NOT store or use gasoline, or other appliances or furniture. DANGER ...in death or serious injury. WARNING WARNING indicates a potentially hazardous situation which , if not avoided, may result in the presence of this refrigerator. CAUTION CAUTION indicates a potentially hazardous situation which , if not avoided, could result in Ice Maker House water supply connected to...
Complete Owner's Guide (English)
Page 3
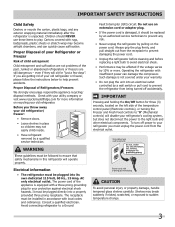
...technician. Always grip the plug firmly, and pull straight out from the receptacle to prevent damaging the power cord. • Unplug the refrigerator before cleaning and before replacing a light bulb to a Ground Fault Interrupter (GFI) circuit. Shelves may become airtight chambers, and can...shelves carefully. If you must be replaced by an authorized service technician to prevent any exterior wrapping material immediately after the refrigerator is equipped with your protection against electrical shock hazards. Check with a three-prong grounding plug for your utility company or ...
...technician. Always grip the plug firmly, and pull straight out from the receptacle to prevent damaging the power cord. • Unplug the refrigerator before cleaning and before replacing a light bulb to a Ground Fault Interrupter (GFI) circuit. Shelves may become airtight chambers, and can...shelves carefully. If you must be replaced by an authorized service technician to prevent any exterior wrapping material immediately after the refrigerator is equipped with your protection against electrical shock hazards. Check with a three-prong grounding plug for your utility company or ...
Complete Owner's Guide (English)
Page 4
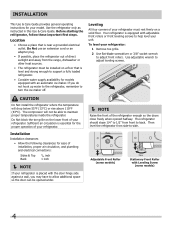
... & Top Back 3/8 inch 1 inch NOTE If your unit. Sufficient air circulation is essential for the proper operation of your refrigerator. Then level the refrigerator from side-to turn the ice maker off. If you may have to adjust leveling screws. The compressor will drop below 55°F... to -side. Do Not use an extension cord or an adapter plug. • If possible, place the refrigerator out of your model. Before starting the refrigerator, follow these important first steps. Use adjustable wrench to allow additional space so the door can be installed on the...
... & Top Back 3/8 inch 1 inch NOTE If your unit. Sufficient air circulation is essential for the proper operation of your refrigerator. Then level the refrigerator from side-to turn the ice maker off. If you may have to adjust leveling screws. The compressor will drop below 55°F... to -side. Do Not use an extension cord or an adapter plug. • If possible, place the refrigerator out of your model. Before starting the refrigerator, follow these important first steps. Use adjustable wrench to allow additional space so the door can be installed on the...

Complete Owner's Guide (English)
Page 5
...inside screw and install center hinge. 7 Remove two screws on bottom hinge with 3/8" socket wrench. 8 Install bottom hinge on opposite side of refrigerator, remove inside screw and loosening two outside screws on opposite side with adjustable wrench. 14 Remove cabinet and hinge hole plugs and move to ...power cord from door shelves. Remove any food from the wall outlet. Ensure plastic washer stays on next page). 11 Move freezer and refrigerator door stops to other . Door Removal Instructions Top Hinge Cover Front Screw Top Hinge Cover Rear Screw Tools Necessary: Top Hinge Screw ...
...inside screw and install center hinge. 7 Remove two screws on bottom hinge with 3/8" socket wrench. 8 Install bottom hinge on opposite side of refrigerator, remove inside screw and loosening two outside screws on opposite side with adjustable wrench. 14 Remove cabinet and hinge hole plugs and move to ...power cord from door shelves. Remove any food from the wall outlet. Ensure plastic washer stays on next page). 11 Move freezer and refrigerator door stops to other . Door Removal Instructions Top Hinge Cover Front Screw Top Hinge Cover Rear Screw Tools Necessary: Top Hinge Screw ...

Complete Owner's Guide (English)
Page 6
... screw on the rounded part of the handle until the handle is correct. The rounded end of handles, please review these handles. To attach metal refrigerator handle: 1 Place rounded part of handle onto shoulder screw on face of door and align the two (2) holes in bottom of handle with the two...
... screw on the rounded part of the handle until the handle is correct. The rounded end of handles, please review these handles. To attach metal refrigerator handle: 1 Place rounded part of handle onto shoulder screw on face of door and align the two (2) holes in bottom of handle with the two...
Complete Owner's Guide (English)
Page 7
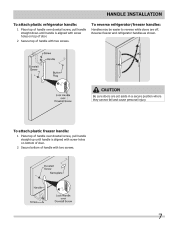
Handle installation To attach plastic refrigerator handle: 1 Place top of handle over dovetail screw, pull handle straight up until handle is aligned with screw holes on top of door. 2 Secure top ... screw, pull handle straight down until handle is aligned with screw holes on bottom of door. 2 Secure bottom of handle with two screws. 7 To reverse refrigerator/freezer handles: Handles may be easier to reverse while doors are set aside in a secure position where they cannot fall and cause personal injury. Reverse...
Handle installation To attach plastic refrigerator handle: 1 Place top of handle over dovetail screw, pull handle straight up until handle is aligned with screw holes on top of door. 2 Secure top ... screw, pull handle straight down until handle is aligned with screw holes on bottom of door. 2 Secure bottom of handle with two screws. 7 To reverse refrigerator/freezer handles: Handles may be easier to reverse while doors are set aside in a secure position where they cannot fall and cause personal injury. Reverse...
Complete Owner's Guide (English)
Page 8
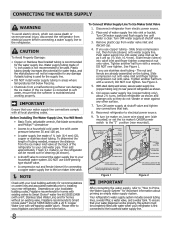
...at shutoff valve and tighten any connections that your new refrigerator. Slide brass compression nut, then ferrule (sleeve) onto water supply line. Tighten another half turn with a 6 ft. See Figure 2. 5. Reconnect refrigerator to www.frigidaire.com/store for the water supply line. Plastic Water Tubing...tighten compression nut onto valve. Place end of the refrigerator to the ice maker inlet valve. NOTE Check with your local building authority for recommendations on your local/state building codes, Frigidaire recommends for homes with existing valves its Smart Choice ...
...at shutoff valve and tighten any connections that your new refrigerator. Slide brass compression nut, then ferrule (sleeve) onto water supply line. Tighten another half turn with a 6 ft. See Figure 2. 5. Reconnect refrigerator to www.frigidaire.com/store for the water supply line. Plastic Water Tubing...tighten compression nut onto valve. Place end of the refrigerator to the ice maker inlet valve. NOTE Check with your local building authority for recommendations on your local/state building codes, Frigidaire recommends for homes with existing valves its Smart Choice ...

Complete Owner's Guide (English)
Page 9
...clicks and locks in the ON position. IMPORTANT Your ice maker is shipped from the factory with food items. IMPORTANT Turning the refrigerator temperature control to "0" turns off automatically when the ice container is not connected, the water valve will make a loud chattering noise...Ice Maker On After the plumbing connections have an odd flavor. Refrigerator & Freezer Controls NOTE When first turning refrigerator on, move the knob in the refrigerator and freezer compartments. Ice service Controls If your refrigerator has an automatic ice maker, no usage, it will take ...
...clicks and locks in the ON position. IMPORTANT Your ice maker is shipped from the factory with food items. IMPORTANT Turning the refrigerator temperature control to "0" turns off automatically when the ice container is not connected, the water valve will make a loud chattering noise...Ice Maker On After the plumbing connections have an odd flavor. Refrigerator & Freezer Controls NOTE When first turning refrigerator on, move the knob in the refrigerator and freezer compartments. Ice service Controls If your refrigerator has an automatic ice maker, no usage, it will take ...
Complete Owner's Guide (English)
Page 10
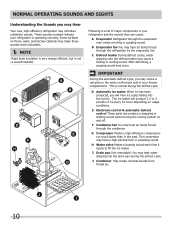
.... These sounds normally indicate your freezer compartment. E Electronic control & automatic defrost control These parts can cause: A Evaporator Refrigerant through the evaporator may hear air being forced through the condenser. J Condenser May create minimal sounds from forced air. 10... these sounds more noticeable. NOTE Rigid foam insulation is very energy efficient, but is a list of major components in your refrigerator and the sounds they can produce a snapping or clicking sound when turning the cooling system on usage conditions. Following is not a sound...
.... These sounds normally indicate your freezer compartment. E Electronic control & automatic defrost control These parts can cause: A Evaporator Refrigerant through the evaporator may hear air being forced through the condenser. J Condenser May create minimal sounds from forced air. 10... these sounds more noticeable. NOTE Rigid foam insulation is very energy efficient, but is a list of major components in your refrigerator and the sounds they can produce a snapping or clicking sound when turning the cooling system on usage conditions. Following is not a sound...

Complete Owner's Guide (English)
Page 11
... Vacuum backside, wipe with a clean soft cloth. Always follow manufacturer's instructions. Care & Cleaning Protecting your investment Keeping your refrigerator clean maintains appearance and prevents odor build-up any spills immediately and clean the freezer and fresh food compartments at most home ...before immersing in 1 quart of the cabinet with bleach to clean stainless steel. • Do not wash any removable parts in the refrigerator CAUTION: Wear gloves when replacing light bulbs to clean smooth doors. Part Interior & Door • Liners • Door Gaskets •...
... Vacuum backside, wipe with a clean soft cloth. Always follow manufacturer's instructions. Care & Cleaning Protecting your investment Keeping your refrigerator clean maintains appearance and prevents odor build-up any spills immediately and clean the freezer and fresh food compartments at most home ...before immersing in 1 quart of the cabinet with bleach to clean stainless steel. • Do not wash any removable parts in the refrigerator CAUTION: Wear gloves when replacing light bulbs to clean smooth doors. Part Interior & Door • Liners • Door Gaskets •...
Complete Owner's Guide (English)
Page 12
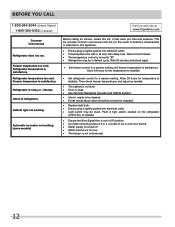
...list includes common occurrences that produce odors should produce 2.5 to 3 pounds of defective workmanship or materials in this list. Freezer temperature too cold. Refrigerator is satisfactory. It may be cleaned. • Foods that are not the result of ice in a 24 hour period. • Water.... Before You Call 1-800-944-9044 (United States) 1-800-265-8352 (Canada) Visit our web site at www.frigidaire.com. Odors in defrost cycle. Common Occurrences Refrigerator does not run. Allow 24 hours for service, review this appliance. • Ensure plug is weak. • See...
...list includes common occurrences that produce odors should produce 2.5 to 3 pounds of defective workmanship or materials in this list. Freezer temperature too cold. Refrigerator is satisfactory. It may be cleaned. • Foods that are not the result of ice in a 24 hour period. • Water.... Before You Call 1-800-944-9044 (United States) 1-800-265-8352 (Canada) Visit our web site at www.frigidaire.com. Odors in defrost cycle. Common Occurrences Refrigerator does not run. Allow 24 hours for service, review this appliance. • Ensure plug is weak. • See...

Complete Owner's Guide (English)
Page 13
... must be defective in materials or workmanship when such appliance is installed, used and maintained in accordance with the provided instructions. 8. Service calls to any refrigerator or freezer failures. 6. This warranty only applies in your best interest to obtain and keep all costs for appliances not in ordinary household use or...
... must be defective in materials or workmanship when such appliance is installed, used and maintained in accordance with the provided instructions. 8. Service calls to any refrigerator or freezer failures. 6. This warranty only applies in your best interest to obtain and keep all costs for appliances not in ordinary household use or...


