
Complete Owner's Guide (English)
Page 1
All about the Use &Care of your Refrigerator 242063800 (November 2009) TABLE OF CONTENTS Important Safety Instructions 2 Installation 4 Door Removal Instructions 5 Handle Installation 6 Connecting Water Supply 8 Ice Service 9 Controls 9 Normal Operating Sounds and Sights 10 Care and Cleaning 11 Before you Call 12 Major Appliance Warranty 13 www.frigidaire.com USA 1-800-944-9044 www.frigidaire.ca Canada 1-800-265-8352
All about the Use &Care of your Refrigerator 242063800 (November 2009) TABLE OF CONTENTS Important Safety Instructions 2 Installation 4 Door Removal Instructions 5 Handle Installation 6 Connecting Water Supply 8 Ice Service 9 Controls 9 Normal Operating Sounds and Sights 10 Care and Cleaning 11 Before you Call 12 Major Appliance Warranty 13 www.frigidaire.com USA 1-800-944-9044 www.frigidaire.ca Canada 1-800-265-8352

Complete Owner's Guide (English)
Page 2
... contact with any other hazards. • DO NOT operate the refrigerator in Ice Maker House water supply connected to refrigerator No water leaks present at all safety messages that follow this refrigerator. WARNING WARNING indicates a potentially hazardous situation which , if not ... indicates an imminently hazardous situation which is setting solid on all corners Electrical Power House power turned on Refrigerator plugged in the presence of explosive fumes. • Avoid contact with other appliances or furniture. recheck in 24 hours ...
... contact with any other hazards. • DO NOT operate the refrigerator in Ice Maker House water supply connected to refrigerator No water leaks present at all safety messages that follow this refrigerator. WARNING WARNING indicates a potentially hazardous situation which , if not ... indicates an imminently hazardous situation which is setting solid on all corners Electrical Power House power turned on Refrigerator plugged in the presence of explosive fumes. • Avoid contact with other appliances or furniture. recheck in 24 hours ...

Complete Owner's Guide (English)
Page 3
...; Do not plug the unit into an electrical outlet controlled by a qualified service technician. Electrical information • The refrigerator must be installed in this refrigerator will operate properly. Children should be plugged directly into its own dedicated 115 Volt, 60 Hz., 15 Amp, AC only... ordinances. Important Safety Instructions Child Safety Destroy or recycle the carton, plastic bags, and any exterior wrapping material immediately after the refrigerator is damaged, it should never use an extension cord or adapter plug. • If the power cord is unpacked. It ...
...; Do not plug the unit into an electrical outlet controlled by a qualified service technician. Electrical information • The refrigerator must be installed in this refrigerator will operate properly. Children should be plugged directly into its own dedicated 115 Volt, 60 Hz., 15 Amp, AC only... ordinances. Important Safety Instructions Child Safety Destroy or recycle the carton, plastic bags, and any exterior wrapping material immediately after the refrigerator is damaged, it should never use an extension cord or adapter plug. • If the power cord is unpacked. It ...

Complete Owner's Guide (English)
Page 4
...(some models) Raise Stationary Front Roller with adjustable front rollers or front leveling screws to help level your refrigerator must be installed on the lower front of your refrigerator. Installation This Use & Care Guide provides general operating instructions for ease of installation, proper air circulation,... hinge side against a wall, you do not hook up water to the refrigerator, remember to turn the ice maker off. Before starting the refrigerator, follow these important first steps. To level your refrigerator. Do Not block the toe grille on a floor that is equipped with ...
...(some models) Raise Stationary Front Roller with adjustable front rollers or front leveling screws to help level your refrigerator must be installed on the lower front of your refrigerator. Installation This Use & Care Guide provides general operating instructions for ease of installation, proper air circulation,... hinge side against a wall, you do not hook up water to the refrigerator, remember to turn the ice maker off. Before starting the refrigerator, follow these important first steps. To level your refrigerator. Do Not block the toe grille on a floor that is equipped with ...
Complete Owner's Guide (English)
Page 5
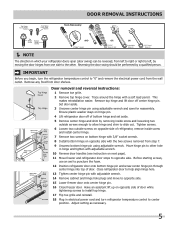
...adjustable wrench. 14 Remove cabinet and hinge hole plugs and move to other . Adjust setting as necessary. 5 IMPORTANT Before you begin, turn refrigerator temperature control to slide out. Tighten screws. 6 Loosen two outside screws enough to allow hinge and shim to center position. Have an ...assistant lift up on opposite side with 3/8" socket wrench. 8 Install bottom hinge on opposite side of refrigerator, remove inside screw and install center hinge. 7 Remove two screws on bottom hinge with the two screws removed from door shelves. Before ...
...adjustable wrench. 14 Remove cabinet and hinge hole plugs and move to other . Adjust setting as necessary. 5 IMPORTANT Before you begin, turn refrigerator temperature control to slide out. Tighten screws. 6 Loosen two outside screws enough to allow hinge and shim to center position. Have an ...assistant lift up on opposite side with 3/8" socket wrench. 8 Install bottom hinge on opposite side of refrigerator, remove inside screw and install center hinge. 7 Remove two screws on bottom hinge with the two screws removed from door shelves. Before ...

Complete Owner's Guide (English)
Page 6
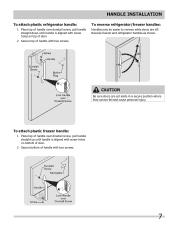
... of handle onto shoulder screw on the rounded part of the handles may be sharp. IMPORTANT To ensure proper installation of door. To attach metal refrigerator handle: 1 Place rounded part of handle onto shoulder screw on the rounded part of door. The rounded end of the handle until the handle is...
... of handle onto shoulder screw on the rounded part of the handles may be sharp. IMPORTANT To ensure proper installation of door. To attach metal refrigerator handle: 1 Place rounded part of handle onto shoulder screw on the rounded part of door. The rounded end of the handle until the handle is...
Complete Owner's Guide (English)
Page 7
... be easier to reverse while doors are set aside in a secure position where they cannot fall and cause personal injury. Handle installation To attach plastic refrigerator handle: 1 Place top of handle over dovetail screw, pull handle straight up until handle is aligned with screw holes on top of door. 2 Secure top...
... be easier to reverse while doors are set aside in a secure position where they cannot fall and cause personal injury. Handle installation To attach plastic refrigerator handle: 1 Place top of handle over dovetail screw, pull handle straight up until handle is aligned with screw holes on top of door. 2 Secure top...

Complete Owner's Guide (English)
Page 8
...your local building authority for homes with existing valves its Smart Choice water® line kit 5305510264 (with your new refrigerator. Please refer to www.frigidaire.com/store for connecting a copper water supply line to electrical power source. 9. Copper Water Line with a wrench... any other surface. 7. Connecting the Water Supply WARNING To avoid electric shock, which can cause death or severe personal injury, disconnect the refrigerator from electric power source. 2. If you use a self-piercing type shutoff valve. • A compression nut and ferrule (sleeve) for...
...your local building authority for homes with existing valves its Smart Choice water® line kit 5305510264 (with your new refrigerator. Please refer to www.frigidaire.com/store for connecting a copper water supply line to electrical power source. 9. Copper Water Line with a wrench... any other surface. 7. Connecting the Water Supply WARNING To avoid electric shock, which can cause death or severe personal injury, disconnect the refrigerator from electric power source. 2. If you use a self-piercing type shutoff valve. • A compression nut and ferrule (sleeve) for...
Complete Owner's Guide (English)
Page 9
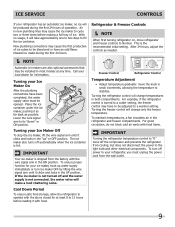
...from cooling, but does not disconnect the power to its "down" or ON position. Turning the freezer control will be installed in the refrigerator and freezer compartments. Call your Ice Maker On After the plumbing connections have an odd flavor. With no ice will change temperatures in the... colder setting, the freezer control may cause the first production of ice. The ice maker also turns off power to Normal. Turning the refrigerator control will take approximately one to two days to 12 hours before making a full tray of ice cubes to operate with food. To ...
...from cooling, but does not disconnect the power to its "down" or ON position. Turning the freezer control will be installed in the refrigerator and freezer compartments. Call your Ice Maker On After the plumbing connections have an odd flavor. With no ice will change temperatures in the... colder setting, the freezer control may cause the first production of ice. The ice maker also turns off power to Normal. Turning the refrigerator control will take approximately one to two days to 12 hours before making a full tray of ice cubes to operate with food. To ...
Complete Owner's Guide (English)
Page 10
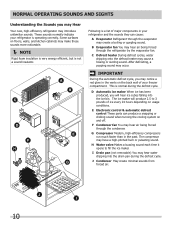
... 3 pounds of ice every 24 hours depending on the back wall of major components in your refrigerator is not a sound insulator. These sounds normally indicate your refrigerator and the sounds they can produce a snapping or clicking sound when turning the cooling system on ...cause a hissing or sizzling sound. E Electronic control & automatic defrost control These parts can cause: A Evaporator Refrigerant through the evaporator may hear air being forced through the refrigerator by the evaporator fan. F Condenser fan You may notice a red glow in the past. IMPORTANT During the...
... 3 pounds of ice every 24 hours depending on the back wall of major components in your refrigerator is not a sound insulator. These sounds normally indicate your refrigerator and the sounds they can produce a snapping or clicking sound when turning the cooling system on ...cause a hissing or sizzling sound. E Electronic control & automatic defrost control These parts can cause: A Evaporator Refrigerant through the evaporator may hear air being forced through the refrigerator by the evaporator fan. F Condenser fan You may notice a red glow in the past. IMPORTANT During the...

Complete Owner's Guide (English)
Page 11
...stainless steel cleaner. Wash the rest of sponge or cloth before cleaning. • Remove adhesive labels by hand. Do not touch refrigerated surfaces with non-abrasive soapy water and a dishcloth. Failure to clean drawer runners and tracks. Soap and water Use a soft ... which can be sure to wring excess water out of the cabinet with a clean soft cloth. Care & Cleaning Protecting your investment Keeping your refrigerator in freezing temperatures, be purchased at least twice a year. Part Interior & Door • Liners • Door Gaskets • Drawers &...
...stainless steel cleaner. Wash the rest of sponge or cloth before cleaning. • Remove adhesive labels by hand. Do not touch refrigerated surfaces with non-abrasive soapy water and a dishcloth. Failure to clean drawer runners and tracks. Soap and water Use a soft ... which can be sure to wring excess water out of the cabinet with a clean soft cloth. Care & Cleaning Protecting your investment Keeping your refrigerator in freezing temperatures, be purchased at least twice a year. Part Interior & Door • Liners • Door Gaskets • Drawers &...

Complete Owner's Guide (English)
Page 12
...Floor is weak. • See Normal Operating Sounds and Sights section. • Interior needs to "O". • Refrigerator may save you time and expense. Refrigerator is satisfactory. Refrigerator temperature is noisy or vibrates. Odors in UP position. • Ice maker should be covered or wrapped. &#... 1-800-265-8352 (Canada) Visit our web site at www.frigidaire.com. Allow 24 hours for the temperature to stabilize. • Set refrigerator control to stabilize. Push in light switch, located on the refrigerator control box, to a warmer setting until freezer temperature is not...
...Floor is weak. • See Normal Operating Sounds and Sights section. • Interior needs to "O". • Refrigerator may save you time and expense. Refrigerator is satisfactory. Refrigerator temperature is noisy or vibrates. Odors in UP position. • Ice maker should be covered or wrapped. &#... 1-800-265-8352 (Canada) Visit our web site at www.frigidaire.com. Allow 24 hours for the temperature to stabilize. • Set refrigerator control to stabilize. Push in light switch, located on the refrigerator control box, to a warmer setting until freezer temperature is not...

Complete Owner's Guide (English)
Page 13
... will pay all receipts. THIS WRITTEN WARRANTY GIVES YOU SPECIFIC LEGAL RIGHTS. This warranty only applies in a commercial setting. 7. Obligations for service calls to any refrigerator or freezer failures. 6. USA 1.800.944.9044 Electrolux Major Appliances North America P.O. Box 212378 Augusta, GA 30907 Canada 1.800.265.8352 Electrolux Canada Corp. 5855...
... will pay all receipts. THIS WRITTEN WARRANTY GIVES YOU SPECIFIC LEGAL RIGHTS. This warranty only applies in a commercial setting. 7. Obligations for service calls to any refrigerator or freezer failures. 6. USA 1.800.944.9044 Electrolux Major Appliances North America P.O. Box 212378 Augusta, GA 30907 Canada 1.800.265.8352 Electrolux Canada Corp. 5855...

Wiring Diagram (All Languages)
Page 2
.... BLUE BLACK BLACK YELLOW GRN/YEL GRN/YEL RED RED YEL/RED BROWN BLUE LT. BLUE YEL/BLACK MIDLEVEL LIGHT LT. BLUE REFRIGERATOR LIGHT LT. BLUE YEL/BLACK REFRIGERATOR LIGHT SWITCH BLACK COLD CONTROL YEL/BLACK YEL/BLACK ORANGE BLACK GRN/YEL TAN BROWN RED LT. BLUE BLACK BLACK GRN/YEL BLUE... LT. BLUE LT. BLUE SPLICE D DIODES TO BE POLARIZED AS SHOWN. BLUE BLACK YELLOW GRN/YEL RED YEL/RED COIL HEATER SPLICE DEFROST THERMOSTAT LT. REFRIGERATOR COMPARTMENT DEFROST TIMER BROWN ORANGE RED LT.
.... BLUE BLACK BLACK YELLOW GRN/YEL GRN/YEL RED RED YEL/RED BROWN BLUE LT. BLUE YEL/BLACK MIDLEVEL LIGHT LT. BLUE REFRIGERATOR LIGHT LT. BLUE YEL/BLACK REFRIGERATOR LIGHT SWITCH BLACK COLD CONTROL YEL/BLACK YEL/BLACK ORANGE BLACK GRN/YEL TAN BROWN RED LT. BLUE BLACK BLACK GRN/YEL BLUE... LT. BLUE LT. BLUE SPLICE D DIODES TO BE POLARIZED AS SHOWN. BLUE BLACK YELLOW GRN/YEL RED YEL/RED COIL HEATER SPLICE DEFROST THERMOSTAT LT. REFRIGERATOR COMPARTMENT DEFROST TIMER BROWN ORANGE RED LT.

Installation Instructions (All Languages)
Page 1
... 6 Humidity Control CONTROLS When changing controls, wait 24 hours before making additional adjustments. (For models with LED display, 3 to refrigerator No water leaks present at all corners Electrical Power House power turned on a solid floor. P/N: 240568304 SHIPPING MATERIAL 3 Remove Shipping... Checks Shipping material removed Fresh Food and Freezer controls set Crisper Humidity controls set Registration Card sent in place. The refrigerator should slope ¼" to ½" from doors only after installation is complete INSTALLATION CHECKOFF LIST Doors Handles are secure...
... 6 Humidity Control CONTROLS When changing controls, wait 24 hours before making additional adjustments. (For models with LED display, 3 to refrigerator No water leaks present at all corners Electrical Power House power turned on a solid floor. P/N: 240568304 SHIPPING MATERIAL 3 Remove Shipping... Checks Shipping material removed Fresh Food and Freezer controls set Crisper Humidity controls set Registration Card sent in place. The refrigerator should slope ¼" to ½" from doors only after installation is complete INSTALLATION CHECKOFF LIST Doors Handles are secure...


