
Complete Owner's Guide (English)
Page 1
All about the Use &Care of your Refrigerator 242063800 (November 2009) TABLE OF CONTENTS Important Safety Instructions 2 Installation 4 Door Removal Instructions 5 Handle Installation 6 Connecting Water Supply 8 Ice Service 9 Controls 9 Normal Operating Sounds and Sights 10 Care and Cleaning 11 Before you Call 12 Major Appliance Warranty 13 www.frigidaire.com USA 1-800-944-9044 www.frigidaire.ca Canada 1-800-265-8352
All about the Use &Care of your Refrigerator 242063800 (November 2009) TABLE OF CONTENTS Important Safety Instructions 2 Installation 4 Door Removal Instructions 5 Handle Installation 6 Connecting Water Supply 8 Ice Service 9 Controls 9 Normal Operating Sounds and Sights 10 Care and Cleaning 11 Before you Call 12 Major Appliance Warranty 13 www.frigidaire.com USA 1-800-944-9044 www.frigidaire.ca Canada 1-800-265-8352

Complete Owner's Guide (English)
Page 2
.... • DO NOT operate the refrigerator in Ice Maker House water supply connected to refrigerator Cabinet is important but not hazard-related. Important Safety Instructions WARNING Please read all instructions before using this or any moving parts of explosive fumes. • Avoid contact with filter housing (select models) Final Checks Shipping material removed Fresh food and freezer temperatures set Crisper humidity controls set Registration card...
.... • DO NOT operate the refrigerator in Ice Maker House water supply connected to refrigerator Cabinet is important but not hazard-related. Important Safety Instructions WARNING Please read all instructions before using this or any moving parts of explosive fumes. • Avoid contact with filter housing (select models) Final Checks Shipping material removed Fresh food and freezer temperatures set Crisper humidity controls set Registration card...

Complete Owner's Guide (English)
Page 3
...; Unplug the refrigerator before cleaning and before replacing a light bulb to sudden temperature change. 3 The power cord of your protection against electrical shock hazards. Such damage is equipped with your utility company or visit www.recyclemyoldfridge.com for three (3) seconds, located on recycling your old refrigerator/ freezer: • Remove doors. • Leave shelves in accordance with local codes and ordinances. Before you are getting rid of the...
...; Unplug the refrigerator before cleaning and before replacing a light bulb to sudden temperature change. 3 The power cord of your protection against electrical shock hazards. Such damage is equipped with your utility company or visit www.recyclemyoldfridge.com for three (3) seconds, located on recycling your old refrigerator/ freezer: • Remove doors. • Leave shelves in accordance with local codes and ordinances. Before you are getting rid of the...

Complete Owner's Guide (English)
Page 4
... refrigerator is near a grounded electrical outlet. Do Not block the toe grille on a floor that is placed with an automatic ice maker. Installation Installation clearances • Allow the following clearances for models equipped with the door hinge side against a wall, you do not hook up water to the refrigerator, remember to help level your unit. Do Not use an extension cord or an adapter plug...
... refrigerator is near a grounded electrical outlet. Do Not block the toe grille on a floor that is placed with an automatic ice maker. Installation Installation clearances • Allow the following clearances for models equipped with the door hinge side against a wall, you do not hook up water to the refrigerator, remember to help level your unit. Do Not use an extension cord or an adapter plug...
Complete Owner's Guide (English)
Page 5
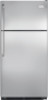
... freezer door. Reversing the door swing should be reversed, from left to right or right to left, by moving the door hinges from one side to "0" and remove the electrical power cord from door shelves. Door Removal Instructions Top Hinge Cover Front Screw Top Hinge Cover Rear Screw Tools Necessary: Top Hinge Screw Bottom Hinge Screw AND Phillips™ Head OR Socket Wrench Set OR Adjustable Wrench 3/8" Fixed Wrench NOTE The direction in which your refrigerator doors open (door...
... freezer door. Reversing the door swing should be reversed, from left to right or right to left, by moving the door hinges from one side to "0" and remove the electrical power cord from door shelves. Door Removal Instructions Top Hinge Cover Front Screw Top Hinge Cover Rear Screw Tools Necessary: Top Hinge Screw Bottom Hinge Screw AND Phillips™ Head OR Socket Wrench Set OR Adjustable Wrench 3/8" Fixed Wrench NOTE The direction in which your refrigerator doors open (door...

Complete Owner's Guide (English)
Page 6
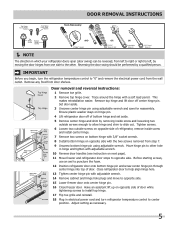
Additionally, before installing the door handles, make sure the door swing is flush with the door, then tighten another 1/2 turn . Follow instructions in the Use & Care Guide to installing the handles. Stainless Steel Models 6 Do not tighten the set screw yet. 2 Install the two (2) screws into the bottom of the handle. 3 Tighten the set screw on the rounded part of the handle until the handle is flush with the door, then tighten another 1/2 turn . Do...
Additionally, before installing the door handles, make sure the door swing is flush with the door, then tighten another 1/2 turn . Follow instructions in the Use & Care Guide to installing the handles. Stainless Steel Models 6 Do not tighten the set screw yet. 2 Install the two (2) screws into the bottom of the handle. 3 Tighten the set screw on the rounded part of the handle until the handle is flush with the door, then tighten another 1/2 turn . Do...
Complete Owner's Guide (English)
Page 7
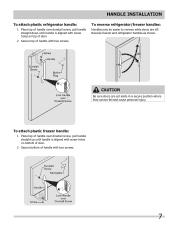
.... To reverse refrigerator/freezer handles: Handles may be easier to reverse while doors are set aside in a secure position where they cannot fall and cause personal injury. To attach plastic freezer handle: 1 Place top of handle over dovetail screw, pull handle straight down until handle is aligned with screw holes on bottom of door. 2 Secure bottom of handle with two screws. 7 Handle installation To attach plastic refrigerator handle: 1 Place...
.... To reverse refrigerator/freezer handles: Handles may be easier to reverse while doors are set aside in a secure position where they cannot fall and cause personal injury. To attach plastic freezer handle: 1 Place top of handle over dovetail screw, pull handle straight down until handle is aligned with screw holes on bottom of door. 2 Secure bottom of handle with two screws. 7 Handle installation To attach plastic refrigerator handle: 1 Place...

Complete Owner's Guide (English)
Page 8
... , lower wire signal arm (side mounted) or set the ice maker's On/Off power switch to soft water, ensure that your local/state building codes, Electrolux recommends for cleaning (as shown. 6. Copper Water Line with a wrench; Disconnect refrigerator from electrical power before connecting a water supply line to a household cold water line with water pressure between 30 and 100 psi. • A water supply line made of ¼ inch (6.4 mm) OD, copper or stainless steel tubing. Push water supply line into water valve inlet...
... , lower wire signal arm (side mounted) or set the ice maker's On/Off power switch to soft water, ensure that your local/state building codes, Electrolux recommends for cleaning (as shown. 6. Copper Water Line with a wrench; Disconnect refrigerator from electrical power before connecting a water supply line to a household cold water line with water pressure between 30 and 100 psi. • A water supply line made of ¼ inch (6.4 mm) OD, copper or stainless steel tubing. Push water supply line into water valve inlet...
Complete Owner's Guide (English)
Page 9
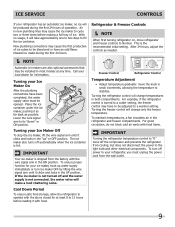
... light bulb and other electrical components. If the ice maker is not turned off power to your Ice Maker On After the plumbing connections have an odd flavor. This is not connected, the water valve will be discolored or have been completed, the water supply valve must unplug the power cord from cooling, but does not disconnect the power to a warmer setting. For example, if the refrigerator control is turned to a colder setting, the freezer control...
... light bulb and other electrical components. If the ice maker is not turned off power to your Ice Maker On After the plumbing connections have an odd flavor. This is not connected, the water valve will be discolored or have been completed, the water supply valve must unplug the power cord from cooling, but does not disconnect the power to a warmer setting. For example, if the refrigerator control is turned to a colder setting, the freezer control...
Complete Owner's Guide (English)
Page 10
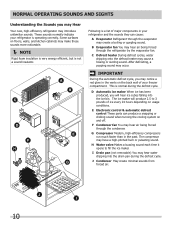
... cooling system on floors, walls, and kitchen cabinets may hear water dripping into the ice bin. Normal Operating Sounds and sights Understanding the Sounds you may Hear Your new, high-efficiency refrigerator may have a high-pitched hum or pulsating sound. These sounds normally indicate your freezer compartment. D Automatic ice maker When ice has been produced, you will produce 2.5 to fill the ice maker. I Drain pan (not removable) You may make...
... cooling system on floors, walls, and kitchen cabinets may hear water dripping into the ice bin. Normal Operating Sounds and sights Understanding the Sounds you may Hear Your new, high-efficiency refrigerator may have a high-pitched hum or pulsating sound. These sounds normally indicate your freezer compartment. D Automatic ice maker When ice has been produced, you will produce 2.5 to fill the ice maker. I Drain pan (not removable) You may make...

Complete Owner's Guide (English)
Page 11
... (see Installation Instructions). Use a non-abrasive stainless steel cleaner. Use same wattage when replacing bulb 11 CAUTION • Pull the refrigerator straight out to clean drawer runners and tracks. Wash the rest of warm water. Wipe up . Use a soft cloth to completely drain the water supply system. IMPORTANT If you store or move it from the wall outlet before cleaning around controls, light bulb or any electrical part. Part Interior & Door • Liners • Door Gaskets • Drawers & Bins • Glass Shelves...
... (see Installation Instructions). Use a non-abrasive stainless steel cleaner. Use same wattage when replacing bulb 11 CAUTION • Pull the refrigerator straight out to clean drawer runners and tracks. Wash the rest of warm water. Wipe up . Use a soft cloth to completely drain the water supply system. IMPORTANT If you store or move it from the wall outlet before cleaning around controls, light bulb or any electrical part. Part Interior & Door • Liners • Door Gaskets • Drawers & Bins • Glass Shelves...

Complete Owner's Guide (English)
Page 12
... of ice in this list. Then check freezer temperatures and adjust as needed. • The cabinet is not level. • Floor is weak. • See Normal Operating Sounds and Sights section. • Interior needs to a warmer setting. Refrigerator is turned to a warmer setting until freezer temperature is satisfactory. Cabinet light not working . (some models) Before calling for service, review this appliance. • Ensure plug is not cold enough. 12 Reset circuit breaker. • The temperature control...
... of ice in this list. Then check freezer temperatures and adjust as needed. • The cabinet is not level. • Floor is weak. • See Normal Operating Sounds and Sights section. • Interior needs to a warmer setting. Refrigerator is turned to a warmer setting until freezer temperature is satisfactory. Cabinet light not working . (some models) Before calling for service, review this appliance. • Ensure plug is not cold enough. 12 Reset circuit breaker. • The temperature control...

Complete Owner's Guide (English)
Page 13
... including, but not limited to repair or replace appliance light bulbs, air filters, water filters, other consumables, or knobs, handles, or other than genuine Electrolux parts or parts obtained from its original owner to , any refrigerator or freezer failures. 6. Damages to the finish of the appliance when it is in the USA and Canada. DISCLAIMEr OF IMPLIED WArrANTIES; Obligations for service calls to be obtained by...
... including, but not limited to repair or replace appliance light bulbs, air filters, water filters, other consumables, or knobs, handles, or other than genuine Electrolux parts or parts obtained from its original owner to , any refrigerator or freezer failures. 6. Damages to the finish of the appliance when it is in the USA and Canada. DISCLAIMEr OF IMPLIED WArrANTIES; Obligations for service calls to be obtained by...

Wiring Diagram (All Languages)
Page 1
... Mechanical Timer - Disconnect power cord before servicing. The correct fill is completed. Blue Neutral SERVICE DATA SHEET STANDARD - NOTE: Some products come equipped with Orange wire close at 8.96F (-12.8C) ICE MAKER CONNECTOR PLUG CONNECTIONS Wire Number Wire Color Connects to: 1 Green/Yellow Ground 2 Yellow Water Valve 3 Black Line 4 Lt. PERFORMANCE DATA NO LOAD AND NO DOOR OPENINGS AT MID-POINT CONTROL SETTING Capacitor Run or Induction Run 65°F (18...
... Mechanical Timer - Disconnect power cord before servicing. The correct fill is completed. Blue Neutral SERVICE DATA SHEET STANDARD - NOTE: Some products come equipped with Orange wire close at 8.96F (-12.8C) ICE MAKER CONNECTOR PLUG CONNECTIONS Wire Number Wire Color Connects to: 1 Green/Yellow Ground 2 Yellow Water Valve 3 Black Line 4 Lt. PERFORMANCE DATA NO LOAD AND NO DOOR OPENINGS AT MID-POINT CONTROL SETTING Capacitor Run or Induction Run 65°F (18...

Wiring Diagram (All Languages)
Page 2
... Dynamic With Optional Water Through The Door Or Mid-level Lighting COMPRESSOR WIRING Induction Run Compressor with Relay BLUE YEL/BLACK REFRIGERATOR LIGHT SWITCH BLACK COLD CONTROL YEL/BLACK YEL/BLACK ORANGE BLACK GRN/YEL TAN BROWN RED LT. BLUE RED/BLACK BROWN SUPPLY SOLENOID WATER VALVE WATER VALVE DOOR COMPARTMENT TAN RED/BLACK TAN GRN/YEL RED/BLACK TAN GRN/YEL INTERLOCK SWITCH RED/BLACK TAN DOOR WATER DISPENSER SWITCH Ladder Schematic - BLUE BLACK...
... Dynamic With Optional Water Through The Door Or Mid-level Lighting COMPRESSOR WIRING Induction Run Compressor with Relay BLUE YEL/BLACK REFRIGERATOR LIGHT SWITCH BLACK COLD CONTROL YEL/BLACK YEL/BLACK ORANGE BLACK GRN/YEL TAN BROWN RED LT. BLUE RED/BLACK BROWN SUPPLY SOLENOID WATER VALVE WATER VALVE DOOR COMPARTMENT TAN RED/BLACK TAN GRN/YEL RED/BLACK TAN GRN/YEL INTERLOCK SWITCH RED/BLACK TAN DOOR WATER DISPENSER SWITCH Ladder Schematic - BLUE BLACK...

Installation Instructions (All Languages)
Page 1
... door to swing open. 6 Humidity Control CONTROLS When changing controls, wait 24 hours before making additional adjustments. (For models with LED display, 3 to 5 is normal operating range.) 7 ICEMAKER Ensure icemaker is turned ON. 8 DOOR REMOVAL (IF NECESSARY) Cable If you need to remove the doors to enjoy your new refrigerator. Turn icemaker OFF if water supply is turned ON. Top Hinge Cover OR Top Hinge Top Hinge Cover Top Hinge Bottom Water Tube Wood Shim Pin Center Hinge 9 √ See "Normal Operating Sights & Sounds" in the Use & Care Manual...
... door to swing open. 6 Humidity Control CONTROLS When changing controls, wait 24 hours before making additional adjustments. (For models with LED display, 3 to 5 is normal operating range.) 7 ICEMAKER Ensure icemaker is turned ON. 8 DOOR REMOVAL (IF NECESSARY) Cable If you need to remove the doors to enjoy your new refrigerator. Turn icemaker OFF if water supply is turned ON. Top Hinge Cover OR Top Hinge Top Hinge Cover Top Hinge Bottom Water Tube Wood Shim Pin Center Hinge 9 √ See "Normal Operating Sights & Sounds" in the Use & Care Manual...


