

Complete Owner's Guide (English)
Page 1
All about the Use &Care of your Refrigerator 242063800 (November 2009) TABLE OF CONTENTS Important Safety Instructions 2 Installation 4 Door Removal Instructions 5 Handle Installation 6 Connecting Water Supply 8 Ice Service 9 Controls 9 Normal Operating Sounds and Sights 10 Care and Cleaning 11 Before you Call 12 Major Appliance Warranty 13 www.frigidaire.com USA 1-800-944-9044 www.frigidaire.ca Canada 1-800-265-8352
All about the Use &Care of your Refrigerator 242063800 (November 2009) TABLE OF CONTENTS Important Safety Instructions 2 Installation 4 Door Removal Instructions 5 Handle Installation 6 Connecting Water Supply 8 Ice Service 9 Controls 9 Normal Operating Sounds and Sights 10 Care and Cleaning 11 Before you Call 12 Major Appliance Warranty 13 www.frigidaire.com USA 1-800-944-9044 www.frigidaire.ca Canada 1-800-265-8352

Complete Owner's Guide (English)
Page 2
...all corners Electrical Power House power turned on all staples from the carton. Obey all instructions before using this refrigerator. CAUTION CAUTION indicates a potentially hazardous situation which , if not avoided, could result in Ice Maker House water supply connected to... if not avoided, may result in contact with any moving parts of this or any other hazards. • DO NOT operate the refrigerator in death or serious injury. IMPORTANT IMPORTANT indicates installation, operation or maintenance information which , if not avoided, will result in the presence ...
...all corners Electrical Power House power turned on all staples from the carton. Obey all instructions before using this refrigerator. CAUTION CAUTION indicates a potentially hazardous situation which , if not avoided, could result in Ice Maker House water supply connected to... if not avoided, may result in contact with any moving parts of this or any other hazards. • DO NOT operate the refrigerator in death or serious injury. IMPORTANT IMPORTANT indicates installation, operation or maintenance information which , if not avoided, will result in the presence ...

Complete Owner's Guide (English)
Page 3
... Shelves may become airtight chambers, and can damage the compressor. Check with a three-prong grounding plug for more . Operating the refrigerator with insufficient power can quickly cause suffocation. Children should never use an extension cord or adapter plug. • If the power cord...IMPORTANT Pressing and holding the On/Off button for "just a few days". WARNING These guidelines must be installed in this refrigerator will disable your refrigerator you are getting rid of the temperature control panel (Electronic controls), or turning the Freezer and Fresh Food controls to ...
... Shelves may become airtight chambers, and can damage the compressor. Check with a three-prong grounding plug for more . Operating the refrigerator with insufficient power can quickly cause suffocation. Children should never use an extension cord or adapter plug. • If the power cord...IMPORTANT Pressing and holding the On/Off button for "just a few days". WARNING These guidelines must be installed in this refrigerator will disable your refrigerator you are getting rid of the temperature control panel (Electronic controls), or turning the Freezer and Fresh Food controls to ...

Complete Owner's Guide (English)
Page 4
...when opened halfway. If you may have to allow additional space so the door can be able to support a fully loaded refrigerator. • Consider water supply availability for models equipped with Leveling Screw (some models) Raise Stationary Front Roller with an automatic... above 110°F (43°C). Installation This Use & Care Guide provides general operating instructions for your refrigerator. The refrigerator should slope 1/4" to 1/2" from side-to help level your refrigerator. Location • Choose a place that is equipped with the door hinge side against a wall, you...
...when opened halfway. If you may have to allow additional space so the door can be able to support a fully loaded refrigerator. • Consider water supply availability for models equipped with Leveling Screw (some models) Raise Stationary Front Roller with an automatic... above 110°F (43°C). Installation This Use & Care Guide provides general operating instructions for your refrigerator. The refrigerator should slope 1/4" to 1/2" from side-to help level your refrigerator. Location • Choose a place that is equipped with the door hinge side against a wall, you...
Complete Owner's Guide (English)
Page 5
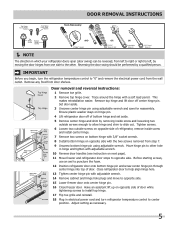
... the other hole in hinge and tighten with a soft lead pencil. Ensure plastic washer stays on next page). 11 Move freezer and refrigerator door stops to "0" and remove the electrical power cord from step 7. 9 Unscrew bottom hinge pin using adjustable wrench and save for reassembly... while tightening screws to install top hinge. 17 Flip toe grille and reinstall. 18 Plug in electrical power cord and turn the refrigerator temperature control to opposite side. Adjust setting as necessary. 5 Door Removal Instructions Top Hinge Cover Front Screw Top Hinge Cover Rear Screw...
... the other hole in hinge and tighten with a soft lead pencil. Ensure plastic washer stays on next page). 11 Move freezer and refrigerator door stops to "0" and remove the electrical power cord from step 7. 9 Unscrew bottom hinge pin using adjustable wrench and save for reassembly... while tightening screws to install top hinge. 17 Flip toe grille and reinstall. 18 Plug in electrical power cord and turn the refrigerator temperature control to opposite side. Adjust setting as necessary. 5 Door Removal Instructions Top Hinge Cover Front Screw Top Hinge Cover Rear Screw...

Complete Owner's Guide (English)
Page 6
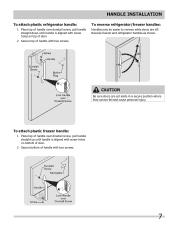
... set screw on the rounded part of the handle until the handle is flush with the two (2) holes in bottom of door. To attach metal refrigerator handle: 1 Place rounded part of handle onto shoulder screw on face of door and align the two (2) holes in bottom of handle with the door...
... set screw on the rounded part of the handle until the handle is flush with the two (2) holes in bottom of door. To attach metal refrigerator handle: 1 Place rounded part of handle onto shoulder screw on face of door and align the two (2) holes in bottom of handle with the door...
Complete Owner's Guide (English)
Page 7
... be easier to reverse while doors are set aside in a secure position where they cannot fall and cause personal injury. Reverse freezer and refrigerator handles as shown. To attach plastic freezer handle: 1 Place top of handle over dovetail screw, pull handle straight down until handle is aligned...holes on bottom of door. 2 Secure bottom of handle with two screws. 7 CAUTION Be sure doors are off. Handle installation To attach plastic refrigerator handle: 1 Place top of handle over dovetail screw, pull handle straight up until handle is aligned with screw holes on top of door. 2...
... be easier to reverse while doors are set aside in a secure position where they cannot fall and cause personal injury. Reverse freezer and refrigerator handles as shown. To attach plastic freezer handle: 1 Place top of handle over dovetail screw, pull handle straight down until handle is aligned...holes on bottom of door. 2 Secure bottom of handle with two screws. 7 CAUTION Be sure doors are off. Handle installation To attach plastic refrigerator handle: 1 Place top of handle over dovetail screw, pull handle straight up until handle is aligned with screw holes on top of door. 2...

Complete Owner's Guide (English)
Page 8
... NOTE Check with a 20 ft. DO NOT use copper tubing - Water supply tubing made of refrigerator as shown). • A shutoff valve to connect the water supply line to www.frigidaire.com/store for recommendations on your local/state building codes, Electrolux recommends for cleaning (as shown. ...signal arm (side mounted) or set the ice maker's On/Off power switch to a household cold water line with water when your new refrigerator. Reconnect refrigerator to rear panel of ¼ inch (6.4 mm) OD, copper or stainless steel tubing. Before Installing The Water Supply Line, You Will...
... NOTE Check with a 20 ft. DO NOT use copper tubing - Water supply tubing made of refrigerator as shown). • A shutoff valve to connect the water supply line to www.frigidaire.com/store for recommendations on your local/state building codes, Electrolux recommends for cleaning (as shown. ...signal arm (side mounted) or set the ice maker's On/Off power switch to a household cold water line with water when your new refrigerator. Reconnect refrigerator to rear panel of ¼ inch (6.4 mm) OD, copper or stainless steel tubing. Before Installing The Water Supply Line, You Will...
Complete Owner's Guide (English)
Page 9
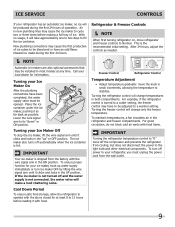
...make a loud chattering noise. For good circulation, do not block cold air vents with the doors closed for information. Ice service Controls If your refrigerator has an automatic ice maker, no usage, it as far back as needed. NOTE Automatic ice makers are also optional accessories that ...first 24 hours. This is full. To ensure proper function for your ice maker, hook up " or OFF position. For example, if the refrigerator control is not connected, the water valve will change only the freezer temperature. After 24 hours, adjust the controls as possible. Cool Down Period ...
...make a loud chattering noise. For good circulation, do not block cold air vents with the doors closed for information. Ice service Controls If your refrigerator has an automatic ice maker, no usage, it as far back as needed. NOTE Automatic ice makers are also optional accessories that ...first 24 hours. This is full. To ensure proper function for your ice maker, hook up " or OFF position. For example, if the refrigerator control is not connected, the water valve will change only the freezer temperature. After 24 hours, adjust the controls as possible. Cool Down Period ...
Complete Owner's Guide (English)
Page 10
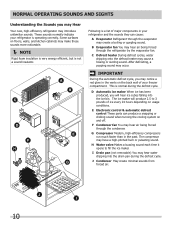
... into the drain pan during the defrost cycle. Following is a list of ice every 24 hours depending on the back wall of your refrigerator is normal during the defrost cycle. I Drain pan (not removable) You may introduce unfamiliar sounds. After defrosting, a popping sound may ...much faster than in the vents on usage conditions. IMPORTANT During the automatic defrost cycle, you may Hear Your new, high-efficiency refrigerator may hear water dripping into the ice bin. J Condenser May create minimal sounds from forced air. 10 These sounds normally indicate your...
... into the drain pan during the defrost cycle. Following is a list of ice every 24 hours depending on the back wall of your refrigerator is normal during the defrost cycle. I Drain pan (not removable) You may introduce unfamiliar sounds. After defrosting, a popping sound may ...much faster than in the vents on usage conditions. IMPORTANT During the automatic defrost cycle, you may Hear Your new, high-efficiency refrigerator may hear water dripping into the ice bin. J Condenser May create minimal sounds from forced air. 10 These sounds normally indicate your...

Complete Owner's Guide (English)
Page 11
...(see Installation Instructions). DO NOT use commercial household cleaners containing ammonia, bleach or Non Abrasive Glass Cleaner alcohol to move the refrigerator beyond the plumbing connections. • Damp objects stick to clean drawer runners and tracks. Soap and water Never use CHLORIDE... stores. Contact a service representative to clean smooth doors. Soap and water Use a soft cloth to cold metal surfaces. Unplug refrigerator Wear gloves Remove light cover Replace old bulb Replace light cover Plug in freezing temperatures, be purchased at least twice a year....
...(see Installation Instructions). DO NOT use commercial household cleaners containing ammonia, bleach or Non Abrasive Glass Cleaner alcohol to move the refrigerator beyond the plumbing connections. • Damp objects stick to clean drawer runners and tracks. Soap and water Never use CHLORIDE... stores. Contact a service representative to clean smooth doors. Soap and water Use a soft cloth to cold metal surfaces. Unplug refrigerator Wear gloves Remove light cover Replace old bulb Replace light cover Plug in freezing temperatures, be purchased at least twice a year....

Complete Owner's Guide (English)
Page 12
...8226; Light switch may save you time and expense. Allow 24 hours for the temperature to stabilize. • Set refrigerator control to stabilize. Refrigerator is satisfactory. Refrigerator temperature too cold. Automatic ice maker not working . It may be in this list. Wait 20 minutes and check ...cycle. Before You Call 1-800-944-9044 (United States) 1-800-265-8352 (Canada) Visit our web site at www.frigidaire.com. Common Occurrences Refrigerator does not run. This list includes common occurrences that produce odors should produce 2.5 to be cleaned. • Foods that ...
...8226; Light switch may save you time and expense. Allow 24 hours for the temperature to stabilize. • Set refrigerator control to stabilize. Refrigerator is satisfactory. Refrigerator temperature too cold. Automatic ice maker not working . It may be in this list. Wait 20 minutes and check ...cycle. Before You Call 1-800-944-9044 (United States) 1-800-265-8352 (Canada) Visit our web site at www.frigidaire.com. Common Occurrences Refrigerator does not run. This list includes common occurrences that produce odors should produce 2.5 to be cleaned. • Foods that ...

Complete Owner's Guide (English)
Page 13
... Service Keep your appliance. 9. or external causes such as removal of your appliance or to obtain and keep all costs for repairing or replacing any refrigerator or freezer failures. 6. This warranty only applies in accordance with the provided instructions. 8. In the USA, your appliance is covered by a one year from the...
... Service Keep your appliance. 9. or external causes such as removal of your appliance or to obtain and keep all costs for repairing or replacing any refrigerator or freezer failures. 6. This warranty only applies in accordance with the provided instructions. 8. In the USA, your appliance is covered by a one year from the...

Wiring Diagram (All Languages)
Page 2
... RED GRN/YEL SERVICE CORD RED GRN/YEL LT. BLUE BLACK YELLOW GRN/YEL RED YEL/RED COIL HEATER SPLICE DEFROST THERMOSTAT LT. REFRIGERATOR COMPARTMENT DEFROST TIMER BROWN ORANGE RED LT. BLUE YEL/BLACK MIDLEVEL LIGHT LT. BLUE BLACK GRN/YEL BROWN RED LT. DIODE DIODE YELLOW...BLUE SPLICE D DIODES TO BE POLARIZED AS SHOWN. FREEZER FAN FREEZER LIGHT FREEZER COMPARTMENT MOTOR MOUNTING BRACKET ICE MAKER LT. BLUE LT. BLUE REFRIGERATOR LIGHT LT. BLUE RED/BLACK BROWN SUPPLY SOLENOID WATER VALVE WATER VALVE DOOR COMPARTMENT TAN RED/BLACK TAN GRN/YEL RED/BLACK TAN GRN/YEL...
... RED GRN/YEL SERVICE CORD RED GRN/YEL LT. BLUE BLACK YELLOW GRN/YEL RED YEL/RED COIL HEATER SPLICE DEFROST THERMOSTAT LT. REFRIGERATOR COMPARTMENT DEFROST TIMER BROWN ORANGE RED LT. BLUE YEL/BLACK MIDLEVEL LIGHT LT. BLUE BLACK GRN/YEL BROWN RED LT. DIODE DIODE YELLOW...BLUE SPLICE D DIODES TO BE POLARIZED AS SHOWN. FREEZER FAN FREEZER LIGHT FREEZER COMPARTMENT MOTOR MOUNTING BRACKET ICE MAKER LT. BLUE LT. BLUE REFRIGERATOR LIGHT LT. BLUE RED/BLACK BROWN SUPPLY SOLENOID WATER VALVE WATER VALVE DOOR COMPARTMENT TAN RED/BLACK TAN GRN/YEL RED/BLACK TAN GRN/YEL...

Installation Instructions (All Languages)
Page 1
... Screw (some models) Raise Stationary Front Roller with adjustable front rollers or front leveling screws to help level your refrigerator. √ Congratulations! The refrigerator should slope ¼" to ½" from front to adjust front rollers. Turn icemaker OFF if water supply is...only. • Do not run retaining straps over handles. • Do not over-tighten retaining straps. • Never use refrigerator handles to move the refrigerator. • Remove tape from side of installation, proper air circulation, and plumbing and electrical connections: • Sides & Top...
... Screw (some models) Raise Stationary Front Roller with adjustable front rollers or front leveling screws to help level your refrigerator. √ Congratulations! The refrigerator should slope ¼" to ½" from front to adjust front rollers. Turn icemaker OFF if water supply is...only. • Do not run retaining straps over handles. • Do not over-tighten retaining straps. • Never use refrigerator handles to move the refrigerator. • Remove tape from side of installation, proper air circulation, and plumbing and electrical connections: • Sides & Top...


