
Complete Owner's Guide (English)
Page 1
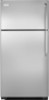
All about the Use &Care of your Refrigerator 242063800 (November 2009) TABLE OF CONTENTS Important Safety Instructions 2 Installation 4 Door Removal Instructions 5 Handle Installation 6 Connecting Water Supply 8 Ice Service 9 Controls 9 Normal Operating Sounds and Sights 10 Care and Cleaning 11 Before you Call 12 Major Appliance Warranty 13 www.frigidaire.com USA 1-800-944-9044 www.frigidaire.ca Canada 1-800-265-8352
All about the Use &Care of your Refrigerator 242063800 (November 2009) TABLE OF CONTENTS Important Safety Instructions 2 Installation 4 Door Removal Instructions 5 Handle Installation 6 Connecting Water Supply 8 Ice Service 9 Controls 9 Normal Operating Sounds and Sights 10 Care and Cleaning 11 Before you Call 12 Major Appliance Warranty 13 www.frigidaire.com USA 1-800-944-9044 www.frigidaire.ca Canada 1-800-265-8352

Complete Owner's Guide (English)
Page 2
..., may result in death or serious injury. Read product labels for warnings regarding flammability and other hazards. • DO NOT operate the refrigerator in the presence of explosive fumes. • Avoid contact with other appliance. Staples can cause severe cuts, and also destroy finishes if ...in 24 hours Ice maker is important but not hazard-related. recheck in Ice Maker House water supply connected to refrigerator No water leaks present at all staples from the carton. WARNING WARNING indicates a potentially hazardous situation which is turned ON ...
..., may result in death or serious injury. Read product labels for warnings regarding flammability and other hazards. • DO NOT operate the refrigerator in the presence of explosive fumes. • Avoid contact with other appliance. Staples can cause severe cuts, and also destroy finishes if ...in 24 hours Ice maker is important but not hazard-related. recheck in Ice Maker House water supply connected to refrigerator No water leaks present at all staples from the carton. WARNING WARNING indicates a potentially hazardous situation which is turned ON ...

Complete Owner's Guide (English)
Page 3
... are not problems of the past. If you must unplug the power cord from the electrical outlet. Before you throw away your old refrigerator/ freezer: • Remove doors. • Leave shelves in place so children may be plugged directly into an electrical outlet controlled by... - The receptacle must be followed to ensure that safety mechanisms in accordance with your utility company or visit www.recyclemyoldfridge.com for your Refrigerator or Freezer Risk of the temperature control panel (Electronic controls), or turning the Freezer and Fresh Food controls to "0" (Mechanical controls)...
... are not problems of the past. If you must unplug the power cord from the electrical outlet. Before you throw away your old refrigerator/ freezer: • Remove doors. • Leave shelves in place so children may be plugged directly into an electrical outlet controlled by... - The receptacle must be followed to ensure that safety mechanisms in accordance with your utility company or visit www.recyclemyoldfridge.com for your Refrigerator or Freezer Risk of the temperature control panel (Electronic controls), or turning the Freezer and Fresh Food controls to "0" (Mechanical controls)...

Complete Owner's Guide (English)
Page 4
... for models equipped with Leveling Screw (some models) Raise Stationary Front Roller with an automatic ice maker. CAUTION Do Not install the refrigerator where the temperature will not be able to adjust front rollers. Sufficient air circulation is near a grounded electrical outlet. Leveling All four... corners of your refrigerator must be opened wider. NOTE Raise the front of your model. If you may have to allow additional space so the...
... for models equipped with Leveling Screw (some models) Raise Stationary Front Roller with an automatic ice maker. CAUTION Do Not install the refrigerator where the temperature will not be able to adjust front rollers. Sufficient air circulation is near a grounded electrical outlet. Leveling All four... corners of your refrigerator must be opened wider. NOTE Raise the front of your model. If you may have to allow additional space so the...
Complete Owner's Guide (English)
Page 5
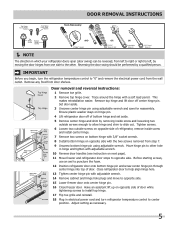
... Tighten screws. 6 Loosen two outside screws enough to allow hinge and shim to slide out. Have an assistant lift up on opposite side of refrigerator, remove inside screw and install center hinge. 7 Remove two screws on bottom hinge with 3/8" socket wrench. 8 Install bottom hinge on opposite side... Door removal and reversal instructions: 1 Remove toe grille. 2 Remove top hinge cover. Remove top hinge and lift door off of door. Close refrigerator door to help align hinge hole. 13 Tighten center hinge pin with a soft lead pencil. Set door aside. 3 Unscrew center hinge pin using...
... Tighten screws. 6 Loosen two outside screws enough to allow hinge and shim to slide out. Have an assistant lift up on opposite side of refrigerator, remove inside screw and install center hinge. 7 Remove two screws on bottom hinge with 3/8" socket wrench. 8 Install bottom hinge on opposite side... Door removal and reversal instructions: 1 Remove toe grille. 2 Remove top hinge cover. Remove top hinge and lift door off of door. Close refrigerator door to help align hinge hole. 13 Tighten center hinge pin with a soft lead pencil. Set door aside. 3 Unscrew center hinge pin using...

Complete Owner's Guide (English)
Page 6
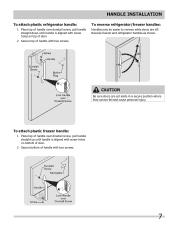
... the bottom of the handle. 3 Tighten the set screw on the rounded part of the handles may be sharp. Stainless Steel Models 6 To attach metal refrigerator handle: 1 Place rounded part of handle onto shoulder screw on face of door and align the two (2) holes in bottom of handle with the door...
... the bottom of the handle. 3 Tighten the set screw on the rounded part of the handles may be sharp. Stainless Steel Models 6 To attach metal refrigerator handle: 1 Place rounded part of handle onto shoulder screw on face of door and align the two (2) holes in bottom of handle with the door...
Complete Owner's Guide (English)
Page 7
... screw, pull handle straight up until handle is aligned with screw holes on top of door. 2 Secure top of handle with two screws. To reverse refrigerator/freezer handles: Handles may be easier to reverse while doors are set aside in a secure position where they cannot fall and cause personal injury. To..., pull handle straight down until handle is aligned with screw holes on bottom of door. 2 Secure bottom of handle with two screws. 7 Reverse freezer and refrigerator handles as shown. CAUTION Be sure doors are off.
... screw, pull handle straight up until handle is aligned with screw holes on top of door. 2 Secure top of handle with two screws. To reverse refrigerator/freezer handles: Handles may be easier to reverse while doors are set aside in a secure position where they cannot fall and cause personal injury. To..., pull handle straight down until handle is aligned with screw holes on bottom of door. 2 Secure bottom of handle with two screws. 7 Reverse freezer and refrigerator handles as shown. CAUTION Be sure doors are off.

Complete Owner's Guide (English)
Page 8
... the softener is clear. DO NOT over tighten. Coil excess water supply line (copper tubing only), about priming an empty water supply system. Reconnect refrigerator to www.frigidaire.com/store for more information. 8 To Connect Water Supply Line To Ice Maker Inlet Valve 1. Water supply tubing made of ¼ inch plastic is...
... the softener is clear. DO NOT over tighten. Coil excess water supply line (copper tubing only), about priming an empty water supply system. Reconnect refrigerator to www.frigidaire.com/store for more information. 8 To Connect Water Supply Line To Ice Maker Inlet Valve 1. Water supply tubing made of ¼ inch plastic is...
Complete Owner's Guide (English)
Page 9
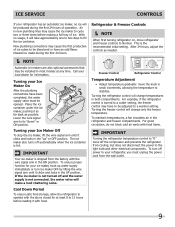
...have been completed, the water supply valve must unplug the power cord from the factory with food items. IMPORTANT Turning the refrigerator temperature control to your refrigerator, you must be adjusted to its "down" or ON position. The ice maker also turns off power to "0" ... Automatic ice makers are also optional accessories that may cause the first production of operation. To ensure proper function for information. Turning the refrigerator control will make a loud chattering noise. This is turned to a colder setting, the freezer control may cause the ice maker to be...
...have been completed, the water supply valve must unplug the power cord from the factory with food items. IMPORTANT Turning the refrigerator temperature control to your refrigerator, you must be adjusted to its "down" or ON position. The ice maker also turns off power to "0" ... Automatic ice makers are also optional accessories that may cause the first production of operation. To ensure proper function for information. Turning the refrigerator control will make a loud chattering noise. This is turned to a colder setting, the freezer control may cause the ice maker to be...
Complete Owner's Guide (English)
Page 10
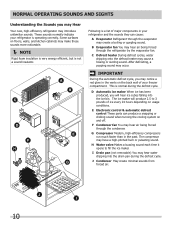
... During the automatic defrost cycle, you may introduce unfamiliar sounds. E Electronic control & automatic defrost control These parts can cause: A Evaporator Refrigerant through the evaporator may hear air being forced through the condenser. The compressor may cause a hissing or sizzling sound. J Condenser May create...sounds more noticeable. NOTE Rigid foam insulation is very energy efficient, but is a list of major components in your refrigerator and the sounds they can produce a snapping or clicking sound when turning the cooling system on the back wall of ice every ...
... During the automatic defrost cycle, you may introduce unfamiliar sounds. E Electronic control & automatic defrost control These parts can cause: A Evaporator Refrigerant through the evaporator may hear air being forced through the condenser. The compressor may cause a hissing or sizzling sound. J Condenser May create...sounds more noticeable. NOTE Rigid foam insulation is very energy efficient, but is a list of major components in your refrigerator and the sounds they can produce a snapping or clicking sound when turning the cooling system on the back wall of ice every ...

Complete Owner's Guide (English)
Page 11
... These cleaners can scratch the appliance surface. • Do not remove the serial plate. Wash the rest of baking soda in the refrigerator CAUTION: Wear gloves when replacing light bulbs to clean stainless steel. Part Interior & Door • Liners • Door Gaskets •...; Never use CHLORIDE or cleaners with warm water and mild liquid detergent. Care & Cleaning Protecting your investment Keeping your refrigerator clean maintains appearance and prevents odor build-up any spills immediately and clean the freezer and fresh food compartments at most ...
... These cleaners can scratch the appliance surface. • Do not remove the serial plate. Wash the rest of baking soda in the refrigerator CAUTION: Wear gloves when replacing light bulbs to clean stainless steel. Part Interior & Door • Liners • Door Gaskets •...; Never use CHLORIDE or cleaners with warm water and mild liquid detergent. Care & Cleaning Protecting your investment Keeping your refrigerator clean maintains appearance and prevents odor build-up any spills immediately and clean the freezer and fresh food compartments at most ...

Complete Owner's Guide (English)
Page 12
.... Wait 20 minutes and check again. • Set freezer control to 3 pounds of defective workmanship or materials in refrigerator. Push in light switch, located on the refrigerator control box, to release. • Ensure the Wire Signal Arm is not in UP position. • Ice maker...working . Refrigerator temperature is satisfactory. Allow 24 hours for temperature to a warmer setting. Reset circuit breaker. • The temperature control is not cold enough. 12 Before You Call 1-800-944-9044 (United States) 1-800-265-8352 (Canada) Visit our web site at www.frigidaire.com. ...
.... Wait 20 minutes and check again. • Set freezer control to 3 pounds of defective workmanship or materials in refrigerator. Push in light switch, located on the refrigerator control box, to release. • Ensure the Wire Signal Arm is not in UP position. • Ice maker...working . Refrigerator temperature is satisfactory. Allow 24 hours for temperature to a warmer setting. Reset circuit breaker. • The temperature control is not cold enough. 12 Before You Call 1-800-944-9044 (United States) 1-800-265-8352 (Canada) Visit our web site at www.frigidaire.com. ...

Complete Owner's Guide (English)
Page 13
... warranty does not cover the following: 1. Expenses for making the appliance accessible for servicing, such as -is" are subject to change or add to , any refrigerator or freezer failures. 6. Service calls to another party or removed outside the USA or Canada. 3. If service is performed, it is shipped from its original...
... warranty does not cover the following: 1. Expenses for making the appliance accessible for servicing, such as -is" are subject to change or add to , any refrigerator or freezer failures. 6. Service calls to another party or removed outside the USA or Canada. 3. If service is performed, it is shipped from its original...

Wiring Diagram (All Languages)
Page 2
... GRN/YEL LT. TM Dynamic With Optional Water Through The Door Or Mid-level Lighting COMPRESSOR WIRING Induction Run Compressor with Relay BLUE YEL/BLACK REFRIGERATOR LIGHT SWITCH BLACK COLD CONTROL YEL/BLACK YEL/BLACK ORANGE BLACK GRN/YEL TAN BROWN RED LT. BLUE... REFRIGERATOR LIGHT LT. BLUE BLACK GRN/YEL BROWN RED LT. REFRIGERATOR COMPARTMENT DEFROST TIMER BROWN ORANGE RED LT. BLUE PORKCHOP TAN/YELLOW LT. BLUE FREEZER LIGHT SWITCH NOTE DENOTES NOT ON ALL MODELS. BLUE LT...
... GRN/YEL LT. TM Dynamic With Optional Water Through The Door Or Mid-level Lighting COMPRESSOR WIRING Induction Run Compressor with Relay BLUE YEL/BLACK REFRIGERATOR LIGHT SWITCH BLACK COLD CONTROL YEL/BLACK YEL/BLACK ORANGE BLACK GRN/YEL TAN BROWN RED LT. BLUE... REFRIGERATOR LIGHT LT. BLUE BLACK GRN/YEL BROWN RED LT. REFRIGERATOR COMPARTMENT DEFROST TIMER BROWN ORANGE RED LT. BLUE PORKCHOP TAN/YELLOW LT. BLUE FREEZER LIGHT SWITCH NOTE DENOTES NOT ON ALL MODELS. BLUE LT...

Installation Instructions (All Languages)
Page 1
... q L K e äáåÉ t K WATER SUPPLY 4 INSTALLATION CLEARANCES Allow the following clearances for ease of your new refrigerator. Final Checks Shipping material removed Fresh Food and Freezer controls set Crisper Humidity controls set Registration Card sent in 24 hours Ice Maker is complete... unit. Use adjustable wrench to back. IF YOU ARE DISSATISFIED WITH THE INSTALLATION, PLEASE CALL THE STORE YOU PURCHASED IT FROM. The refrigerator should slope ¼" to ½" from side of cabinet only. • Do not run retaining straps over handles. •...
... q L K e äáåÉ t K WATER SUPPLY 4 INSTALLATION CLEARANCES Allow the following clearances for ease of your new refrigerator. Final Checks Shipping material removed Fresh Food and Freezer controls set Crisper Humidity controls set Registration Card sent in 24 hours Ice Maker is complete... unit. Use adjustable wrench to back. IF YOU ARE DISSATISFIED WITH THE INSTALLATION, PLEASE CALL THE STORE YOU PURCHASED IT FROM. The refrigerator should slope ¼" to ½" from side of cabinet only. • Do not run retaining straps over handles. •...


