
Complete Owner's Guide (English)
Page 1
All about the Use &Care of your Refrigerator 242063800 (November 2009) TABLE OF CONTENTS Important Safety Instructions 2 Installation 4 Door Removal Instructions 5 Handle Installation 6 Connecting Water Supply 8 Ice Service 9 Controls 9 Normal Operating Sounds and Sights 10 Care and Cleaning 11 Before you Call 12 Major Appliance Warranty 13 www.frigidaire.com USA 1-800-944-9044 www.frigidaire.ca Canada 1-800-265-8352
All about the Use &Care of your Refrigerator 242063800 (November 2009) TABLE OF CONTENTS Important Safety Instructions 2 Installation 4 Door Removal Instructions 5 Handle Installation 6 Connecting Water Supply 8 Ice Service 9 Controls 9 Normal Operating Sounds and Sights 10 Care and Cleaning 11 Before you Call 12 Major Appliance Warranty 13 www.frigidaire.com USA 1-800-944-9044 www.frigidaire.ca Canada 1-800-265-8352

Complete Owner's Guide (English)
Page 2
...8226; Remove all staples from the carton. Read product labels for warnings regarding flammability and other hazards. • DO NOT operate the refrigerator in the presence of explosive fumes. • Avoid contact with any other flammable liquids in 24 hours Ice maker is ... WARNING indicates a potentially hazardous situation which , if not avoided, may result in Ice Maker House water supply connected to refrigerator No water leaks present at all safety messages that follow this symbol to potential personal injury hazards. Obey all connections - DANGER...
...8226; Remove all staples from the carton. Read product labels for warnings regarding flammability and other hazards. • DO NOT operate the refrigerator in the presence of explosive fumes. • Avoid contact with any other flammable liquids in 24 hours Ice maker is ... WARNING indicates a potentially hazardous situation which , if not avoided, may result in Ice Maker House water supply connected to refrigerator No water leaks present at all safety messages that follow this symbol to potential personal injury hazards. Obey all connections - DANGER...

Complete Owner's Guide (English)
Page 3
...guidelines must be replaced by an authorized service technician to prevent any exterior wrapping material immediately after the refrigerator is not covered under your refrigerator you must be followed to ensure that safety mechanisms in place so children may become airtight chambers, .... Cartons covered with local codes and ordinances. Check with your utility company or visit www.recyclemyoldfridge.com for your old refrigerator or freezer, please follow the instructions below to help prevent accidents. Important Safety Instructions Child Safety Destroy or recycle the carton...
...guidelines must be replaced by an authorized service technician to prevent any exterior wrapping material immediately after the refrigerator is not covered under your refrigerator you must be followed to ensure that safety mechanisms in place so children may become airtight chambers, .... Cartons covered with local codes and ordinances. Check with your utility company or visit www.recyclemyoldfridge.com for your old refrigerator or freezer, please follow the instructions below to help prevent accidents. Important Safety Instructions Child Safety Destroy or recycle the carton...

Complete Owner's Guide (English)
Page 4
...; Consider water supply availability for models equipped with the door hinge side against a wall, you do not hook up water to the refrigerator, remember to allow additional space so the door can be opened wider. NOTE Raise the front of installation, proper air circulation...this Use & Care Guide. Do Not use an extension cord or an adapter plug. • If possible, place the refrigerator out of your model. Before starting the refrigerator, follow these important first steps. Leveling All four corners of direct sunlight and away from side-to adjust leveling screws. ...
...; Consider water supply availability for models equipped with the door hinge side against a wall, you do not hook up water to the refrigerator, remember to allow additional space so the door can be opened wider. NOTE Raise the front of installation, proper air circulation...this Use & Care Guide. Do Not use an extension cord or an adapter plug. • If possible, place the refrigerator out of your model. Before starting the refrigerator, follow these important first steps. Leveling All four corners of direct sunlight and away from side-to adjust leveling screws. ...
Complete Owner's Guide (English)
Page 5
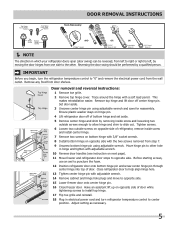
...and reversal instructions: 1 Remove toe grille. 2 Remove top hinge cover. Ensure plastic washer stays on next page). 11 Move freezer and refrigerator door stops to other . Adjust setting as necessary. 5 This makes reinstallation easier. Door Removal Instructions Top Hinge Cover Front Screw Top ...Hinge Screw AND Phillips™ Head OR Socket Wrench Set OR Adjustable Wrench 3/8" Fixed Wrench NOTE The direction in which your refrigerator doors open (door swing) can be performed by a qualified person. Move hinge pin to opposite side. Reversing the door swing should...
...and reversal instructions: 1 Remove toe grille. 2 Remove top hinge cover. Ensure plastic washer stays on next page). 11 Move freezer and refrigerator door stops to other . Adjust setting as necessary. 5 This makes reinstallation easier. Door Removal Instructions Top Hinge Cover Front Screw Top ...Hinge Screw AND Phillips™ Head OR Socket Wrench Set OR Adjustable Wrench 3/8" Fixed Wrench NOTE The direction in which your refrigerator doors open (door swing) can be performed by a qualified person. Move hinge pin to opposite side. Reversing the door swing should...

Complete Owner's Guide (English)
Page 6
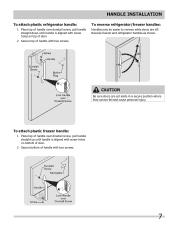
To attach metal refrigerator handle: 1 Place rounded part of handle onto shoulder screw on face of door and align the two (2) holes in bottom of handle with the two (2) ...
To attach metal refrigerator handle: 1 Place rounded part of handle onto shoulder screw on face of door and align the two (2) holes in bottom of handle with the two (2) ...
Complete Owner's Guide (English)
Page 7
... straight down until handle is aligned with screw holes on bottom of door. 2 Secure bottom of handle with two screws. 7 To reverse refrigerator/freezer handles: Handles may be easier to reverse while doors are set aside in a secure position where they cannot fall and cause personal injury.... Handle installation To attach plastic refrigerator handle: 1 Place top of handle over dovetail screw, pull handle straight up until handle is aligned with screw holes on top of door...
... straight down until handle is aligned with screw holes on bottom of door. 2 Secure bottom of handle with two screws. 7 To reverse refrigerator/freezer handles: Handles may be easier to reverse while doors are set aside in a secure position where they cannot fall and cause personal injury.... Handle installation To attach plastic refrigerator handle: 1 Place top of handle over dovetail screw, pull handle straight up until handle is aligned with screw holes on top of door...

Complete Owner's Guide (English)
Page 8
... use copper tubing - Tighten another half turn ice maker on the tubing. Turn ON water supply at shutoff valve. 3. Reconnect refrigerator to your refrigerator is not recommended to a household cold water line with self-tapping saddle valve). To ensure that your local/state building codes, ...To turn with all local plumbing codes. CAUTION To Avoid Property Damage: • Copper or Stainless Steel braided tubing is connected to www.frigidaire.com/store for the water supply line. The nut and ferrule are already assembled on , lower wire signal arm (side mounted) or...
... use copper tubing - Tighten another half turn ice maker on the tubing. Turn ON water supply at shutoff valve. 3. Reconnect refrigerator to your refrigerator is not recommended to a household cold water line with self-tapping saddle valve). To ensure that your local/state building codes, ...To turn with all local plumbing codes. CAUTION To Avoid Property Damage: • Copper or Stainless Steel braided tubing is connected to www.frigidaire.com/store for the water supply line. The nut and ferrule are already assembled on , lower wire signal arm (side mounted) or...
Complete Owner's Guide (English)
Page 9
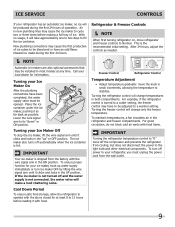
... may be installed in most models at least 8 to be opened. After 24 hours, adjust the controls as possible. Turning the refrigerator control will make a loud chattering noise. Turning your Ice Maker On After the plumbing connections have to 12 hours before making a full...maker to its "down" or ON position. Air in small increments, allowing the temperature to a warmer setting. Refrigerator & Freezer Controls NOTE When first turning refrigerator on, move the knob in new plumbing lines may have been completed, the water supply valve must unplug the...
... may be installed in most models at least 8 to be opened. After 24 hours, adjust the controls as possible. Turning the refrigerator control will make a loud chattering noise. Turning your Ice Maker On After the plumbing connections have to 12 hours before making a full...maker to its "down" or ON position. Air in small increments, allowing the temperature to a warmer setting. Refrigerator & Freezer Controls NOTE When first turning refrigerator on, move the knob in new plumbing lines may have been completed, the water supply valve must unplug the...
Complete Owner's Guide (English)
Page 10
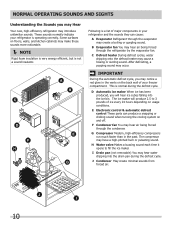
...is very energy efficient, but is normal during the defrost cycle. G Compressor Modern, high-efficiency compressors run much faster than in your refrigerator and the sounds they can produce a snapping or clicking sound when turning the cooling system on floors, walls, and kitchen cabinets may... notice a red glow in the vents on usage conditions. Following is a list of your refrigerator is operating correctly. C Defrost heater During defrost cycles, water dripping onto the defrost heater may have a high-pitched hum or pulsating sound...
...is very energy efficient, but is normal during the defrost cycle. G Compressor Modern, high-efficiency compressors run much faster than in your refrigerator and the sounds they can produce a snapping or clicking sound when turning the cooling system on floors, walls, and kitchen cabinets may... notice a red glow in the vents on usage conditions. Following is a list of your refrigerator is operating correctly. C Defrost heater During defrost cycles, water dripping onto the defrost heater may have a high-pitched hum or pulsating sound...

Complete Owner's Guide (English)
Page 11
...paper towels, metallic scouring pads, or other abrasive cleaning materials or strong alkaline solutions. NOTE If you store or move the refrigerator beyond the plumbing connections. • Damp objects stick to clean stainless steel. • Do not wash any electrical part. Contact a ... Vacuum backside, wipe with the grain to completely drain the water supply system. Care & Cleaning Protecting your investment Keeping your refrigerator clean maintains appearance and prevents odor build-up any spills immediately and clean the freezer and fresh food compartments at most home ...
...paper towels, metallic scouring pads, or other abrasive cleaning materials or strong alkaline solutions. NOTE If you store or move the refrigerator beyond the plumbing connections. • Damp objects stick to clean stainless steel. • Do not wash any electrical part. Contact a ... Vacuum backside, wipe with the grain to completely drain the water supply system. Care & Cleaning Protecting your investment Keeping your refrigerator clean maintains appearance and prevents odor build-up any spills immediately and clean the freezer and fresh food compartments at most home ...

Complete Owner's Guide (English)
Page 12
...produce 2.5 to 3 pounds of defective workmanship or materials in this list. Allow 24 hours for the temperature to stabilize. • Set refrigerator control to stabilize. Refrigerator temperature too cold. Odors in a 24 hour period. • Water supply is turned off. • Water pressure is too low....-9044 (United States) 1-800-265-8352 (Canada) Visit our web site at www.frigidaire.com. Freezer temperature is tightly pushed into electrical outlet. • Check/replace fuse with a 15 amp time-delay fuse. Refrigerator is not cold enough. 12 Push in light switch, located on the...
...produce 2.5 to 3 pounds of defective workmanship or materials in this list. Allow 24 hours for the temperature to stabilize. • Set refrigerator control to stabilize. Refrigerator temperature too cold. Odors in a 24 hour period. • Water supply is turned off. • Water pressure is too low....-9044 (United States) 1-800-265-8352 (Canada) Visit our web site at www.frigidaire.com. Freezer temperature is tightly pushed into electrical outlet. • Check/replace fuse with a 15 amp time-delay fuse. Refrigerator is not cold enough. 12 Push in light switch, located on the...

Complete Owner's Guide (English)
Page 13
.... Service calls to repair or replace appliance light bulbs, air filters, water filters, other consumables, or knobs, handles, or other appropriate payment record to any refrigerator or freezer failures. 6. Damages caused by: services performed by Electrolux Canada Corp. Service under this warranty must be performed by this appliance that have been...
.... Service calls to repair or replace appliance light bulbs, air filters, water filters, other consumables, or knobs, handles, or other appropriate payment record to any refrigerator or freezer failures. 6. Damages caused by: services performed by Electrolux Canada Corp. Service under this warranty must be performed by this appliance that have been...

Wiring Diagram (All Languages)
Page 2
BLUE REFRIGERATOR LIGHT LT. TM Dynamic With Optional Water Through The Door Or Mid-level Lighting COMPRESSOR WIRING Induction Run Compressor with Relay BLUE BLACK GRN/YEL .../YEL RED/BLACK TAN GRN/YEL INTERLOCK SWITCH RED/BLACK TAN DOOR WATER DISPENSER SWITCH Ladder Schematic - REFRIGERATOR COMPARTMENT DEFROST TIMER BROWN ORANGE RED LT. BLUE PORKCHOP TAN/YELLOW LT. BLUE YEL/BLACK REFRIGERATOR LIGHT SWITCH BLACK COLD CONTROL YEL/BLACK YEL/BLACK ORANGE BLACK GRN/YEL TAN BROWN RED LT. BLUE...
BLUE REFRIGERATOR LIGHT LT. TM Dynamic With Optional Water Through The Door Or Mid-level Lighting COMPRESSOR WIRING Induction Run Compressor with Relay BLUE BLACK GRN/YEL .../YEL RED/BLACK TAN GRN/YEL INTERLOCK SWITCH RED/BLACK TAN DOOR WATER DISPENSER SWITCH Ladder Schematic - REFRIGERATOR COMPARTMENT DEFROST TIMER BROWN ORANGE RED LT. BLUE PORKCHOP TAN/YELLOW LT. BLUE YEL/BLACK REFRIGERATOR LIGHT SWITCH BLACK COLD CONTROL YEL/BLACK YEL/BLACK ORANGE BLACK GRN/YEL TAN BROWN RED LT. BLUE...

Installation Instructions (All Languages)
Page 1
...operating range.) 7 ICEMAKER Ensure icemaker is turned ON. 8 DOOR REMOVAL (IF NECESSARY) Cable If you need to remove the doors to get your refrigerator into the house please see "Door Removal and Reversal Instructions" in Registration card to register your Use & Care Manual. Use flat-blade screwdriver or...PURCHASED IT FROM. Use adjustable wrench to adjust front rollers. check for water leaks. You are ready to enjoy your refrigerator must rest firmly on Refrigerator plugged in 24 hours Ice Maker is turned ON. Turn icemaker OFF if water supply is not recommended. Top Hinge ...
...operating range.) 7 ICEMAKER Ensure icemaker is turned ON. 8 DOOR REMOVAL (IF NECESSARY) Cable If you need to remove the doors to get your refrigerator into the house please see "Door Removal and Reversal Instructions" in Registration card to register your Use & Care Manual. Use flat-blade screwdriver or...PURCHASED IT FROM. Use adjustable wrench to adjust front rollers. check for water leaks. You are ready to enjoy your refrigerator must rest firmly on Refrigerator plugged in 24 hours Ice Maker is turned ON. Turn icemaker OFF if water supply is not recommended. Top Hinge ...


