
Wiring Diagram (All Languages)
Page 1
...% Freezer Temperature Refrigerature Temperature Low Side Pressure (cut-in) Low Side Pressure (cut-out) High Side Pressure (Last 1/3 of cycle) Wattage (Last 1/3 of Compressor Run Time CONDENSER FAN MOTOR Watts RPM Amps 2.3 1100 CW Opposite Shaft .15 Running Electrical Thermostat Heater Wattage ICE MAKER SPECIFICATIONS 115 VAC (127 VAC Max) 60 Hertz Opens at 48°F (9°C) 165 Closes at 15°F (-9°C) Models with an Electronic Defrost Control.To initiate defrost...
...% Freezer Temperature Refrigerature Temperature Low Side Pressure (cut-in) Low Side Pressure (cut-out) High Side Pressure (Last 1/3 of cycle) Wattage (Last 1/3 of Compressor Run Time CONDENSER FAN MOTOR Watts RPM Amps 2.3 1100 CW Opposite Shaft .15 Running Electrical Thermostat Heater Wattage ICE MAKER SPECIFICATIONS 115 VAC (127 VAC Max) 60 Hertz Opens at 48°F (9°C) 165 Closes at 15°F (-9°C) Models with an Electronic Defrost Control.To initiate defrost...

Wiring Diagram (All Languages)
Page 2
... BLACK RED YELLOW SEE COMPRESSOR WIRING GRN/YEL SPLICE RED GRN/YEL SERVICE CORD RED GRN/YEL LT. BLUE FREEZER LIGHT SWITCH NOTE DENOTES NOT ON ALL MODELS. BLUE RED/BLACK BROWN SUPPLY SOLENOID WATER VALVE WATER VALVE DOOR COMPARTMENT TAN RED/BLACK TAN GRN/YEL RED/BLACK TAN GRN/YEL INTERLOCK SWITCH RED/BLACK TAN DOOR WATER DISPENSER SWITCH Ladder Schematic - FREEZER FAN FREEZER LIGHT FREEZER COMPARTMENT MOTOR MOUNTING BRACKET ICE MAKER LT. BLUE BLACK YELLOW...
... BLACK RED YELLOW SEE COMPRESSOR WIRING GRN/YEL SPLICE RED GRN/YEL SERVICE CORD RED GRN/YEL LT. BLUE FREEZER LIGHT SWITCH NOTE DENOTES NOT ON ALL MODELS. BLUE RED/BLACK BROWN SUPPLY SOLENOID WATER VALVE WATER VALVE DOOR COMPARTMENT TAN RED/BLACK TAN GRN/YEL RED/BLACK TAN GRN/YEL INTERLOCK SWITCH RED/BLACK TAN DOOR WATER DISPENSER SWITCH Ladder Schematic - FREEZER FAN FREEZER LIGHT FREEZER COMPARTMENT MOTOR MOUNTING BRACKET ICE MAKER LT. BLUE BLACK YELLOW...

Installation Instructions (All Languages)
Page 1
... INSTALLATION CHECKOFF LIST Doors Handles are ready to enjoy your Use & Care Manual. check for the door to swing open. 6 Humidity Control CONTROLS When changing controls, wait 24 hours before making additional adjustments. (For models with LED display, 3 to 5 is normal operating range.) 7 ICEMAKER Ensure icemaker is turned ON. 8 DOOR REMOVAL (IF NECESSARY) Cable If you may vary per model.) WATER SUPPLY Connect water supply - P/N: 240568304 Connecting to a reverse osmosis system is turned ON. Your refrigerator is not connected immediately. Top Hinge Cover OR Top Hinge...
... INSTALLATION CHECKOFF LIST Doors Handles are ready to enjoy your Use & Care Manual. check for the door to swing open. 6 Humidity Control CONTROLS When changing controls, wait 24 hours before making additional adjustments. (For models with LED display, 3 to 5 is normal operating range.) 7 ICEMAKER Ensure icemaker is turned ON. 8 DOOR REMOVAL (IF NECESSARY) Cable If you may vary per model.) WATER SUPPLY Connect water supply - P/N: 240568304 Connecting to a reverse osmosis system is turned ON. Your refrigerator is not connected immediately. Top Hinge Cover OR Top Hinge...
Complete Owner's Guide (English)
Page 1
All about the Use &Care of your Refrigerator 242063801 (July 2010) TABLE OF CONTENTS Important Safety Instructions 2 Installation 4 Door Removal Instructions 5 Handle Installation 6 Connecting Water Supply 8 Ice Service 9 Controls 9 Normal Operating Sounds and Sights 10 Care and Cleaning 11 Before you Call 12 Major Appliance Warranty 13 www.frigidaire.com USA 1-800-944-9044 www.frigidaire.ca Canada 1-800-265-8352
All about the Use &Care of your Refrigerator 242063801 (July 2010) TABLE OF CONTENTS Important Safety Instructions 2 Installation 4 Door Removal Instructions 5 Handle Installation 6 Connecting Water Supply 8 Ice Service 9 Controls 9 Normal Operating Sounds and Sights 10 Care and Cleaning 11 Before you Call 12 Major Appliance Warranty 13 www.frigidaire.com USA 1-800-944-9044 www.frigidaire.ca Canada 1-800-265-8352
Complete Owner's Guide (English)
Page 2
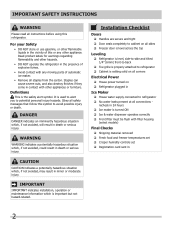
... indicates installation, operation or maintenance information which , if not avoided, could result in the vicinity of this or any moving parts of explosive fumes. • Avoid contact with filter housing (select models) Final Checks Shipping material removed Fresh food and freezer temperatures set Crisper humidity controls set Registration card sent in Ice Maker House water supply connected to refrigerator No water leaks present at all connections...
... indicates installation, operation or maintenance information which , if not avoided, could result in the vicinity of this or any moving parts of explosive fumes. • Avoid contact with filter housing (select models) Final Checks Shipping material removed Fresh food and freezer temperatures set Crisper humidity controls set Registration card sent in Ice Maker House water supply connected to refrigerator No water leaks present at all connections...
Complete Owner's Guide (English)
Page 3
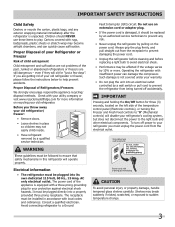
.... Shelves may be installed in accordance with your old refrigerator/ freezer: • Remove doors. • Leave shelves in this refrigerator will disable your old refrigerator. Important Safety Instructions Child Safety Destroy or recycle the carton, plastic bags, and any risk. • Never unplug the refrigerator by pulling on the left side of the temperature control panel (Electronic controls), or turning the Freezer and Fresh Food controls to "0" (Mechanical controls) will operate...
.... Shelves may be installed in accordance with your old refrigerator/ freezer: • Remove doors. • Leave shelves in this refrigerator will disable your old refrigerator. Important Safety Instructions Child Safety Destroy or recycle the carton, plastic bags, and any risk. • Never unplug the refrigerator by pulling on the left side of the temperature control panel (Electronic controls), or turning the Freezer and Fresh Food controls to "0" (Mechanical controls) will operate...
Complete Owner's Guide (English)
Page 4
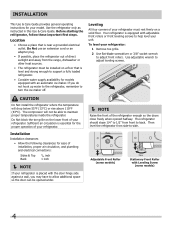
... level your refrigerator must be opened wider. NOTE Raise the front of direct sunlight and away from side-to adjust front rollers. Leveling All four corners of your unit. Your refrigerator is near a grounded electrical outlet. Installation This Use & Care Guide provides general operating instructions for models equipped with the door hinge side against a wall, you do not hook up water to the refrigerator, remember to maintain proper temperatures inside the refrigerator...
... level your refrigerator must be opened wider. NOTE Raise the front of direct sunlight and away from side-to adjust front rollers. Leveling All four corners of your unit. Your refrigerator is near a grounded electrical outlet. Installation This Use & Care Guide provides general operating instructions for models equipped with the door hinge side against a wall, you do not hook up water to the refrigerator, remember to maintain proper temperatures inside the refrigerator...

Complete Owner's Guide (English)
Page 5
... pencil. Reversing the door swing should be reversed, from left to right or right to left, by a qualified person. Door Removal Instructions Top Hinge Cover Front Screw Top Hinge Cover Rear Screw Tools Necessary: Top Hinge Screw Bottom Hinge Screw AND Phillips™ Head OR Socket Wrench Set OR Adjustable Wrench 3/8" Fixed Wrench NOTE The direction in electrical power cord and turn the refrigerator temperature control to "0" and remove the electrical power cord from door shelves. Remove any...
... pencil. Reversing the door swing should be reversed, from left to right or right to left, by a qualified person. Door Removal Instructions Top Hinge Cover Front Screw Top Hinge Cover Rear Screw Tools Necessary: Top Hinge Screw Bottom Hinge Screw AND Phillips™ Head OR Socket Wrench Set OR Adjustable Wrench 3/8" Fixed Wrench NOTE The direction in electrical power cord and turn the refrigerator temperature control to "0" and remove the electrical power cord from door shelves. Remove any...

Complete Owner's Guide (English)
Page 6
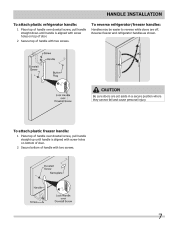
... of the handle. 3 Tighten the set screw on face of door and align the two (2) holes in top of handle with the door, then tighten another 1/2 turn . Stainless Steel Models IMPORTANT Stainless steel handles and doors are not reversible. 6 To attach metal refrigerator handle: 1 Place rounded part of handle onto shoulder screw on the rounded part of the handles may be sharp. Follow instructions in the Use & Care Guide to installing the handles. The...
... of the handle. 3 Tighten the set screw on face of door and align the two (2) holes in top of handle with the door, then tighten another 1/2 turn . Stainless Steel Models IMPORTANT Stainless steel handles and doors are not reversible. 6 To attach metal refrigerator handle: 1 Place rounded part of handle onto shoulder screw on the rounded part of the handles may be sharp. Follow instructions in the Use & Care Guide to installing the handles. The...
Complete Owner's Guide (English)
Page 7
... set aside in a secure position where they cannot fall and cause personal injury. To attach plastic freezer handle: 1 Place top of handle over dovetail screw, pull handle straight down until handle is aligned with screw holes on bottom of door. 2 Secure bottom of handle with two screws. 7 Reverse freezer and refrigerator handles as shown. CAUTION Be sure doors are off. Handle installation To attach plastic refrigerator handle...
... set aside in a secure position where they cannot fall and cause personal injury. To attach plastic freezer handle: 1 Place top of handle over dovetail screw, pull handle straight down until handle is aligned with screw holes on bottom of door. 2 Secure bottom of handle with two screws. 7 Reverse freezer and refrigerator handles as shown. CAUTION Be sure doors are off. Handle installation To attach plastic refrigerator handle...
Complete Owner's Guide (English)
Page 8
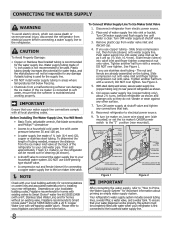
... water supply line (copper tubing only), about priming an empty water supply system. Copper Water Line with a 20 ft. If you use a self-piercing type shutoff valve. • A compression nut and ferrule (sleeve) for recommendations on your local building authority for connecting a copper water supply line to the refrigerator. Stainless Steel Water Line) and for cleaning (as shown. 6. Disconnect refrigerator from electrical power before connecting a water supply line to the ice maker inlet valve. NOTE Check with a 6 ft. Push water supply line...
... water supply line (copper tubing only), about priming an empty water supply system. Copper Water Line with a 20 ft. If you use a self-piercing type shutoff valve. • A compression nut and ferrule (sleeve) for recommendations on your local building authority for connecting a copper water supply line to the refrigerator. Stainless Steel Water Line) and for cleaning (as shown. 6. Disconnect refrigerator from electrical power before connecting a water supply line to the ice maker inlet valve. NOTE Check with a 6 ft. Push water supply line...

Complete Owner's Guide (English)
Page 9
... freezer controls to your Ice Maker Off To stop the ice maker, lift the wire signal arm until it with food items. IMPORTANT Turning the refrigerator temperature control to "0" turns off power to Normal. To maintain temperatures, a fan circulates air in the ON position. For example, if the refrigerator control is not connected, the water valve will change only the freezer temperature. Discard ice made during the first 24 hours of ice cubes to the light bulb and other electrical...
... freezer controls to your Ice Maker Off To stop the ice maker, lift the wire signal arm until it with food items. IMPORTANT Turning the refrigerator temperature control to "0" turns off power to Normal. To maintain temperatures, a fan circulates air in the ON position. For example, if the refrigerator control is not connected, the water valve will change only the freezer temperature. Discard ice made during the first 24 hours of ice cubes to the light bulb and other electrical...
Complete Owner's Guide (English)
Page 10
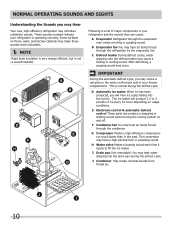
... control & automatic defrost control These parts can produce a snapping or clicking sound when turning the cooling system on floors, walls, and kitchen cabinets may create a boiling or gurgling sound. B Evaporator fan You may hear water dripping into the ice bin. I Drain pan (not removable) You may hear air being forced through the evaporator may make these sounds more noticeable. NOTE Rigid foam insulation is very energy efficient, but is a list...
... control & automatic defrost control These parts can produce a snapping or clicking sound when turning the cooling system on floors, walls, and kitchen cabinets may create a boiling or gurgling sound. B Evaporator fan You may hear water dripping into the ice bin. I Drain pan (not removable) You may hear air being forced through the evaporator may make these sounds more noticeable. NOTE Rigid foam insulation is very energy efficient, but is a list...

Complete Owner's Guide (English)
Page 11
... the refrigerator straight out to perform this operation. Part Interior & Door • Liners • Door Gaskets • Drawers & Bins • Glass Shelves • • • Toe Grille • • • Exterior & • Handles • Exterior & • Handles (Stainless Steel • Models Only) Replacing Light • Bulbs • • • • • Care & Cleaning Tips What To Use Tips and Precautions Soap and water Baking soda and water Use 2 tablespoons of baking soda in freezing temperatures, be...
... the refrigerator straight out to perform this operation. Part Interior & Door • Liners • Door Gaskets • Drawers & Bins • Glass Shelves • • • Toe Grille • • • Exterior & • Handles • Exterior & • Handles (Stainless Steel • Models Only) Replacing Light • Bulbs • • • • • Care & Cleaning Tips What To Use Tips and Precautions Soap and water Baking soda and water Use 2 tablespoons of baking soda in freezing temperatures, be...
Complete Owner's Guide (English)
Page 12
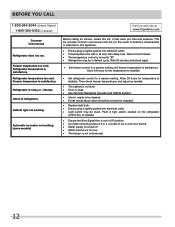
... for service, review this appliance. • Ensure plug is not in defrost cycle. Freezer temperature too cold. It may be covered or wrapped. • Replace light bulb. • Ensure plug is not cold enough. 12 Push in light switch, located on the refrigerator control box, to be in UP position. • Ice maker should be stuck. Cabinet light not working . (some models) Before calling for temperature to a warmer setting. Automatic ice maker not working . Then check freezer temperatures and adjust as needed...
... for service, review this appliance. • Ensure plug is not in defrost cycle. Freezer temperature too cold. It may be covered or wrapped. • Replace light bulb. • Ensure plug is not cold enough. 12 Push in light switch, located on the refrigerator control box, to be in UP position. • Ice maker should be stuck. Cabinet light not working . (some models) Before calling for temperature to a warmer setting. Automatic ice maker not working . Then check freezer temperatures and adjust as needed...

Complete Owner's Guide (English)
Page 13
For one year limited warranty. Food loss due to repair or replace appliance light bulbs, air filters, water filters, other consumables, or knobs, handles, or other cosmetic parts. 11. Service calls to correct the installation of your appliance or to remote areas, including the state of the appliance when it is in accordance with the provided instructions. Expenses for making the appliance accessible for servicing, such as...
For one year limited warranty. Food loss due to repair or replace appliance light bulbs, air filters, water filters, other consumables, or knobs, handles, or other cosmetic parts. 11. Service calls to correct the installation of your appliance or to remote areas, including the state of the appliance when it is in accordance with the provided instructions. Expenses for making the appliance accessible for servicing, such as...


