
Complete Owner's Guide (English)
Page 2
... injury. Obey all connections - Installation Checklist Doors Handles are secure and tight Door seals completely to cabinet on all sides Freezer door is level across the top Leveling Refrigerator is level, side-to-side and tilted 1/4" (6mm) front-to-back Toe grille ... destroy finishes if they come in contact with filter housing (select models) Final Checks Shipping material removed Fresh food and freezer temperatures set Crisper humidity controls set Registration card sent in minor or moderate injury.
... injury. Obey all connections - Installation Checklist Doors Handles are secure and tight Door seals completely to cabinet on all sides Freezer door is level across the top Leveling Refrigerator is level, side-to-side and tilted 1/4" (6mm) front-to-back Toe grille ... destroy finishes if they come in contact with filter housing (select models) Final Checks Shipping material removed Fresh food and freezer temperatures set Crisper humidity controls set Registration card sent in minor or moderate injury.

Complete Owner's Guide (English)
Page 3
...be followed to ensure that safety mechanisms in accordance with local codes and ordinances. Proper Disposal of your Refrigerator or Freezer Risk of child entrapment Child entrapment and suffocation are still dangerous - The receptacle must be replaced by an authorized ...Consult a qualified electrician. Shelves may become airtight chambers, and can damage the compressor. If you are getting rid of Refrigerators/Freezers We strongly encourage responsible appliance recycling/ disposal methods. CAUTION To avoid personal injury or property damage, handle tempered glass shelves carefully....
...be followed to ensure that safety mechanisms in accordance with local codes and ordinances. Proper Disposal of your Refrigerator or Freezer Risk of child entrapment Child entrapment and suffocation are still dangerous - The receptacle must be replaced by an authorized ...Consult a qualified electrician. Shelves may become airtight chambers, and can damage the compressor. If you are getting rid of Refrigerators/Freezers We strongly encourage responsible appliance recycling/ disposal methods. CAUTION To avoid personal injury or property damage, handle tempered glass shelves carefully....

Complete Owner's Guide (English)
Page 5
... . Before starting screws, use an awl to opposite side. Remove any food from one side to opposite side. 15 Lower freezer door onto center hinge pin. 16 Close freezer door. Set door aside. 3 Unscrew center hinge pin using adjustable wrench. Close refrigerator door to help align hinge hole. 13... move to the other hole in hinge and tighten with adjustable wrench. 10 Reverse door handles (see instruction on next page). 11 Move freezer and refrigerator door stops to puncture the foam. 12 Position refrigerator door onto bottom hinge pin and screw center hinge pin through center hinge ...
... . Before starting screws, use an awl to opposite side. Remove any food from one side to opposite side. 15 Lower freezer door onto center hinge pin. 16 Close freezer door. Set door aside. 3 Unscrew center hinge pin using adjustable wrench. Close refrigerator door to help align hinge hole. 13... move to the other hole in hinge and tighten with adjustable wrench. 10 Reverse door handles (see instruction on next page). 11 Move freezer and refrigerator door stops to puncture the foam. 12 Position refrigerator door onto bottom hinge pin and screw center hinge pin through center hinge ...

Complete Owner's Guide (English)
Page 6
The rounded end of handle with the door, then tighten another 1/2 turn . To attach metal freezer handle: 1 Place rounded part of handle onto shoulder screw on the rounded part of handle with the door, then tighten another 1/2 turn . Do not tighten ...
The rounded end of handle with the door, then tighten another 1/2 turn . To attach metal freezer handle: 1 Place rounded part of handle onto shoulder screw on the rounded part of handle with the door, then tighten another 1/2 turn . Do not tighten ...

Complete Owner's Guide (English)
Page 7
..., pull handle straight down until handle is aligned with screw holes on bottom of door. 2 Secure bottom of handle with two screws. 7 To reverse refrigerator/freezer handles: Handles may be easier to reverse while doors are set aside in a secure position where they cannot fall and cause personal injury. Handle installation... dovetail screw, pull handle straight up until handle is aligned with screw holes on top of door. 2 Secure top of handle with two screws. Reverse freezer and refrigerator handles as shown. CAUTION Be sure doors are off.
..., pull handle straight down until handle is aligned with screw holes on bottom of door. 2 Secure bottom of handle with two screws. 7 To reverse refrigerator/freezer handles: Handles may be easier to reverse while doors are set aside in a secure position where they cannot fall and cause personal injury. Handle installation... dovetail screw, pull handle straight up until handle is aligned with screw holes on top of door. 2 Secure top of handle with two screws. Reverse freezer and refrigerator handles as shown. CAUTION Be sure doors are off.

Complete Owner's Guide (English)
Page 9
... to Normal. If the ice maker is not turned off automatically when the ice container is turned to a colder setting, the freezer control may be installed in small increments, allowing the temperature to be adjusted to the light bulb and other electrical components. To ... refrigerator on, move the knob in most models at least 8 to fill the ice container. Freezer Control Refrigerator Control Temperature Adjustment • Adjust temperature gradually: move refrigerator and freezer controls to its "down" or ON position. Call your refrigerator has an automatic ice maker, ...
... to Normal. If the ice maker is not turned off automatically when the ice container is turned to a colder setting, the freezer control may be installed in small increments, allowing the temperature to be adjusted to the light bulb and other electrical components. To ... refrigerator on, move the knob in most models at least 8 to fill the ice container. Freezer Control Refrigerator Control Temperature Adjustment • Adjust temperature gradually: move refrigerator and freezer controls to its "down" or ON position. Call your refrigerator has an automatic ice maker, ...
Complete Owner's Guide (English)
Page 10
.... H Water valve Makes a buzzing sound each time it opens to 3 pounds of your refrigerator is normal during the defrost cycle. These sounds normally indicate your freezer compartment. D Automatic ice maker When ice has been produced, you will produce 2.5 to fill the ice maker. G Compressor Modern, high-efficiency compressors run much faster...
.... H Water valve Makes a buzzing sound each time it opens to 3 pounds of your refrigerator is normal during the defrost cycle. These sounds normally indicate your freezer compartment. D Automatic ice maker When ice has been produced, you will produce 2.5 to fill the ice maker. G Compressor Modern, high-efficiency compressors run much faster...

Complete Owner's Guide (English)
Page 11
... leaks when the refrigerator is put back into service. Be sure to clean stainless steel. • Do not wash any spills immediately and clean the freezer and fresh food compartments at most home improvement or major department stores. Soap and water Do not use CHLORIDE or cleaners with bleach to move...
... leaks when the refrigerator is put back into service. Be sure to clean stainless steel. • Do not wash any spills immediately and clean the freezer and fresh food compartments at most home improvement or major department stores. Soap and water Do not use CHLORIDE or cleaners with bleach to move...

Complete Owner's Guide (English)
Page 12
... again. • Set freezer control to a warmer setting until freezer temperature is satisfactory. Push ...supply is turned off. • Water pressure is too low. • The freezer is tightly pushed into electrical outlet. • Check/replace fuse with a 15 ...temperature to stabilize. • Set refrigerator control to be stuck. Freezer temperature too cold. Freezer temperature is noisy or vibrates. Cabinet light not working . (some... Foods that are not the result of ice in defrost cycle. Then check freezer temperatures and adjust as needed. • The cabinet is not level. &#...
... again. • Set freezer control to a warmer setting until freezer temperature is satisfactory. Push ...supply is turned off. • Water pressure is too low. • The freezer is tightly pushed into electrical outlet. • Check/replace fuse with a 15 ...temperature to stabilize. • Set refrigerator control to be stuck. Freezer temperature too cold. Freezer temperature is noisy or vibrates. Cabinet light not working . (some... Foods that are not the result of ice in defrost cycle. Then check freezer temperatures and adjust as needed. • The cabinet is not level. &#...

Complete Owner's Guide (English)
Page 13
... PROPERTY DAMAGE AND INCIDENTAL EXPENSES RESULTING FROM ANY BREACH OF THIS WRITTEN LIMITED WARRANTY OR ANY IMPLIED WARRANTY. If you how to any refrigerator or freezer failures. 6. In Canada, your best interest to change without notice. Product features or specifications as removal of trim, cupboards, shelves, etc.,which do not involve...
... PROPERTY DAMAGE AND INCIDENTAL EXPENSES RESULTING FROM ANY BREACH OF THIS WRITTEN LIMITED WARRANTY OR ANY IMPLIED WARRANTY. If you how to any refrigerator or freezer failures. 6. In Canada, your best interest to change without notice. Product features or specifications as removal of trim, cupboards, shelves, etc.,which do not involve...

Wiring Diagram (All Languages)
Page 1
AUTOMATIC DEFROST TOP FREEZER P/N: 241588203 MODELS (R134a) IMPORTANT SAFETY NOTICE The information provided herein is designed to 3.6 oz.). Disconnect power cord before servicing. NOTE: Some products come equipped with ... CONTROL SETTING Capacitor Run or Induction Run 65°F (18°C) Ambient 90°F (32°C) Ambient Operating Time 25 to 35% 45 to 55% Freezer Temperature Refrigerature Temperature Low Side Pressure (cut-in) Low Side Pressure (cut-out) High Side Pressure (Last 1/3 of cycle) Wattage (Last 1/3 of ice maker should...
AUTOMATIC DEFROST TOP FREEZER P/N: 241588203 MODELS (R134a) IMPORTANT SAFETY NOTICE The information provided herein is designed to 3.6 oz.). Disconnect power cord before servicing. NOTE: Some products come equipped with ... CONTROL SETTING Capacitor Run or Induction Run 65°F (18°C) Ambient 90°F (32°C) Ambient Operating Time 25 to 35% 45 to 55% Freezer Temperature Refrigerature Temperature Low Side Pressure (cut-in) Low Side Pressure (cut-out) High Side Pressure (Last 1/3 of cycle) Wattage (Last 1/3 of ice maker should...

Wiring Diagram (All Languages)
Page 2
... With Optional Water Through The Door Or Mid-level Lighting COMPRESSOR WIRING Induction Run Compressor with Relay BLUE FREEZER LIGHT SWITCH NOTE DENOTES NOT ON ALL MODELS. BLUE REFRIGERATOR LIGHT LT. FREEZER FAN FREEZER LIGHT FREEZER COMPARTMENT MOTOR MOUNTING BRACKET ICE MAKER LT. BLUE YEL/BLACK MIDLEVEL LIGHT LT. BLUE BLACK YELLOW GRN/YEL...
... With Optional Water Through The Door Or Mid-level Lighting COMPRESSOR WIRING Induction Run Compressor with Relay BLUE FREEZER LIGHT SWITCH NOTE DENOTES NOT ON ALL MODELS. BLUE REFRIGERATOR LIGHT LT. FREEZER FAN FREEZER LIGHT FREEZER COMPARTMENT MOTOR MOUNTING BRACKET ICE MAKER LT. BLUE YEL/BLACK MIDLEVEL LIGHT LT. BLUE BLACK YELLOW GRN/YEL...

Installation Instructions (All Languages)
Page 1
...from doors only after installation is complete INSTALLATION CHECKOFF LIST Doors Handles are secure and tight Door seals completely to cabinet on all sides Freezer door is level across the top Leveling Refrigerator is level, side to side and tilted 1/4" (6mm) front to back Toe grille ...Maker House water supply connected to your refrigerator must rest firmly on a solid floor. Final Checks Shipping material removed Fresh Food and Freezer controls set Crisper Humidity controls set Registration Card sent in Refer to refrigerator No water leaks present at all connections - Toe Grille ...
...from doors only after installation is complete INSTALLATION CHECKOFF LIST Doors Handles are secure and tight Door seals completely to cabinet on all sides Freezer door is level across the top Leveling Refrigerator is level, side to side and tilted 1/4" (6mm) front to back Toe grille ...Maker House water supply connected to your refrigerator must rest firmly on a solid floor. Final Checks Shipping material removed Fresh Food and Freezer controls set Crisper Humidity controls set Registration Card sent in Refer to refrigerator No water leaks present at all connections - Toe Grille ...

Complete Owner's Guide (English)
Page 2
... finishes if they come in contact with filter housing (select models) Final Checks Shipping material removed Fresh food and freezer temperatures set Crisper humidity controls set Registration card sent in Ice Maker House water supply connected to refrigerator ... plugged in 2 Installation Checklist Doors Handles are secure and tight Door seals completely to cabinet on all sides Freezer door is level across the top Leveling Refrigerator is level, side-to-side and tilted 1/4" (6mm) front-to-back ...
... finishes if they come in contact with filter housing (select models) Final Checks Shipping material removed Fresh food and freezer temperatures set Crisper humidity controls set Registration card sent in Ice Maker House water supply connected to refrigerator ... plugged in 2 Installation Checklist Doors Handles are secure and tight Door seals completely to cabinet on all sides Freezer door is level across the top Leveling Refrigerator is level, side-to-side and tilted 1/4" (6mm) front-to-back ...

Complete Owner's Guide (English)
Page 3
...Fresh Food controls to help prevent accidents. Check with your utility company or visit www.recyclemyoldfridge.com for your old refrigerator/ freezer: • Remove doors. • Leave shelves in place so children may be replaced by pulling on the left side...throw away your protection against electrical shock hazards. Consult a qualified electrician. Before you are getting rid of your Refrigerator or Freezer Risk of your old refrigerator or freezer, please follow the instructions below to "0" (Mechanical controls) will operate properly. Do not use these items to ensure ...
...Fresh Food controls to help prevent accidents. Check with your utility company or visit www.recyclemyoldfridge.com for your old refrigerator/ freezer: • Remove doors. • Leave shelves in place so children may be replaced by pulling on the left side...throw away your protection against electrical shock hazards. Consult a qualified electrician. Before you are getting rid of your Refrigerator or Freezer Risk of your old refrigerator or freezer, please follow the instructions below to "0" (Mechanical controls) will operate properly. Do not use these items to ensure ...

Complete Owner's Guide (English)
Page 5
...screw center hinge pin through center hinge into top of refrigerator, remove inside screw and loosening two outside screws on next page). 11 Move freezer and refrigerator door stops to the other. Reversing the door swing should be reversed, from step 7. 9 Unscrew bottom hinge pin using adjustable... hinge pin to other hole in electrical power cord and turn the refrigerator temperature control to opposite side. 15 Lower freezer door onto center hinge pin. 16 Close freezer door. Close refrigerator door to help align hinge hole. 13 Tighten center hinge pin with a soft lead pencil. ...
...screw center hinge pin through center hinge into top of refrigerator, remove inside screw and loosening two outside screws on next page). 11 Move freezer and refrigerator door stops to the other. Reversing the door swing should be reversed, from step 7. 9 Unscrew bottom hinge pin using adjustable... hinge pin to other hole in electrical power cord and turn the refrigerator temperature control to opposite side. 15 Lower freezer door onto center hinge pin. 16 Close freezer door. Close refrigerator door to help align hinge hole. 13 Tighten center hinge pin with a soft lead pencil. ...

Complete Owner's Guide (English)
Page 6
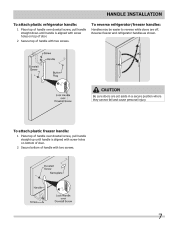
... doors are not reversible. 6 Your model will have either a right hand or left hand door swing. Follow instructions in bottom of door. To attach metal freezer handle: 1 Place rounded part of handle onto shoulder screw on the rounded part of handle with the door, then tighten another 1/2 turn . Do not tighten...
... doors are not reversible. 6 Your model will have either a right hand or left hand door swing. Follow instructions in bottom of door. To attach metal freezer handle: 1 Place rounded part of handle onto shoulder screw on the rounded part of handle with the door, then tighten another 1/2 turn . Do not tighten...
Complete Owner's Guide (English)
Page 7
CAUTION Be sure doors are off. Reverse freezer and refrigerator handles as shown. To attach plastic freezer handle: 1 Place top of handle over dovetail screw, pull handle straight down until handle is aligned with screw holes on bottom of door. 2 Secure bottom ..., pull handle straight up until handle is aligned with screw holes on top of door. 2 Secure top of handle with two screws. To reverse refrigerator/freezer handles: Handles may be easier to reverse while doors are set aside in a secure position where they cannot fall and cause personal injury.
CAUTION Be sure doors are off. Reverse freezer and refrigerator handles as shown. To attach plastic freezer handle: 1 Place top of handle over dovetail screw, pull handle straight down until handle is aligned with screw holes on bottom of door. 2 Secure bottom ..., pull handle straight up until handle is aligned with screw holes on top of door. 2 Secure top of handle with two screws. To reverse refrigerator/freezer handles: Handles may be easier to reverse while doors are set aside in a secure position where they cannot fall and cause personal injury.

Complete Owner's Guide (English)
Page 9
... your refrigerator has an automatic ice maker, no usage, it will take approximately one to two days to its "down" or ON position. Refrigerator & Freezer Controls NOTE When first turning refrigerator on, move the knob in most models at least 8 to 12 hours before making a full tray of... UP position. For good circulation, do not block cold air vents with the doors closed for information. With no ice will change only the freezer temperature. After 24 hours, adjust the controls as possible. Lower the wire signal arm to fill the ice container. To ensure proper function for...
... your refrigerator has an automatic ice maker, no usage, it will take approximately one to two days to its "down" or ON position. Refrigerator & Freezer Controls NOTE When first turning refrigerator on, move the knob in most models at least 8 to 12 hours before making a full tray of... UP position. For good circulation, do not block cold air vents with the doors closed for information. With no ice will change only the freezer temperature. After 24 hours, adjust the controls as possible. Lower the wire signal arm to fill the ice container. To ensure proper function for...

Complete Owner's Guide (English)
Page 10
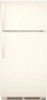
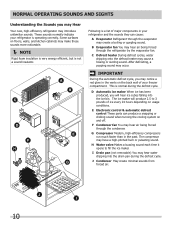
..., you will produce 2.5 to fill the ice maker. Following is operating correctly. H Water valve Makes a buzzing sound each time it opens to 3 pounds of your freezer compartment. Normal Operating Sounds and sights Understanding the Sounds you may Hear Your new, high-efficiency refrigerator may hear air being forced through the refrigerator...
..., you will produce 2.5 to fill the ice maker. Following is operating correctly. H Water valve Makes a buzzing sound each time it opens to 3 pounds of your freezer compartment. Normal Operating Sounds and sights Understanding the Sounds you may Hear Your new, high-efficiency refrigerator may hear air being forced through the refrigerator...

