
Installation Instructions
Page 1
...; Remove the refrigerator doors (see how in your household water line and the refrigerator supply line. If the refrigerator is available for your Use & Care Manual. Discard the cap. 4 Slide the brass compression nut, then the ferrule (sleeve) onto Plastic Water Tubing to position the refrigerator directly in front of your... the rear of your refrigerator without connecting it clockwise until water is clear by customer after unit is in position, you purchased your Use & Care Manual.
...; Remove the refrigerator doors (see how in your household water line and the refrigerator supply line. If the refrigerator is available for your Use & Care Manual. Discard the cap. 4 Slide the brass compression nut, then the ferrule (sleeve) onto Plastic Water Tubing to position the refrigerator directly in front of your... the rear of your refrigerator without connecting it clockwise until water is clear by customer after unit is in position, you purchased your Use & Care Manual.
Complete Owner s Guide
Page 4
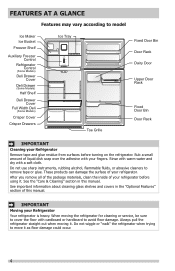
...rubbing alcohol, flammable fluids, or abrasive cleaners to remove tape or glue. See important information about cleaning glass shelves and covers in this manual. Always pull the refrigerator straight out when moving the refrigerator for cleaning or service, be sure to cover the floor with cardboard or ...warm water and dry with your Refrigerator Your refrigerator is heavy. After you remove all of the package materials, clean the inside of this manual. Do not wiggle or "walk" the refrigerator when trying to move it . FEATURES AT A GLANCE Features may vary according to model Ice...
...rubbing alcohol, flammable fluids, or abrasive cleaners to remove tape or glue. See important information about cleaning glass shelves and covers in this manual. Always pull the refrigerator straight out when moving the refrigerator for cleaning or service, be sure to cover the floor with cardboard or ...warm water and dry with your Refrigerator Your refrigerator is heavy. After you remove all of the package materials, clean the inside of this manual. Do not wiggle or "walk" the refrigerator when trying to move it . FEATURES AT A GLANCE Features may vary according to model Ice...
Complete Owner s Guide
Page 6
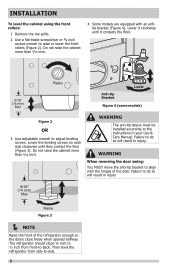
..." (14 mm) Max Raise Anti-tip Bracket Lower Figure 4 (some models) Figure 2 OR 3 Use adjustable wrench to do so will result in your Use & Care Manual.
..." (14 mm) Max Raise Anti-tip Bracket Lower Figure 4 (some models) Figure 2 OR 3 Use adjustable wrench to do so will result in your Use & Care Manual.

Wiring Diagram
Page 1
... 1: 2 Beeps Test 2: Power ON Press Door Switch Compressor ON Enters Service 2 Times Mode 2 Beeps Press Door Switch 2 Times Manual Defrost 2 Beeps to Defrost Heater To Exit Service Mode from Press Door Switch any green grounding wires are removed during this appliance. Test...Switch 2 Times 2 Beeps Test 3: Fresh Food Light ON P/N A01437001 IMPORTANT START-UP NOTE: Upon 1st start the first test. MANUAL DEFROST Unit will sound to confirm the next test has started. All components of electrical shock. Disconnect power cord before servicing this time...
... 1: 2 Beeps Test 2: Power ON Press Door Switch Compressor ON Enters Service 2 Times Mode 2 Beeps Press Door Switch 2 Times Manual Defrost 2 Beeps to Defrost Heater To Exit Service Mode from Press Door Switch any green grounding wires are removed during this appliance. Test...Switch 2 Times 2 Beeps Test 3: Fresh Food Light ON P/N A01437001 IMPORTANT START-UP NOTE: Upon 1st start the first test. MANUAL DEFROST Unit will sound to confirm the next test has started. All components of electrical shock. Disconnect power cord before servicing this time...


