

Installation Instructions
Page 1
... 8 Door Removal (if necessary) Humidity Control If you purchased your Use & Care Manual. WARNING To avoid electric shock, which you need : • Access to move it to a water supply, make sure the ice maker's power switch is turned Off (see "Door Removal Instructions" in your refrigerator. Do not use packing foam and tape to start after initial start up or power interruption. Installation Instructions for the water supply connection at all connections recheck in 24 hours ȽȽ Ice Maker...
... 8 Door Removal (if necessary) Humidity Control If you purchased your Use & Care Manual. WARNING To avoid electric shock, which you need : • Access to move it to a water supply, make sure the ice maker's power switch is turned Off (see "Door Removal Instructions" in your refrigerator. Do not use packing foam and tape to start after initial start up or power interruption. Installation Instructions for the water supply connection at all connections recheck in 24 hours ȽȽ Ice Maker...
Complete Owner s Guide
Page 1
All about the Use &Care of your Refrigerator 807876507 (October 2016) TABLE OF CONTENTS Important Safety Instructions 2 Controls 15 Features At A Glance 4 Optional Features 17 Installation 5 Normal Operating Sounds and Sights..........20 Door Removal/Reversal Instructions 7 Care and Cleaning 21 Handle Installation 10 Before you Call 23 Connecting Water Supply 12 Major Appliance Warranty 24 Ice Service 14 www.frigidaire.com USA 1-800-944-9044 www.frigidaire.ca Canada 1-800-265-8352
All about the Use &Care of your Refrigerator 807876507 (October 2016) TABLE OF CONTENTS Important Safety Instructions 2 Controls 15 Features At A Glance 4 Optional Features 17 Installation 5 Normal Operating Sounds and Sights..........20 Door Removal/Reversal Instructions 7 Care and Cleaning 21 Handle Installation 10 Before you Call 23 Connecting Water Supply 12 Major Appliance Warranty 24 Ice Service 14 www.frigidaire.com USA 1-800-944-9044 www.frigidaire.ca Canada 1-800-265-8352
Complete Owner s Guide
Page 2
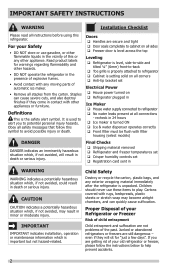
... appliances or furniture. Junked or abandoned refrigerators or freezers are not problems of automatic ice maker. • Remove all connections - It is setting solid on Refrigerator plugged in death or serious injury. Final Checks Shipping material removed Refrigerator and freezer temperatures set Crisper humidity controls set Electrical Power House power turned on all sides Freezer door is level across the top Leveling Refrigerator is level, side-to-side and tilted ¼...
... appliances or furniture. Junked or abandoned refrigerators or freezers are not problems of automatic ice maker. • Remove all connections - It is setting solid on Refrigerator plugged in death or serious injury. Final Checks Shipping material removed Refrigerator and freezer temperatures set Crisper humidity controls set Electrical Power House power turned on all sides Freezer door is level across the top Leveling Refrigerator is level, side-to-side and tilted ¼...

Complete Owner s Guide
Page 3
... switch or pull cord to prevent the refrigerator from being turned off power to avoid electrical shock. • Performance may also cause harm to the environment if released to sudden temperature change. Before you may have a cooling system that safety mechanisms in this refrigerator will disable your old refrigerator/ freezer: • Remove doors. • Leave shelves in accordance with a three-prong grounding plug for your warranty...
... switch or pull cord to prevent the refrigerator from being turned off power to avoid electrical shock. • Performance may also cause harm to the environment if released to sudden temperature change. Before you may have a cooling system that safety mechanisms in this refrigerator will disable your old refrigerator/ freezer: • Remove doors. • Leave shelves in accordance with a three-prong grounding plug for your warranty...
Complete Owner s Guide
Page 4
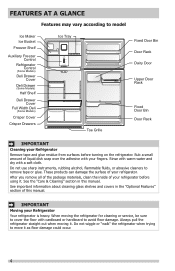
... warm water and dry with cardboard or hardboard to avoid floor damage. After you remove all of the package materials, clean the inside of this manual. Always pull the refrigerator straight out when moving the refrigerator for cleaning or service, be sure to cover the floor with a soft cloth. FEATURES AT A GLANCE Features may vary according to model Ice Maker Ice Bucket Freezer Shelf Auxiliary Freezer Control Refrigerator Control (Some Models) Deli Drawer Cover...
... warm water and dry with cardboard or hardboard to avoid floor damage. After you remove all of the package materials, clean the inside of this manual. Always pull the refrigerator straight out when moving the refrigerator for cleaning or service, be sure to cover the floor with a soft cloth. FEATURES AT A GLANCE Features may vary according to model Ice Maker Ice Bucket Freezer Shelf Auxiliary Freezer Control Refrigerator Control (Some Models) Deli Drawer Cover...

Complete Owner s Guide
Page 5
... ease of installation, proper air circulation, and plumbing and electrical connections: Sides & Top ⅜ inch Back 1 inch NOTE If your refrigerator is placed with an automatic ice maker. Remove the cover on the side corresponding with the door hinge bracket. • Consider water supply availability for models equipped with the door hinge side against a wall, you do not hook up water to the refrigerator, remember to "Controls" section. Guidelines...
... ease of installation, proper air circulation, and plumbing and electrical connections: Sides & Top ⅜ inch Back 1 inch NOTE If your refrigerator is placed with an automatic ice maker. Remove the cover on the side corresponding with the door hinge bracket. • Consider water supply availability for models equipped with the door hinge side against a wall, you do not hook up water to the refrigerator, remember to "Controls" section. Guidelines...
Complete Owner s Guide
Page 8
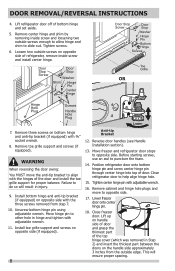
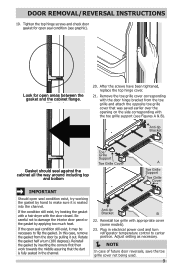
.... Reverse door handles (see Handle Installation section). 13. Move freezer and refrigerator door stops to other hole in hinge and tighten with adjustable wrench. 11. Position refrigerator door onto bottom hinge pin and screw center hinge pin through center hinge into top of bottom hinge and set aside. 5. Lift up on handle side of door and grasp the thinnest part of the top hinge cover (which was removed in injury. 9. DOOR REMOVAL/REVERSAL INSTRUCTIONS 4. WARNING When reversing the door swing...
.... Reverse door handles (see Handle Installation section). 13. Move freezer and refrigerator door stops to other hole in hinge and tighten with adjustable wrench. 11. Position refrigerator door onto bottom hinge pin and screw center hinge pin through center hinge into top of bottom hinge and set aside. 5. Lift up on handle side of door and grasp the thinnest part of the top hinge cover (which was removed in injury. 9. DOOR REMOVAL/REVERSAL INSTRUCTIONS 4. WARNING When reversing the door swing...
Complete Owner s Guide
Page 9
.... Be careful not to damage the interior door panel or the gasket by pulling it may be necessary to make sure it is fully seated in electrical power cord and turn (180 degrees). Anti-tip Bracket B 22. Adjust setting as necessary. NOTE In case of future door reversals, save the toe grille cover not being used. 9 If the condition still exist, try working the gasket by...
.... Be careful not to damage the interior door panel or the gasket by pulling it may be necessary to make sure it is fully seated in electrical power cord and turn (180 degrees). Anti-tip Bracket B 22. Adjust setting as necessary. NOTE In case of future door reversals, save the toe grille cover not being used. 9 If the condition still exist, try working the gasket by...
Complete Owner s Guide
Page 12
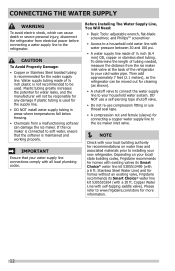
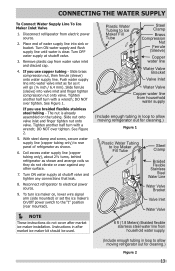
... tubing needed, measure the distance from electrical power before connecting a water supply line to installing your cold water pipe. CAUTION To Avoid Property Damage: • Copper or Stainless Steel braided tubing is maintained and working properly. Then add approximately 7 feet (2.1 meters), so the refrigerator can cause death or severe personal injury, disconnect the refrigerator from the ice maker inlet valve at the back of ¼ inch plastic is used . Depending on water lines...
... tubing needed, measure the distance from electrical power before connecting a water supply line to installing your cold water pipe. CAUTION To Avoid Property Damage: • Copper or Stainless Steel braided tubing is maintained and working properly. Then add approximately 7 feet (2.1 meters), so the refrigerator can cause death or severe personal injury, disconnect the refrigerator from the ice maker inlet valve at the back of ¼ inch plastic is used . Depending on water lines...
Complete Owner s Guide
Page 13
... cover after market ice maker kit should be used. To turn with a wrench; Turn ON water supply at shutoff valve. 3. If you use copper tubing - CONNECTING THE WATER SUPPLY To Connect Water Supply Line To Ice Maker Inlet Valve 1. Disconnect refrigerator from water valve inlet and discard cap. 4. Turn ON water supply and flush supply line until water is already assembled on , lower wire signal arm (side mounted) or set the ice maker's On/Off power switch to rear panel of water supply line into valve inlet and finger tighten compression nut onto valve. Remove...
... cover after market ice maker kit should be used. To turn with a wrench; Turn ON water supply at shutoff valve. 3. If you use copper tubing - CONNECTING THE WATER SUPPLY To Connect Water Supply Line To Ice Maker Inlet Valve 1. Disconnect refrigerator from water valve inlet and discard cap. 4. Turn ON water supply and flush supply line until water is already assembled on , lower wire signal arm (side mounted) or set the ice maker's On/Off power switch to rear panel of water supply line into valve inlet and finger tighten compression nut onto valve. Remove...
Complete Owner s Guide
Page 14
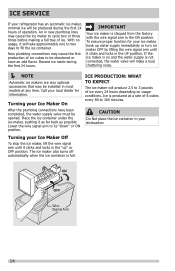
.... The ice maker also turns off automatically when the ice container is not connected, the water valve will make a loud chattering noise. NOTE Automatic ice makers are also optional accessories that may be opened. ICE PRODUCTION: WHAT TO EXPECT The ice maker will take approximately one to two days to 3 pounds of ice every 24 hours depending on and the water supply is full. ICE SERVICE If your refrigerator has...
.... The ice maker also turns off automatically when the ice container is not connected, the water valve will make a loud chattering noise. NOTE Automatic ice makers are also optional accessories that may be opened. ICE PRODUCTION: WHAT TO EXPECT The ice maker will take approximately one to two days to 3 pounds of ice every 24 hours depending on and the water supply is full. ICE SERVICE If your refrigerator has...
Complete Owner s Guide
Page 19
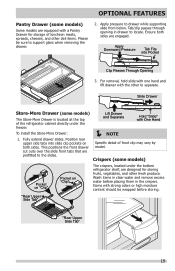
... in clear water and remove excess water before storing. Apply pressure to the slides. Tab/clip passes through opening in drawer to support glass when removing the drawer. 2. Items with strong odors or high moisture content should be sure to locate. "Rear Upper Side Tab" "Rear Upper Side Tab" 19 OPTIONAL FEATURES Pantry Drawer (some models) Some models are equipped with a Pantry Drawer for...
... in clear water and remove excess water before storing. Apply pressure to the slides. Tab/clip passes through opening in drawer to support glass when removing the drawer. 2. Items with strong odors or high moisture content should be sure to locate. "Rear Upper Side Tab" "Rear Upper Side Tab" 19 OPTIONAL FEATURES Pantry Drawer (some models) Some models are equipped with a Pantry Drawer for...
Complete Owner s Guide
Page 20
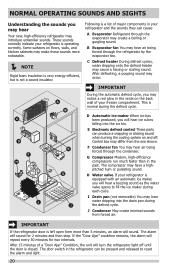
... a buzzing sound as the water valve opens to reset the alarm and light. 20 After 15 minutes of your refrigerator is operating correctly. I Drain pan (not removable) You may hear air being forced through the condenser. IMPORTANT If the refrigerator door is closed. After defrosting, a popping sound may cause a hissing or sizzling sound. The compressor may hear air being forced through the refrigerator by the evaporator fan. J Condenser May create...
... a buzzing sound as the water valve opens to reset the alarm and light. 20 After 15 minutes of your refrigerator is operating correctly. I Drain pan (not removable) You may hear air being forced through the condenser. IMPORTANT If the refrigerator door is closed. After defrosting, a popping sound may cause a hissing or sizzling sound. The compressor may hear air being forced through the refrigerator by the evaporator fan. J Condenser May create...
Complete Owner s Guide
Page 21
... containing petroleum products on plastic parts, interior doors, gaskets or cabinet liners. Contact a service representative to perform this operation. NOTE If you set your temperature controls to turn off cooling, power to clean stainless steel. • Do not wash any spills immediately and clean the freezer and refrigerator compartments at least twice a year. Wipe up . When cleaning, take the following precautions: • Never use paper towels, metallic scouring...
... containing petroleum products on plastic parts, interior doors, gaskets or cabinet liners. Contact a service representative to perform this operation. NOTE If you set your temperature controls to turn off cooling, power to clean stainless steel. • Do not wash any spills immediately and clean the freezer and refrigerator compartments at least twice a year. Wipe up . When cleaning, take the following precautions: • Never use paper towels, metallic scouring...
Complete Owner s Guide
Page 22
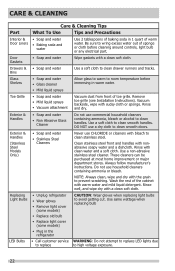
... gaskets with warm water and mild liquid detergent. Use a soft cloth to avoid getting cut. Always follow manufacturer's instructions. CARE & CLEANING Care & Cleaning Tips Part What To Use Tips and Precautions Interior & Door Liners • Soap and water • Baking soda and water Use 2 tablespoons of baking soda in 1 quart of toe grille. Replacing Light Bulbs • Unplug refrigerator • Wear gloves • Remove light cover (some models) • Replace old bulb • Replace light cover (some models) • Plug in the refrigerator...
... gaskets with warm water and mild liquid detergent. Use a soft cloth to avoid getting cut. Always follow manufacturer's instructions. CARE & CLEANING Care & Cleaning Tips Part What To Use Tips and Precautions Interior & Door Liners • Soap and water • Baking soda and water Use 2 tablespoons of baking soda in 1 quart of toe grille. Replacing Light Bulbs • Unplug refrigerator • Wear gloves • Remove light cover (some models) • Replace old bulb • Replace light cover (some models) • Plug in the refrigerator...
Complete Owner s Guide
Page 23
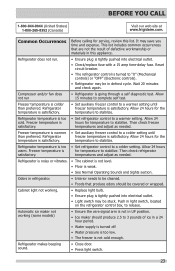
... vibrates. • The cabinet is not level. • Floor is colder than preferred. Cabinet light not working (some models) • Ensure the wire signal arm is not in this list. Refrigerator makes beeping sound. • Close door. • Press light switch. 23 Refrigerator freezer temperature is tightly pushed into electrical outlet. • Check/replace fuse with a 15 amp time-delay fuse. Refrigerator temperature is satisfactory. • Set auxiliary freezer control to release.
... vibrates. • The cabinet is not level. • Floor is colder than preferred. Cabinet light not working (some models) • Ensure the wire signal arm is not in this list. Refrigerator makes beeping sound. • Close door. • Press light switch. 23 Refrigerator freezer temperature is tightly pushed into electrical outlet. • Check/replace fuse with a 15 amp time-delay fuse. Refrigerator temperature is satisfactory. • Set auxiliary freezer control to release.
Complete Owner s Guide
Page 24
... are subject to change or add to any obligations under this appliance that prove to remote areas, including the state of Alaska. 12. Damages to repair or replace appliance light bulbs, air filters, water filters, other consumables, or knobs, handles, or other than in accordance with the provided instructions. Damages caused by: services performed by this warranty. 5. LIMITATION OF REMEDIES CUSTOMER'S SOLE AND EXCLUSIVE...
... are subject to change or add to any obligations under this appliance that prove to remote areas, including the state of Alaska. 12. Damages to repair or replace appliance light bulbs, air filters, water filters, other consumables, or knobs, handles, or other than in accordance with the provided instructions. Damages caused by: services performed by this warranty. 5. LIMITATION OF REMEDIES CUSTOMER'S SOLE AND EXCLUSIVE...

Wiring Diagram
Page 1
...;C) Heater Wattage 165 W ICE MAKER CONNECTOR PLUG CONNECTIONS Wire Number Wire Color Connects to the possibility of electrical shock. initiate first/next test --> Press the door switch 2 times; 2 short beeps acknowledge selection. 1 Compressor 2 Heater 3 FF Light 4 Evaporator Fan Press the FF door switch twice to advance between tests. Press the FF door switch twice again to start -up to 10 minutes for another 5 minutes. AUTOMATIC DEFROST TOP MOUNT FREEZER - IMPORTANT If any Test Press Door Switch 2 Times...
...;C) Heater Wattage 165 W ICE MAKER CONNECTOR PLUG CONNECTIONS Wire Number Wire Color Connects to the possibility of electrical shock. initiate first/next test --> Press the door switch 2 times; 2 short beeps acknowledge selection. 1 Compressor 2 Heater 3 FF Light 4 Evaporator Fan Press the FF door switch twice to advance between tests. Press the FF door switch twice again to start -up to 10 minutes for another 5 minutes. AUTOMATIC DEFROST TOP MOUNT FREEZER - IMPORTANT If any Test Press Door Switch 2 Times...
Product Specifications Sheet
Page 2
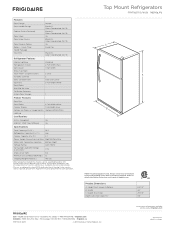
.... Compliant1 Yes ENERGY STAR® Most Efficient Yes Top View B Recessed water line Recessed (ice maker models only) electrical outlet Specifications Total Capacity (Cu. Standards for ease of Justice's 2010 A.D.A. Hinges & Rollers) B - Door) Depth with restricted removal.) Product Dimensions A - Ft. Top Mount Refrigerators Features Door Design Door Handle Design Cabinet Finish (Textured) Door Stops Door Hinge Covers Door Reverse Option Rollers - Depth (Incl. Front / Rear Sound Package Toe Grille Top Mount Refrigerators Frigidaire Baseline Square Black...
.... Compliant1 Yes ENERGY STAR® Most Efficient Yes Top View B Recessed water line Recessed (ice maker models only) electrical outlet Specifications Total Capacity (Cu. Standards for ease of Justice's 2010 A.D.A. Hinges & Rollers) B - Door) Depth with restricted removal.) Product Dimensions A - Ft. Top Mount Refrigerators Features Door Design Door Handle Design Cabinet Finish (Textured) Door Stops Door Hinge Covers Door Reverse Option Rollers - Depth (Incl. Front / Rear Sound Package Toe Grille Top Mount Refrigerators Frigidaire Baseline Square Black...
Product Specifications Sheet
Page 3
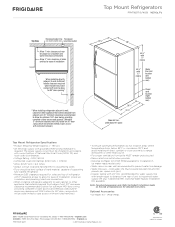
...° door swing, providing complete crisper access and removal. (Absolute 3" minimum clearance will provide limited crisper access with restricted removal.) 29 7/8" 28" 65 1/8" with 3/8" rollers 64 7/8" with 3/8" rollers Water line inlet location (left bottom rear) 26 5/8" 32 1/4" Power cord location (right bottom rear) Allow 56" min. (with doors 90° open) Top Mount Refrigerator Specifications • Product Shipping Weight (approx.) - 190 Lbs. • An electrical supply with...
...° door swing, providing complete crisper access and removal. (Absolute 3" minimum clearance will provide limited crisper access with restricted removal.) 29 7/8" 28" 65 1/8" with 3/8" rollers 64 7/8" with 3/8" rollers Water line inlet location (left bottom rear) 26 5/8" 32 1/4" Power cord location (right bottom rear) Allow 56" min. (with doors 90° open) Top Mount Refrigerator Specifications • Product Shipping Weight (approx.) - 190 Lbs. • An electrical supply with...


