
Installation Instructions
Page 1
...to an electrical power source until they contact the floor (Figure 3). To connect the water supply to the rear of your Use & Care Manual. The refrigerator should slope ¼ inch to ½ inch from the water valve inlet at all materials for a water supply installation, ... connections: Sides & Top: 3/8 inch Rear: 1 inch NOTE Information about 2½ turns) behind (Include enough tubing in your Use & Care Manual. Do not use refrigerator handles to Ice Maker Fill Tube Steel Clamp Brass Compression Nut Ferrule (Sleeve) Copper Water Line copper tube. 5 Push the copper...
...to an electrical power source until they contact the floor (Figure 3). To connect the water supply to the rear of your Use & Care Manual. The refrigerator should slope ¼ inch to ½ inch from the water valve inlet at all materials for a water supply installation, ... connections: Sides & Top: 3/8 inch Rear: 1 inch NOTE Information about 2½ turns) behind (Include enough tubing in your Use & Care Manual. Do not use refrigerator handles to Ice Maker Fill Tube Steel Clamp Brass Compression Nut Ferrule (Sleeve) Copper Water Line copper tube. 5 Push the copper...
Complete Owner s Guide
Page 4
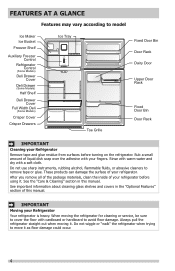
These products can damage the surface of this manual. See the "Care & Cleaning" section in the "Optional Features" section of your refrigerator before turning on the refrigerator. After you remove all of the package .... IMPORTANT Moving your Refrigerator Remove tape and glue residue from surfaces before using it. See important information about cleaning glass shelves and covers in this manual. FEATURES AT A GLANCE Features may vary according to model Ice Maker Ice Bucket Freezer Shelf Auxiliary Freezer Control Refrigerator Control (Some Models) Deli Drawer Cover...
These products can damage the surface of this manual. See the "Care & Cleaning" section in the "Optional Features" section of your refrigerator before turning on the refrigerator. After you remove all of the package .... IMPORTANT Moving your Refrigerator Remove tape and glue residue from surfaces before using it. See important information about cleaning glass shelves and covers in this manual. FEATURES AT A GLANCE Features may vary according to model Ice Maker Ice Bucket Freezer Shelf Auxiliary Freezer Control Refrigerator Control (Some Models) Deli Drawer Cover...
Complete Owner s Guide
Page 6
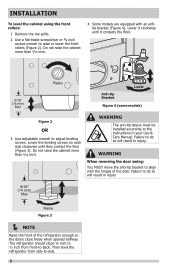
... the front rollers: 1 Remove the toe grille. 2 Use a flat-blade screwdriver or ⅜ inch socket wrench to do so will result in your Use & Care Manual.
... the front rollers: 1 Remove the toe grille. 2 Use a flat-blade screwdriver or ⅜ inch socket wrench to do so will result in your Use & Care Manual.

Wiring Diagram
Page 1
...Beep Test 1: 2 Beeps Test 2: Power ON Press Door Switch Compressor ON Enters Service 2 Times Mode 2 Beeps Press Door Switch 2 Times Manual Defrost 2 Beeps to Defrost Heater To Exit Service Mode from housing. PERFORMANCE DATA NO LOAD & NO DOOR OPENINGS AT MID-POINT CONTROL SETTING... 2 times; 2 short beeps acknowledge selection. 1 Compressor 2 Heater 3 FF Light 4 Evaporator Fan Press the FF door switch twice to acknowledge MANUAL DEFROST. The component will turn is replaced, the fill volume must be checked. feel for 2 minutes, then stop. Two beeps will complete normal...
...Beep Test 1: 2 Beeps Test 2: Power ON Press Door Switch Compressor ON Enters Service 2 Times Mode 2 Beeps Press Door Switch 2 Times Manual Defrost 2 Beeps to Defrost Heater To Exit Service Mode from housing. PERFORMANCE DATA NO LOAD & NO DOOR OPENINGS AT MID-POINT CONTROL SETTING... 2 times; 2 short beeps acknowledge selection. 1 Compressor 2 Heater 3 FF Light 4 Evaporator Fan Press the FF door switch twice to acknowledge MANUAL DEFROST. The component will turn is replaced, the fill volume must be checked. feel for 2 minutes, then stop. Two beeps will complete normal...


