

Installation Instructions
Page 1
... need to remove the doors to get your Use & Care Manual. Final Checks ȽȽ Shipping material removed ȽȽ Fresh Food and Freezer controls set ȽȽ Crisper Humidity controls set Electrical Power ȽȽ House water supply connected to support a fully loaded refrigerator. Call 1-877-435-3287. If the refrigerator is in place. Shifting the refrigerator from side to side may operate noisily if the household water supply is more likely to leak). • Ensure water supply...
... need to remove the doors to get your Use & Care Manual. Final Checks ȽȽ Shipping material removed ȽȽ Fresh Food and Freezer controls set ȽȽ Crisper Humidity controls set Electrical Power ȽȽ House water supply connected to support a fully loaded refrigerator. Call 1-877-435-3287. If the refrigerator is in place. Shifting the refrigerator from side to side may operate noisily if the household water supply is more likely to leak). • Ensure water supply...
Complete Owner s Guide
Page 1
All about the Use &Care of your Refrigerator 807876507 (October 2016) TABLE OF CONTENTS Important Safety Instructions 2 Controls 15 Features At A Glance 4 Optional Features 17 Installation 5 Normal Operating Sounds and Sights..........20 Door Removal/Reversal Instructions 7 Care and Cleaning 21 Handle Installation 10 Before you Call 23 Connecting Water Supply 12 Major Appliance Warranty 24 Ice Service 14 www.frigidaire.com USA 1-800-944-9044 www.frigidaire.ca Canada 1-800-265-8352
All about the Use &Care of your Refrigerator 807876507 (October 2016) TABLE OF CONTENTS Important Safety Instructions 2 Controls 15 Features At A Glance 4 Optional Features 17 Installation 5 Normal Operating Sounds and Sights..........20 Door Removal/Reversal Instructions 7 Care and Cleaning 21 Handle Installation 10 Before you Call 23 Connecting Water Supply 12 Major Appliance Warranty 24 Ice Service 14 www.frigidaire.com USA 1-800-944-9044 www.frigidaire.ca Canada 1-800-265-8352
Complete Owner s Guide
Page 2
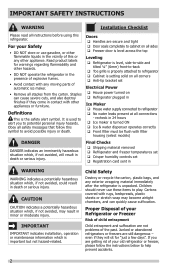
... not problems of explosive fumes. • Avoid contact with filter housing (select models) DANGER DANGER indicates an imminently hazardous situation which is setting solid on all corners Anti-tip bracket set Registration card sent in death or serious injury. Doors Handles are still dangerous - Final Checks Shipping material removed Refrigerator and freezer temperatures set Crisper humidity controls set Electrical Power House power turned...
... not problems of explosive fumes. • Avoid contact with filter housing (select models) DANGER DANGER indicates an imminently hazardous situation which is setting solid on all corners Anti-tip bracket set Registration card sent in death or serious injury. Doors Handles are still dangerous - Final Checks Shipping material removed Refrigerator and freezer temperatures set Crisper humidity controls set Electrical Power House power turned...

Complete Owner s Guide
Page 3
... the power cord. • Unplug the refrigerator before cleaning and before replacing a light bulb to avoid electrical shock. • Performance may be subject to sudden temperature change. IMPORTANT CFC/HCFC Disposal Your old refrigerator may break suddenly if nicked, scratched, or exposed to fines and imprisonment under your old refrigerator/ freezer: • Remove doors. • Leave shelves in this refrigerator will disable your protection against electrical shock...
... the power cord. • Unplug the refrigerator before cleaning and before replacing a light bulb to avoid electrical shock. • Performance may be subject to sudden temperature change. IMPORTANT CFC/HCFC Disposal Your old refrigerator may break suddenly if nicked, scratched, or exposed to fines and imprisonment under your old refrigerator/ freezer: • Remove doors. • Leave shelves in this refrigerator will disable your protection against electrical shock...
Complete Owner s Guide
Page 4
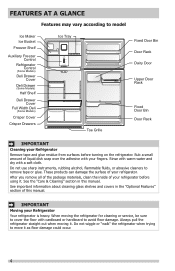
... abrasive cleaners to remove tape or glue. Rinse with warm water and dry with a soft cloth. FEATURES AT A GLANCE Features may vary according to model Ice Maker Ice Bucket Freezer Shelf Auxiliary Freezer Control Refrigerator Control (Some Models) Deli Drawer Cover Deli Drawer (Some Models) Half Shelf Deli Drawer Cover Full Width Deli (Some Models) Crisper Cover Crisper Drawers Ice Tray Toe Grille Fixed Door Bin Door Rack Dairy Door Upper Door Rack Fixed Door Bin Door Rack IMPORTANT Cleaning your Refrigerator Remove tape and glue residue from surfaces before using it.
... abrasive cleaners to remove tape or glue. Rinse with warm water and dry with a soft cloth. FEATURES AT A GLANCE Features may vary according to model Ice Maker Ice Bucket Freezer Shelf Auxiliary Freezer Control Refrigerator Control (Some Models) Deli Drawer Cover Deli Drawer (Some Models) Half Shelf Deli Drawer Cover Full Width Deli (Some Models) Crisper Cover Crisper Drawers Ice Tray Toe Grille Fixed Door Bin Door Rack Dairy Door Upper Door Rack Fixed Door Bin Door Rack IMPORTANT Cleaning your Refrigerator Remove tape and glue residue from surfaces before using it.

Complete Owner s Guide
Page 5
... side corresponding with the door hinge bracket. • Consider water supply availability for your refrigerator. 2. Attach toe grille to ensure that doors close and seal properly). • If possible, place the refrigerator out of your refrigerator is near a grounded electrical outlet. INSTALLATION This Use & Care Guide provides general operating instructions for models equipped with an automatic ice maker. To install the toe grille: 1. If you may freeze. The refrigerator compartment contents may...
... side corresponding with the door hinge bracket. • Consider water supply availability for your refrigerator. 2. Attach toe grille to ensure that doors close and seal properly). • If possible, place the refrigerator out of your refrigerator is near a grounded electrical outlet. INSTALLATION This Use & Care Guide provides general operating instructions for models equipped with an automatic ice maker. To install the toe grille: 1. If you may freeze. The refrigerator compartment contents may...
Complete Owner s Guide
Page 8
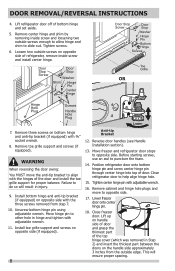
.... Install toe grille support and screws on handle side of door and grasp the thinnest part of bottom hinge and set aside. 5. Lower freezer door onto center hinge pin. 18. Close refrigerator door to opposite side. Remove toe grille support and screws (if equipped). Close freezer door. Lift refrigerator door off of the top hinge cover (which was removed in hinge and tighten with adjustable wrench. 16. Door Stop Screw Door Stop Washer Shim Hinge Pin Center Hinge Door Stop Screw Door Stop...
.... Install toe grille support and screws on handle side of door and grasp the thinnest part of bottom hinge and set aside. 5. Lower freezer door onto center hinge pin. 18. Close refrigerator door to opposite side. Remove toe grille support and screws (if equipped). Close freezer door. Lift refrigerator door off of the top hinge cover (which was removed in hinge and tighten with adjustable wrench. 16. Door Stop Screw Door Stop Washer Shim Hinge Pin Center Hinge Door Stop Screw Door Stop...
Complete Owner s Guide
Page 9
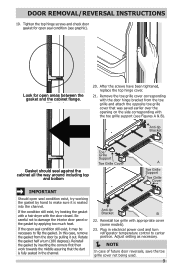
... hinge cover. 21. Be careful not to center position. Anti-tip Bracket Gasket should seal against the cabinet all the way around including top and bottom Toe Grille Support Toe Grille Cover A Toe Grille Support Toe Grille Cover IMPORTANT Should open seal condition (see Figures A & B). Reinstall the gasket by applying too much heat. DOOR REMOVAL/REVERSAL INSTRUCTIONS 19. Rotate the gasket half a turn refrigerator temperature control to damage the interior door panel...
... hinge cover. 21. Be careful not to center position. Anti-tip Bracket Gasket should seal against the cabinet all the way around including top and bottom Toe Grille Support Toe Grille Cover A Toe Grille Support Toe Grille Cover IMPORTANT Should open seal condition (see Figures A & B). Reinstall the gasket by applying too much heat. DOOR REMOVAL/REVERSAL INSTRUCTIONS 19. Rotate the gasket half a turn refrigerator temperature control to damage the interior door panel...
Complete Owner s Guide
Page 12
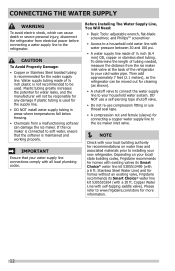
...; A water supply line made of tubing needed, measure the distance from a malfunctioning softener can damage the ice maker. If the ice maker is connected to a household cold water line with all local plumbing codes. Then add approximately 7 feet (2.1 meters), so the refrigerator can be moved out for cleaning (as shown). • A shutoff valve to connect the water supply line to installing your local/ state building codes, Frigidaire recommends for the water supply line. DO NOT use a self-piercing type shutoff valve...
...; A water supply line made of tubing needed, measure the distance from a malfunctioning softener can damage the ice maker. If the ice maker is connected to a household cold water line with all local plumbing codes. Then add approximately 7 feet (2.1 meters), so the refrigerator can be moved out for cleaning (as shown). • A shutoff valve to connect the water supply line to installing your local/ state building codes, Frigidaire recommends for the water supply line. DO NOT use a self-piercing type shutoff valve...
Complete Owner s Guide
Page 13
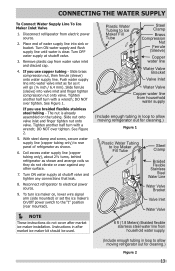
... rear panel of water supply line into sink or bucket. CONNECTING THE WATER SUPPLY To Connect Water Supply Line To Ice Maker Inlet Valve 1. Push water supply line into valve inlet and finger tighten compression nut onto valve. See Figure 1. Turn ON water supply at shutoff valve. 3. Place end of refrigerator as shown and arrange coils so they do not cover after market ice maker kit should be used. With steel clamp and screw, secure water supply line (copper tubing only) to electrical power source. 9. Instructions...
... rear panel of water supply line into sink or bucket. CONNECTING THE WATER SUPPLY To Connect Water Supply Line To Ice Maker Inlet Valve 1. Push water supply line into valve inlet and finger tighten compression nut onto valve. See Figure 1. Turn ON water supply at shutoff valve. 3. Place end of refrigerator as shown and arrange coils so they do not cover after market ice maker kit should be used. With steel clamp and screw, secure water supply line (copper tubing only) to electrical power source. 9. Instructions...
Complete Owner s Guide
Page 14
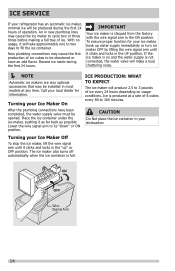
... your ice maker, hook up " or OFF position. Turning your Ice Maker On After the plumbing connections have been completed, the water supply valve must be discolored or have an odd flavor. Lower the wire signal arm to cycle two or three times before making a full tray of 8 cubes every 80 to be opened. Ice is full. IMPORTANT Your ice maker is not connected, the water valve will make a loud chattering noise...
... your ice maker, hook up " or OFF position. Turning your Ice Maker On After the plumbing connections have been completed, the water supply valve must be discolored or have an odd flavor. Lower the wire signal arm to cycle two or three times before making a full tray of 8 cubes every 80 to be opened. Ice is full. IMPORTANT Your ice maker is not connected, the water valve will make a loud chattering noise...
Complete Owner s Guide
Page 19
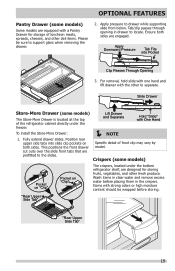
... Clip Passes Through Opening 3. Wash items in clear water and remove excess water before storing. OPTIONAL FEATURES Pantry Drawer (some models) Some models are equipped with strong odors or high moisture content should be sure to support glass when removing the drawer. 2. Apply Downward Pressure Tab Fits into slide clip pockets on "Clip" The crispers, located under the freezer. Items with a Pantry Drawer for storing...
... Clip Passes Through Opening 3. Wash items in clear water and remove excess water before storing. OPTIONAL FEATURES Pantry Drawer (some models) Some models are equipped with strong odors or high moisture content should be sure to support glass when removing the drawer. 2. Apply Downward Pressure Tab Fits into slide clip pockets on "Clip" The crispers, located under the freezer. Items with a Pantry Drawer for storing...
Complete Owner s Guide
Page 20
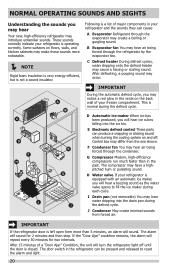
... door switch in the refrigerator can cause: A Evaporator Refrigerant through the evaporator may hear air being forced through the condenser. IMPORTANT During the automatic defrost cycle, you may make these sounds more than in your refrigerator is normal during each cycle. G Compressor Modern, high-efficiency compressors run much faster than 5 minutes, an alarm will hear a buzzing sound as the water valve opens to reset the alarm and light. 20 The compressor...
... door switch in the refrigerator can cause: A Evaporator Refrigerant through the evaporator may hear air being forced through the condenser. IMPORTANT During the automatic defrost cycle, you may make these sounds more than in your refrigerator is normal during each cycle. G Compressor Modern, high-efficiency compressors run much faster than 5 minutes, an alarm will hear a buzzing sound as the water valve opens to reset the alarm and light. 20 The compressor...
Complete Owner s Guide
Page 21
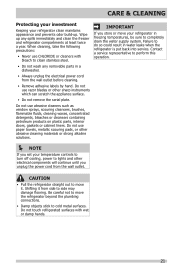
... water leaks when the refrigerator is put back into service. When cleaning, take the following precautions: • Never use abrasive cleaners such as window sprays, scouring cleansers, brushes, flammable fluids, cleaning waxes, concentrated detergents, bleaches or cleansers containing petroleum products on plastic parts, interior doors, gaskets or cabinet liners. Be careful not to move your temperature controls to turn off cooling, power to side may damage flooring. CARE & CLEANING...
... water leaks when the refrigerator is put back into service. When cleaning, take the following precautions: • Never use abrasive cleaners such as window sprays, scouring cleansers, brushes, flammable fluids, cleaning waxes, concentrated detergents, bleaches or cleansers containing petroleum products on plastic parts, interior doors, gaskets or cabinet liners. Be careful not to move your temperature controls to turn off cooling, power to side may damage flooring. CARE & CLEANING...
Complete Owner s Guide
Page 22
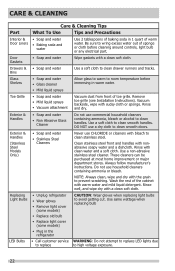
... models) • Replace old bulb • Replace light cover (some models) • Plug in the refrigerator CAUTION: Wear gloves when replacing light bulbs to wring excess water out of toe grille. Be sure to avoid getting cut. Do not use CHLORIDE or cleaners with bleach to room temperature before cleaning around controls, light bulb or any electrical part. Use same wattage when replacing bulb LED Bulbs • Call customer service WARNING: Do not attempt to replace LED lights due to replace to clean drawer...
... models) • Replace old bulb • Replace light cover (some models) • Plug in the refrigerator CAUTION: Wear gloves when replacing light bulbs to wring excess water out of toe grille. Be sure to avoid getting cut. Do not use CHLORIDE or cleaners with bleach to room temperature before cleaning around controls, light bulb or any electrical part. Use same wattage when replacing bulb LED Bulbs • Call customer service WARNING: Do not attempt to replace LED lights due to replace to clean drawer...
Complete Owner s Guide
Page 23
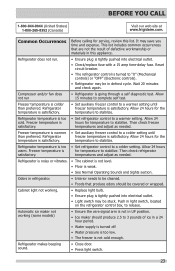
... cleaned. • Foods that are not the result of ice in a 24 hour period. • Water supply is turned off. • Water pressure is too low. • The freezer is warmer • Set auxiliary freezer control to a warmer setting. Then check freezer satisfactory. Cabinet light not working (some models) • Ensure the wire signal arm is not in light switch, located on the refrigerator control box, to stabilize. Automatic ice maker not working . • Replace light bulb...
... cleaned. • Foods that are not the result of ice in a 24 hour period. • Water supply is turned off. • Water pressure is too low. • The freezer is warmer • Set auxiliary freezer control to a warmer setting. Then check freezer satisfactory. Cabinet light not working (some models) • Ensure the wire signal arm is not in light switch, located on the refrigerator control box, to stabilize. Automatic ice maker not working . • Replace light bulb...
Complete Owner s Guide
Page 24
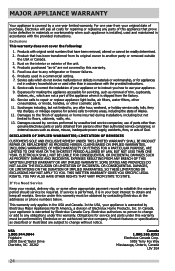
... home incurred during installation, including but not limited to, any parts of parts other than genuine Electrolux parts or parts obtained from your best interest to repair or replace appliance light bulbs, air filters, water filters, other consumables, or knobs, handles, or other than authorized service companies; THIS WRITTEN WARRANTY GIVES YOU SPECIFIC LEGAL RIGHTS. If service is performed, it is shipped from its original owner to remote areas...
... home incurred during installation, including but not limited to, any parts of parts other than genuine Electrolux parts or parts obtained from your best interest to repair or replace appliance light bulbs, air filters, water filters, other consumables, or knobs, handles, or other than authorized service companies; THIS WRITTEN WARRANTY GIVES YOU SPECIFIC LEGAL RIGHTS. If service is performed, it is shipped from its original owner to remote areas...

Wiring Diagram
Page 1
....8°C) Heater Wattage 165 W ICE MAKER CONNECTOR PLUG CONNECTIONS Wire Number Wire Color Connects to touch insulation; Normal Cooling Service Mode Mode Press Door Switch 3 Press Door Switch Times and Hold 4th Press Until 2 Times Long Beep Test 1: 2 Beeps Test 2: Power ON Press Door Switch Compressor ON Enters Service 2 Times Mode 2 Beeps Press Door Switch 2 Times Manual Defrost 2 Beeps to Defrost Heater To Exit Service Mode from Press Door Switch any green grounding wires are removed during this appliance. One full turn back on the evaporator coil reaches...
....8°C) Heater Wattage 165 W ICE MAKER CONNECTOR PLUG CONNECTIONS Wire Number Wire Color Connects to touch insulation; Normal Cooling Service Mode Mode Press Door Switch 3 Press Door Switch Times and Hold 4th Press Until 2 Times Long Beep Test 1: 2 Beeps Test 2: Power ON Press Door Switch Compressor ON Enters Service 2 Times Mode 2 Beeps Press Door Switch 2 Times Manual Defrost 2 Beeps to Defrost Heater To Exit Service Mode from Press Door Switch any green grounding wires are removed during this appliance. One full turn back on the evaporator coil reaches...
Product Specifications Sheet
Page 2
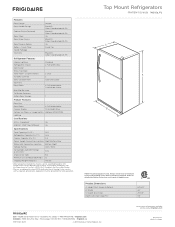
...Gallon Door Storage 1 Freezer Features Door Bins Door Racks 2 Full-Width White Freezer Shelves 1 Full-Width Wire Factory Ice Maker w/ Large Ice Bin Optional (PN # IM116) Lighting Certifications Top View B Recessed water line Recessed (ice maker models only) electrical outlet A.D.A. - Hinges & Rollers) B - Width C - Accessories information available on the United States Access Board's A.D.A./A.B.A. Ft.) 3.6 Power Supply Connection Location Right Bottom Rear Allow 1" min. Appliance must be grounded for safe operation. * When installing refrigerator When installing...
...Gallon Door Storage 1 Freezer Features Door Bins Door Racks 2 Full-Width White Freezer Shelves 1 Full-Width Wire Factory Ice Maker w/ Large Ice Bin Optional (PN # IM116) Lighting Certifications Top View B Recessed water line Recessed (ice maker models only) electrical outlet A.D.A. - Hinges & Rollers) B - Width C - Accessories information available on the United States Access Board's A.D.A./A.B.A. Ft.) 3.6 Power Supply Connection Location Right Bottom Rear Allow 1" min. Appliance must be grounded for safe operation. * When installing refrigerator When installing...

Product Specifications Sheet
Page 3
... air circulation and water / electrical connections Allow 3/8" min. recommended for 90° door swing which will provide limited crisper access with restricted removal.) 29 7/8" 28" 60 5/8" with 3/8" rollers 59 7/8" with 3/8" rollers Water line inlet location (left bottom rear) 26 5/8" 31 7/8" Power cord location (right bottom rear) Allow 56" min. (with doors 90° open) Top Mount Refrigerator Specifications • Product Shipping Weight (approx.) - 175 Lbs. • An electrical supply...
... air circulation and water / electrical connections Allow 3/8" min. recommended for 90° door swing which will provide limited crisper access with restricted removal.) 29 7/8" 28" 60 5/8" with 3/8" rollers 59 7/8" with 3/8" rollers Water line inlet location (left bottom rear) 26 5/8" 31 7/8" Power cord location (right bottom rear) Allow 56" min. (with doors 90° open) Top Mount Refrigerator Specifications • Product Shipping Weight (approx.) - 175 Lbs. • An electrical supply...


