Complete Owners Guide
Page 1
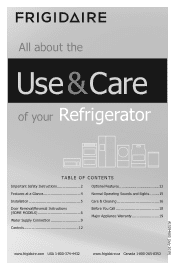
All about the Use &Care of your Refrigerator TABLE OF CONTENTS Important Safety Instructions 2 Features at a Glance 4 Installation 5 Door Removal/Reversal Instructions (SOME MODELS 6 Water Supply Connection 9 Controls 12 Optional Features 13 Normal Operating Sounds and Sights..........15 Care & Cleaning 16 Before You Call 18 Major Appliance Warranty 19 www.frigidaire.com USA 1-800-374-4432 www.frigidaire.ca Canada 1-800-265-8352 A15294603 (July 2019)
All about the Use &Care of your Refrigerator TABLE OF CONTENTS Important Safety Instructions 2 Features at a Glance 4 Installation 5 Door Removal/Reversal Instructions (SOME MODELS 6 Water Supply Connection 9 Controls 12 Optional Features 13 Normal Operating Sounds and Sights..........15 Care & Cleaning 16 Before You Call 18 Major Appliance Warranty 19 www.frigidaire.com USA 1-800-374-4432 www.frigidaire.ca Canada 1-800-265-8352 A15294603 (July 2019)
Complete Owners Guide
Page 2
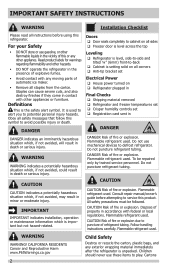
...; Cabinet is the safety alert symbol. Do not use mechanical devices to play. Consult repair manual/owner's guide before using this refrigerator. CAUTION Risk of fire or explosion. Children should never use gasoline, or other flammable liquids in DANGER DANGER Risk of this symbol...federal or local regulations. DANGER Risk of fire or explosion. All safety precautions must be repaired only by trained service personnel. Flammable refrigerant used . It is unpacked. Obey all safety messages that follow this or any other appliances or furniture. CAUTION CAUTION Risk of...
...; Cabinet is the safety alert symbol. Do not use mechanical devices to play. Consult repair manual/owner's guide before using this refrigerator. CAUTION Risk of fire or explosion. Children should never use gasoline, or other flammable liquids in DANGER DANGER Risk of this symbol...federal or local regulations. DANGER Risk of fire or explosion. All safety precautions must be repaired only by trained service personnel. Flammable refrigerant used . It is unpacked. Obey all safety messages that follow this or any other appliances or furniture. CAUTION CAUTION Risk of...
Complete Owners Guide
Page 3
...may have a cooling system that safety mechanisms in accordance with local codes and ordinances. Proper Disposal of your old refrigerator. Electrical information • The refrigerator must be subject to the atmosphere. It must unplug the power cord from the electrical outlet. If you may...covered under any risk. even if they will sit for more . Before you must be replaced by pulling on recycling your Refrigerator or Freezer Risk of child entrapment Child entrapment and suffocation are not problems of environmental legislation. 3 Power cord with 3-prong ...
...may have a cooling system that safety mechanisms in accordance with local codes and ordinances. Proper Disposal of your old refrigerator. Electrical information • The refrigerator must be subject to the atmosphere. It must unplug the power cord from the electrical outlet. If you may...covered under any risk. even if they will sit for more . Before you must be replaced by pulling on recycling your Refrigerator or Freezer Risk of child entrapment Child entrapment and suffocation are not problems of environmental legislation. 3 Power cord with 3-prong ...
Complete Owners Guide
Page 4
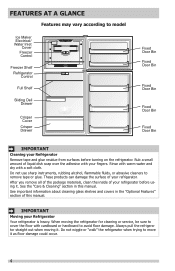
... with warm water and dry with cardboard or hardboard to avoid floor damage. When moving it . Rub a small amount of your refrigerator. These products can damage the surface of liquid dish soap over the adhesive with your fingers. FEATURES AT A GLANCE Features may vary according to... model Ice Maker Electrical/ Water Inlet Cover Freezer Control Freezer Shelf Refrigerator Control Full Shelf Sliding Deli Drawer Crisper Cover Crisper Drawer Fixed Door Bin Fixed Door Bin Fixed Door Bin Fixed Door Bin Fixed Door Bin...
... with warm water and dry with cardboard or hardboard to avoid floor damage. When moving it . Rub a small amount of your refrigerator. These products can damage the surface of liquid dish soap over the adhesive with your fingers. FEATURES AT A GLANCE Features may vary according to... model Ice Maker Electrical/ Water Inlet Cover Freezer Control Freezer Shelf Refrigerator Control Full Shelf Sliding Deli Drawer Crisper Cover Crisper Drawer Fixed Door Bin Fixed Door Bin Fixed Door Bin Fixed Door Bin Fixed Door Bin...
Complete Owners Guide
Page 5
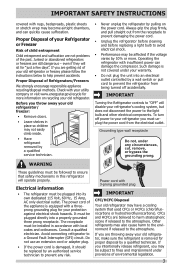
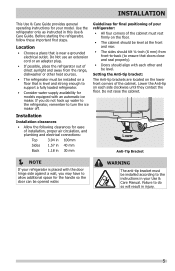
...outlet. Do not raise the cabinet. Do Not use an extension cord or an adapter plug. • If possible, place the refrigerator out of your refrigerator is placed with each side clockwise until they contact the floor. Setting the Anti-tip bracket: The Anti-tip brackets are located ... close and seal properly). • Doors should tilt ¼-inch (6 mm) from the range, dishwasher or other heat sources. • The refrigerator must be installed on each other and be opened wider. Failure to allow additional space for final positioning of direct sunlight and away from front...
...outlet. Do not raise the cabinet. Do Not use an extension cord or an adapter plug. • If possible, place the refrigerator out of your refrigerator is placed with each side clockwise until they contact the floor. Setting the Anti-tip bracket: The Anti-tip brackets are located ... close and seal properly). • Doors should tilt ¼-inch (6 mm) from the range, dishwasher or other heat sources. • The refrigerator must be installed on each other and be opened wider. Failure to allow additional space for final positioning of direct sunlight and away from front...
Complete Owners Guide
Page 6
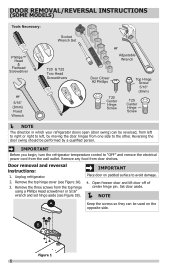
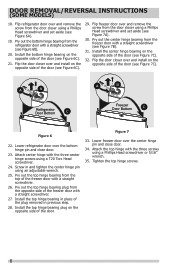
...swing should be used on padded surface to "OFF" and remove the electrical power cord from the wall outlet. Unplug refrigerator. 2. IMPORTANT Before you begin, turn the refrigerator temperature control to avoid damage. 4. A IMPORTANT Place door on the opposite side. Remove the three screws from the top... Closer #2 Phillips T20 Center Hinge Screw Top Hinge Screw 5/16" (8mm) T25 Center Hinge Screw NOTE The direction in which your refrigerator doors open (door swing) can be performed by moving the door hinges from one side to the other. B Figure 1 6 Open freezer door...
...swing should be used on padded surface to "OFF" and remove the electrical power cord from the wall outlet. Unplug refrigerator. 2. IMPORTANT Before you begin, turn the refrigerator temperature control to avoid damage. 4. A IMPORTANT Place door on the opposite side. Remove the three screws from the top... Closer #2 Phillips T20 Center Hinge Screw Top Hinge Screw 5/16" (8mm) T25 Center Hinge Screw NOTE The direction in which your refrigerator doors open (door swing) can be performed by moving the door hinges from one side to the other. B Figure 1 6 Open freezer door...
Complete Owners Guide
Page 7
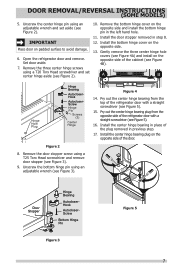
... remove. Remove the bottom hinge cover on padded surface to avoid damage. 6. Pry out the center hinge bearing from the opposite side of the refrigerator door with a straight screwdriver (see Figure 2). 10. Remove the three center hinge screws using an adjustable wrench and set center hinge aside (see... bearing plug from the top of the plug removed in step 8. 12. Install the center hinge bearing in place of the refrigerator door with a straight screwdriver (see Figure 3). 9. Door Stopper Hinge Bearing AutocloserHook AutocloserScrew Bottom Hinge Pin Figure 3 Figure 5 7
... remove. Remove the bottom hinge cover on padded surface to avoid damage. 6. Pry out the center hinge bearing from the opposite side of the refrigerator door with a straight screwdriver (see Figure 2). 10. Remove the three center hinge screws using an adjustable wrench and set center hinge aside (see... bearing plug from the top of the plug removed in step 8. 12. Install the center hinge bearing in place of the refrigerator door with a straight screwdriver (see Figure 3). 9. Door Stopper Hinge Bearing AutocloserHook AutocloserScrew Bottom Hinge Pin Figure 3 Figure 5 7
Complete Owners Guide
Page 8
... out the bottom hinge bearing from the freezer door with a straight screwdriver (see Figure 6A). 19. Pry out the center hinge bearing from the refrigerator door with a straight screwdriver (see Figure 6C). 29. Flip the door closer over the bottom hinge pin and close door. 34. Attach center ...wrench. 25. Install the top hinge bearing in and tighten the center hinge pin using a Phillips Head screwdriver or 5/16" wrench. 35. Flip refrigerator door over and remove the screw from the door closer using a Phillips Head screwdriver and set aside (see Figure 6B). 20. Flip freezer door ...
... out the bottom hinge bearing from the freezer door with a straight screwdriver (see Figure 6A). 19. Pry out the center hinge bearing from the refrigerator door with a straight screwdriver (see Figure 6C). 29. Flip the door closer over the bottom hinge pin and close door. 34. Attach center ...wrench. 25. Install the top hinge bearing in and tighten the center hinge pin using a Phillips Head screwdriver or 5/16" wrench. 35. Flip refrigerator door over and remove the screw from the door closer using a Phillips Head screwdriver and set aside (see Figure 6B). 20. Flip freezer door ...
Complete Owners Guide
Page 9
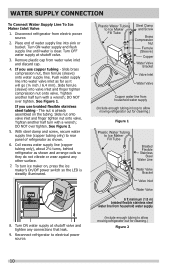
...or use thread seal tape. • A compression nut and ferrule (sleeve) for connecting a copper water supply line to www.frigidaire.com/Refrigerator-Accessories for homes with existing valves its Smart Choice® water line kit 5304493869 (with water pressure between 30 and 100 psi...measure the distance from electrical power before connecting a water supply line to the refrigerator. Depending on water lines and associated materials prior to installing your local/ state building codes, Frigidaire recommends for more information. NOTE These instructions do not cover aftermarket ...
...or use thread seal tape. • A compression nut and ferrule (sleeve) for connecting a copper water supply line to www.frigidaire.com/Refrigerator-Accessories for homes with existing valves its Smart Choice® water line kit 5304493869 (with water pressure between 30 and 100 psi...measure the distance from electrical power before connecting a water supply line to the refrigerator. Depending on water lines and associated materials prior to installing your local/ state building codes, Frigidaire recommends for more information. NOTE These instructions do not cover aftermarket ...
Complete Owners Guide
Page 10
...tubing only) to rear panel of water supply line into valve inlet and finger tighten compression nut onto valve. See Figure 1. Place end of refrigerator as it will go (¼ inch / 6.4 mm). Slide ferrule (sleeve) into sink or bucket. If you use copper tubing - If ...and Screw Brass Compression Nut Ferrule (Sleeve) Copper Water Valve Bracket Valve Inlet Water Valve Copper water line from household water supply 8. Disconnect refrigerator from water valve inlet and discard cap. 4. Slide brass compression nut, then ferrule (sleeve) onto water supply line. smerovdicee Plastic Water...
...tubing only) to rear panel of water supply line into valve inlet and finger tighten compression nut onto valve. See Figure 1. Place end of refrigerator as it will go (¼ inch / 6.4 mm). Slide ferrule (sleeve) into sink or bucket. If you use copper tubing - If ...and Screw Brass Compression Nut Ferrule (Sleeve) Copper Water Valve Bracket Valve Inlet Water Valve Copper water line from household water supply 8. Disconnect refrigerator from water valve inlet and discard cap. 4. Slide brass compression nut, then ferrule (sleeve) onto water supply line. smerovdicee Plastic Water...
Complete Owners Guide
Page 11
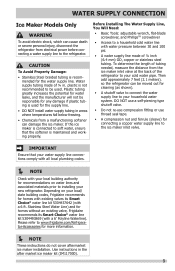
Air in new plumbing lines may cause the ice maker to 160 minutes. NOTE If your refrigerator has an automatic ice maker, it will produce 2 to fill the ice container. Discard ice made during the first 24 hours of operation. To ensure ... a loud chattering noise. WATER SUPPLY CONNECTION NOTE Automatic ice makers are optional accessories that may be discolored or have an odd flavor. Visit www.frigidaire.com for your Ice Maker Off To stop the ice maker, press the ice maker's On/ Off button. CAUTION Do Not place the ice container...
Air in new plumbing lines may cause the ice maker to 160 minutes. NOTE If your refrigerator has an automatic ice maker, it will produce 2 to fill the ice container. Discard ice made during the first 24 hours of operation. To ensure ... a loud chattering noise. WATER SUPPLY CONNECTION NOTE Automatic ice makers are optional accessories that may be discolored or have an odd flavor. Visit www.frigidaire.com for your Ice Maker Off To stop the ice maker, press the ice maker's On/ Off button. CAUTION Do Not place the ice container...
Complete Owners Guide
Page 12
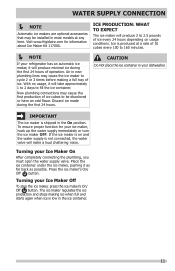
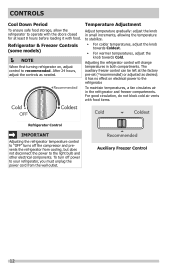
... increments, allowing the temperature to recommended. For good circulation, do not block cold air vents with food. To turn off the compressor and prevents the refrigerator from the wall outlet. After 24 hours, adjust the controls as desired; The auxiliary freezer control can be left at least 8 hours before loading it...
... increments, allowing the temperature to recommended. For good circulation, do not block cold air vents with food. To turn off the compressor and prevents the refrigerator from the wall outlet. After 24 hours, adjust the controls as desired; The auxiliary freezer control can be left at least 8 hours before loading it...
Complete Owners Guide
Page 13
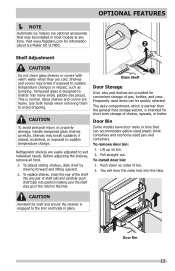
...Automatic ice makers are cold. Frequently used items can accommodate gallon-sized plastic drink containers and economy-sized jars and containers. Visit www.frigidaire.com for convenient storage of bin. 2. Tempered glass is engaged to shatter into many small, pebble-size pieces. Glass Shelf Door Storage...To avoid personal injury or property damage, handle tempered glass shelves carefully. Shelves may break if exposed to avoid dropping. Refrigerator shelves are easily adjusted to sudden temperature change. To remove door bin: 1. To install door bin: 1. Door Bin 13
...Automatic ice makers are cold. Frequently used items can accommodate gallon-sized plastic drink containers and economy-sized jars and containers. Visit www.frigidaire.com for convenient storage of bin. 2. Tempered glass is engaged to shatter into many small, pebble-size pieces. Glass Shelf Door Storage...To avoid personal injury or property damage, handle tempered glass shelves carefully. Shelves may break if exposed to avoid dropping. Refrigerator shelves are easily adjusted to sudden temperature change. To remove door bin: 1. To install door bin: 1. Door Bin 13
Complete Owners Guide
Page 15
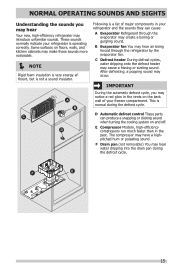
...cycle. IMPORTANT During the automatic defrost cycle, you may hear Your new, high-efficiency refrigerator may introduce unfamiliar sounds. D Automatic defrost control These parts can cause: A Evaporator Refrigerant through the refrigerator by the evaporator fan. This is not a sound insulator. Some surfaces on floors... may notice a red glow in the vents on the back wall of major components in your refrigerator is operating correctly. These sounds normally indicate your refrigerator and the sounds they can produce a snapping or clicking sound when turning the cooling system on ...
...cycle. IMPORTANT During the automatic defrost cycle, you may hear Your new, high-efficiency refrigerator may introduce unfamiliar sounds. D Automatic defrost control These parts can cause: A Evaporator Refrigerant through the refrigerator by the evaporator fan. This is not a sound insulator. Some surfaces on floors... may notice a red glow in the vents on the back wall of major components in your refrigerator is operating correctly. These sounds normally indicate your refrigerator and the sounds they can produce a snapping or clicking sound when turning the cooling system on ...

Complete Owners Guide
Page 16
...not use CHLORIDE or cleaners with bleach to clean stainless steel. • Do not wash any spills immediately and clean the freezer and refrigerator compartments at least twice a year. Failure to do so could result in a dishwasher. • Always unplug the electrical power cord ...from side to side may damage flooring. Contact a service representative to perform this operation. Wipe up . CAUTION Pull the refrigerator straight out to move the refrigerator beyond the plumbing connections. 16 CARE & CLEANING Protecting your investment NOTE If you set your temperature controls to ...
...not use CHLORIDE or cleaners with bleach to clean stainless steel. • Do not wash any spills immediately and clean the freezer and refrigerator compartments at least twice a year. Failure to do so could result in a dishwasher. • Always unplug the electrical power cord ...from side to side may damage flooring. Contact a service representative to perform this operation. Wipe up . CAUTION Pull the refrigerator straight out to move the refrigerator beyond the plumbing connections. 16 CARE & CLEANING Protecting your investment NOTE If you set your temperature controls to ...

Complete Owners Guide
Page 17
... • Mild liquid sprays • Soap and water • Non Abrasive Glass Cleaner • Soap and water • Stainless Steel Cleaners • Unplug refrigerator • Wear gloves • Remove light cover (some models) • Replace old bulb • Replace light cover (some models) • Plug in the... refrigerator Allow glass to warm to clean exterior. Wash the rest of the cabinet with a clean soft cloth. Rinse well, and wipe dry with warm ...
... • Mild liquid sprays • Soap and water • Non Abrasive Glass Cleaner • Soap and water • Stainless Steel Cleaners • Unplug refrigerator • Wear gloves • Remove light cover (some models) • Replace old bulb • Replace light cover (some models) • Plug in the... refrigerator Allow glass to warm to clean exterior. Wash the rest of the cabinet with a clean soft cloth. Rinse well, and wipe dry with warm ...
Complete Owners Guide
Page 18
...See Normal Operating Sounds and Sights section. Reset circuit breaker. • The refrigerator control is colder than preferred. Freezer temperature is turned to "OFF". • Refrigerator may save you time and expense. Freezer temperature is for temperature to a ...Visit our web site at www.frigidaire.com Common Occurrences Before calling for service, review this appliance. It may be covered or wrapped. Refrigerator freezer temperature is too • Set refrigerator control to stabilize. Then check refrigerator satisfactory. temperatures and adjust as ...
...See Normal Operating Sounds and Sights section. Reset circuit breaker. • The refrigerator control is colder than preferred. Freezer temperature is turned to "OFF". • Refrigerator may save you time and expense. Freezer temperature is for temperature to a ...Visit our web site at www.frigidaire.com Common Occurrences Before calling for service, review this appliance. It may be covered or wrapped. Refrigerator freezer temperature is too • Set refrigerator control to stabilize. Then check refrigerator satisfactory. temperatures and adjust as ...

Complete Owners Guide
Page 19
...other cosmetic parts. 11. Service calls which are not a part of this warranty. 5. Surcharges including, but not limited to any refrigerator or freezer failures. 6. use of Electrolux Home Products, Inc. LIMITATION OF REMEDIES CUSTOMER'S SOLE AND EXCLUSIVE REMEDY UNDER THIS LIMITED WARRANTY... instructions. 8. or external causes such as described or illustrated are not covered by Electrolux Canada Corp. USA 1.800.374.4432 Frigidaire 10200 David Taylor Drive Charlotte, NC 28262 Canada 1.800.265.8352 Electrolux Canada Corp. 5855 Terry Fox Way Mississauga, Ontario, ...
...other cosmetic parts. 11. Service calls which are not a part of this warranty. 5. Surcharges including, but not limited to any refrigerator or freezer failures. 6. use of Electrolux Home Products, Inc. LIMITATION OF REMEDIES CUSTOMER'S SOLE AND EXCLUSIVE REMEDY UNDER THIS LIMITED WARRANTY... instructions. 8. or external causes such as described or illustrated are not covered by Electrolux Canada Corp. USA 1.800.374.4432 Frigidaire 10200 David Taylor Drive Charlotte, NC 28262 Canada 1.800.265.8352 Electrolux Canada Corp. 5855 Terry Fox Way Mississauga, Ontario, ...
Wiring Diagram
Page 1
... psig (498 to 503 kPa) Wattage (last 1/3 cycle) 68 W 68 W Amps (running) 0.6 to 0.8 A 0.6 to 0.8 A Base Voltage 115 V 115 V Refrigerant Charge 1.58 oz. (45 g) DEFROST SPECIFICATIONS Thermal Fuse Heater Defrost Thermistor Cabinet Size: 14' Cut-out Watts Ohms Termination 161.6°F (72°C) 166 79... 45 to 47% Freezer Temperature 5° to -2.2°F (-15° to -19°C) 5° to -2.2°F (-15° to -19°C) Refrigerator Temperature 35° to 40°F (2° to 4°C) 35° to 40°F (2° to 4°C) Low Side Pressure (cut-in) ...
... psig (498 to 503 kPa) Wattage (last 1/3 cycle) 68 W 68 W Amps (running) 0.6 to 0.8 A 0.6 to 0.8 A Base Voltage 115 V 115 V Refrigerant Charge 1.58 oz. (45 g) DEFROST SPECIFICATIONS Thermal Fuse Heater Defrost Thermistor Cabinet Size: 14' Cut-out Watts Ohms Termination 161.6°F (72°C) 166 79... 45 to 47% Freezer Temperature 5° to -2.2°F (-15° to -19°C) 5° to -2.2°F (-15° to -19°C) Refrigerator Temperature 35° to 40°F (2° to 4°C) 35° to 40°F (2° to 4°C) Low Side Pressure (cut-in) ...

Installation Instructions
Page 1
... Basic Tools: adjustable wrench, flat-blade screwdriver, and PhillipsTM House plumbing line screwdriver • Access to www.frigidaire.com/RefrigeratorAccessories for contractors. Freezer Control Refrigerator Control Humidity Control 8 Door Removal (if necessary) If you can remove this material. 2 pieces of tape... codes. NOTE For homes with existing valves, Frigidaire recommends its Smart Choice® water line kit 5304493869 (with a 6 ft. Then add approximately 7 feet (2.1 meters), so the refrigerator can cause death or severe personal injury, do not vibrate...
... Basic Tools: adjustable wrench, flat-blade screwdriver, and PhillipsTM House plumbing line screwdriver • Access to www.frigidaire.com/RefrigeratorAccessories for contractors. Freezer Control Refrigerator Control Humidity Control 8 Door Removal (if necessary) If you can remove this material. 2 pieces of tape... codes. NOTE For homes with existing valves, Frigidaire recommends its Smart Choice® water line kit 5304493869 (with a 6 ft. Then add approximately 7 feet (2.1 meters), so the refrigerator can cause death or severe personal injury, do not vibrate...


