
Installation Instructions (All Languages)
Page 1
... Set Screw (some models) Door Stop Flange 3 Ensure both doors. Press firmly on top of toe grille until you for choosing Frigidaire. 8 Installation Checkoff List Doors Door seals completely to cabinet on all corners Electrical Power House power turned...Guidelines for final positioning of your product. Close the doors. Congratulations. or you are not completed. Installation Instructions for Side-by-Side Refrigerator This document should only be removed by turning the adjustment screw clockwise using a 7/16 inch wrench. (See illustration 3.) 4 After ...
... Set Screw (some models) Door Stop Flange 3 Ensure both doors. Press firmly on top of toe grille until you for choosing Frigidaire. 8 Installation Checkoff List Doors Door seals completely to cabinet on all corners Electrical Power House power turned...Guidelines for final positioning of your product. Close the doors. Congratulations. or you are not completed. Installation Instructions for Side-by-Side Refrigerator This document should only be removed by turning the adjustment screw clockwise using a 7/16 inch wrench. (See illustration 3.) 4 After ...
Wiring Diagram (All Languages)
Page 1
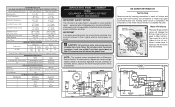
... Time 32 to 40% 55 to 65% Freezer Temperature 0º to 4ºF -18º to -16ºC -1º to 3ºF -18º to -16ºC Refrigerator Temperature 34º to 39ºF 1º to 4ºC 34º to 39ºF 1º to 4ºC Low Side Pressure (cut-in 6 seconds (light bulb...
... Time 32 to 40% 55 to 65% Freezer Temperature 0º to 4ºF -18º to -16ºC -1º to 3ºF -18º to -16ºC Refrigerator Temperature 34º to 39ºF 1º to 4ºC 34º to 39ºF 1º to 4ºC Low Side Pressure (cut-in 6 seconds (light bulb...
Complete Owner's Guide (English)
Page 1
All about the Use &Care of your Refrigerator 242065101 (July 2010) TABLE OF CONTENTS Important Safety Instructions 2 Features at a Glance 4 Installation 5 Door Removal Instructions 7 Connecting Water Supply 8 Controls 9 Storage Features 13 Automatic Ice & Water Dispenser 14 Changing the Filter 18 Normal Operating Sounds and Sights 19 Care and Cleaning 20 Before you Call 21 Major Appliance Warranty 23 www.frigidaire.com USA 1-800-944-9044 www.frigidaire.ca Canada 1-800-265-8352
All about the Use &Care of your Refrigerator 242065101 (July 2010) TABLE OF CONTENTS Important Safety Instructions 2 Features at a Glance 4 Installation 5 Door Removal Instructions 7 Connecting Water Supply 8 Controls 9 Storage Features 13 Automatic Ice & Water Dispenser 14 Changing the Filter 18 Normal Operating Sounds and Sights 19 Care and Cleaning 20 Before you Call 21 Major Appliance Warranty 23 www.frigidaire.com USA 1-800-944-9044 www.frigidaire.ca Canada 1-800-265-8352
Complete Owner's Guide (English)
Page 2
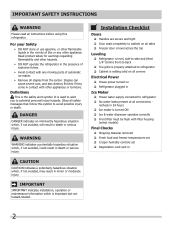
.... Definitions This is setting solid on all corners Electrical Power House power turned on Refrigerator plugged in death or serious injury. Read product labels for warnings regarding flammability and other hazards. • DO NOT operate the... refrigerator in the presence of automatic ice maker. • Remove all safety messages that follow this refrigerator. Obey all staples from the carton. IMPORTANT IMPORTANT indicates installation, operation or maintenance information...
.... Definitions This is setting solid on all corners Electrical Power House power turned on Refrigerator plugged in death or serious injury. Read product labels for warnings regarding flammability and other hazards. • DO NOT operate the... refrigerator in the presence of automatic ice maker. • Remove all safety messages that follow this refrigerator. Obey all staples from the carton. IMPORTANT IMPORTANT indicates installation, operation or maintenance information...
Complete Owner's Guide (English)
Page 3
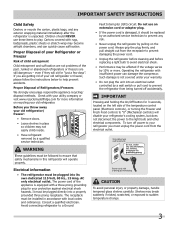
... 60 Hz., 15 Amp, AC only electrical outlet. IMPORTANT Pressing and holding the On/Off button for more . Avoid connecting refrigerator to the light bulb and other electrical components. CAUTION To avoid personal injury or property damage, handle tempered glass shelves carefully. Children... should never use an extension cord or adapter plug. • If the power cord is unpacked. Cartons covered with your refrigerator's cooling system, but does not disconnect the power to a Ground Fault Interrupter (GFI) circuit. Proper Disposal of child entrapment Child ...
... 60 Hz., 15 Amp, AC only electrical outlet. IMPORTANT Pressing and holding the On/Off button for more . Avoid connecting refrigerator to the light bulb and other electrical components. CAUTION To avoid personal injury or property damage, handle tempered glass shelves carefully. Children... should never use an extension cord or adapter plug. • If the power cord is unpacked. Cartons covered with your refrigerator's cooling system, but does not disconnect the power to a Ground Fault Interrupter (GFI) circuit. Proper Disposal of child entrapment Child ...
Complete Owner's Guide (English)
Page 4
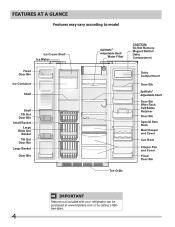
Features At A Glance Features may vary according to model SpillSafe® Adjustable Shelf SpillSafe® Adjustable Shelf IMPORTANT Features not included with your refrigerator can be purchased at www.frigidaire.com or by calling 1-800944-9044. 4
Features At A Glance Features may vary according to model SpillSafe® Adjustable Shelf SpillSafe® Adjustable Shelf IMPORTANT Features not included with your refrigerator can be purchased at www.frigidaire.com or by calling 1-800944-9044. 4
Complete Owner's Guide (English)
Page 5
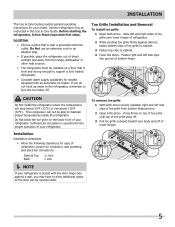
... as instructed in this Use & Care Guide. Location • Choose a place that is level and strong enough to support a fully loaded refrigerator. • Consider water supply availability for ease of toe grille to cabinet. 3 Fasten top clips to turn the ice maker off of lower hinges. 5 CAUTION... Do Not install the refrigerator where the temperature will not be able to allow additional space so the door can be installed on a floor that is essential for your model...
... as instructed in this Use & Care Guide. Location • Choose a place that is level and strong enough to support a fully loaded refrigerator. • Consider water supply availability for ease of toe grille to cabinet. 3 Fasten top clips to turn the ice maker off of lower hinges. 5 CAUTION... Do Not install the refrigerator where the temperature will not be able to allow additional space so the door can be installed on a floor that is essential for your model...
Complete Owner's Guide (English)
Page 6
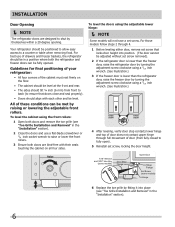
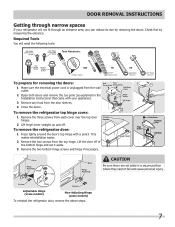
...and Removal" in a position where both doors are designed to a counter or table when removing food. Installation Door Opening NOTE The refrigerator doors are bind-free with their seals touching the cabinet on the floor. • The cabinet should be level at the front and rear....cabinet using the adjustable lower hinge: NOTE Some models will not have a set screw removed). 2 If the refrigerator door is lower than the freezer door, raise the refrigerator door by turning the adjustment screw clockwise using a 7/16 inch wrench. (See illustration.) 3 If the freezer door is...
...and Removal" in a position where both doors are designed to a counter or table when removing food. Installation Door Opening NOTE The refrigerator doors are bind-free with their seals touching the cabinet on the floor. • The cabinet should be level at the front and rear....cabinet using the adjustable lower hinge: NOTE Some models will not have a set screw removed). 2 If the refrigerator door is lower than the freezer door, raise the refrigerator door by turning the adjustment screw clockwise using a 7/16 inch wrench. (See illustration.) 3 If the freezer door is...
Complete Owner's Guide (English)
Page 7
...3/8" Fixed Wrench CAUTION Be sure doors are set it aside. 3 Remove the two bottom hinge screws and hinge if necessary. To remove the refrigerator top hinge cover: 1 Remove the three screws from the wall outlet. 2 Open both doors and remove the toe grille (as explained in ... Adjustable Hinge (some models) Non-Adjusting Hinge (some models) To reinstall the refrigerator door, reverse the above steps. 7 To remove the refrigerator door: 1 Trace lightly around the door's top hinge with your refrigerator will need the following tools: Top Hinge Cover Front Screw Top Hinge Cover Rear...
...3/8" Fixed Wrench CAUTION Be sure doors are set it aside. 3 Remove the two bottom hinge screws and hinge if necessary. To remove the refrigerator top hinge cover: 1 Remove the three screws from the wall outlet. 2 Open both doors and remove the toe grille (as explained in ... Adjustable Hinge (some models) Non-Adjusting Hinge (some models) To reinstall the refrigerator door, reverse the above steps. 7 To remove the refrigerator door: 1 Trace lightly around the door's top hinge with your refrigerator will need the following tools: Top Hinge Cover Front Screw Top Hinge Cover Rear...
Complete Owner's Guide (English)
Page 9
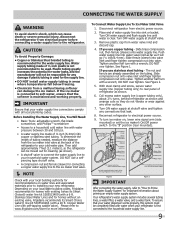
...water supply at the back of ¼ inch plastic is connected to installing your local/state building codes, Frigidaire recommends for important information about 2½ turns, behind refrigerator as shown. 6. Slide brass compression nut, then ferrule (sleeve) onto water supply line. The nut and ... this system must be used for homes without an existing valve, Frigidaire recommends its Smart Choice® water line kit 5305513409 (with water pressure between 30 and 100 psi. • A water supply line made of the refrigerator to a household cold water line with a 6 ft. See ...
...water supply at the back of ¼ inch plastic is connected to installing your local/state building codes, Frigidaire recommends for important information about 2½ turns, behind refrigerator as shown. 6. Slide brass compression nut, then ferrule (sleeve) onto water supply line. The nut and ... this system must be used for homes without an existing valve, Frigidaire recommends its Smart Choice® water line kit 5305513409 (with water pressure between 30 and 100 psi. • A water supply line made of the refrigerator to a household cold water line with a 6 ft. See ...
Complete Owner's Guide (English)
Page 10
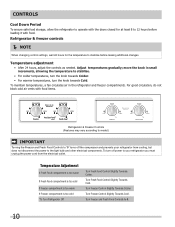
...a fan circulates air in small increments, allowing the temperature to 0. 10 For good circulation, do not block cold air vents with food items. Refrigerator & Freezer Controls (Features may vary according to model.) IMPORTANT Turning the Freezer and Fresh Food Controls to "0" turns off power to the light bulb... too warm If Fresh Food compartment is too cold If Freezer compartment is too warm If Freezer compartment is too cold *To Turn Refrigerator Off Turn Fresh Food Control Slightly Towards Colder. To turn the knob towards Cold. Controls Cool Down Period To ensure safe food storage...
...a fan circulates air in small increments, allowing the temperature to 0. 10 For good circulation, do not block cold air vents with food items. Refrigerator & Freezer Controls (Features may vary according to model.) IMPORTANT Turning the Freezer and Fresh Food Controls to "0" turns off power to the light bulb... too warm If Fresh Food compartment is too cold If Freezer compartment is too warm If Freezer compartment is too cold *To Turn Refrigerator Off Turn Fresh Food Control Slightly Towards Colder. To turn the knob towards Cold. Controls Cool Down Period To ensure safe food storage...
Complete Owner's Guide (English)
Page 11
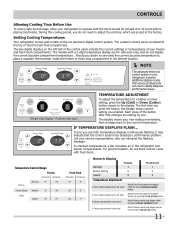
... During this cooling period, you entered. TEMPERATURE ADJUSTMENT (Single Digit Display - To maintain temperatures, a fan circulates air in your refrigerator includes additional display modes that the control system has detected a performance problem. Each press of the the fresh food compartment. Adjust ...) button. The display shows your new setting momentarily, then changes back to the current temperature. Setting Cooling Temperatures Your refrigerator comes with a state-of your freezer and fresh food compartments. Adjust Freezer control one degree colder by pressing the Up...
... During this cooling period, you entered. TEMPERATURE ADJUSTMENT (Single Digit Display - To maintain temperatures, a fan circulates air in your refrigerator includes additional display modes that the control system has detected a performance problem. Each press of the the fresh food compartment. Adjust ...) button. The display shows your new setting momentarily, then changes back to the current temperature. Setting Cooling Temperatures Your refrigerator comes with a state-of your freezer and fresh food compartments. Adjust Freezer control one degree colder by pressing the Up...

Complete Owner's Guide (English)
Page 12
...other electrical components. To ensure that you do not accidentally turn the cooling system back on the control panel, a single audible tone acknowledges your refrigerator you must unplug the power cord from the wall outlet. To turn off the cooling system, the button does not work unless you disable the... cooling system, all refrigeration to your input. Controls Cooling System On/Off Button Indicator NOTE Pressing the On/Off button on the control panel disables your...
...other electrical components. To ensure that you do not accidentally turn the cooling system back on the control panel, a single audible tone acknowledges your refrigerator you must unplug the power cord from the wall outlet. To turn off the cooling system, the button does not work unless you disable the... cooling system, all refrigeration to your input. Controls Cooling System On/Off Button Indicator NOTE Pressing the On/Off button on the control panel disables your...
Complete Owner's Guide (English)
Page 13
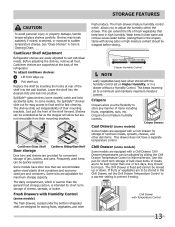
...mounting brackets. Items with Temperature Control 13 The Chill Drawer is intended for fast cleaning. Just pull the front of the refrigerator. To adjust cantilever shelves: 1 Lift front edge up or down. Shelves can be wrapped before placing them in high ...maximum storage capacity. Chill Drawer temperatures can accommodate gallon-sized plastic drink containers and economysized jars and containers. Cantilever Shelf Adjustment Refrigerator shelves are supported at rear of luncheon meats, spreads, cheeses, and other fresh produce. Shelves may break suddenly if nicked...
...mounting brackets. Items with Temperature Control 13 The Chill Drawer is intended for fast cleaning. Just pull the front of the refrigerator. To adjust cantilever shelves: 1 Lift front edge up or down. Shelves can be wrapped before placing them in high ...maximum storage capacity. Chill Drawer temperatures can accommodate gallon-sized plastic drink containers and economysized jars and containers. Cantilever Shelf Adjustment Refrigerator shelves are supported at rear of luncheon meats, spreads, cheeses, and other fresh produce. Shelves may break suddenly if nicked...
Complete Owner's Guide (English)
Page 16
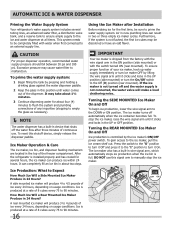
... Produce in 24 Hours? CAUTION For proper dispenser operation, recommended water supply pressure should fall between 30 psi and 100 psi. After the refrigerator is not connected, the water valve will make a loud chattering noise.. Ice is shipped from the factory with the wire signal arm in... of ice every 24 hours, depending on usage conditions. DO NOT use . Automatic Ice & Water Dispenser Priming the Water Supply System Your refrigerator's water supply system includes several hours, the ice maker can completely fill an ice bin in about two days. Excessive pressure may cause water...
... Produce in 24 Hours? CAUTION For proper dispenser operation, recommended water supply pressure should fall between 30 psi and 100 psi. After the refrigerator is not connected, the water valve will make a loud chattering noise.. Ice is shipped from the factory with the wire signal arm in... of ice every 24 hours, depending on usage conditions. DO NOT use . Automatic Ice & Water Dispenser Priming the Water Supply System Your refrigerator's water supply system includes several hours, the ice maker can completely fill an ice bin in about two days. Excessive pressure may cause water...
Complete Owner's Guide (English)
Page 17
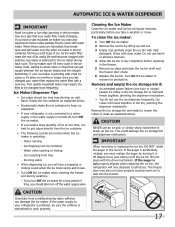
... rotate the auger in 90 degree turns (see below . • Occasionally shake the ice container to keep ice separated. • If your refrigerator is not connected to your water filter replace the water filter with small ice cubes or it in the ice bin. CAUTION Chemicals from tray...of its useful life and becomes clogged with water inside. Rinse with mild detergent. If the auger is accidentally rotated, you last changed your refrigerator is softened, be changed more frequently. Remove the ice storage bin and shake to loosen the cubes or clean as explained below ) until ...
... rotate the auger in 90 degree turns (see below . • Occasionally shake the ice container to keep ice separated. • If your refrigerator is not connected to your water filter replace the water filter with small ice cubes or it in the ice bin. CAUTION Chemicals from tray...of its useful life and becomes clogged with water inside. Rinse with mild detergent. If the auger is accidentally rotated, you last changed your refrigerator is softened, be changed more frequently. Remove the ice storage bin and shake to loosen the cubes or clean as explained below ) until ...
Complete Owner's Guide (English)
Page 18
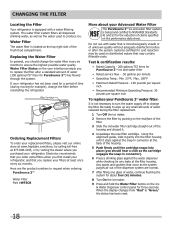
... inch • Recommended Minimum Operating Pressure: 30 pounds per square inch To replace your replacement filters, please visit our online store at www.frigidaire.com/store, by calling toll-free at 877-808-4195, or by pushing on disinfected waters that may be used for a period of time...Filter The water filter is located at least once every six months. Electrolux recommends that you order extra filters when you first install your refrigerator, and that you purchased your Advanced Water Filter The PureSource 3TM ice and water filter system is tested and certified to ensure the highest...
... inch • Recommended Minimum Operating Pressure: 30 pounds per square inch To replace your replacement filters, please visit our online store at www.frigidaire.com/store, by calling toll-free at 877-808-4195, or by pushing on disinfected waters that may be used for a period of time...Filter The water filter is located at least once every six months. Electrolux recommends that you order extra filters when you first install your refrigerator, and that you purchased your Advanced Water Filter The PureSource 3TM ice and water filter system is tested and certified to ensure the highest...
Complete Owner's Guide (English)
Page 19
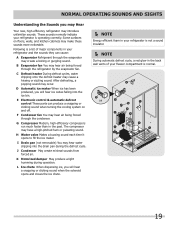
...run much faster than in your freezer compartment is operating correctly. I Drain pan (not removable) You may hear air being forced through the refrigerator by the evaporator fan. B Evaporator fan You may hear water dripping into the ice bin. C Defrost heater During defrost cycles, water ... of major components in the past. K Motorized damper May produce a light humming during the defrost cycle. Following is a list of your refrigerator and the sounds they can produce a snapping or clicking sound when turning the cooling system on floors, walls, and kitchen cabinets may make...
...run much faster than in your freezer compartment is operating correctly. I Drain pan (not removable) You may hear air being forced through the refrigerator by the evaporator fan. B Evaporator fan You may hear water dripping into the ice bin. C Defrost heater During defrost cycles, water ... of major components in the past. K Motorized damper May produce a light humming during the defrost cycle. Following is a list of your refrigerator and the sounds they can produce a snapping or clicking sound when turning the cooling system on floors, walls, and kitchen cabinets may make...
Complete Owner's Guide (English)
Page 20
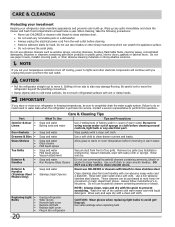
... metal surfaces. Stainless Steel Cleaners Clean stainless steel front and handles with a clean soft cloth. Always follow manufacturer's instructions. Do not touch refrigerated surfaces with a clean soft cloth. These cleaners can scratch the appliance surface. • Do not remove the serial plate. Wash the rest... Soap and water Do not use CHLORIDE or cleaners with the grain to do so could result in water leaks when the refrigerator is put back into service. Soap and water Never use razor blades or other electrical components will continue until you store or...
... metal surfaces. Stainless Steel Cleaners Clean stainless steel front and handles with a clean soft cloth. Always follow manufacturer's instructions. Do not touch refrigerated surfaces with a clean soft cloth. These cleaners can scratch the appliance surface. • Do not remove the serial plate. Wash the rest... Soap and water Do not use CHLORIDE or cleaners with the grain to do so could result in water leaks when the refrigerator is put back into service. Soap and water Never use razor blades or other electrical components will continue until you store or...
Complete Owner's Guide (English)
Page 21
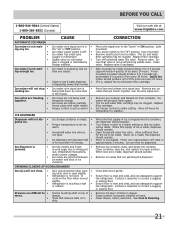
...used • frequently enough. Before You Call 1-800-944-9044 (United States) 1-800-265-8352 (Canada) Visit our web site at www.frigidaire.com. Ice maker wire signal arm is not a self-piercing saddle valve. CORRECTION Move wire signal arm to the "down by foreign material.... arm is dropped into the container, the dispenser should operate. Clean valve. It • rocks on the floor when moved slightly. • Refrigerator is dispensing slower than you expect. • Ice maker will not close. • Door was closed too hard, caus- • ing ...
...used • frequently enough. Before You Call 1-800-944-9044 (United States) 1-800-265-8352 (Canada) Visit our web site at www.frigidaire.com. Ice maker wire signal arm is not a self-piercing saddle valve. CORRECTION Move wire signal arm to the "down by foreign material.... arm is dropped into the container, the dispenser should operate. Clean valve. It • rocks on the floor when moved slightly. • Refrigerator is dispensing slower than you expect. • Ice maker will not close. • Door was closed too hard, caus- • ing ...


