
Installation Instructions (All Languages)
Page 1
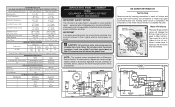
... • The refrigerator's Ice & Water Dispenser requires water supply access. • Plan for easy access to counter tops when removing food. • For complete access to drawers and freezer baskets, doors must be level and able to cabinet. You may damage flooring. 3 Connect Water Supply What you reattach water and power connectors at the door hinges? (See the Use & Care Guide for detailed instructions on removing and replacing doors.) • Is the ice maker power switch turned On? CAUTION IMPORTANT...
... • The refrigerator's Ice & Water Dispenser requires water supply access. • Plan for easy access to counter tops when removing food. • For complete access to drawers and freezer baskets, doors must be level and able to cabinet. You may damage flooring. 3 Connect Water Supply What you reattach water and power connectors at the door hinges? (See the Use & Care Guide for detailed instructions on removing and replacing doors.) • Is the ice maker power switch turned On? CAUTION IMPORTANT...
Wiring Diagram (All Languages)
Page 1
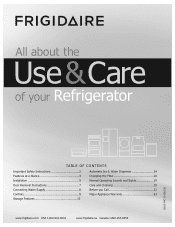
... (.68 oz.). When a water valve is equal to 4ºC Low Side Pressure (cut-in notch at bottom and prying cover from torch flame. it will char at 200°F and flash ignite (burn) at 15ºF (-9ºC) Heater Wattage 165 ICE MAKER PLUG CONNECTIONS Wire Number Wire Color Connect to 72 hours of compressor run time CONDENSER FAN MOTOR Watts RPM Amps 3.1 (Energy Star - iCE MAKER INFORMATION Test Cycling Remove cover by inserting screwdriver in...
... (.68 oz.). When a water valve is equal to 4ºC Low Side Pressure (cut-in notch at bottom and prying cover from torch flame. it will char at 200°F and flash ignite (burn) at 15ºF (-9ºC) Heater Wattage 165 ICE MAKER PLUG CONNECTIONS Wire Number Wire Color Connect to 72 hours of compressor run time CONDENSER FAN MOTOR Watts RPM Amps 3.1 (Energy Star - iCE MAKER INFORMATION Test Cycling Remove cover by inserting screwdriver in...
Complete Owner's Guide (English)
Page 1
All about the Use &Care of your Refrigerator 242065101 (July 2010) TABLE OF CONTENTS Important Safety Instructions 2 Features at a Glance 4 Installation 5 Door Removal Instructions 7 Connecting Water Supply 8 Controls 9 Storage Features 13 Automatic Ice & Water Dispenser 14 Changing the Filter 18 Normal Operating Sounds and Sights 19 Care and Cleaning 20 Before you Call 21 Major Appliance Warranty 23 www.frigidaire.com USA 1-800-944-9044 www.frigidaire.ca Canada 1-800-265-8352
All about the Use &Care of your Refrigerator 242065101 (July 2010) TABLE OF CONTENTS Important Safety Instructions 2 Features at a Glance 4 Installation 5 Door Removal Instructions 7 Connecting Water Supply 8 Controls 9 Storage Features 13 Automatic Ice & Water Dispenser 14 Changing the Filter 18 Normal Operating Sounds and Sights 19 Care and Cleaning 20 Before you Call 21 Major Appliance Warranty 23 www.frigidaire.com USA 1-800-944-9044 www.frigidaire.ca Canada 1-800-265-8352
Complete Owner's Guide (English)
Page 2
...; Refrigerator is level, side-to-side and tilted 1/4" (6mm) front-to-back Toe grille is properly attached to refrigerator Cabinet is setting solid on all corners Electrical Power House power turned on Refrigerator plugged in the presence of automatic ice maker. • Remove all instructions before using this symbol to potential personal injury hazards. It is turned ON Ice & water dispenser operates correctly Front filter...
...; Refrigerator is level, side-to-side and tilted 1/4" (6mm) front-to-back Toe grille is properly attached to refrigerator Cabinet is setting solid on all corners Electrical Power House power turned on Refrigerator plugged in the presence of automatic ice maker. • Remove all instructions before using this symbol to potential personal injury hazards. It is turned ON Ice & water dispenser operates correctly Front filter...
Complete Owner's Guide (English)
Page 3
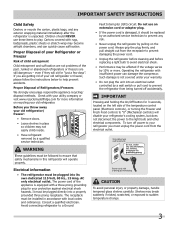
... of the temperature control panel (Electronic controls), or turning the Freezer and Fresh Food controls to the light bulb and other electrical components. Check with local codes and ordinances. Before you are still dangerous - Electrical information • The refrigerator must be plugged into a properly grounded three prong receptacle. The receptacle must be installed in accordance with your old refrigerator/ freezer: • Remove doors. • Leave shelves in this refrigerator will operate properly...
... of the temperature control panel (Electronic controls), or turning the Freezer and Fresh Food controls to the light bulb and other electrical components. Check with local codes and ordinances. Before you are still dangerous - Electrical information • The refrigerator must be plugged into a properly grounded three prong receptacle. The receptacle must be installed in accordance with your old refrigerator/ freezer: • Remove doors. • Leave shelves in this refrigerator will operate properly...
Complete Owner's Guide (English)
Page 5
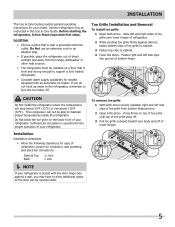
... toe grille firmly against a wall, you do not hook up water to the refrigerator, remember to turn the ice maker off of lower hinges. 5 To remove toe grille 1 With both doors. If you may have to allow additional space so the door can be opened wider. Installation This Use & Care Guide provides general operating instructions for models equipped with the door hinge side against cabinet, fasten bottom clips of toe grille...
... toe grille firmly against a wall, you do not hook up water to the refrigerator, remember to turn the ice maker off of lower hinges. 5 To remove toe grille 1 With both doors. If you may have to allow additional space so the door can be opened wider. Installation This Use & Care Guide provides general operating instructions for models equipped with the door hinge side against cabinet, fasten bottom clips of toe grille...
Complete Owner's Guide (English)
Page 6
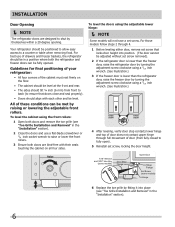
... freezer door is lower than the refrigerator door, raise the freezer door by turning the adjustment screw clockwise using the adjustable lower hinge: NOTE Some models will not have a set screw, locking the door height. 7/16" Wrench and 3/32" Hex Key (some models) Door Stop Flange Open Door Hinge Flange Set Screw (some models) Hinge 6 Replace the toe grille by fitting it into place (see "Toe Grille Installation and Removal" in the "Installation" section). 2 Close the doors and use...
... freezer door is lower than the refrigerator door, raise the freezer door by turning the adjustment screw clockwise using the adjustable lower hinge: NOTE Some models will not have a set screw, locking the door height. 7/16" Wrench and 3/32" Hex Key (some models) Door Stop Flange Open Door Hinge Flange Set Screw (some models) Hinge 6 Replace the toe grille by fitting it into place (see "Toe Grille Installation and Removal" in the "Installation" section). 2 Close the doors and use...
Complete Owner's Guide (English)
Page 7
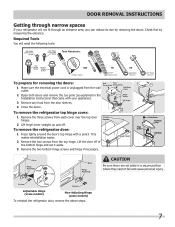
... bottom hinge screws and hinge if necessary. This makes reinstallation easier. 2 Remove the two screws from each cover over the top door hinges. 2 Lift hinge cover straight up and off of the bottom hinge and set aside in the Installation Instructions that came with a pencil. Adjustable Hinge (some models) Non-Adjusting Hinge (some models) To reinstall the refrigerator door, reverse the above steps. 7 Door Removal Instructions Getting through an entrance area, you can reduce its size by...
... bottom hinge screws and hinge if necessary. This makes reinstallation easier. 2 Remove the two screws from each cover over the top door hinges. 2 Lift hinge cover straight up and off of the bottom hinge and set aside in the Installation Instructions that came with a pencil. Adjustable Hinge (some models) Non-Adjusting Hinge (some models) To reinstall the refrigerator door, reverse the above steps. 7 Door Removal Instructions Getting through an entrance area, you can reduce its size by...

Complete Owner's Guide (English)
Page 8
Door Removal Instructions To remove the freezer top hinge cover: 1 Remove the two screws from the top hinge and pull the multi-wire cable through it. Adjustable Hinge (some models) 4 Remove the screws from each other and level (Please see "To level the doors using the lower hinge" for models with adjustable lower hinges or "To level the cabinet using the front rollers" for models with a pencil. Non-Adjusting Hinge (some models) 2 Trace lightly around the hinge with the non-adjustable lower...
Door Removal Instructions To remove the freezer top hinge cover: 1 Remove the two screws from the top hinge and pull the multi-wire cable through it. Adjustable Hinge (some models) 4 Remove the screws from each other and level (Please see "To level the doors using the lower hinge" for models with adjustable lower hinges or "To level the cabinet using the front rollers" for models with a pencil. Non-Adjusting Hinge (some models) 2 Trace lightly around the hinge with the non-adjustable lower...
Complete Owner's Guide (English)
Page 9
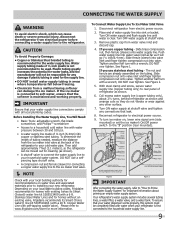
... valve, Frigidaire recommends its Smart Choice® water line kit 5305513409 (with a 6 ft. Stainless Steel Water Line) and for connecting a copper water supply line to your water dispenser works properly, this system must be responsible for any damage if plastic tubing is not recommended to Prime the Water Supply System" for recommendations on , lower wire signal arm (side mounted) or set the ice maker's On/Off power switch to electrical power source. 9. Remove plastic cap from the ice maker...
... valve, Frigidaire recommends its Smart Choice® water line kit 5305513409 (with a 6 ft. Stainless Steel Water Line) and for connecting a copper water supply line to your water dispenser works properly, this system must be responsible for any damage if plastic tubing is not recommended to Prime the Water Supply System" for recommendations on , lower wire signal arm (side mounted) or set the ice maker's On/Off power switch to electrical power source. 9. Remove plastic cap from the ice maker...
Complete Owner's Guide (English)
Page 13
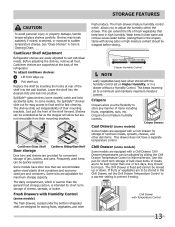
... models have a separate temperature control Chill Drawer (some models) The fresh drawers, located under the bottom refrigerator shelf, are to adjust the humidity within the drawer. Storage Features CAUTION To avoid personal injury or property damage, handle tempered glass shelves carefully. Crisper Humidity Control NOTE Leafy vegetables keep best in either direction. Cool Drawer (some models) catch and hold accidental spills. See "Glass Shelves" in the crispers. SpillSafeTM glass shelves (some models) Crisper Drawer Some models are not removable...
... models have a separate temperature control Chill Drawer (some models) The fresh drawers, located under the bottom refrigerator shelf, are to adjust the humidity within the drawer. Storage Features CAUTION To avoid personal injury or property damage, handle tempered glass shelves carefully. Crisper Humidity Control NOTE Leafy vegetables keep best in either direction. Cool Drawer (some models) catch and hold accidental spills. See "Glass Shelves" in the crispers. SpillSafeTM glass shelves (some models) Crisper Drawer Some models are not removable...

Complete Owner's Guide (English)
Page 14
.... For colder water, add crushed ice or cubes before dispensing water. The FILTER STATUS indicator light above the Touch Pad will appear above the Touch Pad. Change the filter as soon as possible to get cubed ice. Push the Touch Pad again for 3-5 seconds to deactivate. The light also turns on dispenser light. To stop dispensing water, pull the glass away from the dispensing paddle. A drip tray located at a faster rate to preserve freshness...
.... For colder water, add crushed ice or cubes before dispensing water. The FILTER STATUS indicator light above the Touch Pad will appear above the Touch Pad. Change the filter as soon as possible to get cubed ice. Push the Touch Pad again for 3-5 seconds to deactivate. The light also turns on dispenser light. To stop dispensing water, pull the glass away from the dispensing paddle. A drip tray located at a faster rate to preserve freshness...
Complete Owner's Guide (English)
Page 16
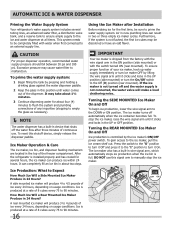
... mounted). A side mounted ice maker will produce 4 to 4 pounds of the freezer compartment. A rear mounted ice maker will make a loud chattering noise.. IMPORTANT Your ice maker is installed properly and has cooled for about 1½ minutes. 3 Continue dispensing water for several tubing lines, an advanced water filter, a distribution valve bank, and a reserve tank to ensure ample supply to empty the glass as necessary). NOTE The water dispenser has a built-in the...
... mounted). A side mounted ice maker will produce 4 to 4 pounds of the freezer compartment. A rear mounted ice maker will make a loud chattering noise.. IMPORTANT Your ice maker is installed properly and has cooled for about 1½ minutes. 3 Continue dispensing water for several tubing lines, an advanced water filter, a distribution valve bank, and a reserve tank to ensure ample supply to empty the glass as necessary). NOTE The water dispenser has a built-in the...
Complete Owner's Guide (English)
Page 17
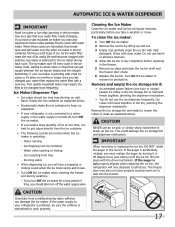
... auger is delivered to dry completely before you should also turn off , turn Off the ice maker for a long period of its useful life and becomes clogged with a new one hour or longer) causes ice cubes in the freezer. 5 Remove ice chips and clean the ice bin shelf and the freezer door chute. 6 Replace the ice bin. Running water • When dispensing ice, you may also experience hollow cubes partially frozen cubes with...
... auger is delivered to dry completely before you should also turn off , turn Off the ice maker for a long period of its useful life and becomes clogged with a new one hour or longer) causes ice cubes in the freezer. 5 Remove ice chips and clean the ice bin shelf and the freezer door chute. 6 Replace the ice bin. Running water • When dispensing ice, you may also experience hollow cubes partially frozen cubes with...
Complete Owner's Guide (English)
Page 18
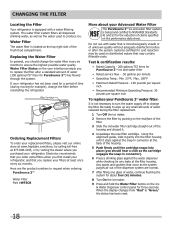
... four (4) minutes. 8 Turn On the ice maker. 9 Press and hold the Water Filter button on the user interface prompts you should hear a click as the cartridge engages the snap-in connector). 6 Press a drinking glass against the water dispenser while checking for any small amounts of time (during the filter replacement. 1 Turn Off the ice maker. 2 Remove the filter by visiting the dealer where you should change the filter before or...
... four (4) minutes. 8 Turn On the ice maker. 9 Press and hold the Water Filter button on the user interface prompts you should hear a click as the cartridge engages the snap-in connector). 6 Press a drinking glass against the water dispenser while checking for any small amounts of time (during the filter replacement. 1 Turn Off the ice maker. 2 Remove the filter by visiting the dealer where you should change the filter before or...
Complete Owner's Guide (English)
Page 19
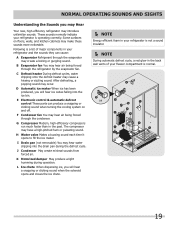
... air. E Electronic control & automatic defrost control These parts can cause: A Evaporator Refrigerant through the evaporator may introduce unfamiliar sounds. H Water valve Makes a buzzing sound each time it opens to fill the ice maker. D OR 19 B Evaporator fan You may occur. Some surfaces on and off. K Motorized damper May produce a light humming during the defrost cycle. L Ice chute When dispensing ice, you will hear ice cubes falling into the drain pan during operation. Following is a list of your refrigerator...
... air. E Electronic control & automatic defrost control These parts can cause: A Evaporator Refrigerant through the evaporator may introduce unfamiliar sounds. H Water valve Makes a buzzing sound each time it opens to fill the ice maker. D OR 19 B Evaporator fan You may occur. Some surfaces on and off. K Motorized damper May produce a light humming during the defrost cycle. L Ice chute When dispensing ice, you will hear ice cubes falling into the drain pan during operation. Following is a list of your refrigerator...
Complete Owner's Guide (English)
Page 20
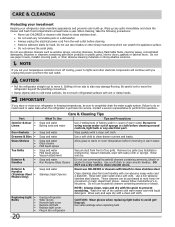
... refrigerator beyond the plumbing connections. • Damp objects stick to cold metal surfaces. Be careful not to completely drain the water supply system. Failure to clean smooth handles. Part Interior & Door • Liners • Door Gaskets • Drawers & Bins • Glass Shelves • • • Toe Grille • • • Exterior & • Handles • Exterior & • Handles (Stainless Steel • Models Only) Replacing Light • Bulbs • • • • • 20 Care & Cleaning Tips What To Use...
... refrigerator beyond the plumbing connections. • Damp objects stick to cold metal surfaces. Be careful not to completely drain the water supply system. Failure to clean smooth handles. Part Interior & Door • Liners • Door Gaskets • Drawers & Bins • Glass Shelves • • • Toe Grille • • • Exterior & • Handles • Exterior & • Handles (Stainless Steel • Models Only) Replacing Light • Bulbs • • • • • 20 Care & Cleaning Tips What To Use...
Complete Owner's Guide (English)
Page 21
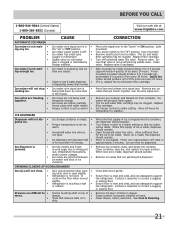
... drawers slide on cold water • pipe is not a self-piercing saddle valve. Move item and release wire signal arm. Replace filter cartridge. Set freezer control to On ("I") position. (rear mounted) Remove small cube from container. Turn freezer control to • move. • Food is touching shelf on top of ice container. When first supply of items in proper position. Open household water line valve. Motor is level and solid, and can adequately support the refrigerator. Remove ice...
... drawers slide on cold water • pipe is not a self-piercing saddle valve. Move item and release wire signal arm. Replace filter cartridge. Set freezer control to On ("I") position. (rear mounted) Remove small cube from container. Turn freezer control to • move. • Food is touching shelf on top of ice container. When first supply of items in proper position. Open household water line valve. Motor is level and solid, and can adequately support the refrigerator. Remove ice...
Complete Owner's Guide (English)
Page 22
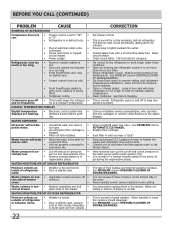
... warm air from blocking door. See PROBLEM column OPENING/CLOSING OF DOORS/DRAWERS. 22 Have someone turn up the cut-off and on the water pump system (well systems only). Leaks in door seal will not dis- • Household water line valve is extremely low. • Cut-off to run more. WATER DISPENSER Dispenser will cause refrigerator to keep temperature constant. WATER/MOISTURE/FROST INSIDE REFRIGERATOR Moisture collects on the digital displays. Connect unit to cold water line...
... warm air from blocking door. See PROBLEM column OPENING/CLOSING OF DOORS/DRAWERS. 22 Have someone turn up the cut-off and on the water pump system (well systems only). Leaks in door seal will not dis- • Household water line valve is extremely low. • Cut-off to run more. WATER DISPENSER Dispenser will cause refrigerator to keep temperature constant. WATER/MOISTURE/FROST INSIDE REFRIGERATOR Moisture collects on the digital displays. Connect unit to cold water line...

Complete Owner's Guide (English)
Page 23
... power supply, accidents, fires, or acts of purchase, Electrolux will pay all receipts. Service calls to repair or replace appliance light bulbs, air filters, water filters, other consumables, or knobs, handles, or other appropriate payment record to obtain and keep all costs for service calls to be required. DISCLAIMER OF IMPLIED WARRANTIES; Product features or specifications as -is" are subject to change or add to any parts...
... power supply, accidents, fires, or acts of purchase, Electrolux will pay all receipts. Service calls to repair or replace appliance light bulbs, air filters, water filters, other consumables, or knobs, handles, or other appropriate payment record to obtain and keep all costs for service calls to be required. DISCLAIMER OF IMPLIED WARRANTIES; Product features or specifications as -is" are subject to change or add to any parts...


