
Installation Instructions (All Languages)
Page 1
... door stop contacts lower hinge and top of door does not contact upper hinge through full movement of door (from the water valve inlet at the door hinges? (See the Use & Care Guide for : • Is the refrigerator's power cord plugged in Ice Maker House water supply connected to move it to a water supply, make sure the ice maker's power switch is turned Off (see the Use & Care Guide for the water supply line (plastic tubing is more details). • Shifting the refrigerator from bottom hinge groove Open...
... door stop contacts lower hinge and top of door does not contact upper hinge through full movement of door (from the water valve inlet at the door hinges? (See the Use & Care Guide for : • Is the refrigerator's power cord plugged in Ice Maker House water supply connected to move it to a water supply, make sure the ice maker's power switch is turned Off (see the Use & Care Guide for the water supply line (plastic tubing is more details). • Shifting the refrigerator from bottom hinge groove Open...
Wiring Diagram (All Languages)
Page 1
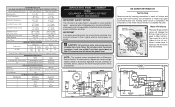
... .07 Running ICE MAKER SPECIFICATIONS Electrical 115 vac (127 vac max) 60 Hertz Thermostat Opens at 48ºF (9ºC) Closes at 500°F. Disconnect power cord before servicing. caution: All electrical parts and wiring must be shielded from housing. it will char at 200°F and flash ignite (burn) at 15ºF (-9ºC) Heater Wattage 165 ICE MAKER PLUG CONNECTIONS Wire Number Wire Color Connect to 72 hours of electrical shock. Water Fill Adjustment Motor Gear...
... .07 Running ICE MAKER SPECIFICATIONS Electrical 115 vac (127 vac max) 60 Hertz Thermostat Opens at 48ºF (9ºC) Closes at 500°F. Disconnect power cord before servicing. caution: All electrical parts and wiring must be shielded from housing. it will char at 200°F and flash ignite (burn) at 15ºF (-9ºC) Heater Wattage 165 ICE MAKER PLUG CONNECTIONS Wire Number Wire Color Connect to 72 hours of electrical shock. Water Fill Adjustment Motor Gear...
Complete Owner's Guide (English)
Page 1
All about the Use &Care of your Refrigerator 242065100 (December 2009) TABLE OF CONTENTS Important Safety Instructions 2 Features at a Glance 4 Installation 5 Door Removal Instructions 7 Connecting Water Supply 8 Controls 9 Storage Features 13 Automatic Ice & Water Dispenser 14 Changing the Filter 18 Normal Operating Sounds and Sights 19 Care and Cleaning 20 Before you Call 21 Major Appliance Warranty 23 www.frigidaire.com USA 1-800-944-9044 www.frigidaire.ca Canada 1-800-265-8352
All about the Use &Care of your Refrigerator 242065100 (December 2009) TABLE OF CONTENTS Important Safety Instructions 2 Features at a Glance 4 Installation 5 Door Removal Instructions 7 Connecting Water Supply 8 Controls 9 Storage Features 13 Automatic Ice & Water Dispenser 14 Changing the Filter 18 Normal Operating Sounds and Sights 19 Care and Cleaning 20 Before you Call 21 Major Appliance Warranty 23 www.frigidaire.com USA 1-800-944-9044 www.frigidaire.ca Canada 1-800-265-8352
Complete Owner's Guide (English)
Page 2
... attached to avoid possible injury or death. Definitions This is setting solid on all corners Electrical Power House power turned on Refrigerator plugged in death or serious injury. IMPORTANT IMPORTANT indicates installation, operation or maintenance information which , if not avoided, could result in Ice Maker House water supply connected to refrigerator No water leaks present at all safety messages that follow this symbol to...
... attached to avoid possible injury or death. Definitions This is setting solid on all corners Electrical Power House power turned on Refrigerator plugged in death or serious injury. IMPORTANT IMPORTANT indicates installation, operation or maintenance information which , if not avoided, could result in Ice Maker House water supply connected to refrigerator No water leaks present at all safety messages that follow this symbol to...
Complete Owner's Guide (English)
Page 3
.../Off button for your protection against electrical shock hazards. Cartons covered with local codes and ordinances. If you throw away your warranty. • Do not plug the unit into an electrical outlet controlled by a wall switch or pull cord to prevent the refrigerator from being turned off power to sudden temperature change. 3 The power cord of your refrigerator's cooling system, but does not disconnect the power to the light bulb...
.../Off button for your protection against electrical shock hazards. Cartons covered with local codes and ordinances. If you throw away your warranty. • Do not plug the unit into an electrical outlet controlled by a wall switch or pull cord to prevent the refrigerator from being turned off power to sudden temperature change. 3 The power cord of your refrigerator's cooling system, but does not disconnect the power to the light bulb...
Complete Owner's Guide (English)
Page 5
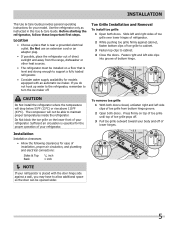
... against a wall, you do not hook up water to the refrigerator, remember to allow additional space so the door can be opened wider. Press firmly on a floor that is level and strong enough to maintain proper temperatures inside the refrigerator. Slide left side clips into groove of lower hinges. 5 Installation This Use & Care Guide provides general operating instructions for models equipped with the door hinge side against cabinet, fasten bottom clips...
... against a wall, you do not hook up water to the refrigerator, remember to allow additional space so the door can be opened wider. Press firmly on a floor that is level and strong enough to maintain proper temperatures inside the refrigerator. Slide left side clips into groove of lower hinges. 5 Installation This Use & Care Guide provides general operating instructions for models equipped with the door hinge side against cabinet, fasten bottom clips...
Complete Owner's Guide (English)
Page 6
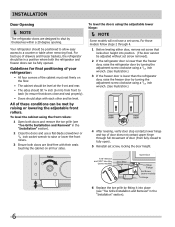
... Open Door Hinge Flange Set Screw (some models) Hinge 6 Replace the toe grille by turning the adjustment screw clockwise using a 7/16 inch wrench. (See illustration.) 4 After leveling, verify door stop contacts lower hinge and top of door does not contact upper hinge through 4. 1 Before leveling either door, remove set screw that locks door height into position. (The door cannot be adjusted without set screw. All of the cabinet must rest firmly on all four sides. Installation Door Opening...
... Open Door Hinge Flange Set Screw (some models) Hinge 6 Replace the toe grille by turning the adjustment screw clockwise using a 7/16 inch wrench. (See illustration.) 4 After leveling, verify door stop contacts lower hinge and top of door does not contact upper hinge through 4. 1 Before leveling either door, remove set screw that locks door height into position. (The door cannot be adjusted without set screw. All of the cabinet must rest firmly on all four sides. Installation Door Opening...
Complete Owner's Guide (English)
Page 8
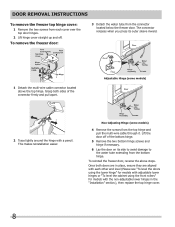
...-Adjusting Hinge (some models) 2 Trace lightly around the hinge with the non-adjustable lower hinges in place, ensure they are aligned with each cover over the top door hinges. 2 Lift hinge cover straight up and off of the connector firmly and pull apart. To remove the freezer door: 3 Detach the water tube from the top hinge and pull the multi-wire cable through it. Grasp both doors are in the "Installation...
...-Adjusting Hinge (some models) 2 Trace lightly around the hinge with the non-adjustable lower hinges in place, ensure they are aligned with each cover over the top door hinges. 2 Lift hinge cover straight up and off of the connector firmly and pull apart. To remove the freezer door: 3 Detach the water tube from the top hinge and pull the multi-wire cable through it. Grasp both doors are in the "Installation...
Complete Owner's Guide (English)
Page 9
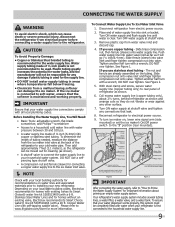
... first connected to installing your refrigerator is used . Disconnect refrigerator from the ice maker inlet valve at the back of the refrigerator to the "I" position (rear mounted). Tighten another half turn with a 20 ft. If you use stainless steel tubing - DO NOT over tighten. Reconnect refrigerator to www.frigidaire.com/store for recommendations on , lower wire signal arm (side mounted) or set the ice maker's On/Off power switch to your water supply line connections...
... first connected to installing your refrigerator is used . Disconnect refrigerator from the ice maker inlet valve at the back of the refrigerator to the "I" position (rear mounted). Tighten another half turn with a 20 ft. If you use stainless steel tubing - DO NOT over tighten. Reconnect refrigerator to www.frigidaire.com/store for recommendations on , lower wire signal arm (side mounted) or set the ice maker's On/Off power switch to your water supply line connections...
Complete Owner's Guide (English)
Page 13
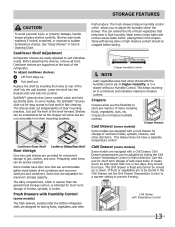
.... Frequently used items can extend the life of their mounting brackets. 1 1 2 2 Cantilever Glass Shelf Door storage Cantilever Sliding Glass Shelf Door bins and shelves are equipped with the humidity control set the Chill Drawer Temperature Control to a warmer setting to suit individual needs. Some bins are supported at rear of the refrigerator. Storage Features CAUTION To avoid personal injury or property damage, handle tempered glass shelves carefully. SpillSafeTM glass shelves (some models, the SpillSafeTM shelves slide out...
.... Frequently used items can extend the life of their mounting brackets. 1 1 2 2 Cantilever Glass Shelf Door storage Cantilever Sliding Glass Shelf Door bins and shelves are equipped with the humidity control set the Chill Drawer Temperature Control to a warmer setting to suit individual needs. Some bins are supported at rear of the refrigerator. Storage Features CAUTION To avoid personal injury or property damage, handle tempered glass shelves carefully. SpillSafeTM glass shelves (some models, the SpillSafeTM shelves slide out...
Complete Owner's Guide (English)
Page 14
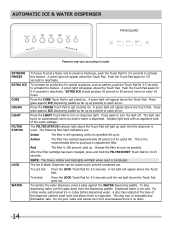
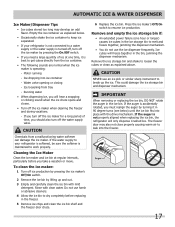
... Touch Pad for 3-5 seconds until the red light above the Touch Pad. The Ice & Water Dispenser can be locked out to evaporate. The light also turns on dispenser light. EXTREME FREEZE EXTRA ICE CUBE CRUSH LIGHT FILTER STATUS LOCK WATER To freeze food at the base of the same wattage. Dispensed water is not cold. Replace light bulb with an appliance bulb of the dispenser catches small spills and allows them to prevent unwanted use.
... Touch Pad for 3-5 seconds until the red light above the Touch Pad. The Ice & Water Dispenser can be locked out to evaporate. The light also turns on dispenser light. EXTREME FREEZE EXTRA ICE CUBE CRUSH LIGHT FILTER STATUS LOCK WATER To freeze food at the base of the same wattage. Dispensed water is not cold. Replace light bulb with an appliance bulb of the dispenser catches small spills and allows them to prevent unwanted use.
Complete Owner's Guide (English)
Page 16
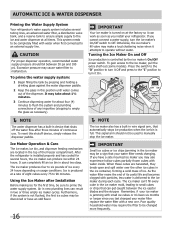
... cannot connect a water supply, turn it attempts to operate without water. Otherwise, the ice maker's fill valve may make a loud chattering noise when it On. IMPORTANT Small ice cubes or ice chips jamming in two or three empty ice maker cycles. When these cubes are located in this shutoff device, simply release the dispenser paddle. This system needs to 90 minutes. Air in new plumbing lines can completely fill an ice bin in wire...
... cannot connect a water supply, turn it attempts to operate without water. Otherwise, the ice maker's fill valve may make a loud chattering noise when it On. IMPORTANT Small ice cubes or ice chips jamming in two or three empty ice maker cycles. When these cubes are located in this shutoff device, simply release the dispenser paddle. This system needs to 90 minutes. Air in new plumbing lines can completely fill an ice bin in wire...
Complete Owner's Guide (English)
Page 17
... carefully clean the ice bin with mild detergent. Motor running - Running water • When dispensing ice, you should also turn off the ice maker when cleaning the freezer and during vacations. - Do not use an ice pick or similar sharp instrument to a water supply or the water supply is best to work properly. Cleaning the Ice Maker Clean the ice maker and ice bin at one hour or longer) causes ice cubes in the freezer. 5 Remove ice chips and clean the ice bin shelf and the freezer door chute. 6 Replace the ice bin...
... carefully clean the ice bin with mild detergent. Motor running - Running water • When dispensing ice, you should also turn off the ice maker when cleaning the freezer and during vacations. - Do not use an ice pick or similar sharp instrument to a water supply or the water supply is best to work properly. Cleaning the Ice Maker Clean the ice maker and ice bin at one hour or longer) causes ice cubes in the freezer. 5 Remove ice chips and clean the ice bin shelf and the freezer door chute. 6 Replace the ice bin...
Complete Owner's Guide (English)
Page 18
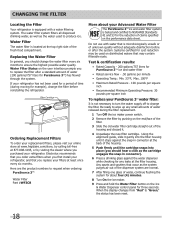
... use with a water filtering system. Using the alignment guide, slide it gently into the filter housing until the cartridge snaps into place (you should change the filter before or after a standard amount of time (during the filter replacement. 1 Turn Off the ice maker power switch. 2 Remove the filter by visiting the dealer where you should hear a click as the system purges air out of the dispenser system are the product numbers...
... use with a water filtering system. Using the alignment guide, slide it gently into the filter housing until the cartridge snaps into place (you should change the filter before or after a standard amount of time (during the filter replacement. 1 Turn Off the ice maker power switch. 2 Remove the filter by visiting the dealer where you should hear a click as the system purges air out of the dispenser system are the product numbers...
Complete Owner's Guide (English)
Page 20
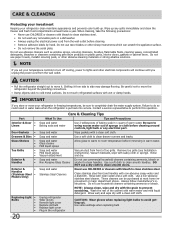
.... Unplug refrigerator Wear gloves Remove light cover Replace old bulb Replace light cover Plug in the refrigerator CAUTION: Wear gloves when replacing light bulbs to move it from the wall outlet. CAUTION • Pull the refrigerator straight out to avoid getting cut. Contact a service representative to cold metal surfaces. Soap and water Wipe gaskets with sudsy cloth or sponge. Remove toe grille (see Installation Instructions). Use same wattage when replacing bulb Be careful not to move your refrigerator clean maintains...
.... Unplug refrigerator Wear gloves Remove light cover Replace old bulb Replace light cover Plug in the refrigerator CAUTION: Wear gloves when replacing light bulbs to move it from the wall outlet. CAUTION • Pull the refrigerator straight out to avoid getting cut. Contact a service representative to cold metal surfaces. Soap and water Wipe gaskets with sudsy cloth or sponge. Remove toe grille (see Installation Instructions). Use same wattage when replacing bulb Be careful not to move your refrigerator clean maintains...
Complete Owner's Guide (English)
Page 21
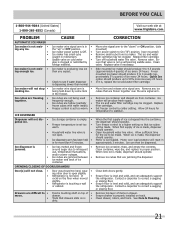
... , the dispenser should operate. Turn freezer control to 50% more than normal. When ice is • dirty. Clean container, wipe dry, and replace in mechanism. • Saddle valve on is made . See Care & Cleaning. 21 Ice cubes are jamming the dispenser. Replace filter cartridge. Quick Ice option should produce 3 to infrequent use, temperature fluctuations, and/or power outages. • Ice cubes are hollow (partially • frozen cubes with water inside). The ice and water filter cartridge may...
... , the dispenser should operate. Turn freezer control to 50% more than normal. When ice is • dirty. Clean container, wipe dry, and replace in mechanism. • Saddle valve on is made . See Care & Cleaning. 21 Ice cubes are jamming the dispenser. Replace filter cartridge. Quick Ice option should produce 3 to infrequent use, temperature fluctuations, and/or power outages. • Ice cubes are hollow (partially • frozen cubes with water inside). The ice and water filter cartridge may...
Complete Owner's Guide (English)
Page 22
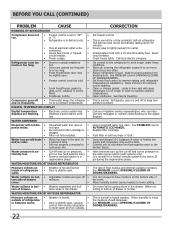
... drawer. CORRECTION Set freezer control. Warm air entering the refrigerator causes it to • cold water line. Clean condenser. Check/replace fuse with a 15 amp time-delay fuse. DIGITAL TEMPERATURE DISPLAY Digital temperature displays are flashing. • Electronic control system has • detected a performance problem. Open household water line valve. Water collecting in bot- • Washed vegetables and fruit • tom of time. • Unit not properly connected to run longer in • regenerative phase. WATER DISPENSER Dispenser will cause refrigerator...
... drawer. CORRECTION Set freezer control. Warm air entering the refrigerator causes it to • cold water line. Clean condenser. Check/replace fuse with a 15 amp time-delay fuse. DIGITAL TEMPERATURE DISPLAY Digital temperature displays are flashing. • Electronic control system has • detected a performance problem. Open household water line valve. Water collecting in bot- • Washed vegetables and fruit • tom of time. • Unit not properly connected to run longer in • regenerative phase. WATER DISPENSER Dispenser will cause refrigerator...
Complete Owner's Guide (English)
Page 23
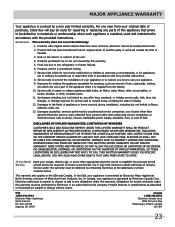
... genuine Electrolux parts or parts obtained from your appliance is warranted by Electrolux or an authorized service company. Product features or specifications as removal of the appliance when it is in a commercial setting. 7. major appliance warranty Your appliance is covered by this warranty. 5. Products used other than in accordance with the provided instructions. 8. Expenses for making the appliance accessible for repairing or replacing any...
... genuine Electrolux parts or parts obtained from your appliance is warranted by Electrolux or an authorized service company. Product features or specifications as removal of the appliance when it is in a commercial setting. 7. major appliance warranty Your appliance is covered by this warranty. 5. Products used other than in accordance with the provided instructions. 8. Expenses for making the appliance accessible for repairing or replacing any...

Product Specifications Sheet (English)
Page 2
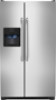
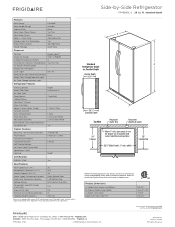
... Wire Door Bins Fixed Shelves Full Extension Baskets Full Freezer Baskets Half Freezer Baskets Ice Cream Shelf / Pizza Shelf SpaceSaver™ Shelf Lighting 4 White / No 1 Flip-Out / 2 Wire 1 Plastic Bright Certifications ENERGY STAR® Yes Specifications Total Capacity (Cu. Frigidaire Baseline Side-by-Side Refrigerator FFHS2612L S 26 Cu. Ft.) Power Supply Connection Location Water Inlet Connection Location Voltage Rating Connected Load (kW Rating) @ 120 Volts1 Amps @ 120 Volts Minimum Circuit Required (Amps) Shipping Weight (Approx.) 26 16.5 9.5 Right Bottom Rear Left...
... Wire Door Bins Fixed Shelves Full Extension Baskets Full Freezer Baskets Half Freezer Baskets Ice Cream Shelf / Pizza Shelf SpaceSaver™ Shelf Lighting 4 White / No 1 Flip-Out / 2 Wire 1 Plastic Bright Certifications ENERGY STAR® Yes Specifications Total Capacity (Cu. Frigidaire Baseline Side-by-Side Refrigerator FFHS2612L S 26 Cu. Ft.) Power Supply Connection Location Water Inlet Connection Location Voltage Rating Connected Load (kW Rating) @ 120 Volts1 Amps @ 120 Volts Minimum Circuit Required (Amps) Shipping Weight (Approx.) 26 16.5 9.5 Right Bottom Rear Left...
Product Specifications Sheet (English)
Page 2
... Water Filter Location Sound Package UltraSoft™ Stainless Black Yes / Yes Black Adjustable / Yes Yes Top Right Rear Quiet Pack Dispenser Controls Ready-Select™ Dispenser Design Short, 2-Paddle Number of Dispenser Buttons 4 Crushed Ice / Cube Ice / Chilled Water Yes / Yes / Yes Ice Option / Freeze Option Display On / Off Option Lock / Light No / Yes Temp / Door Ajar / Power Failure Alerts Water Filter Change Indicator Light Air Filter Change Indicator Light Refrigerator Features Interior Lighting Water Filter Type Air Filter Type Fixed Shelves Sliding Shelves Cool...
... Water Filter Location Sound Package UltraSoft™ Stainless Black Yes / Yes Black Adjustable / Yes Yes Top Right Rear Quiet Pack Dispenser Controls Ready-Select™ Dispenser Design Short, 2-Paddle Number of Dispenser Buttons 4 Crushed Ice / Cube Ice / Chilled Water Yes / Yes / Yes Ice Option / Freeze Option Display On / Off Option Lock / Light No / Yes Temp / Door Ajar / Power Failure Alerts Water Filter Change Indicator Light Air Filter Change Indicator Light Refrigerator Features Interior Lighting Water Filter Type Air Filter Type Fixed Shelves Sliding Shelves Cool...


