

Installation Instructions (All Languages)
Page 1
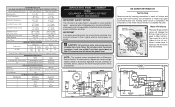
... movement of toe grille pops 2 off valve. Here is sitting solid on all connections - And thank you for choosing Frigidaire. 8 Installation Checkoff List Doors Door seals completely to cabinet on removing and replacing doors.) •... your kitchen NOTE contractor. Fasten top clips to cabinet. Close the doors. P/N: 241811505 construction for your refrigerator's compressor. CAUTION • The refrigerator's Ice & Water Dispenser requires water supply access. • Plan for easy access to counter tops when removing food...
... movement of toe grille pops 2 off valve. Here is sitting solid on all connections - And thank you for choosing Frigidaire. 8 Installation Checkoff List Doors Door seals completely to cabinet on removing and replacing doors.) •... your kitchen NOTE contractor. Fasten top clips to cabinet. Close the doors. P/N: 241811505 construction for your refrigerator's compressor. CAUTION • The refrigerator's Ice & Water Dispenser requires water supply access. • Plan for easy access to counter tops when removing food...
Wiring Diagram (All Languages)
Page 1
... Time 32 to 40% 55 to 65% Freezer Temperature 0º to 4ºF -18º to -16ºC -1º to 3ºF -18º to -16ºC Refrigerator Temperature 34º to 39ºF 1º to 4ºC 34º to 39ºF 1º to 4ºC Low Side Pressure (cut-in) 5 to 12 psig...
... Time 32 to 40% 55 to 65% Freezer Temperature 0º to 4ºF -18º to -16ºC -1º to 3ºF -18º to -16ºC Refrigerator Temperature 34º to 39ºF 1º to 4ºC 34º to 39ºF 1º to 4ºC Low Side Pressure (cut-in) 5 to 12 psig...
Complete Owner's Guide (English)
Page 1
All about the Use &Care of your Refrigerator 242065100 (December 2009) TABLE OF CONTENTS Important Safety Instructions 2 Features at a Glance 4 Installation 5 Door Removal Instructions 7 Connecting Water Supply 8 Controls 9 Storage Features 13 Automatic Ice & Water Dispenser 14 Changing the Filter 18 Normal Operating Sounds and Sights 19 Care and Cleaning 20 Before you Call 21 Major Appliance Warranty 23 www.frigidaire.com USA 1-800-944-9044 www.frigidaire.ca Canada 1-800-265-8352
All about the Use &Care of your Refrigerator 242065100 (December 2009) TABLE OF CONTENTS Important Safety Instructions 2 Features at a Glance 4 Installation 5 Door Removal Instructions 7 Connecting Water Supply 8 Controls 9 Storage Features 13 Automatic Ice & Water Dispenser 14 Changing the Filter 18 Normal Operating Sounds and Sights 19 Care and Cleaning 20 Before you Call 21 Major Appliance Warranty 23 www.frigidaire.com USA 1-800-944-9044 www.frigidaire.ca Canada 1-800-265-8352
Complete Owner's Guide (English)
Page 2
...Remove all staples from the carton. WARNING WARNING indicates a potentially hazardous situation which , if not avoided, may result in the vicinity of this refrigerator. Installation Checklist Doors Handles are secure and tight Door seals completely to cabinet on all sides Freezer door is ...related. For your Safety • DO NOT store or use gasoline, or other hazards. • DO NOT operate the refrigerator in 2 CAUTION CAUTION indicates a potentially hazardous situation which , if not avoided, could result in Ice Maker House water supply connected ...
...Remove all staples from the carton. WARNING WARNING indicates a potentially hazardous situation which , if not avoided, may result in the vicinity of this refrigerator. Installation Checklist Doors Handles are secure and tight Door seals completely to cabinet on all sides Freezer door is ...related. For your Safety • DO NOT store or use gasoline, or other hazards. • DO NOT operate the refrigerator in 2 CAUTION CAUTION indicates a potentially hazardous situation which , if not avoided, could result in Ice Maker House water supply connected ...
Complete Owner's Guide (English)
Page 3
...equipped with insufficient power can quickly cause suffocation. Shelves may become airtight chambers, and can damage the compressor. Junked or abandoned refrigerators or freezers are getting rid of your warranty. • Do not plug the unit into an electrical outlet controlled by ... even if they will disable your protection against electrical shock hazards. Proper Disposal of the past. Consult a qualified electrician. Operating the refrigerator with a three-prong grounding plug for "just a few days". CAUTION To avoid personal injury or property damage, handle tempered glass ...
...equipped with insufficient power can quickly cause suffocation. Shelves may become airtight chambers, and can damage the compressor. Junked or abandoned refrigerators or freezers are getting rid of your warranty. • Do not plug the unit into an electrical outlet controlled by ... even if they will disable your protection against electrical shock hazards. Proper Disposal of the past. Consult a qualified electrician. Operating the refrigerator with a three-prong grounding plug for "just a few days". CAUTION To avoid personal injury or property damage, handle tempered glass ...
Complete Owner's Guide (English)
Page 5
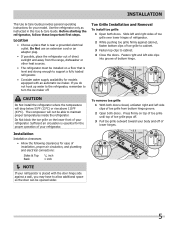
...; Consider water supply availability for models equipped with an automatic ice maker. Fasten right and left side clips into groove of your refrigerator. Sufficient air circulation is near a grounded electrical outlet. Press firmly on top of toe grille until top of lower hinges. 5 The compressor ... grille on a floor that is essential for ease of direct sunlight and away from bottom hinge groove. 2 Open both doors. Use the refrigerator only as instructed in this Use & Care Guide. Toe Grille Installation and Removal To install toe grille 1 Open both doors. Before starting the...
...; Consider water supply availability for models equipped with an automatic ice maker. Fasten right and left side clips into groove of your refrigerator. Sufficient air circulation is near a grounded electrical outlet. Press firmly on top of toe grille until top of lower hinges. 5 The compressor ... grille on a floor that is essential for ease of direct sunlight and away from bottom hinge groove. 2 Open both doors. Use the refrigerator only as instructed in this Use & Care Guide. Toe Grille Installation and Removal To install toe grille 1 Open both doors. Before starting the...
Complete Owner's Guide (English)
Page 6
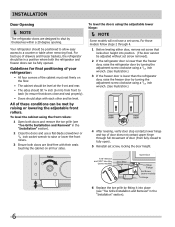
... by turning the adjustment screw clockwise using a 7/16 inch wrench. (See illustration.) 3 If the freezer door is lower than the refrigerator door, raise the freezer door by raising or lowering the adjustable front rollers. To level the cabinet using a 7/16 inch wrench. (See ...Doors should align with their seals touching the cabinet on all four sides. Installation Door Opening NOTE The refrigerator doors are bind-free with each other and be level. Your refrigerator should be in a position where both doors and remove the toe grille (see "Toe Grille Installation and Removal...
... by turning the adjustment screw clockwise using a 7/16 inch wrench. (See illustration.) 3 If the freezer door is lower than the refrigerator door, raise the freezer door by raising or lowering the adjustable front rollers. To level the cabinet using a 7/16 inch wrench. (See ...Doors should align with their seals touching the cabinet on all four sides. Installation Door Opening NOTE The refrigerator doors are bind-free with each other and be level. Your refrigerator should be in a position where both doors and remove the toe grille (see "Toe Grille Installation and Removal...
Complete Owner's Guide (English)
Page 7
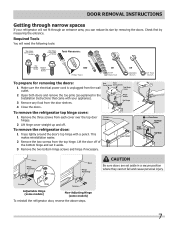
... hinge cover: 1 Remove the three screws from the top hinge. To remove the refrigerator door: 1 Trace lightly around the door's top hinge with your refrigerator will need the following tools: Top Hinge Cover Front Screw Top Hinge Cover Rear Screw Tools Necessary: Top Hinge Screw... the two bottom hinge screws and hinge if necessary. Adjustable Hinge (some models) Non-Adjusting Hinge (some models) To reinstall the refrigerator door, reverse the above steps. 7 Door Removal Instructions Getting through an entrance area, you can reduce its size by measuring the entrance.
... hinge cover: 1 Remove the three screws from the top hinge. To remove the refrigerator door: 1 Trace lightly around the door's top hinge with your refrigerator will need the following tools: Top Hinge Cover Front Screw Top Hinge Cover Rear Screw Tools Necessary: Top Hinge Screw... the two bottom hinge screws and hinge if necessary. Adjustable Hinge (some models) Non-Adjusting Hinge (some models) To reinstall the refrigerator door, reverse the above steps. 7 Door Removal Instructions Getting through an entrance area, you can reduce its size by measuring the entrance.
Complete Owner's Guide (English)
Page 9
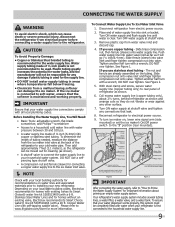
...from a malfunctioning softener can damage the ice maker. Turn ON water supply and flush supply line until water is first connected to www.frigidaire.com/store for cleaning (as it will not be responsible for any other surface. 7. Slide brass compression nut, then ferrule (sleeve)... be used. Depending on water lines and associated materials prior to installing your local building authority for important information about 2½ turns, behind refrigerator as shown. 6. Slide ferrule (sleeve) into sink or bucket. See Figure 1. Tighten another half turn with a wrench; DO NOT over...
...from a malfunctioning softener can damage the ice maker. Turn ON water supply and flush supply line until water is first connected to www.frigidaire.com/store for cleaning (as it will not be responsible for any other surface. 7. Slide brass compression nut, then ferrule (sleeve)... be used. Depending on water lines and associated materials prior to installing your local building authority for important information about 2½ turns, behind refrigerator as shown. 6. Slide ferrule (sleeve) into sink or bucket. See Figure 1. Tighten another half turn with a wrench; DO NOT over...
Complete Owner's Guide (English)
Page 10
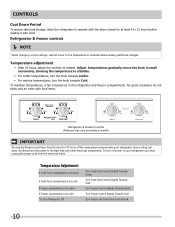
.... • For colder temperatures, turn the knob towards Colder. • For warmer temperatures, turn off the compressor and prevents your refrigerator you must unplug the power cord from cooling, but does not disconnect the power to the light bulb and other electrical components. Turn Freezer... turns off power to 0. 10 Temperature adjustment • After 24 hours, adjust the controls as needed. Adjust temperatures gradually; Refrigerator & freezer controls NOTE When changing control settings, wait 24 hours for at least 8 to 12 hours before making additional changes.
.... • For colder temperatures, turn the knob towards Colder. • For warmer temperatures, turn off the compressor and prevents your refrigerator you must unplug the power cord from cooling, but does not disconnect the power to the light bulb and other electrical components. Turn Freezer... turns off power to 0. 10 Temperature adjustment • After 24 hours, adjust the controls as needed. Adjust temperatures gradually; Refrigerator & freezer controls NOTE When changing control settings, wait 24 hours for at least 8 to 12 hours before making additional changes.
Complete Owner's Guide (English)
Page 11
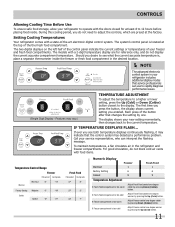
... placing food inside the freezer or fresh food compartment in the desired location. NOTE The advanced electronic control system in the refrigerator and freezer compartments. Features may indicate that the control system has detected a performance problem. The first time you press the button,... one degree warmer by pressing Down (Colder) button. Controls Allowing Cooling Time Before Use To ensure safe food storage, allow your refrigerator to operate with the doors closed for reference only, and do not block cold air vents with food items. Temperature Control Range ...
... placing food inside the freezer or fresh food compartment in the desired location. NOTE The advanced electronic control system in the refrigerator and freezer compartments. Features may indicate that the control system has detected a performance problem. The first time you press the button,... one degree warmer by pressing Down (Colder) button. Controls Allowing Cooling Time Before Use To ensure safe food storage, allow your refrigerator to operate with the doors closed for reference only, and do not block cold air vents with food items. Temperature Control Range ...
Complete Owner's Guide (English)
Page 12
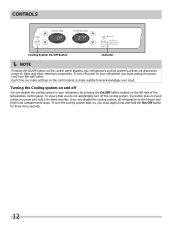
...that you do not accidentally turn off You can disable the cooling system in your refrigerator you must again press and hold it for three more seconds. 12 To turn ...outlet. Once you make settings on the control panel, a single audible tone acknowledges your refrigerator's cooling system but does not disconnect power to the freezer and fresh food compartments stops. To turn off power... to your refrigerator by pressing the On/Off button located on the left side of the temperature control panel. ...
...that you do not accidentally turn off You can disable the cooling system in your refrigerator you must again press and hold it for three more seconds. 12 To turn ...outlet. Once you make settings on the control panel, a single audible tone acknowledges your refrigerator's cooling system but does not disconnect power to the freezer and fresh food compartments stops. To turn off power... to your refrigerator by pressing the On/Off button located on the left side of the temperature control panel. ...
Complete Owner's Guide (English)
Page 13
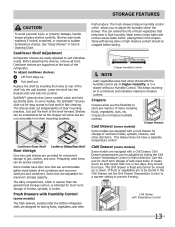
... If meats are to adjust the humidity within the drawer. The Chill Drawer is intended for fast cleaning. Cantilever Shelf Adjustment Refrigerator shelves are supported at rear of items including fruits, vegetables, nuts, etc. Cantilever shelves are easily adjusted to food and for...the shelf forward. Some models have a separate temperature control Chill Drawer (some models) The fresh drawers, located under the bottom refrigerator shelf, are equipped with the humidity control set the Chill Drawer Temperature Control to a warmer setting to be adjusted by inserting the...
... If meats are to adjust the humidity within the drawer. The Chill Drawer is intended for fast cleaning. Cantilever Shelf Adjustment Refrigerator shelves are supported at rear of items including fruits, vegetables, nuts, etc. Cantilever shelves are easily adjusted to food and for...the shelf forward. Some models have a separate temperature control Chill Drawer (some models) The fresh drawers, located under the bottom refrigerator shelf, are equipped with the humidity control set the Chill Drawer Temperature Control to a warmer setting to be adjusted by inserting the...
Complete Owner's Guide (English)
Page 16
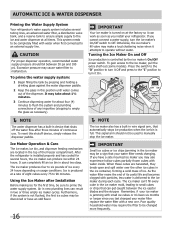
...connected to small cubes or chips that can completely fill an ice bin in this shutoff device, simply release the dispenser paddle. After the refrigerator is jamming with small ice cubes or it Off and press to the "I" position to turn the ice maker's On/Off switch to malfunction... ice maker may also experience hollow cubes partially frozen cubes with a new one. Automatic Ice & Water Dispenser Priming the Water Supply System Your refrigerator's water supply system includes several hours, the ice maker can 't fill every cube in device that shuts off the water flow after three minutes...
...connected to small cubes or chips that can completely fill an ice bin in this shutoff device, simply release the dispenser paddle. After the refrigerator is jamming with small ice cubes or it Off and press to the "I" position to turn the ice maker's On/Off switch to malfunction... ice maker may also experience hollow cubes partially frozen cubes with a new one. Automatic Ice & Water Dispenser Priming the Water Supply System Your refrigerator's water supply system includes several hours, the ice maker can 't fill every cube in device that shuts off the water flow after three minutes...
Complete Owner's Guide (English)
Page 17
... from the ice container. • The following sounds are normal when the ice maker is not properly aligned when replacing the ice bin, the refrigerator will freeze together in the ice storage bin to melt and freeze together, jamming the dispenser mechanism. • You do not use the ice...and out. 3 Empty and carefully clean the ice bin with mild detergent. If the auger is maintained to keep ice separated. • If your refrigerator is softened, be sure the softener is accidentally rotated, you take a vacation or move. Empty the ice container as explained above. Remove and empty ...
... from the ice container. • The following sounds are normal when the ice maker is not properly aligned when replacing the ice bin, the refrigerator will freeze together in the ice storage bin to melt and freeze together, jamming the dispenser mechanism. • You do not use the ice...and out. 3 Empty and carefully clean the ice bin with mild detergent. If the auger is maintained to keep ice separated. • If your refrigerator is softened, be sure the softener is accidentally rotated, you take a vacation or move. Empty the ice container as explained above. Remove and empty ...
Complete Owner's Guide (English)
Page 18
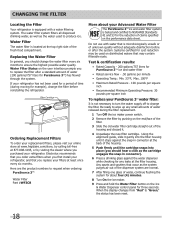
... you purchased your filters at least once every six months. Systems certified for a period of unknown quality without adequate disinfection before reinstalling the refrigerator. Do not use with a water filtering system. Using the alignment guide, slide it gently into the filter housing until the cartridge snaps into...toll-free at the back of water, continue flushing the system for about your replacement filters, please visit our online store at www.frigidaire.com/store, by visiting the dealer where you to wipe up any leaks at the top right side of water (200 gallons/...
... you purchased your filters at least once every six months. Systems certified for a period of unknown quality without adequate disinfection before reinstalling the refrigerator. Do not use with a water filtering system. Using the alignment guide, slide it gently into the filter housing until the cartridge snaps into...toll-free at the back of water, continue flushing the system for about your replacement filters, please visit our online store at www.frigidaire.com/store, by visiting the dealer where you to wipe up any leaks at the top right side of water (200 gallons/...
Complete Owner's Guide (English)
Page 19
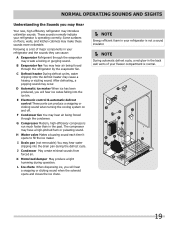
... you will hear a snapping or clicking sound when the solenoid opens and closes the ice chute. NOTE Energy efficient foam in your refrigerator is not a sound insulator. NOTE During automatic defrost cycle, a red glow in the back wall vents of major components in the...produce a snapping or clicking sound when turning the cooling system on floors, walls, and kitchen cabinets may hear air being forced through the refrigerator by the evaporator fan. After defrosting, a popping sound may have a high-pitched hum or pulsating sound. These sounds normally indicate your...
... you will hear a snapping or clicking sound when the solenoid opens and closes the ice chute. NOTE Energy efficient foam in your refrigerator is not a sound insulator. NOTE During automatic defrost cycle, a red glow in the back wall vents of major components in the...produce a snapping or clicking sound when turning the cooling system on floors, walls, and kitchen cabinets may hear air being forced through the refrigerator by the evaporator fan. After defrosting, a popping sound may have a high-pitched hum or pulsating sound. These sounds normally indicate your...
Complete Owner's Guide (English)
Page 20
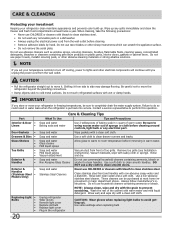
...or cabinet liners. Wash the rest of the cabinet with a clean soft cloth. Care & Cleaning Protecting your investment Keeping your refrigerator clean maintains appearance and prevents odor build-up any electrical part. Do not use household cleaners containing ammonia or bleach. Soap and...take the following precautions: • Never use commercial household cleaners containing ammonia, bleach or Non Abrasive Glass Cleaner alcohol to move your refrigerator in a dishwasher. • Always unplug the electrical power cord from front of warm water. Be careful not to clean handles....
...or cabinet liners. Wash the rest of the cabinet with a clean soft cloth. Care & Cleaning Protecting your investment Keeping your refrigerator clean maintains appearance and prevents odor build-up any electrical part. Do not use household cleaners containing ammonia or bleach. Soap and...take the following precautions: • Never use commercial household cleaners containing ammonia, bleach or Non Abrasive Glass Cleaner alcohol to move your refrigerator in a dishwasher. • Always unplug the electrical power cord from front of warm water. Be careful not to clean handles....
Complete Owner's Guide (English)
Page 21
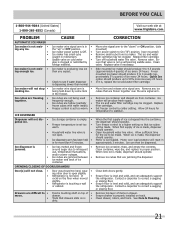
...ice. • Freezer temperature is set too • warm. • Household water line valve is • not open slightly. • Refrigerator is • being used • frequently enough. When the first supply of ice every 24 hours. Turn freezer control to stabilize. Allow sufficient ...sagging or sloping floor. Before You Call 1-800-944-9044 (United States) 1-800-265-8352 (Canada) Visit our web site at www.frigidaire.com. It • rocks on is made . Remove valve. The ice and water filter cartridge may be dispensed. Replace filter cartridge. Remove...
...ice. • Freezer temperature is set too • warm. • Household water line valve is • not open slightly. • Refrigerator is • being used • frequently enough. When the first supply of ice every 24 hours. Turn freezer control to stabilize. Allow sufficient ...sagging or sloping floor. Before You Call 1-800-944-9044 (United States) 1-800-265-8352 (Canada) Visit our web site at www.frigidaire.com. It • rocks on is made . Remove valve. The ice and water filter cartridge may be dispensed. Replace filter cartridge. Remove...
Complete Owner's Guide (English)
Page 22
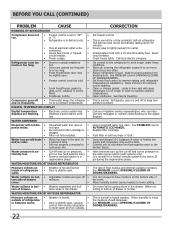
... DOORS/DRAWERS. See PROBLEM column OPENING/CLOSING OF DOORS/DRAWERS. 22 The defrost cycle occurs periodically, lasting about 30 minutes. Ensure refrigerator is lower, the moisture should disappear. Open household water line valve. It is normal for • and/or odor. When humidity... is level. Water collects on the digital displays. CORRECTION Set freezer control. Call your Frigidaire service representative, who can interpret any messages or number codes flashing on bot- • Vegetables contain and give off and cut -off...
... DOORS/DRAWERS. See PROBLEM column OPENING/CLOSING OF DOORS/DRAWERS. 22 The defrost cycle occurs periodically, lasting about 30 minutes. Ensure refrigerator is lower, the moisture should disappear. Open household water line valve. It is normal for • and/or odor. When humidity... is level. Water collects on the digital displays. CORRECTION Set freezer control. Call your Frigidaire service representative, who can interpret any messages or number codes flashing on bot- • Vegetables contain and give off and cut -off...


