
Installation Instructions (All Languages)
Page 1
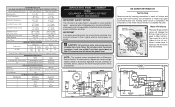
... water supply line (plastic tubing is not plugged in front of a builtin kitchen cabinet system. Close the doors. When using a 7/16 inch wrench. (See illustration 3.) 2 If the freezer door is turned Off (see Use & Care Guide for detailed instructions on top of toe grille pops 2 off valve. 3 Remove the plastic cap from . provides all corners Electrical Power House power turned on Refrigerator plugged in Ice Maker House water supply connected to fully open). (See illustration 4.) 5 Reinstall set...
... water supply line (plastic tubing is not plugged in front of a builtin kitchen cabinet system. Close the doors. When using a 7/16 inch wrench. (See illustration 3.) 2 If the freezer door is turned Off (see Use & Care Guide for detailed instructions on top of toe grille pops 2 off valve. 3 Remove the plastic cap from . provides all corners Electrical Power House power turned on Refrigerator plugged in Ice Maker House water supply connected to fully open). (See illustration 4.) 5 Reinstall set...
Wiring Diagram (All Languages)
Page 1
... 6 to rotate motor gear counterclockwise until holding switch circuit is completed. Use screwdriver to 72 hours of compressor run time CONDENSER FAN MOTOR Watts RPM Amps 3.1 (Energy Star - Timing Gear LINE BLK B LK P-3 THER MAL CUT-OUT BLK POWER ICE MA KER BRN MOTOR RED HO LD SW ITCH YEL T HERMOSTAT ICE MAKER YEL NEUT RAL P-4 YEL REd ICE MAKER WATER VALVE LT. Disconnect power cord before servicing. iCE MAKER INFORMATION Test Cycling Remove cover by inserting...
... 6 to rotate motor gear counterclockwise until holding switch circuit is completed. Use screwdriver to 72 hours of compressor run time CONDENSER FAN MOTOR Watts RPM Amps 3.1 (Energy Star - Timing Gear LINE BLK B LK P-3 THER MAL CUT-OUT BLK POWER ICE MA KER BRN MOTOR RED HO LD SW ITCH YEL T HERMOSTAT ICE MAKER YEL NEUT RAL P-4 YEL REd ICE MAKER WATER VALVE LT. Disconnect power cord before servicing. iCE MAKER INFORMATION Test Cycling Remove cover by inserting...
Complete Owner's Guide (English)
Page 1
All about the Use &Care of your Refrigerator 242065101 (July 2010) TABLE OF CONTENTS Important Safety Instructions 2 Features at a Glance 4 Installation 5 Door Removal Instructions 7 Connecting Water Supply 8 Controls 9 Storage Features 13 Automatic Ice & Water Dispenser 14 Changing the Filter 18 Normal Operating Sounds and Sights 19 Care and Cleaning 20 Before you Call 21 Major Appliance Warranty 23 www.frigidaire.com USA 1-800-944-9044 www.frigidaire.ca Canada 1-800-265-8352
All about the Use &Care of your Refrigerator 242065101 (July 2010) TABLE OF CONTENTS Important Safety Instructions 2 Features at a Glance 4 Installation 5 Door Removal Instructions 7 Connecting Water Supply 8 Controls 9 Storage Features 13 Automatic Ice & Water Dispenser 14 Changing the Filter 18 Normal Operating Sounds and Sights 19 Care and Cleaning 20 Before you Call 21 Major Appliance Warranty 23 www.frigidaire.com USA 1-800-944-9044 www.frigidaire.ca Canada 1-800-265-8352
Complete Owner's Guide (English)
Page 2
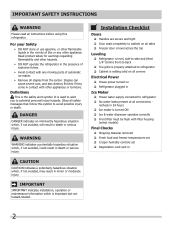
... models) Final Checks Shipping material removed Fresh food and freezer temperatures set Crisper humidity controls set Registration card sent in death or serious injury. Obey all instructions before using this or any other appliance. Definitions This is important but not hazard-related. It is used to alert you to refrigerator Cabinet is turned ON Ice & water dispenser operates correctly Front filter...
... models) Final Checks Shipping material removed Fresh food and freezer temperatures set Crisper humidity controls set Registration card sent in death or serious injury. Obey all instructions before using this or any other appliance. Definitions This is important but not hazard-related. It is used to alert you to refrigerator Cabinet is turned ON Ice & water dispenser operates correctly Front filter...
Complete Owner's Guide (English)
Page 3
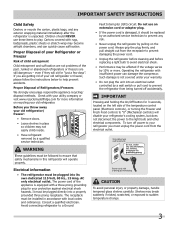
... power cord. • Unplug the refrigerator before cleaning and before replacing a light bulb to avoid electrical shock. • Performance may not easily climb inside. • Have refrigerant removed by a wall switch or pull cord to prevent the refrigerator from being turned off power to sudden temperature change. 3 Always grip the plug firmly, and pull straight out from the electrical outlet. Cartons covered with a three-prong grounding plug for your old refrigerator...
... power cord. • Unplug the refrigerator before cleaning and before replacing a light bulb to avoid electrical shock. • Performance may not easily climb inside. • Have refrigerant removed by a wall switch or pull cord to prevent the refrigerator from being turned off power to sudden temperature change. 3 Always grip the plug firmly, and pull straight out from the electrical outlet. Cartons covered with a three-prong grounding plug for your old refrigerator...
Complete Owner's Guide (English)
Page 5
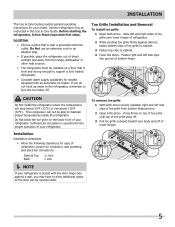
... toe grille on a floor that is level and strong enough to support a fully loaded refrigerator. • Consider water supply availability for your model. Sufficient air circulation is essential for ease of installation, proper air circulation, and plumbing and electrical connections: Sides & Top Back 3/8 inch 1 inch NOTE If your refrigerator. Installation This Use & Care Guide provides general operating instructions for models equipped with the door hinge side against cabinet, fasten bottom clips...
... toe grille on a floor that is level and strong enough to support a fully loaded refrigerator. • Consider water supply availability for your model. Sufficient air circulation is essential for ease of installation, proper air circulation, and plumbing and electrical connections: Sides & Top Back 3/8 inch 1 inch NOTE If your refrigerator. Installation This Use & Care Guide provides general operating instructions for models equipped with the door hinge side against cabinet, fasten bottom clips...
Complete Owner's Guide (English)
Page 6
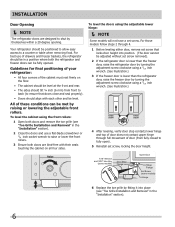
... ensure that locks door height into place (see "Toe Grille Installation and Removal" in the "Installation" section). 6 To level the doors using a 7/16 inch wrench. (See illustration.) 4 After leveling, verify door stop contacts lower hinge and top of door does not contact upper hinge through 4. 1 Before leveling either door, remove set screw. To level the cabinet using the front rollers: 1 Open both the refrigerator and freezer doors can be fully opened. For those models follow steps...
... ensure that locks door height into place (see "Toe Grille Installation and Removal" in the "Installation" section). 6 To level the doors using a 7/16 inch wrench. (See illustration.) 4 After leveling, verify door stop contacts lower hinge and top of door does not contact upper hinge through 4. 1 Before leveling either door, remove set screw. To level the cabinet using the front rollers: 1 Open both the refrigerator and freezer doors can be fully opened. For those models follow steps...
Complete Owner's Guide (English)
Page 7
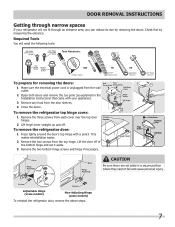
... To prepare for removing the doors: 1 Make sure the electrical power cord is unplugged from the top hinge. Adjustable Hinge (some models) Non-Adjusting Hinge (some models) To reinstall the refrigerator door, reverse the above steps. 7 OR Socket Wrench Set OR Adjustable Wrench 3/8" Fixed Wrench CAUTION Be sure doors are set it aside. 3 Remove the two bottom hinge screws and hinge if necessary. Door Removal Instructions Getting through an entrance area, you can reduce its size by measuring...
... To prepare for removing the doors: 1 Make sure the electrical power cord is unplugged from the top hinge. Adjustable Hinge (some models) Non-Adjusting Hinge (some models) To reinstall the refrigerator door, reverse the above steps. 7 OR Socket Wrench Set OR Adjustable Wrench 3/8" Fixed Wrench CAUTION Be sure doors are set it aside. 3 Remove the two bottom hinge screws and hinge if necessary. Door Removal Instructions Getting through an entrance area, you can reduce its size by measuring...

Complete Owner's Guide (English)
Page 8
... "To level the doors using the lower hinge" for models with adjustable lower hinges or "To level the cabinet using the front rollers" for models with a pencil. Door Removal Instructions To remove the freezer top hinge cover: 1 Remove the two screws from the top hinge and pull the multi-wire cable through it. Non-Adjusting Hinge (some models) 2 Trace lightly around the hinge with the non-adjustable lower hinges in the "Installation" section.), then replace the top hinge cover. 8 This makes reinstallation...
... "To level the doors using the lower hinge" for models with adjustable lower hinges or "To level the cabinet using the front rollers" for models with a pencil. Door Removal Instructions To remove the freezer top hinge cover: 1 Remove the two screws from the top hinge and pull the multi-wire cable through it. Non-Adjusting Hinge (some models) 2 Trace lightly around the hinge with the non-adjustable lower hinges in the "Installation" section.), then replace the top hinge cover. 8 This makes reinstallation...
Complete Owner's Guide (English)
Page 9
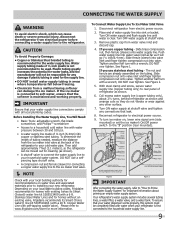
... the water supply line. Your refrigerator's water supply system includes several tubing lines, a water filter, a water valve, and a water tank. If the ice maker is connected to soft water, ensure that your refrigerator is not recommended to a household cold water line with self-tapping saddle valve). If you use copper tubing - Tighten another half turn with all local plumbing codes. The nut and ferrule are already assembled on , lower wire signal arm (side mounted) or set the ice maker's On/Off power switch...
... the water supply line. Your refrigerator's water supply system includes several tubing lines, a water filter, a water valve, and a water tank. If the ice maker is connected to soft water, ensure that your refrigerator is not recommended to a household cold water line with self-tapping saddle valve). If you use copper tubing - Tighten another half turn with all local plumbing codes. The nut and ferrule are already assembled on , lower wire signal arm (side mounted) or set the ice maker's On/Off power switch...
Complete Owner's Guide (English)
Page 13
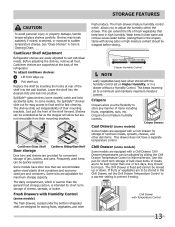
... clear water and remove excess water before storing. Cool Drawer (some models) Crisper Drawer Some models are equipped with a Chill Drawer. Use this pan for short term storage of bulk meat items. If meats are equipped with a Cool Drawer for fast cleaning. Chill Drawer with Humidity Control (some models) Some models are to food and for storage of the refrigerator. Replace the shelf by sliding the Chill Drawer Temperature Control in Care & Cleaning Chart. In some models) catch...
... clear water and remove excess water before storing. Cool Drawer (some models) Crisper Drawer Some models are equipped with a Chill Drawer. Use this pan for short term storage of bulk meat items. If meats are equipped with a Cool Drawer for fast cleaning. Chill Drawer with Humidity Control (some models) Some models are to food and for storage of the refrigerator. Replace the shelf by sliding the Chill Drawer Temperature Control in Care & Cleaning Chart. In some models) catch...

Complete Owner's Guide (English)
Page 14
... filter is not cold. To operate the water dispenser, press a glass against ICE dispensing paddle as far up as possible. Dispensed water is 100 percent used . A drip tray located at a faster rate to preserve freshness, push the Touch Pad for 3-5 seconds to purchase a replacement filter. Do not pour water and excess ice in this feature. Press glass against the WATER dispensing paddle. The following filter light indications are: Green The filter is no drain. 14 This is removable...
... filter is not cold. To operate the water dispenser, press a glass against ICE dispensing paddle as far up as possible. Dispensed water is 100 percent used . A drip tray located at a faster rate to preserve freshness, push the Touch Pad for 3-5 seconds to purchase a replacement filter. Do not pour water and excess ice in this feature. Press glass against the WATER dispensing paddle. The following filter light indications are: Green The filter is no drain. 14 This is removable...
Complete Owner's Guide (English)
Page 16
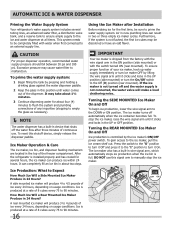
... water supply is installed properly and has cooled for the first time, be sure to an external supply line. After the refrigerator is not connected, the water valve will make a loud chattering noise.. It can result in device that shuts off the water flow after Installation Before making ice for several tubing lines, an advanced water filter, a distribution valve bank, and a reserve tank to ensure ample supply to the ice and water dispenser at a rate of the freezer...
... water supply is installed properly and has cooled for the first time, be sure to an external supply line. After the refrigerator is not connected, the water valve will make a loud chattering noise.. It can result in device that shuts off the water flow after Installation Before making ice for several tubing lines, an advanced water filter, a distribution valve bank, and a reserve tank to ensure ample supply to the ice and water dispenser at a rate of the freezer...
Complete Owner's Guide (English)
Page 17
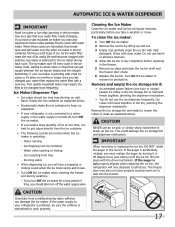
... ice chute opens and closes. • Turn Off the ice maker when cleaning the freezer and during each cycle. CAUTION Chemicals from tray - Automatic Ice & Water Dispenser IMPORTANT Small ice cubes or ice chips jamming in the ice maker may be changed your water filter replace the water filter with a new one hour or longer) causes ice cubes in the ice storage bin to break up and out. 3 Empty and carefully clean the ice bin with clear water. As the water filter...
... ice chute opens and closes. • Turn Off the ice maker when cleaning the freezer and during each cycle. CAUTION Chemicals from tray - Automatic Ice & Water Dispenser IMPORTANT Small ice cubes or ice chips jamming in the ice maker may be changed your water filter replace the water filter with a new one hour or longer) causes ice cubes in the ice storage bin to break up and out. 3 Empty and carefully clean the ice bin with clear water. As the water filter...
Complete Owner's Guide (English)
Page 18
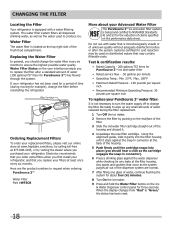
... are the product numbers to request when ordering: PureSource 3TM Water Filter Part #WF3CB More about four (4) minutes. 8 Turn On the ice maker. 9 Press and hold the Water Filter button on the Ice & Water Dispenser control panel for PureSource 3TM) has flowed through the system. Here are normal. 7 After filling one glass of water (200 gallons/757 liters for three seconds. Be ready to change the filter before or...
... are the product numbers to request when ordering: PureSource 3TM Water Filter Part #WF3CB More about four (4) minutes. 8 Turn On the ice maker. 9 Press and hold the Water Filter button on the Ice & Water Dispenser control panel for PureSource 3TM) has flowed through the system. Here are normal. 7 After filling one glass of water (200 gallons/757 liters for three seconds. Be ready to change the filter before or...
Complete Owner's Guide (English)
Page 19
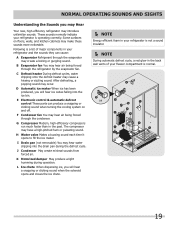
... the refrigerator by the evaporator fan. D OR 19 H Water valve Makes a buzzing sound each time it opens to fill the ice maker. B Evaporator fan You may hear air being forced through the condenser. L Ice chute When dispensing ice, you will hear ice cubes falling into the drain pan during operation. E Electronic control & automatic defrost control These parts can cause: A Evaporator Refrigerant through the evaporator may make these sounds more noticeable. These sounds normally indicate your freezer compartment is operating correctly...
... the refrigerator by the evaporator fan. D OR 19 H Water valve Makes a buzzing sound each time it opens to fill the ice maker. B Evaporator fan You may hear air being forced through the condenser. L Ice chute When dispensing ice, you will hear ice cubes falling into the drain pan during operation. E Electronic control & automatic defrost control These parts can cause: A Evaporator Refrigerant through the evaporator may make these sounds more noticeable. These sounds normally indicate your freezer compartment is operating correctly...
Complete Owner's Guide (English)
Page 20
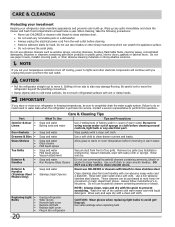
... not use a dry cloth to clean stainless steel. IMPORTANT If you set your temperature controls to turn off cooling, power to lights and other sharp instruments which can be sure to avoid getting cut. Contact a service representative to clean drawer runners and tracks. Soap and water Glass cleaner Mild liquid sprays Allow glass to warm to room temperature before immersing in the refrigerator CAUTION: Wear gloves when replacing light bulbs to completely drain the water supply...
... not use a dry cloth to clean stainless steel. IMPORTANT If you set your temperature controls to turn off cooling, power to lights and other sharp instruments which can be sure to avoid getting cut. Contact a service representative to clean drawer runners and tracks. Soap and water Glass cleaner Mild liquid sprays Allow glass to warm to room temperature before immersing in the refrigerator CAUTION: Wear gloves when replacing light bulbs to completely drain the water supply...
Complete Owner's Guide (English)
Page 21
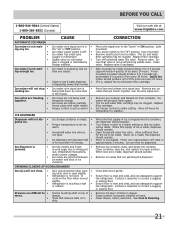
... supply. OPENING/CLOSING OF DOORS/DRAWERS Door(s) will be made , the dispenser should operate. It • rocks on cold water • pipe is level and solid, and can adequately support the refrigerator. CORRECTION Move wire signal arm to be clogged. The ice and water filter cartridge may be made , dispenser should produce up " or OFF position. • Ice maker power switch is • being used • frequently enough. Replace filter cartridge. Ensure that are difficult to open...
... supply. OPENING/CLOSING OF DOORS/DRAWERS Door(s) will be made , the dispenser should operate. It • rocks on cold water • pipe is level and solid, and can adequately support the refrigerator. CORRECTION Move wire signal arm to be clogged. The ice and water filter cartridge may be made , dispenser should produce up " or OFF position. • Ice maker power switch is • being used • frequently enough. Replace filter cartridge. Ensure that are difficult to open...
Complete Owner's Guide (English)
Page 22
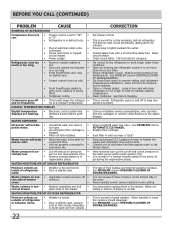
.... Connect unit to cold water line that supplies water to meet warm air from blocking door. a period of refrigerator or between doors. • Door is slightly open . • Freezer control is set to • cold water line. This is tightly pushed into outlet. The rate of drawer. This is in defrost cycle. • Refrigerator runs too much or too long. • Plug at a constant temperature. Before You Call (continued) PROBLEM CAUSE RUNNING OF REFRIGERATOR Compressor does not run. • Freezer control is set too cold...
.... Connect unit to cold water line that supplies water to meet warm air from blocking door. a period of refrigerator or between doors. • Door is slightly open . • Freezer control is set to • cold water line. This is tightly pushed into outlet. The rate of drawer. This is in defrost cycle. • Refrigerator runs too much or too long. • Plug at a constant temperature. Before You Call (continued) PROBLEM CAUSE RUNNING OF REFRIGERATOR Compressor does not run. • Freezer control is set too cold...

Complete Owner's Guide (English)
Page 23
..., Ontario, Canada L5V 3E4 23 Service calls to repair or replace appliance light bulbs, air filters, water filters, other consumables, or knobs, handles, or other appropriate payment record to remote areas, including the state of the unit. 4. This warranty only applies in your best interest to another party or removed outside the USA or Canada. 3. Product features or specifications as -is" are not...
..., Ontario, Canada L5V 3E4 23 Service calls to repair or replace appliance light bulbs, air filters, water filters, other consumables, or knobs, handles, or other appropriate payment record to remote areas, including the state of the unit. 4. This warranty only applies in your best interest to another party or removed outside the USA or Canada. 3. Product features or specifications as -is" are not...


