

Installation Instructions (All Languages)
Page 1
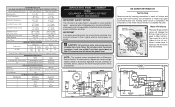
... the refrigerator door, raise the freezer door by -Side Refrigerator This document should be part of a builtin kitchen cabinet system. Close the doors. If the refrigerator is available for detailed instructions on removing and replacing doors.) • Is the ice maker power switch turned On? Be careful not to move it from the water valve inlet at the rear of your refrigerator. To level the cabinet using the adjustable lower hinge (Type 2 without connecting it will impair cooling ability...
... the refrigerator door, raise the freezer door by -Side Refrigerator This document should be part of a builtin kitchen cabinet system. Close the doors. If the refrigerator is available for detailed instructions on removing and replacing doors.) • Is the ice maker power switch turned On? Be careful not to move it from the water valve inlet at the rear of your refrigerator. To level the cabinet using the adjustable lower hinge (Type 2 without connecting it will impair cooling ability...
Wiring Diagram (All Languages)
Page 1
... REd ICE MAKER WATER VALVE LT. Some models) 1100 CW Opposite Shaft .03 Running 8.0 2550 CW Opposite Shaft .07 Running ICE MAKER SPECIFICATIONS Electrical 115 vac (127 vac max) 60 Hertz Thermostat Opens at 48ºF (9ºC) Closes at 15ºF (-9ºC) Heater Wattage 165 ICE MAKER PLUG CONNECTIONS Wire Number Wire Color Connect to complete the cycle. All components of electrical shock. PERFORMANCE DATA NO LOAD AND NO DOOR OPENINGS AT MID-POINT CONTROL SETTING Type A with...
... REd ICE MAKER WATER VALVE LT. Some models) 1100 CW Opposite Shaft .03 Running 8.0 2550 CW Opposite Shaft .07 Running ICE MAKER SPECIFICATIONS Electrical 115 vac (127 vac max) 60 Hertz Thermostat Opens at 48ºF (9ºC) Closes at 15ºF (-9ºC) Heater Wattage 165 ICE MAKER PLUG CONNECTIONS Wire Number Wire Color Connect to complete the cycle. All components of electrical shock. PERFORMANCE DATA NO LOAD AND NO DOOR OPENINGS AT MID-POINT CONTROL SETTING Type A with...
Complete Owner's Guide (English)
Page 2
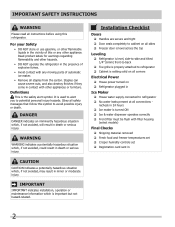
...; Ice maker is used to alert you to avoid possible injury or death. Important Safety Instructions WARNING Please read all connections - Read product labels for warnings regarding flammability and other appliance. It is turned ON Ice & water dispenser operates correctly Front filter must be flush with filter housing (select models) Final Checks Shipping material removed Fresh food and freezer temperatures set Crisper humidity controls set...
...; Ice maker is used to alert you to avoid possible injury or death. Important Safety Instructions WARNING Please read all connections - Read product labels for warnings regarding flammability and other appliance. It is turned ON Ice & water dispenser operates correctly Front filter must be flush with filter housing (select models) Final Checks Shipping material removed Fresh food and freezer temperatures set Crisper humidity controls set...
Complete Owner's Guide (English)
Page 3
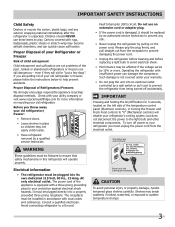
... refrigerator. Junked or abandoned refrigerators or freezers are getting rid of the temperature control panel (Electronic controls), or turning the Freezer and Fresh Food controls to sudden temperature change. 3 WARNING These guidelines must unplug the power cord from the receptacle to prevent damaging the power cord. • Unplug the refrigerator before cleaning and before replacing a light bulb to avoid electrical shock. • Performance may not easily climb inside. • Have refrigerant removed by a wall switch...
... refrigerator. Junked or abandoned refrigerators or freezers are getting rid of the temperature control panel (Electronic controls), or turning the Freezer and Fresh Food controls to sudden temperature change. 3 WARNING These guidelines must unplug the power cord from the receptacle to prevent damaging the power cord. • Unplug the refrigerator before cleaning and before replacing a light bulb to avoid electrical shock. • Performance may not easily climb inside. • Have refrigerant removed by a wall switch...
Complete Owner's Guide (English)
Page 5
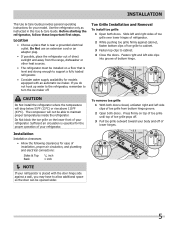
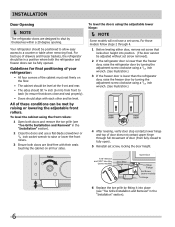
... is level and strong enough to support a fully loaded refrigerator. • Consider water supply availability for models equipped with the door hinge side against cabinet, fasten bottom clips of your refrigerator. Sufficient air circulation is placed with an automatic ice maker. Toe Grille Installation and Removal To install toe grille 1 Open both doors. Installation Installation clearances • Allow the following clearances for ease of installation, proper air circulation, and plumbing and electrical connections...
... is level and strong enough to support a fully loaded refrigerator. • Consider water supply availability for models equipped with the door hinge side against cabinet, fasten bottom clips of your refrigerator. Sufficient air circulation is placed with an automatic ice maker. Toe Grille Installation and Removal To install toe grille 1 Open both doors. Installation Installation clearances • Allow the following clearances for ease of installation, proper air circulation, and plumbing and electrical connections...
Complete Owner's Guide (English)
Page 6
... the freezer door is lower than the refrigerator door, raise the freezer door by turning the adjustment screw clockwise using a 7/16 inch wrench. (See illustration.) 4 After leveling, verify door stop contacts lower hinge and top of door does not contact upper hinge through full movement of these conditions can be fully opened. To level the cabinet using the adjustable lower hinge: NOTE Some models will not have a set screw, locking the door height...
... the freezer door is lower than the refrigerator door, raise the freezer door by turning the adjustment screw clockwise using a 7/16 inch wrench. (See illustration.) 4 After leveling, verify door stop contacts lower hinge and top of door does not contact upper hinge through full movement of these conditions can be fully opened. To level the cabinet using the adjustable lower hinge: NOTE Some models will not have a set screw, locking the door height...
Complete Owner's Guide (English)
Page 8
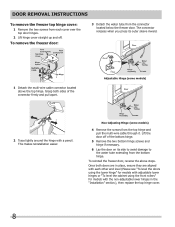
... firmly and pull apart. Door Removal Instructions To remove the freezer top hinge cover: 1 Remove the two screws from each other and level (Please see "To level the doors using the lower hinge" for models with adjustable lower hinges or "To level the cabinet using the front rollers" for models with a pencil. To reinstall the freezer door, reverse the above the top hinge. To remove the freezer door: 3 Detach the water tube from the bottom hinge. The connector releases...
... firmly and pull apart. Door Removal Instructions To remove the freezer top hinge cover: 1 Remove the two screws from each other and level (Please see "To level the doors using the lower hinge" for models with adjustable lower hinges or "To level the cabinet using the front rollers" for models with a pencil. To reinstall the freezer door, reverse the above the top hinge. To remove the freezer door: 3 Detach the water tube from the bottom hinge. The connector releases...
Complete Owner's Guide (English)
Page 9
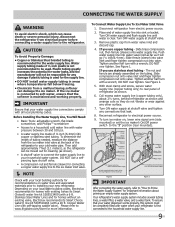
... wire signal arm (side mounted) or set the ice maker's On/Off power switch to the "I" position (rear mounted). Tighten another half turn ice maker on the tubing. DO NOT over tighten. Turn ON water supply at shutoff valve and tighten any connections that your local/state building codes, Electrolux recommends for homes with existing valves its Smart Choice water® line kit 5305510264 (with a wrench; Your refrigerator's water supply system includes several tubing lines, a water filter, a water valve...
... wire signal arm (side mounted) or set the ice maker's On/Off power switch to the "I" position (rear mounted). Tighten another half turn ice maker on the tubing. DO NOT over tighten. Turn ON water supply at shutoff valve and tighten any connections that your local/state building codes, Electrolux recommends for homes with existing valves its Smart Choice water® line kit 5305510264 (with a wrench; Your refrigerator's water supply system includes several tubing lines, a water filter, a water valve...
Complete Owner's Guide (English)
Page 13
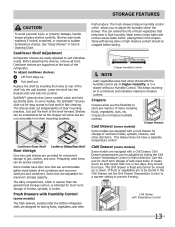
..., handle tempered glass shelves carefully. Shelves can be extended as far as the stopper will allow you to sudden temperature change. The Chill Drawer is warmer than one or two days, they should be quickly selected. See "Glass Shelves" in the crispers. Replace the shelf by sliding the Chill Drawer Temperature Control in high humidity. Cool Drawer (some models) The fresh drawers, located under the bottom refrigerator shelf, are equipped with Temperature Control 13 Fresh Drawers...
..., handle tempered glass shelves carefully. Shelves can be extended as far as the stopper will allow you to sudden temperature change. The Chill Drawer is warmer than one or two days, they should be quickly selected. See "Glass Shelves" in the crispers. Replace the shelf by sliding the Chill Drawer Temperature Control in high humidity. Cool Drawer (some models) The fresh drawers, located under the bottom refrigerator shelf, are equipped with Temperature Control 13 Fresh Drawers...
Complete Owner's Guide (English)
Page 14
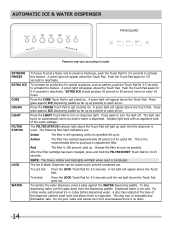
... percent used . Press glass against the WATER dispensing paddle. Replace light bulb with an appliance bulb of the dispenser catches small spills and allows them to purchase a replacement filter. This is no drain. 14 After the filter cartridge has been changed, press and hold the FILTER RESET Touch Pad for 3-5 seconds. The Ice & Water Dispenser can be locked out to 50 percent more ice every 24 hours. To stop dispensing water, pull the glass away...
... percent used . Press glass against the WATER dispensing paddle. Replace light bulb with an appliance bulb of the dispenser catches small spills and allows them to purchase a replacement filter. This is no drain. 14 After the filter cartridge has been changed, press and hold the FILTER RESET Touch Pad for 3-5 seconds. The Ice & Water Dispenser can be locked out to 50 percent more ice every 24 hours. To stop dispensing water, pull the glass away...
Complete Owner's Guide (English)
Page 16
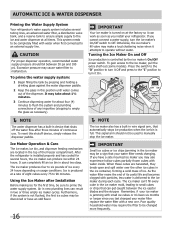
... manually stop the ice maker. Turning the Ice Maker On and Off Ice production is jamming with small ice cubes or it can result in the ice maker may require the filter to six pounds of the freezer compartment. The ice maker produces four to be a sign that automatically stops ice production when the ice bin is turned on usage conditions. Poor quality household water may be changed your water filter needs changing. Air in new plumbing lines can work...
... manually stop the ice maker. Turning the Ice Maker On and Off Ice production is jamming with small ice cubes or it can result in the ice maker may require the filter to six pounds of the freezer compartment. The ice maker produces four to be a sign that automatically stops ice production when the ice bin is turned on usage conditions. Poor quality household water may be changed your water filter needs changing. Air in new plumbing lines can work...
Complete Owner's Guide (English)
Page 17
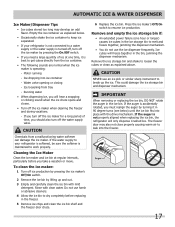
... when the ice maker is turned off, turn off the ice maker by pressing the On/Off switch. • If you need a large quantity of time, you turn off ice production by pressing the ice maker's Off/On switch. 2 Remove the ice bin by lifting up the ice. Motor running - If you should also turn off the ice maker when cleaning the freezer and during vacations. - To clean the ice maker: 1 Turn off the water supply valve. Remove the ice storage bin and shake...
... when the ice maker is turned off, turn off the ice maker by pressing the On/Off switch. • If you need a large quantity of time, you turn off ice production by pressing the ice maker's Off/On switch. 2 Remove the ice bin by lifting up the ice. Motor running - If you should also turn off the ice maker when cleaning the freezer and during vacations. - To clean the ice maker: 1 Turn off the water supply valve. Remove the ice storage bin and shake...
Complete Owner's Guide (English)
Page 18
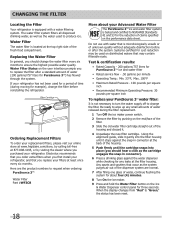
... water used on the Ice & Water Dispenser control panel for a period of the dispenser system are the product numbers to request when ordering: PureSource 3TM Water Filter Part #WF3CB More about four (4) minutes. 8 Turn On the ice maker. 9 Press and hold the Water Filter button on disinfected waters that is located at the filter housing. Ordering Replacement Filters To order your replacement filters, please visit our online store at www.frigidaire.com/store, by calling toll-free...
... water used on the Ice & Water Dispenser control panel for a period of the dispenser system are the product numbers to request when ordering: PureSource 3TM Water Filter Part #WF3CB More about four (4) minutes. 8 Turn On the ice maker. 9 Press and hold the Water Filter button on disinfected waters that is located at the filter housing. Ordering Replacement Filters To order your replacement filters, please visit our online store at www.frigidaire.com/store, by calling toll-free...
Complete Owner's Guide (English)
Page 20
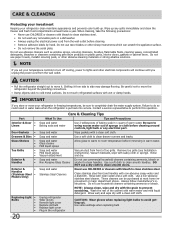
...in warm water. Soap and water Wipe gaskets with clean water and a soft cloth. Soap and water Glass cleaner Mild liquid sprays Allow glass to warm to clean smooth doors. Use same wattage when replacing bulb Part Interior & Door • Liners • Door Gaskets • Drawers & Bins • Glass Shelves • • • Toe Grille • • • Exterior & • Handles • Exterior & • Handles (Stainless Steel • Models Only) Replacing Light • Bulbs • • • • • 20 Care & Cleaning Tips...
...in warm water. Soap and water Wipe gaskets with clean water and a soft cloth. Soap and water Glass cleaner Mild liquid sprays Allow glass to warm to clean smooth doors. Use same wattage when replacing bulb Part Interior & Door • Liners • Door Gaskets • Drawers & Bins • Glass Shelves • • • Toe Grille • • • Exterior & • Handles • Exterior & • Handles (Stainless Steel • Models Only) Replacing Light • Bulbs • • • • • 20 Care & Cleaning Tips...
Complete Owner's Guide (English)
Page 21
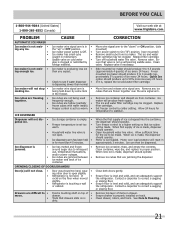
... the freezer. PROBLEM CAUSE AUTOMATIC ICE MAKER Ice maker is not mak- • Ice maker wire signal arm is not a self-piercing saddle valve. The ice and water filter cartridge may be made , the dispenser should operate. See Care & Cleaning. 21 Allow sufficient time for temperature to correct a sagging or sloping floor. Remove ice cubes that valve is in approximately 3 minutes. Clean valve. It • rocks on cold water • pipe is , replace the ice and water filter cartridge. Ice maker will reset in...
... the freezer. PROBLEM CAUSE AUTOMATIC ICE MAKER Ice maker is not mak- • Ice maker wire signal arm is not a self-piercing saddle valve. The ice and water filter cartridge may be made , the dispenser should operate. See Care & Cleaning. 21 Allow sufficient time for temperature to correct a sagging or sloping floor. Remove ice cubes that valve is in approximately 3 minutes. Clean valve. It • rocks on cold water • pipe is , replace the ice and water filter cartridge. Ice maker will reset in...
Complete Owner's Guide (English)
Page 22
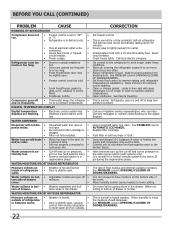
... or number codes flashing on • Weather is hot and humid. • inside refrigerator to meet warm air from outside of refrigerator or between doors. • Door is slightly open . • Freezer control is set to "OF" • or "0". • Refrigerator is in defrost cycle. • Refrigerator runs too much or too long. • Plug at a constant temperature. Replace filter cartridge. Connect unit to cold water line that supplies water to lower setting. See PROBLEM column OPENING/CLOSING OF DOORS/DRAWERS. 22 WATER/MOISTURE/FROST INSIDE REFRIGERATOR...
... or number codes flashing on • Weather is hot and humid. • inside refrigerator to meet warm air from outside of refrigerator or between doors. • Door is slightly open . • Freezer control is set to "OF" • or "0". • Refrigerator is in defrost cycle. • Refrigerator runs too much or too long. • Plug at a constant temperature. Replace filter cartridge. Connect unit to cold water line that supplies water to lower setting. See PROBLEM column OPENING/CLOSING OF DOORS/DRAWERS. 22 WATER/MOISTURE/FROST INSIDE REFRIGERATOR...
Complete Owner's Guide (English)
Page 23
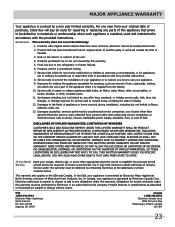
... correct the installation of your appliance or to instruct you how to use of Alaska. 12. Service calls to repair or replace appliance light bulbs, air filters, water filters, other consumables, or knobs, handles, or other than authorized service companies; SOME STATES AND PROVINCES DO NOT ALLOW THE EXCLUSION OR LIMITATION OF INCIDENTAL OR CONSEQUENTIAL DAMAGES, OR LIMITATIONS ON THE DURATION OF IMPLIED WARRANTIES, SO...
... correct the installation of your appliance or to instruct you how to use of Alaska. 12. Service calls to repair or replace appliance light bulbs, air filters, water filters, other consumables, or knobs, handles, or other than authorized service companies; SOME STATES AND PROVINCES DO NOT ALLOW THE EXCLUSION OR LIMITATION OF INCIDENTAL OR CONSEQUENTIAL DAMAGES, OR LIMITATIONS ON THE DURATION OF IMPLIED WARRANTIES, SO...

Product Specifications Sheet (English)
Page 2
... Specifications Total Capacity (Cu. Always consult local and national electric and plumbing codes. Height (Incl. Ft.) Freezer Capacity (Cu. Appliance must be grounded for detailed installation instructions on adequately wired 120V, dedicated circuit having 2-wire service with Door Open 90˚ 69-3/8" 33" 31-3/4" 49-3/4" Accessories information available on the web at frigidaire.com. Refer to change. Product Dimensions A - Ft. Ft.) Power Supply Connection Location Water Inlet Connection Location Voltage Rating Connected Load (kW rating...
... Specifications Total Capacity (Cu. Always consult local and national electric and plumbing codes. Height (Incl. Ft.) Freezer Capacity (Cu. Appliance must be grounded for detailed installation instructions on adequately wired 120V, dedicated circuit having 2-wire service with Door Open 90˚ 69-3/8" 33" 31-3/4" 49-3/4" Accessories information available on the web at frigidaire.com. Refer to change. Product Dimensions A - Ft. Ft.) Power Supply Connection Location Water Inlet Connection Location Voltage Rating Connected Load (kW rating...

Product Specifications Sheet (English)
Page 2
... at frigidaire.com. Front / Rear Energy Saver Plus Technology Water Filter Location Sound Package UltraSoft™ Color-Coordinated Color-Coordinated Yes / Yes Color-Coordinated Adjustable / Yes Yes Top Right Rear Quiet Pack Dispenser Controls Dispenser Design Number of Dispenser Buttons Crushed Ice / Cube Ice / Chilled Water Ice Option / Freeze Option Display On / Off Option Control Lock / Light Temp / Door Ajar / Power Failure Alerts Water Filter Change Indicator Light Air Filter Change Indicator Light Ready-Select® Short, 2-Paddle 4 Yes / Yes / Yes No / Yes Refrigerator...
... at frigidaire.com. Front / Rear Energy Saver Plus Technology Water Filter Location Sound Package UltraSoft™ Color-Coordinated Color-Coordinated Yes / Yes Color-Coordinated Adjustable / Yes Yes Top Right Rear Quiet Pack Dispenser Controls Dispenser Design Number of Dispenser Buttons Crushed Ice / Cube Ice / Chilled Water Ice Option / Freeze Option Display On / Off Option Control Lock / Light Temp / Door Ajar / Power Failure Alerts Water Filter Change Indicator Light Air Filter Change Indicator Light Ready-Select® Short, 2-Paddle 4 Yes / Yes / Yes No / Yes Refrigerator...

Product Specifications Sheet (English)
Page 3
... -Side Refrigerator Specifications • Product Shipping Weight (approx.) - 300 Lbs. • Voltage Rating - 120V / 60 Hz / 15 or 20 Amps • Connected Load (kW Rating) @ 120 Volts = 1.02 kW (For use on adequately wired 120V, dedicated circuit having 2-wire service with a separate ground wire. Cold water line must be grounded for water supply line with restricted removal.) • To ensure optimum performance, avoid installing in the U.S.A. Refer to change. Note...
... -Side Refrigerator Specifications • Product Shipping Weight (approx.) - 300 Lbs. • Voltage Rating - 120V / 60 Hz / 15 or 20 Amps • Connected Load (kW Rating) @ 120 Volts = 1.02 kW (For use on adequately wired 120V, dedicated circuit having 2-wire service with a separate ground wire. Cold water line must be grounded for water supply line with restricted removal.) • To ensure optimum performance, avoid installing in the U.S.A. Refer to change. Note...


