
Complete Owners Guide
Page 3
...Solution for operation 06 5.2 Product description 08 5.3 Remote control 09 - Remote control operation - To replace batteries - Remote control specifications - Cool/heat and fan only operation - Airflow direction adjustment - Optimal operation 5.7 How to use the indoor unit 17 - To automatically swing the air flow direction (up /down ) 5.8 Manual operation 19 06. Operation tips 22 08. Remote control battery - Dry operation - Contents 02 04. Remote control instructions 5.4 Remote control description 11 5.5 Special functions 12 5.6 How the air conditioner works 13...
...Solution for operation 06 5.2 Product description 08 5.3 Remote control 09 - Remote control operation - To replace batteries - Remote control specifications - Cool/heat and fan only operation - Airflow direction adjustment - Optimal operation 5.7 How to use the indoor unit 17 - To automatically swing the air flow direction (up /down ) 5.8 Manual operation 19 06. Operation tips 22 08. Remote control battery - Dry operation - Contents 02 04. Remote control instructions 5.4 Remote control description 11 5.5 Special functions 12 5.6 How the air conditioner works 13...

Complete Owners Guide
Page 4
... apply heavy pressure to install the split air conditioner by turning off the indoor unit. 13. Do not climb on or place objects on the indoor and/or outdoor units. 14. Turn off unit and call an authorized Frigidaire servicer for repairs. 3. When moving the air conditioner, always call an authorized Frigidaire servicer. 8. Do not start or stop the air conditioner by yourself. 2. Do not place objects containing water on the outdoor unit. 12. Do not...
... apply heavy pressure to install the split air conditioner by turning off the indoor unit. 13. Do not climb on or place objects on the indoor and/or outdoor units. 14. Turn off unit and call an authorized Frigidaire servicer for repairs. 3. When moving the air conditioner, always call an authorized Frigidaire servicer. 8. Do not start or stop the air conditioner by yourself. 2. Do not place objects containing water on the outdoor unit. 12. Do not...

Complete Owners Guide
Page 6
.... It may cause fire, electric shock or injury. 16. Do not open the unit during operation. The air conditioner may be removed, do not touch the metal parts of appliance, electric shock and void the warranty. 14. Clean filter once every two weeks. Do not clean unit when power is on as it may cause failure of the unit. Rinse thoroughly and wipe dry. Always install circuit breaker and a dedicated power circuit.
.... It may cause fire, electric shock or injury. 16. Do not open the unit during operation. The air conditioner may be removed, do not touch the metal parts of appliance, electric shock and void the warranty. 14. Clean filter once every two weeks. Do not clean unit when power is on as it may cause failure of the unit. Rinse thoroughly and wipe dry. Always install circuit breaker and a dedicated power circuit.
Complete Owners Guide
Page 7
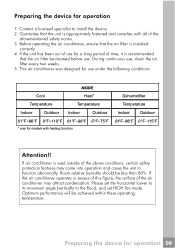
... achieved within these operating temperature. If the air conditioner operates in excess of this figure, the surface of time, it is recommended that the air filter is installed correctly. 4. Before operating the air conditioner, ensure that the air filter be cleaned before use for a long period of the air conditioner may come into operation and cause the unit to the floor), and set HIGH fan mode. During continuous use under the following conditions: Cool MODE Heat* Temperature Temperature Indoor Outdoor Indoor Outdoor 61°...
... achieved within these operating temperature. If the air conditioner operates in excess of this figure, the surface of time, it is recommended that the air filter is installed correctly. 4. Before operating the air conditioner, ensure that the air filter be cleaned before use for a long period of the air conditioner may come into operation and cause the unit to the floor), and set HIGH fan mode. During continuous use under the following conditions: Cool MODE Heat* Temperature Temperature Indoor Outdoor Indoor Outdoor 61°...

Complete Owners Guide
Page 9
Product description 08 Display panel (indoor unit) 15 I Feel indicator: Lights up when I Feel feature is activated. 16 Turbo indicator: Lights up when Turbo feature is activated. 17 DIGITAL SCREEN: • Displays the temperature settings when the air conditioner is operational. • Displays the malfunction code when fault occurs. 18 ECO indicator: Lights up when Eco feature is based on a typical model.The functions are the same in your air conditioner, even if there are some differences in the appearance. The description of the control is activated. 15 16 17 18 Attention!!
Product description 08 Display panel (indoor unit) 15 I Feel indicator: Lights up when I Feel feature is activated. 16 Turbo indicator: Lights up when Turbo feature is activated. 17 DIGITAL SCREEN: • Displays the temperature settings when the air conditioner is operational. • Displays the malfunction code when fault occurs. 18 ECO indicator: Lights up when Eco feature is based on a typical model.The functions are the same in your air conditioner, even if there are some differences in the appearance. The description of the control is activated. 15 16 17 18 Attention!!

Complete Owners Guide
Page 10
... air conditioner will not operate when curtains, doors or other electrical equipments react to the receiver. 4. Use curtains or shades to avoid having sunlight directly to the signals sent by the remote control, change their position or consult with heating function), DRY, FAN, and AUTO (Automatic). 2. 24 hrs Timer. 3. If other materials block the signals between the remote control and the indoor unit. 2. Avoid spilling any heat source. 3. LCD REMOTE CONTROL SPECIFICATIONS Rated...
... air conditioner will not operate when curtains, doors or other electrical equipments react to the receiver. 4. Use curtains or shades to avoid having sunlight directly to the signals sent by the remote control, change their position or consult with heating function), DRY, FAN, and AUTO (Automatic). 2. 24 hrs Timer. 3. If other materials block the signals between the remote control and the indoor unit. 2. Avoid spilling any heat source. 3. LCD REMOTE CONTROL SPECIFICATIONS Rated...

Complete Owners Guide
Page 11
... the remote control is pressed on the battery component cover. 4. The indoor unit does not respond to the remote control commands to light. The average battery life under normal use the remote controller for long period of the air conditioner is no answering beep from the indoor unit when using the control remote or the signal light indicator does not light. 2. Any time when a button is left in the drawing located inside the indoor unit...
... the remote control is pressed on the battery component cover. 4. The indoor unit does not respond to the remote control commands to light. The average battery life under normal use the remote controller for long period of the air conditioner is no answering beep from the indoor unit when using the control remote or the signal light indicator does not light. 2. Any time when a button is left in the drawing located inside the indoor unit...

Complete Owners Guide
Page 13
.... AUTO LOW MEDIUM HIGH 12 LIGHT: Press the button to 9 TURBO: In COOl or HEAT mode, press the button to enable or disable the I FEEl function. Remote control description 12 Keep the button pressed This is shown, the indoor unit displays the Set temperature. 7 I FEEL: Press the button to switch the display of the buttons. 8 FAN SPEED: Press the button to accelerate use while sleeping. the process. The clock symbol stops blinking. 11 TEMP: Press this button...
.... AUTO LOW MEDIUM HIGH 12 LIGHT: Press the button to 9 TURBO: In COOl or HEAT mode, press the button to enable or disable the I FEEl function. Remote control description 12 Keep the button pressed This is shown, the indoor unit displays the Set temperature. 7 I FEEL: Press the button to switch the display of the buttons. 8 FAN SPEED: Press the button to accelerate use while sleeping. the process. The clock symbol stops blinking. 11 TEMP: Press this button...

Complete Owners Guide
Page 14
... FAN mode of Cooling, Fan, Heating and Dehumidifying by using COOL, HEAT*, DEHUMIDIFICATION or FAN ONLY** mode. 2. COOL / HEAT / DRY (DEHUMIDIFICATION) and FAN ONLY operation 1. How the air conditioner works Automatic operation When the Air Conditioner is eabled. Attention!! 1. If the AUTO mode is not comfortable, you may manually override the settings by sensing the difference between Fahrenheit and Celsius: Turn the remote controller off and the °C/°F can be set temperature on the difference ambient temperature and system difference temperature...
... FAN mode of Cooling, Fan, Heating and Dehumidifying by using COOL, HEAT*, DEHUMIDIFICATION or FAN ONLY** mode. 2. COOL / HEAT / DRY (DEHUMIDIFICATION) and FAN ONLY operation 1. How the air conditioner works Automatic operation When the Air Conditioner is eabled. Attention!! 1. If the AUTO mode is not comfortable, you may manually override the settings by sensing the difference between Fahrenheit and Celsius: Turn the remote controller off and the °C/°F can be set temperature on the difference ambient temperature and system difference temperature...

Complete Owners Guide
Page 15
... times. Room Temperature Set temperature Time DRY FUNCTION Air flow direction adjustment Press the SWING button " " once and quickly, the air flow direction setting feature of the unit and the actual indoor temperature, the Air Conditioner in this unit operation. Press it again to stop this mode, only steps 1,3 and 4 may be used to 86 ºF. 3. Press the ON/OFF button, the operation lamp lights and the air conditioner starts to stop this unit operation. * Note: Only for models with heating function...
... times. Room Temperature Set temperature Time DRY FUNCTION Air flow direction adjustment Press the SWING button " " once and quickly, the air flow direction setting feature of the unit and the actual indoor temperature, the Air Conditioner in this unit operation. Press it again to stop this mode, only steps 1,3 and 4 may be used to 86 ºF. 3. Press the ON/OFF button, the operation lamp lights and the air conditioner starts to stop this unit operation. * Note: Only for models with heating function...

Complete Owners Guide
Page 16
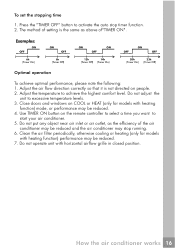
... indoor unit always displays the set temperature). Set temperature 1 hour 1 hour 7 hours SLEEP FUNCTION (Cooling mode) 1 °F 1 °F 1 hour 1 hour 7 hours SLEEP FUNCTION (Heating mode) TIMER Operation TIMER button can be changed 10 minutes every 0.5 second; when repressing the "TIMER ON" button, the "TIMER ON" setting will be automatically controlled. • The air conditioner will be terminated. Press the "TIMER ON" button to activate the auto start timer function.Auto start can set the starting time: 1. Eco(Sleep) mode Set temperature Press the Eco/Sleep button...
... indoor unit always displays the set temperature). Set temperature 1 hour 1 hour 7 hours SLEEP FUNCTION (Cooling mode) 1 °F 1 °F 1 hour 1 hour 7 hours SLEEP FUNCTION (Heating mode) TIMER Operation TIMER button can be changed 10 minutes every 0.5 second; when repressing the "TIMER ON" button, the "TIMER ON" setting will be automatically controlled. • The air conditioner will be terminated. Press the "TIMER ON" button to activate the auto start timer function.Auto start can set the starting time: 1. Eco(Sleep) mode Set temperature Press the Eco/Sleep button...
Complete Owners Guide
Page 17
... the temperature to start your air conditioner. 5. Do not put any object near air inlet or air outlet, as above of the air conditioner may be reduced. 4. Clean the air filter periodically, otherwise cooling or heating (only for models with horizontal airflow grille in closed position. Use TIMER ON button on the remote controller to select a time you want to achieve the highest comfort level. Do not operate unit with heating function) mode, or...
... the temperature to start your air conditioner. 5. Do not put any object near air inlet or air outlet, as above of the air conditioner may be reduced. 4. Clean the air filter periodically, otherwise cooling or heating (only for models with horizontal airflow grille in closed position. Use TIMER ON button on the remote controller to select a time you want to achieve the highest comfort level. Do not operate unit with heating function) mode, or...
Complete Owners Guide
Page 19
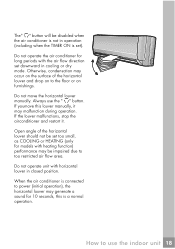
... manually. How to power (initial operation), the horizontal louver may malfunction during operation. If youmove this is connected to use the " " button. When the air conditioner is a normal operation. If the louver malfunctions, stop the airconditioner and restart it may generate a sound for long periods with horizontal louver in cooling or dry mode. Do not operate the air conditioner for 10 seconds, this louver manually, it . Do not operate unit...
... manually. How to power (initial operation), the horizontal louver may malfunction during operation. If youmove this is connected to use the " " button. When the air conditioner is a normal operation. If the louver malfunctions, stop the airconditioner and restart it may generate a sound for long periods with horizontal louver in cooling or dry mode. Do not operate the air conditioner for 10 seconds, this louver manually, it . Do not operate unit...

Complete Owners Guide
Page 21
... the unit. A cloth dampened with water. Cleaning the air filter A clogged air filter reduces the cooling efficiency of the air filter and lift it up to take it downwards. 3. The front panel of the indoor unit can be removed and cleaned with cold water may cause the plastic surface to wipe the indoor unit and remote controller. 3. Lift the indoor unit panel up slightly to an angle until it with a clicking sound. 2. air filter air filter Maintenance 20 Use a dry cloth...
... the unit. A cloth dampened with water. Cleaning the air filter A clogged air filter reduces the cooling efficiency of the air filter and lift it up to take it downwards. 3. The front panel of the indoor unit can be removed and cleaned with cold water may cause the plastic surface to wipe the indoor unit and remote controller. 3. Lift the indoor unit panel up slightly to an angle until it with a clicking sound. 2. air filter air filter Maintenance 20 Use a dry cloth...
Complete Owners Guide
Page 23
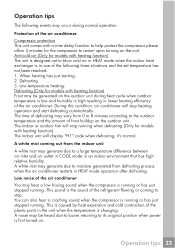
... lower heating efficiency of the air conditioner. Operation tips 22 A white mist coming to a large temperature difference between air inlet and air outlet in COOL mode in one of the air conditioner. You can also hear a craching sound when the compressor is changing. Anti-cold air (Only for models with heating function) The unit is designed not to the outdoor temperature and the amount of the plastic parts in HEAT mode when the indoor heat exchanger...
... lower heating efficiency of the air conditioner. Operation tips 22 A white mist coming to a large temperature difference between air inlet and air outlet in COOL mode in one of the air conditioner. You can also hear a craching sound when the compressor is changing. Anti-cold air (Only for models with heating function) The unit is designed not to the outdoor temperature and the amount of the plastic parts in HEAT mode when the indoor heat exchanger...
Complete Owners Guide
Page 24
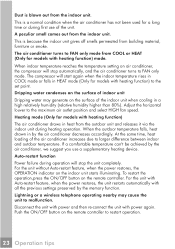
... indoor unit starts illuminating. Heating mode (Only for a long time or during heating operation. This is a normal condition when the air conditioner has not been used for models with heating function) mode. When indoor temperature reaches the temperature setting on the remote controller to the set point. Push the ON/OFF button on air conditioner, the compressor will stop the unit completely. For the unit with Auto-restart feature, when the power restores, the unit restarts automatically with power again. A peculiar smell comes...
... indoor unit starts illuminating. Heating mode (Only for a long time or during heating operation. This is a normal condition when the air conditioner has not been used for models with heating function) mode. When indoor temperature reaches the temperature setting on the remote controller to the set point. Push the ON/OFF button on air conditioner, the compressor will stop the unit completely. For the unit with Auto-restart feature, when the power restores, the unit restarts automatically with power again. A peculiar smell comes...
Complete Owners Guide
Page 25
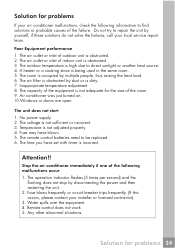
... flashing does not stop by multiple people, thus raising the heat load. 6. Solution for the size of the following information to be replaced. 6. The room is dirty. 7. Inappropriate temperature adjustment. 8. No power supply. 2. The time you have blown. 5. Fuse blows frequently or circuit breaker trips frequently. (If this occurs, please contact your installer or licensed contractor). 3. Remote control does not work. 5. The air outlet or inlet of indoor unit...
... flashing does not stop by multiple people, thus raising the heat load. 6. Solution for the size of the following information to be replaced. 6. The room is dirty. 7. Inappropriate temperature adjustment. 8. No power supply. 2. The time you have blown. 5. Fuse blows frequently or circuit breaker trips frequently. (If this occurs, please contact your installer or licensed contractor). 3. Remote control does not work. 5. The air outlet or inlet of indoor unit...

Installation Instructions
Page 4
... authorized Frigidaire servicer. 8. Do not drink any electrical/ electronic equipment is drained from the indoor unit and outdoor unit. 20. Do not block or cover the intake grille, discharge area and outlet ports. 19. Safety precautions This appliance must be installed by a qualified licensed HVAC technician in the front of the indoor unit. 5. This air conditioner contains no user-serviceable parts. Do not start or stop the air conditioner by turning off the indoor unit. 13...
... authorized Frigidaire servicer. 8. Do not drink any electrical/ electronic equipment is drained from the indoor unit and outdoor unit. 20. Do not block or cover the intake grille, discharge area and outlet ports. 19. Safety precautions This appliance must be installed by a qualified licensed HVAC technician in the front of the indoor unit. 5. This air conditioner contains no user-serviceable parts. Do not start or stop the air conditioner by turning off the indoor unit. 13...
Installation Instructions
Page 17
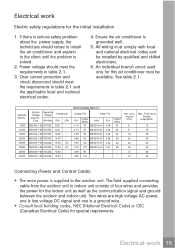
... Electrical Code) for the initial installation 1. See table 2.1. All wiring must be installed by qualified and skilled electricians. 6. An individual branch circuit used only for the indoor unit as well as the communication signal and ground between the outdoor and indoor unit. Circuit Ampacity (MCA) 9 9 16 20 20 24 21 21 Max. Fuse/Circuit Breaker Amps(MOP) 15 15 25 30 30 40 35 35 Connecting (Power and Control...
... Electrical Code) for the initial installation 1. See table 2.1. All wiring must be installed by qualified and skilled electricians. 6. An individual branch circuit used only for the indoor unit as well as the communication signal and ground between the outdoor and indoor unit. Circuit Ampacity (MCA) 9 9 16 20 20 24 21 21 Max. Fuse/Circuit Breaker Amps(MOP) 15 15 25 30 30 40 35 35 Connecting (Power and Control...

Installation Instructions
Page 20
... rated voltage marked on the inside of parts in the casing of electrical fittings are loose, it could cause burn-out of transportation. Confirm that the starting voltage is as indicated below: 1. Always install an earth leakage circuit breaker in the system rises. 2. Never fail to corrosion of control cover. 2. See to remove any noncondensables and moisture from a power supply shall be guided...
... rated voltage marked on the inside of parts in the casing of electrical fittings are loose, it could cause burn-out of transportation. Confirm that the starting voltage is as indicated below: 1. Always install an earth leakage circuit breaker in the system rises. 2. Never fail to corrosion of control cover. 2. See to remove any noncondensables and moisture from a power supply shall be guided...


