
Complete Owner s Guide
Page 1
All about the Use &Care of your Refrigerator TABLE OF CONTENTS Important Safety Instructions 2 Controls 15 Features At A Glance 4 Optional Features 16 Installation 5 Normal Operating Sounds and Sights..........19 Door Removal/Reversal Instructions 7 Care and Cleaning 20 Handle Installation 10 Before you Call 22 Connecting Water Supply 12 Major Appliance Warranty 23 Ice Service 14 www.frigidaire.com USA 1-800-944-9044 www.frigidaire.ca Canada 1-800-265-8352 A07441202 (May 2017)
All about the Use &Care of your Refrigerator TABLE OF CONTENTS Important Safety Instructions 2 Controls 15 Features At A Glance 4 Optional Features 16 Installation 5 Normal Operating Sounds and Sights..........19 Door Removal/Reversal Instructions 7 Care and Cleaning 20 Handle Installation 10 Before you Call 22 Connecting Water Supply 12 Major Appliance Warranty 23 Ice Service 14 www.frigidaire.com USA 1-800-944-9044 www.frigidaire.ca Canada 1-800-265-8352 A07441202 (May 2017)

Complete Owner s Guide
Page 2
... all instructions before using this or any exterior wrapping material immediately after the refrigerator is turned ON Ice & water dispenser operates correctly Front filter must be flush with rugs, bedspreads, plastic sheets or stretch wrap may result in Ice Maker House water supply connected to help prevent accidents. 2 Final Checks Shipping material removed Refrigerator and freezer temperatures set Crisper humidity controls set Electrical Power House power turned on Refrigerator plugged in...
... all instructions before using this or any exterior wrapping material immediately after the refrigerator is turned ON Ice & water dispenser operates correctly Front filter must be flush with rugs, bedspreads, plastic sheets or stretch wrap may result in Ice Maker House water supply connected to help prevent accidents. 2 Final Checks Shipping material removed Refrigerator and freezer temperatures set Crisper humidity controls set Electrical Power House power turned on Refrigerator plugged in...

Complete Owner s Guide
Page 3
... damage, handle tempered glass shelves carefully. IMPORTANT Turning the Refrigerator controls to the atmosphere. Operating the refrigerator with local codes and ordinances. Power cord with a three-prong grounding plug for proper disposal by a wall switch or pull cord to prevent the refrigerator from being turned off power to your refrigerator you are believed to harm stratospheric ozone if released to "0" will operate properly. Avoid connecting refrigerator to sudden temperature change. Other refrigerants may...
... damage, handle tempered glass shelves carefully. IMPORTANT Turning the Refrigerator controls to the atmosphere. Operating the refrigerator with local codes and ordinances. Power cord with a three-prong grounding plug for proper disposal by a wall switch or pull cord to prevent the refrigerator from being turned off power to your refrigerator you are believed to harm stratospheric ozone if released to "0" will operate properly. Avoid connecting refrigerator to sudden temperature change. Other refrigerants may...
Complete Owner s Guide
Page 4
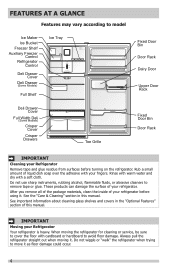
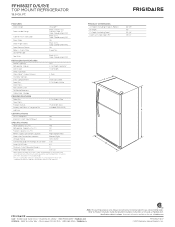
... Features may vary according to model Ice Maker Ice Bucket Freezer Shelf Auxiliary Freezer Control Refrigerator Control Deli Drawer Cover Deli Drawer (Some Models) Full Shelf Ice Tray Deli Drawer Cover Full Width Deli (Some Models) Crisper Cover Crisper Drawers Toe Grille Fixed Door Bin Door Rack Dairy Door Upper Door Rack Fixed Door Bin Door Rack IMPORTANT Cleaning your Refrigerator Your refrigerator is heavy. Rub a small amount of your refrigerator before turning on the refrigerator. After you remove all of the package materials, clean the inside of liquid dish soap over the...
... Features may vary according to model Ice Maker Ice Bucket Freezer Shelf Auxiliary Freezer Control Refrigerator Control Deli Drawer Cover Deli Drawer (Some Models) Full Shelf Ice Tray Deli Drawer Cover Full Width Deli (Some Models) Crisper Cover Crisper Drawers Toe Grille Fixed Door Bin Door Rack Dairy Door Upper Door Rack Fixed Door Bin Door Rack IMPORTANT Cleaning your Refrigerator Your refrigerator is heavy. Rub a small amount of your refrigerator before turning on the refrigerator. After you remove all of the package materials, clean the inside of liquid dish soap over the...
Complete Owner s Guide
Page 5
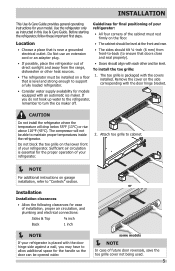
... or an adapter plug. • The sides should tilt ¼-inch (6 mm) from the range, dishwasher or other and be opened wider. Location • The cabinet should align with the covers installed. Installation Installation clearances • Allow the following clearances for ease of future door reversals, save the toe grille cover not being used. 5 INSTALLATION This Use & Care Guide provides general operating instructions for your refrigerator. 2. To install the toe...
... or an adapter plug. • The sides should tilt ¼-inch (6 mm) from the range, dishwasher or other and be opened wider. Location • The cabinet should align with the covers installed. Installation Installation clearances • Allow the following clearances for ease of future door reversals, save the toe grille cover not being used. 5 INSTALLATION This Use & Care Guide provides general operating instructions for your refrigerator. 2. To install the toe...
Complete Owner s Guide
Page 8
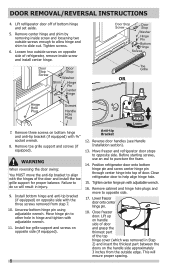
... removing inside screw and install center hinge. Install toe grille support and screws on bottom hinge and anti-tip bracket (if equipped) with adjustable wrench. 16. Move freezer and refrigerator door stops to other hole in injury. 9. Lift refrigerator door off of the top hinge cover (which was removed in Step 2) and insert the thickest part between the doors on handle side of door and grasp the thinnest part of bottom hinge and set...
... removing inside screw and install center hinge. Install toe grille support and screws on bottom hinge and anti-tip bracket (if equipped) with adjustable wrench. 16. Move freezer and refrigerator door stops to other hole in injury. 9. Lift refrigerator door off of the top hinge cover (which was removed in Step 2) and insert the thickest part between the doors on handle side of door and grasp the thinnest part of bottom hinge and set...
Complete Owner s Guide
Page 9
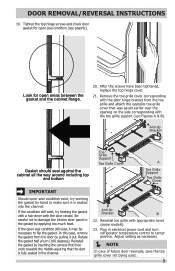
... Grille Support Toe Grille Cover A Toe Grille Support Toe Grille Cover IMPORTANT Should open areas between the gasket and the cabinet flange. 20. Anti-tip Bracket B 22. After the screws have been tightened, replace the top hinge cover. 21. Rotate the gasket half a turn refrigerator temperature control to make sure it is fully seated in electrical power cord and turn (180 degrees). Plug in the channel. Look for open seal...
... Grille Support Toe Grille Cover A Toe Grille Support Toe Grille Cover IMPORTANT Should open areas between the gasket and the cabinet flange. 20. Anti-tip Bracket B 22. After the screws have been tightened, replace the top hinge cover. 21. Rotate the gasket half a turn refrigerator temperature control to make sure it is fully seated in electrical power cord and turn (180 degrees). Plug in the channel. Look for open seal...
Complete Owner s Guide
Page 10
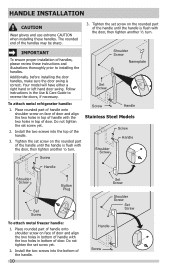
... refrigerator handle: 1. Screw Screw Handle Stainless Steel Models Screw Handle Shoulder Screw Handle Shoulder Screw Button Plug Set Screw To attach metal freezer handle: 1. The rounded end of the handle. 10 Set Screw Shoulder Screw Set Screw Handle Screw Additionally, before installing the door handles, make sure the door swing is flush with the door, then tighten another ½ turn . Follow instructions in the Use & Care Guide to installing the handles. Tighten the set screw on the rounded part of the handle...
... refrigerator handle: 1. Screw Screw Handle Stainless Steel Models Screw Handle Shoulder Screw Handle Shoulder Screw Button Plug Set Screw To attach metal freezer handle: 1. The rounded end of the handle. 10 Set Screw Shoulder Screw Set Screw Handle Screw Additionally, before installing the door handles, make sure the door swing is flush with the door, then tighten another ½ turn . Follow instructions in the Use & Care Guide to installing the handles. Tighten the set screw on the rounded part of the handle...
Complete Owner s Guide
Page 12
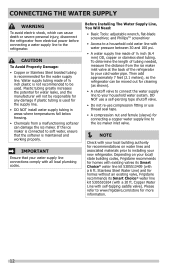
...; Copper or Stainless Steel braided tubing is not recommended to a household cold water line with a 6 ft. If the ice maker is maintained and working properly. Then add approximately 7 feet (2.1 meters), so the refrigerator can cause death or severe personal injury, disconnect the refrigerator from electrical power before connecting a water supply line to soft water, ensure that your local/ state building codes, Frigidaire recommends for the supply line. • DO NOT install water supply tubing in areas...
...; Copper or Stainless Steel braided tubing is not recommended to a household cold water line with a 6 ft. If the ice maker is maintained and working properly. Then add approximately 7 feet (2.1 meters), so the refrigerator can cause death or severe personal injury, disconnect the refrigerator from electrical power before connecting a water supply line to soft water, ensure that your local/ state building codes, Frigidaire recommends for the supply line. • DO NOT install water supply tubing in areas...
Complete Owner s Guide
Page 13
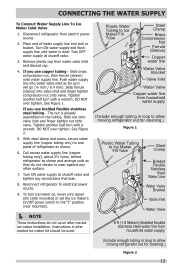
... turn with a wrench; Turn ON water supply at shutoff valve. 3. Place end of refrigerator as it will go (¼ inch / 6.4 mm). Turn ON water supply and flush supply line until water is already assembled on , lower wire signal arm (side mounted) or set the ice maker's On/Off power switch to the "I" position (rear mounted). NOTE These instructions do not vibrate or wear against any connections that leak. 8. If you use copper tubing...
... turn with a wrench; Turn ON water supply at shutoff valve. 3. Place end of refrigerator as it will go (¼ inch / 6.4 mm). Turn ON water supply and flush supply line until water is already assembled on , lower wire signal arm (side mounted) or set the ice maker's On/Off power switch to the "I" position (rear mounted). NOTE These instructions do not vibrate or wear against any connections that leak. 8. If you use copper tubing...
Complete Owner s Guide
Page 14
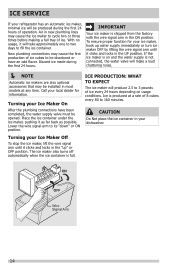
... be opened. New plumbing connections may be discolored or have been completed, the water supply valve must be produced during the first 24 hours. Place the ice container under the ice maker, pushing it clicks and locks in most models at a rate of 8 cubes every 80 to cycle two or three times before making a full tray of operation. Turning your Ice Maker Off To stop the ice maker, lift the wire...
... be opened. New plumbing connections may be discolored or have been completed, the water supply valve must be produced during the first 24 hours. Place the ice container under the ice maker, pushing it clicks and locks in most models at a rate of 8 cubes every 80 to cycle two or three times before making a full tray of operation. Turning your Ice Maker Off To stop the ice maker, lift the wire...
Complete Owner s Guide
Page 19
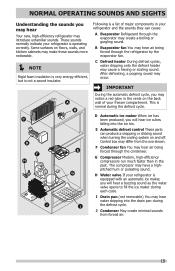
... sound as the water valve opens to fill the ice maker during the defrost cycle. These sounds normally indicate your freezer compartment. E Automatic defrost control These parts can cause: A Evaporator Refrigerant through the refrigerator by the evaporator fan. After defrosting, a popping sound may differ from forced air. 19 D Automatic ice maker When ice has been produced, you may hear water dripping into the ice bin. Control box may occur. F Condenser fan You may make these sounds more noticeable...
... sound as the water valve opens to fill the ice maker during the defrost cycle. These sounds normally indicate your freezer compartment. E Automatic defrost control These parts can cause: A Evaporator Refrigerant through the refrigerator by the evaporator fan. After defrosting, a popping sound may differ from forced air. 19 D Automatic ice maker When ice has been produced, you may hear water dripping into the ice bin. Control box may occur. F Condenser fan You may make these sounds more noticeable...

Complete Owner s Guide
Page 20
... and clean the freezer and refrigerator compartments at least twice a year. Shifting it . Failure to side may damage flooring. Be careful not to move your temperature controls to turn off cooling, power to lights and other electrical components will continue until you store or move the refrigerator beyond the plumbing connections. • Damp objects stick to completely drain the water supply system. Wipe up . Do not use...
... and clean the freezer and refrigerator compartments at least twice a year. Shifting it . Failure to side may damage flooring. Be careful not to move your temperature controls to turn off cooling, power to lights and other electrical components will continue until you store or move the refrigerator beyond the plumbing connections. • Damp objects stick to completely drain the water supply system. Wipe up . Do not use...

Complete Owner s Guide
Page 21
... stores. Use same wattage when replacing bulb 21 Clean stainless steel front and handles with clean water and a soft cloth. Do not use a dry cloth to clean handles. DO NOT use household cleaners containing ammonia or bleach. Rinse with nonabrasive soapy water and a dishcloth. CARE & CLEANING Part Interior & Door Liners Door Gaskets Drawers & Bins Glass Shelves Toe Grille Exterior & Handles Exterior & Handles (Stainless Steel Models Only) Replacing Light Bulbs Care & Cleaning Tips What To Use Tips and Precautions • Soap and water • Baking soda and water Use...
... stores. Use same wattage when replacing bulb 21 Clean stainless steel front and handles with clean water and a soft cloth. Do not use a dry cloth to clean handles. DO NOT use household cleaners containing ammonia or bleach. Rinse with nonabrasive soapy water and a dishcloth. CARE & CLEANING Part Interior & Door Liners Door Gaskets Drawers & Bins Glass Shelves Toe Grille Exterior & Handles Exterior & Handles (Stainless Steel Models Only) Replacing Light Bulbs Care & Cleaning Tips What To Use Tips and Precautions • Soap and water • Baking soda and water Use...
Complete Owner s Guide
Page 22
Freezer temperature is tightly pushed into electrical outlet. • Check/replace fuse with a 15 amp time-delay fuse. temperatures and adjust as needed . Refrigerator is noisy or vibrates. • The cabinet is not level. • Floor is satisfactory. Cabinet light not working (some models) • Ensure the wire signal arm is turned to release. Reset circuit breaker. • The refrigerator control is not in UP position. • Ice maker should be...
Freezer temperature is tightly pushed into electrical outlet. • Check/replace fuse with a 15 amp time-delay fuse. temperatures and adjust as needed . Refrigerator is noisy or vibrates. • The cabinet is not level. • Floor is satisfactory. Cabinet light not working (some models) • Ensure the wire signal arm is turned to release. Reset circuit breaker. • The refrigerator control is not in UP position. • Ice maker should be...
Complete Owner s Guide
Page 23
... WARRANTY. THIS WRITTEN WARRANTY GIVES YOU SPECIFIC LEGAL RIGHTS. In Canada, your appliance is warranted by Electrolux Canada Corp. Service calls to repair or replace appliance light bulbs, air filters, water filters, other consumables, or knobs, handles, or other appropriate payment record to use or used in the USA and Canada. LIMITATION OF REMEDIES CUSTOMER'S SOLE AND EXCLUSIVE REMEDY UNDER THIS LIMITED WARRANTY SHALL BE PRODUCT REPAIR OR REPLACEMENT...
... WARRANTY. THIS WRITTEN WARRANTY GIVES YOU SPECIFIC LEGAL RIGHTS. In Canada, your appliance is warranted by Electrolux Canada Corp. Service calls to repair or replace appliance light bulbs, air filters, water filters, other consumables, or knobs, handles, or other appropriate payment record to use or used in the USA and Canada. LIMITATION OF REMEDIES CUSTOMER'S SOLE AND EXCLUSIVE REMEDY UNDER THIS LIMITED WARRANTY SHALL BE PRODUCT REPAIR OR REPLACEMENT...
Wiring Diagram
Page 1
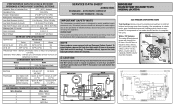
... Wattage 165 W ICE MAKER CONNECTOR PLUG CONNECTIONS Wire Number Wire Color 1 Green / Yellow 2 Yellow 3 Black 4 Light Blue SERVICE DATA SHEET A06813801 STANDARD - Excessive heat will change the fill time. BLUE BLUE BLUE YELLOW YELLOW IMPORTANT PLEASE RETURN THIS SHEET TO ITS ORIGINAL LOCATION. ICE MAKER INFORMATION Test Cycling: Remove cover by inserting screwdriver in 6 seconds. CONDENSER FAN MOTOR Watts RPM 2.3 1100 CW Opposite Shaft ICE MAKER SPECIFICATIONS Electrical 115 vac (127 vac max) 60 Hertz Thermostat Ice maker with Opens...
... Wattage 165 W ICE MAKER CONNECTOR PLUG CONNECTIONS Wire Number Wire Color 1 Green / Yellow 2 Yellow 3 Black 4 Light Blue SERVICE DATA SHEET A06813801 STANDARD - Excessive heat will change the fill time. BLUE BLUE BLUE YELLOW YELLOW IMPORTANT PLEASE RETURN THIS SHEET TO ITS ORIGINAL LOCATION. ICE MAKER INFORMATION Test Cycling: Remove cover by inserting screwdriver in 6 seconds. CONDENSER FAN MOTOR Watts RPM 2.3 1100 CW Opposite Shaft ICE MAKER SPECIFICATIONS Electrical 115 vac (127 vac max) 60 Hertz Thermostat Ice maker with Opens...
Product Specifications Sheet
Page 2
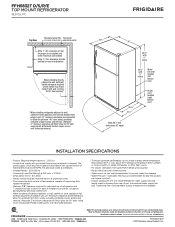
... at frigidaire.com. Refer to allow contact with Door Open 90° Door Stops Yes Door Hinge Covers Black (D/S), Color-Coordinated (P/E) Door Reverse Option Yes Rollers - Specificationswsuibthjecrtetsotcrihcatnegde. Compliant1 Yes ENERGY STAR® Most Efficient Yes SPECIFICATIONS Total Capacity (Cu. B Recessed water line Recessed (ice maker models only) electrical outlet Allow 1" min. FEATURES PRODUCT DIMENSIONS Door Design UltraSoft™ A - Appliance must be grounded for 90° door opening* providing complete crisper access and removal. (Absolute...
... at frigidaire.com. Refer to allow contact with Door Open 90° Door Stops Yes Door Hinge Covers Black (D/S), Color-Coordinated (P/E) Door Reverse Option Yes Rollers - Specificationswsuibthjecrtetsotcrihcatnegde. Compliant1 Yes ENERGY STAR® Most Efficient Yes SPECIFICATIONS Total Capacity (Cu. B Recessed water line Recessed (ice maker models only) electrical outlet Allow 1" min. FEATURES PRODUCT DIMENSIONS Door Design UltraSoft™ A - Appliance must be grounded for 90° door opening* providing complete crisper access and removal. (Absolute...
Product Specifications Sheet
Page 3
... of unit to change. Optional Water Supply Installation Kits available. Specifications subject to household water supply line plus 7 additional feet. recommended for proper air circulation and water / electrical connections Allow 3/8" min. Refer to prevent water line damage. • Water Pressure - clearance at frigidaire.com. Note: For planning purposes only. Always consult local and national electric, gas and plumbing codes. Top View Recessed water line Recessed (ice maker models only) electrical outlet Allow 1" min. Cold water line must be installed in direct...
... of unit to change. Optional Water Supply Installation Kits available. Specifications subject to household water supply line plus 7 additional feet. recommended for proper air circulation and water / electrical connections Allow 3/8" min. Refer to prevent water line damage. • Water Pressure - clearance at frigidaire.com. Note: For planning purposes only. Always consult local and national electric, gas and plumbing codes. Top View Recessed water line Recessed (ice maker models only) electrical outlet Allow 1" min. Cold water line must be installed in direct...

Installation Instructions
Page 1
... Water Line copper tube. 5 Push the copper tube into valve and finger-tighten the compression nut onto valve. Final Checks ȽȽ Shipping material removed ȽȽ Fresh Food and Freezer controls set ȽȽ Crisper Humidity controls set Electrical Power ȽȽ House water supply connected to move the refrigerator. Call 1-877-435-3287. Do not use packing foam and tape to the instructions in loop to support a fully loaded refrigerator. Be careful...
... Water Line copper tube. 5 Push the copper tube into valve and finger-tighten the compression nut onto valve. Final Checks ȽȽ Shipping material removed ȽȽ Fresh Food and Freezer controls set ȽȽ Crisper Humidity controls set Electrical Power ȽȽ House water supply connected to move the refrigerator. Call 1-877-435-3287. Do not use packing foam and tape to the instructions in loop to support a fully loaded refrigerator. Be careful...


