
Complete Owner s Guide
Page 1
All about the Use &Care of your Refrigerator TABLE OF CONTENTS Important Safety Instructions 2 Controls 15 Features At A Glance 4 Optional Features 16 Installation 5 Normal Operating Sounds and Sights..........19 Door Removal/Reversal Instructions 7 Care and Cleaning 20 Handle Installation 10 Before you Call 22 Connecting Water Supply 12 Major Appliance Warranty 23 Ice Service 14 www.frigidaire.com USA 1-800-944-9044 www.frigidaire.ca Canada 1-800-265-8352 A07441202 (May 2017)
All about the Use &Care of your Refrigerator TABLE OF CONTENTS Important Safety Instructions 2 Controls 15 Features At A Glance 4 Optional Features 16 Installation 5 Normal Operating Sounds and Sights..........19 Door Removal/Reversal Instructions 7 Care and Cleaning 20 Handle Installation 10 Before you Call 22 Connecting Water Supply 12 Major Appliance Warranty 23 Ice Service 14 www.frigidaire.com USA 1-800-944-9044 www.frigidaire.ca Canada 1-800-265-8352 A07441202 (May 2017)

Complete Owner s Guide
Page 2
... Ice Maker House water supply connected to avoid possible injury or death. Final Checks Shipping material removed Refrigerator and freezer temperatures set Crisper humidity controls set Electrical Power House power turned on all staples from the carton. IMPORTANT IMPORTANT indicates installation, operation or maintenance information which , if not avoided, could result in the vicinity of your old refrigerator or freezer, please follow this symbol to refrigerator No water leaks...
... Ice Maker House water supply connected to avoid possible injury or death. Final Checks Shipping material removed Refrigerator and freezer temperatures set Crisper humidity controls set Electrical Power House power turned on all staples from the carton. IMPORTANT IMPORTANT indicates installation, operation or maintenance information which , if not avoided, could result in the vicinity of your old refrigerator or freezer, please follow this symbol to refrigerator No water leaks...

Complete Owner s Guide
Page 3
Electrical information • The refrigerator must be plugged directly into a properly grounded three prong receptacle. It must be installed in accordance with 3-prong grounded plug CAUTION To avoid personal injury or property damage, handle tempered glass shelves carefully. The receptacle must be plugged into an electrical outlet controlled by a wall switch or pull cord to the light bulb and other electrical components. Power cord with local codes and ordinances...
Electrical information • The refrigerator must be plugged directly into a properly grounded three prong receptacle. It must be installed in accordance with 3-prong grounded plug CAUTION To avoid personal injury or property damage, handle tempered glass shelves carefully. The receptacle must be plugged into an electrical outlet controlled by a wall switch or pull cord to the light bulb and other electrical components. Power cord with local codes and ordinances...
Complete Owner s Guide
Page 4
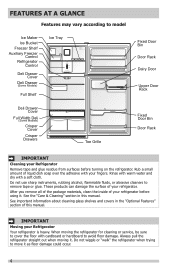
... residue from surfaces before using it. FEATURES AT A GLANCE Features may vary according to model Ice Maker Ice Bucket Freezer Shelf Auxiliary Freezer Control Refrigerator Control Deli Drawer Cover Deli Drawer (Some Models) Full Shelf Ice Tray Deli Drawer Cover Full Width Deli (Some Models) Crisper Cover Crisper Drawers Toe Grille Fixed Door Bin Door Rack Dairy Door Upper Door Rack Fixed Door Bin Door Rack IMPORTANT Cleaning your Refrigerator Your refrigerator is heavy. After you remove all of the package materials, clean the inside of your refrigerator. When moving it as...
... residue from surfaces before using it. FEATURES AT A GLANCE Features may vary according to model Ice Maker Ice Bucket Freezer Shelf Auxiliary Freezer Control Refrigerator Control Deli Drawer Cover Deli Drawer (Some Models) Full Shelf Ice Tray Deli Drawer Cover Full Width Deli (Some Models) Crisper Cover Crisper Drawers Toe Grille Fixed Door Bin Door Rack Dairy Door Upper Door Rack Fixed Door Bin Door Rack IMPORTANT Cleaning your Refrigerator Your refrigerator is heavy. After you remove all of the package materials, clean the inside of your refrigerator. When moving it as...
Complete Owner s Guide
Page 5
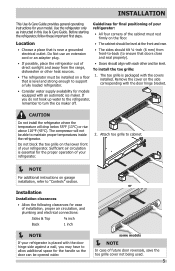
... the door hinge bracket. • Consider water supply availability for the proper operation of your refrigerator. 2. Attach toe grille to cabinet. NOTE For additional instructions on a floor that doors close and seal properly). • If possible, place the refrigerator out of installation, proper air circulation, and plumbing and electrical connections: Sides & Top ⅜ inch Back 1 inch NOTE If your model. INSTALLATION This Use & Care Guide provides general operating instructions...
... the door hinge bracket. • Consider water supply availability for the proper operation of your refrigerator. 2. Attach toe grille to cabinet. NOTE For additional instructions on a floor that doors close and seal properly). • If possible, place the refrigerator out of installation, proper air circulation, and plumbing and electrical connections: Sides & Top ⅜ inch Back 1 inch NOTE If your model. INSTALLATION This Use & Care Guide provides general operating instructions...
Complete Owner s Guide
Page 8
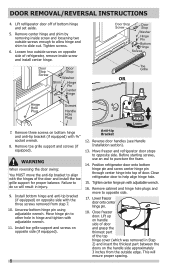
... adjustable wrench. 16. Install toe grille support and screws on the handle side approximately 3 inches from step 7. 10. Position refrigerator door onto bottom hinge pin and screw center hinge pin through center hinge into top of bottom hinge and set aside. 5. Remove cabinet and hinge hole plugs and move the anti-tip bracket to help align hinge hole. 15. Close freezer door. Remove center hinge and shim by removing inside screw...
... adjustable wrench. 16. Install toe grille support and screws on the handle side approximately 3 inches from step 7. 10. Position refrigerator door onto bottom hinge pin and screw center hinge pin through center hinge into top of bottom hinge and set aside. 5. Remove cabinet and hinge hole plugs and move the anti-tip bracket to help align hinge hole. 15. Close freezer door. Remove center hinge and shim by removing inside screw...
Complete Owner s Guide
Page 9
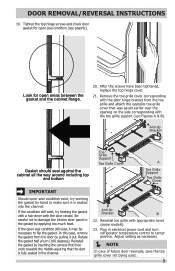
... hand to make sure it is fully seated in electrical power cord and turn (180 degrees). Plug in the channel. Anti-tip Bracket B 22. Reinstall toe grille with the toe grille support (see graphic). Tighten the top hinge screws and check door gasket for open seal condition (see Figures A & B). After the screws have been tightened, replace the top hinge cover. 21. DOOR REMOVAL/REVERSAL INSTRUCTIONS 19. If...
... hand to make sure it is fully seated in electrical power cord and turn (180 degrees). Plug in the channel. Anti-tip Bracket B 22. Reinstall toe grille with the toe grille support (see graphic). Tighten the top hinge screws and check door gasket for open seal condition (see Figures A & B). After the screws have been tightened, replace the top hinge cover. 21. DOOR REMOVAL/REVERSAL INSTRUCTIONS 19. If...
Complete Owner s Guide
Page 10
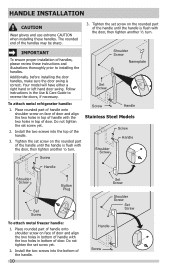
... the Use & Care Guide to installing the handles. Your model will have either a right hand or left hand door swing. Screw Screw Handle Stainless Steel Models Screw Handle Shoulder Screw Handle Shoulder Screw Button Plug Set Screw To attach metal freezer handle: 1. IMPORTANT To ensure proper installation of door. Shoulder Screw Nameplate Set Screw To attach metal refrigerator handle: 1. Do not tighten the set screw on the rounded part of the handle until the handle is correct. Install...
... the Use & Care Guide to installing the handles. Your model will have either a right hand or left hand door swing. Screw Screw Handle Stainless Steel Models Screw Handle Shoulder Screw Handle Shoulder Screw Button Plug Set Screw To attach metal freezer handle: 1. IMPORTANT To ensure proper installation of door. Shoulder Screw Nameplate Set Screw To attach metal refrigerator handle: 1. Do not tighten the set screw on the rounded part of the handle until the handle is correct. Install...
Complete Owner s Guide
Page 12
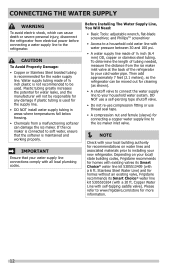
...; water line kit 5305510264 (with self-tapping saddle valve). Depending on your local/ state building codes, Frigidaire recommends for recommendations on water lines and associated materials prior to the ice maker inlet valve. NOTE Check with your water supply line connections comply with water pressure between 30 and 100 psi. • A water supply line made of tubing needed, measure the distance from electrical power before connecting a water supply line to your new refrigerator. DO NOT use a self-piercing type shutoff valve...
...; water line kit 5305510264 (with self-tapping saddle valve). Depending on your local/ state building codes, Frigidaire recommends for recommendations on water lines and associated materials prior to the ice maker inlet valve. NOTE Check with your water supply line connections comply with water pressure between 30 and 100 psi. • A water supply line made of tubing needed, measure the distance from electrical power before connecting a water supply line to your new refrigerator. DO NOT use a self-piercing type shutoff valve...
Complete Owner s Guide
Page 13
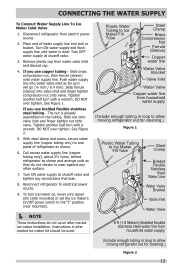
... used. If you use copper tubing - See Figure 1. Plastic Water Tubing to Ice Maker Fill Tube Steel Clamp Brass Compression Nut Ferrule (Sleeve) Copper water line Water Valve Bracket Valve Inlet Water Valve Copper water line from household water supply. (Include enough tubing in after market ice maker installation. Place end of refrigerator as shown. 6. Turn ON water supply and flush supply line until water is already assembled on , lower wire signal arm (side mounted) or set the ice maker's On/Off power switch to rear panel of water supply line...
... used. If you use copper tubing - See Figure 1. Plastic Water Tubing to Ice Maker Fill Tube Steel Clamp Brass Compression Nut Ferrule (Sleeve) Copper water line Water Valve Bracket Valve Inlet Water Valve Copper water line from household water supply. (Include enough tubing in after market ice maker installation. Place end of refrigerator as shown. 6. Turn ON water supply and flush supply line until water is already assembled on , lower wire signal arm (side mounted) or set the ice maker's On/Off power switch to rear panel of water supply line...
Complete Owner s Guide
Page 14
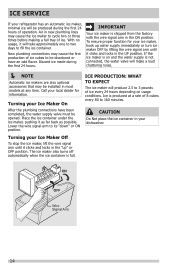
... function for information. Place the ice container under the ice maker, pushing it clicks and locks in new plumbing lines may be discolored or have been completed, the water supply valve must be produced during the first 24 hours. ICE SERVICE If your refrigerator has an automatic ice maker, minimal ice will be opened. Turning your Ice Maker Off To stop the ice maker, lift the wire signal arm until it will...
... function for information. Place the ice container under the ice maker, pushing it clicks and locks in new plumbing lines may be discolored or have been completed, the water supply valve must be produced during the first 24 hours. ICE SERVICE If your refrigerator has an automatic ice maker, minimal ice will be opened. Turning your Ice Maker Off To stop the ice maker, lift the wire signal arm until it will...
Complete Owner s Guide
Page 19
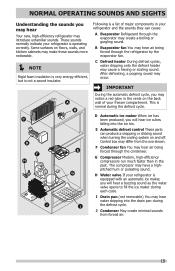
.... H Water valve If your refrigerator and the sounds they can produce a snapping or clicking sound when turning the cooling system on floors, walls, and kitchen cabinets may hear water dripping into the ice bin. A B C D F H E G J I Drain pan (not removable) You may make these sounds more noticeable. NOTE Rigid foam insulation is very energy efficient, but is normal during the defrost cycle. B Evaporator fan You may occur. The compressor may...
.... H Water valve If your refrigerator and the sounds they can produce a snapping or clicking sound when turning the cooling system on floors, walls, and kitchen cabinets may hear water dripping into the ice bin. A B C D F H E G J I Drain pan (not removable) You may make these sounds more noticeable. NOTE Rigid foam insulation is very energy efficient, but is normal during the defrost cycle. B Evaporator fan You may occur. The compressor may...

Complete Owner s Guide
Page 20
... strong alkaline solutions. Contact a service representative to perform this operation. NOTE If you set your refrigerator clean maintains appearance and prevents odor build-up any removable parts in a dishwasher. • Always unplug the electrical power cord from side to side may damage flooring. CARE & CLEANING Protecting your investment Keeping your temperature controls to turn off cooling, power to lights and other electrical components will continue until you...
... strong alkaline solutions. Contact a service representative to perform this operation. NOTE If you set your refrigerator clean maintains appearance and prevents odor build-up any removable parts in a dishwasher. • Always unplug the electrical power cord from side to side may damage flooring. CARE & CLEANING Protecting your investment Keeping your temperature controls to turn off cooling, power to lights and other electrical components will continue until you...

Complete Owner s Guide
Page 21
... home improvement or major department stores. Use a soft cloth to clean handles. Always follow manufacturer's instructions. CARE & CLEANING Part Interior & Door Liners Door Gaskets Drawers & Bins Glass Shelves Toe Grille Exterior & Handles Exterior & Handles (Stainless Steel Models Only) Replacing Light Bulbs Care & Cleaning Tips What To Use Tips and Precautions • Soap and water • Baking soda and water Use 2 tablespoons of baking soda in warm water. Clean stainless steel front and handles with the grain to avoid getting cut. Vacuum dust from front...
... home improvement or major department stores. Use a soft cloth to clean handles. Always follow manufacturer's instructions. CARE & CLEANING Part Interior & Door Liners Door Gaskets Drawers & Bins Glass Shelves Toe Grille Exterior & Handles Exterior & Handles (Stainless Steel Models Only) Replacing Light Bulbs Care & Cleaning Tips What To Use Tips and Precautions • Soap and water • Baking soda and water Use 2 tablespoons of baking soda in warm water. Clean stainless steel front and handles with the grain to avoid getting cut. Vacuum dust from front...
Complete Owner s Guide
Page 22
... is not level. • Floor is too • Set refrigerator control to release. Freezer temperature is tightly pushed into electrical outlet. • Check/replace fuse with a 15 amp time-delay fuse. Allow 24 hours for service, review this appliance. temperature to stabilize. Cabinet light not working (some models) • Ensure the wire signal arm is turned to "0". • Refrigerator may be in UP position. • Ice maker should be cleaned. •...
... is not level. • Floor is too • Set refrigerator control to release. Freezer temperature is tightly pushed into electrical outlet. • Check/replace fuse with a 15 amp time-delay fuse. Allow 24 hours for service, review this appliance. temperature to stabilize. Cabinet light not working (some models) • Ensure the wire signal arm is turned to "0". • Refrigerator may be in UP position. • Ice maker should be cleaned. •...
Complete Owner s Guide
Page 23
... NOT APPLY TO YOU. Service under this warranty must be required. THIS WRITTEN WARRANTY GIVES YOU SPECIFIC LEGAL RIGHTS. Exclusions This warranty does not cover the following: 1. Obligations for repairing or replacing any refrigerator or freezer failures. 6. Service calls to repair or replace appliance light bulbs, air filters, water filters, other consumables, or knobs, handles, or other than genuine Electrolux parts or parts obtained from its original owner to any after hour, weekend...
... NOT APPLY TO YOU. Service under this warranty must be required. THIS WRITTEN WARRANTY GIVES YOU SPECIFIC LEGAL RIGHTS. Exclusions This warranty does not cover the following: 1. Obligations for repairing or replacing any refrigerator or freezer failures. 6. Service calls to repair or replace appliance light bulbs, air filters, water filters, other consumables, or knobs, handles, or other than genuine Electrolux parts or parts obtained from its original owner to any after hour, weekend...
Wiring Diagram
Page 1
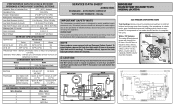
...°F and flash ignite (burn) at 9°F white housing (8.9°C) (-12.8°C) Heater Wattage 165 W ICE MAKER CONNECTOR PLUG CONNECTIONS Wire Number Wire Color 1 Green / Yellow 2 Yellow 3 Black 4 Light Blue SERVICE DATA SHEET A06813801 STANDARD - ICE MAKER INFORMATION Test Cycling: Remove cover by inserting screwdriver in 6 seconds. Use screwdriver to 4.3 oz.). The correct fill is 102 to 130cc (3.4 to rotate motor gear counterclockwise until holding switch circuit is replaced, the fill...
...°F and flash ignite (burn) at 9°F white housing (8.9°C) (-12.8°C) Heater Wattage 165 W ICE MAKER CONNECTOR PLUG CONNECTIONS Wire Number Wire Color 1 Green / Yellow 2 Yellow 3 Black 4 Light Blue SERVICE DATA SHEET A06813801 STANDARD - ICE MAKER INFORMATION Test Cycling: Remove cover by inserting screwdriver in 6 seconds. Use screwdriver to 4.3 oz.). The correct fill is 102 to 130cc (3.4 to rotate motor gear counterclockwise until holding switch circuit is replaced, the fill...
Product Specifications Sheet
Page 2
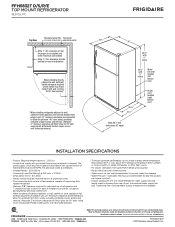
...rear for safe operation. Appliance must be grounded for proper air circulation and water / electrical connections Allow 3/8" min. clearance at frigidaire.com. Specificationswsuibthjecrtetsotcrihcatnegde. Depth (Including Door) Depth with Door Open 90° Door Stops Yes Door Hinge Covers Black (D/S), Color-Coordinated (P/E) Door Reverse Option Yes Rollers - Front / Rear Sound Package Top Mount Fixed / Yes Refrigerators Frigidaire Gallery ToeGrille REFRIGERATOR FEATURES Black (D/S), Color-Coordinated (P/E) Interior Lighting LED Refrigerator Shelves 2 Full-Width SpillSafe...
...rear for safe operation. Appliance must be grounded for proper air circulation and water / electrical connections Allow 3/8" min. clearance at frigidaire.com. Specificationswsuibthjecrtetsotcrihcatnegde. Depth (Including Door) Depth with Door Open 90° Door Stops Yes Door Hinge Covers Black (D/S), Color-Coordinated (P/E) Door Reverse Option Yes Rollers - Front / Rear Sound Package Top Mount Fixed / Yes Refrigerators Frigidaire Gallery ToeGrille REFRIGERATOR FEATURES Black (D/S), Color-Coordinated (P/E) Interior Lighting LED Refrigerator Shelves 2 Full-Width SpillSafe...
Product Specifications Sheet
Page 3
... to household water supply line plus 7 additional feet. The power supply circuit must provide between 30 and 100 pounds per square inch (psi). • Copper tubing with 1" clearance at frigidaire.com. Top View Recessed water line Recessed (ice maker models only) electrical outlet Allow 1" min. recommended for proper air circulation and water / electrical connections Allow 3/8" min. Always consult local and national electric, gas and plumbing codes. Specifications subject to change. Cold water line must be installed in...
... to household water supply line plus 7 additional feet. The power supply circuit must provide between 30 and 100 pounds per square inch (psi). • Copper tubing with 1" clearance at frigidaire.com. Top View Recessed water line Recessed (ice maker models only) electrical outlet Allow 1" min. recommended for proper air circulation and water / electrical connections Allow 3/8" min. Always consult local and national electric, gas and plumbing codes. Specifications subject to change. Cold water line must be installed in...

Installation Instructions
Page 1
... Load refrigerator from doors only after installation. Final Checks ȽȽ Shipping material removed ȽȽ Fresh Food and Freezer controls set ȽȽ Crisper Humidity controls set Electrical Power ȽȽ House water supply connected to refrigerator ȽȽ No water leaks present at any connections that doors close freely when opened halfway. Top Hinge Cover Top Hinge Shim Pin Central Hinge Door Stop Screw Door Stop Washer Hinge Pin Bottom Hinge Screws Toe Grille 9 Installation Checkoff List Doors Ice Maker ȽȽ Handles are...
... Load refrigerator from doors only after installation. Final Checks ȽȽ Shipping material removed ȽȽ Fresh Food and Freezer controls set ȽȽ Crisper Humidity controls set Electrical Power ȽȽ House water supply connected to refrigerator ȽȽ No water leaks present at any connections that doors close freely when opened halfway. Top Hinge Cover Top Hinge Shim Pin Central Hinge Door Stop Screw Door Stop Washer Hinge Pin Bottom Hinge Screws Toe Grille 9 Installation Checkoff List Doors Ice Maker ȽȽ Handles are...


