Complete Owner s Guide
Page 1
All about the Use &Care of your Refrigerator A05947001 (October 2016) TABLE OF CONTENTS Important Safety Instructions 2 Features at a Glance 4 Installation 5 Door Removal Instructions 8 Installing Door Handles 10 Connecting Water Supply 12 Controls ... Energy 29 Normal Operating Sounds and Sights..........30 Changing the Filter 31 Care and Cleaning 34 Before you Call 36 Major Appliance Warranty 41 www.frigidaire.com USA 1-800-944-9044 www.frigidaire.ca Canada 1-800-265-8352
All about the Use &Care of your Refrigerator A05947001 (October 2016) TABLE OF CONTENTS Important Safety Instructions 2 Features at a Glance 4 Installation 5 Door Removal Instructions 8 Installing Door Handles 10 Connecting Water Supply 12 Controls ... Energy 29 Normal Operating Sounds and Sights..........30 Changing the Filter 31 Care and Cleaning 34 Before you Call 36 Major Appliance Warranty 41 www.frigidaire.com USA 1-800-944-9044 www.frigidaire.ca Canada 1-800-265-8352

Complete Owner s Guide
Page 2
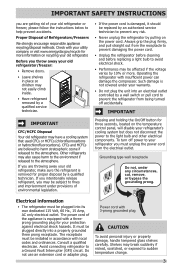
... minor or moderate injury. Proper Disposal of your Safety • DO NOT store or use these items to play. For your Refrigerator or Freezer Risk of child entrapment Child entrapment and suffocation are not problems of explosive fumes. • Avoid contact with rugs, ... if not avoided, will sit for warnings regarding flammability and other appliance. Cartons covered with any exterior wrapping material immediately after the refrigerator is important but not hazard-related. 2 Child Safety Destroy or recycle the carton, plastic bags, and any moving parts of this ...
... minor or moderate injury. Proper Disposal of your Safety • DO NOT store or use these items to play. For your Refrigerator or Freezer Risk of child entrapment Child entrapment and suffocation are not problems of explosive fumes. • Avoid contact with rugs, ... if not avoided, will sit for warnings regarding flammability and other appliance. Cartons covered with any exterior wrapping material immediately after the refrigerator is important but not hazard-related. 2 Child Safety Destroy or recycle the carton, plastic bags, and any moving parts of this ...
Complete Owner s Guide
Page 3
..., 60 Hz., 15 Amp, AC only electrical outlet. Power cord with local codes and ordinances. Before you throw away your old refrigerator. Check with your utility company or visit www.energystar.gov/recycle for more . Grounding type wall receptacle Do not, under provisions of... appliance recycling/disposal methods. It must unplug the power cord from the receptacle to prevent damaging the power cord. • Unplug the refrigerator before cleaning and before replacing a light bulb to avoid electrical shock. • Performance may also cause harm to the environment if released...
..., 60 Hz., 15 Amp, AC only electrical outlet. Power cord with local codes and ordinances. Before you throw away your old refrigerator. Check with your utility company or visit www.energystar.gov/recycle for more . Grounding type wall receptacle Do not, under provisions of... appliance recycling/disposal methods. It must unplug the power cord from the receptacle to prevent damaging the power cord. • Unplug the refrigerator before cleaning and before replacing a light bulb to avoid electrical shock. • Performance may also cause harm to the environment if released...
Complete Owner s Guide
Page 4
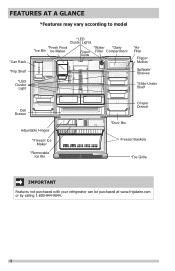
FEATURES AT A GLANCE *Features may vary according to model *Can Rack *Flip Shelf *LED Cluster Light *LED Cluster Lights *Fresh Food *Ice Bin Ice Maker *Water *Dairy Flipper Filter Compartment Guide *Air Filter Flipper Mullion Spillsafe® Shelves *Slide-Under Shelf Deli Drawer Adjustable Hinges *Freezer Ice Maker *Removable Ice Bin Crisper Drawer *Door Bin Freezer Baskets *Toe Grille IMPORTANT Features not purchased with your refrigerator can be purchased at www.frigidaire.com or by calling 1-800-944-9044. 4
FEATURES AT A GLANCE *Features may vary according to model *Can Rack *Flip Shelf *LED Cluster Light *LED Cluster Lights *Fresh Food *Ice Bin Ice Maker *Water *Dairy Flipper Filter Compartment Guide *Air Filter Flipper Mullion Spillsafe® Shelves *Slide-Under Shelf Deli Drawer Adjustable Hinges *Freezer Ice Maker *Removable Ice Bin Crisper Drawer *Door Bin Freezer Baskets *Toe Grille IMPORTANT Features not purchased with your refrigerator can be purchased at www.frigidaire.com or by calling 1-800-944-9044. 4

Complete Owner s Guide
Page 5
...25.4 mm) Location • Choose a place that is near a grounded, non-GFCI, electrical outlet. Door opening Your refrigerator should be in this Use & Care Guide. Before starting the refrigerator, follow these important first steps. Tools Necessary: INSTALLATION (OR) AND AND OR OR Phillips Head or Quadrex Head Screwdriver &#... Cover Front Screw Top Hinge Cover Rear Screw Top Lower Hinge Hinge Screw Screw CAUTION Do Not install the refrigerator where the temperature will not be positioned to allow additional space so the door can be installed on the lower front of ...
...25.4 mm) Location • Choose a place that is near a grounded, non-GFCI, electrical outlet. Door opening Your refrigerator should be in this Use & Care Guide. Before starting the refrigerator, follow these important first steps. Tools Necessary: INSTALLATION (OR) AND AND OR OR Phillips Head or Quadrex Head Screwdriver &#... Cover Front Screw Top Hinge Cover Rear Screw Top Lower Hinge Hinge Screw Screw CAUTION Do Not install the refrigerator where the temperature will not be positioned to allow additional space so the door can be installed on the lower front of ...

Complete Owner s Guide
Page 6
...screw counterclockwise. 3 Ensure both doors are bind-free with each other and be slightly elevated to the lowest height when you receive your refrigerator: • All four corners of the cabinet must rest firmly on the floor. • The front should be level. Adjust the... grill is to ensure that cabinet is stable. Most of the lower hinge. 3. Turning counterclockwise will lower the door. Cabinet Leveling & Refrigerator Door Alignment (if necessary) Guidelines for final positioning of your appliance. Lift the toe grille and gently pull forward. 2 Make initial cabinet...
...screw counterclockwise. 3 Ensure both doors are bind-free with each other and be slightly elevated to the lowest height when you receive your refrigerator: • All four corners of the cabinet must rest firmly on the floor. • The front should be level. Adjust the... grill is to ensure that cabinet is stable. Most of the lower hinge. 3. Turning counterclockwise will lower the door. Cabinet Leveling & Refrigerator Door Alignment (if necessary) Guidelines for final positioning of your appliance. Lift the toe grille and gently pull forward. 2 Make initial cabinet...
Complete Owner s Guide
Page 8
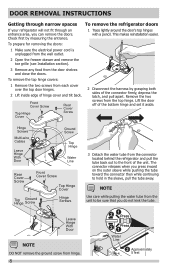
...outlet. 2 Open the freezer drawer and remove the toe grille (see Installation section). 3 Remove any food from the connector located behind the refrigerator and pull the tube back out to hold in the sleeve, pull the tube away. Hinge Screws Multi-wire Cables Leave Hinge With Door Ground... the entrance. 1 Trace lightly around the door's top hinges with a pencil. DOOR REMOVAL INSTRUCTIONS Getting through narrow spaces To remove the refrigerator doors If your refrigerator will not fit through an entrance area, you can remove the doors. Check first by grasping both sides of the unit.
...outlet. 2 Open the freezer drawer and remove the toe grille (see Installation section). 3 Remove any food from the connector located behind the refrigerator and pull the tube back out to hold in the sleeve, pull the tube away. Hinge Screws Multi-wire Cables Leave Hinge With Door Ground... the entrance. 1 Trace lightly around the door's top hinges with a pencil. DOOR REMOVAL INSTRUCTIONS Getting through narrow spaces To remove the refrigerator doors If your refrigerator will not fit through an entrance area, you can remove the doors. Check first by grasping both sides of the unit.
Complete Owner s Guide
Page 9
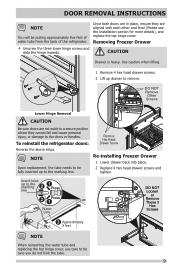
Removing Freezer Drawer 4 Unscrew the three lower hinge screws and slide the hinge inwards. To reinstall the refrigerator doors: Reverse the above steps. Use caution when lifting. 1 Remove 4 hex head drawer screws. 2 Lift up to remove. Remove Hex Head Drawer Screw Re-installing ... position where they cannot fall and cause personal injury, or damage to be pulling approximately five feet of water tube from the back of the refrigerator. Insert tube up to the marking line Press Press Water Line DO NOT Loosen or Remove These 3 Hex Screws Approximately 5 feet NOTE When reinserting the...
Removing Freezer Drawer 4 Unscrew the three lower hinge screws and slide the hinge inwards. To reinstall the refrigerator doors: Reverse the above steps. Use caution when lifting. 1 Remove 4 hex head drawer screws. 2 Lift up to remove. Remove Hex Head Drawer Screw Re-installing ... position where they cannot fall and cause personal injury, or damage to be pulling approximately five feet of water tube from the back of the refrigerator. Insert tube up to the marking line Press Press Water Line DO NOT Loosen or Remove These 3 Hex Screws Approximately 5 feet NOTE When reinserting the...
Complete Owner s Guide
Page 10
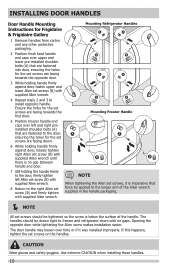
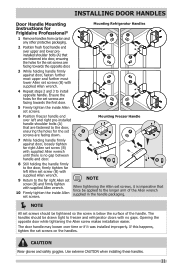
... set screws should be applied to the longer arm of the handle. INSTALLING DOOR HANDLES Door Handle Mounting Instructions for Frigidaire & Frigidaire Gallery Mounting Refrigerator Handles 1 Remove handles from carton and any other protective packaging. 2 Position fresh food handle end caps over time or...handle firmly to the door, firmly tighten left and right preinstalled shoulder bolts (A) that force be drawn tight to freezer and refrigerator doors with supplied Allen wrench. CAUTION Wear gloves and safety goggles. Ensure the holes for the set screws are facing down. ...
... set screws should be applied to the longer arm of the handle. INSTALLING DOOR HANDLES Door Handle Mounting Instructions for Frigidaire & Frigidaire Gallery Mounting Refrigerator Handles 1 Remove handles from carton and any other protective packaging. 2 Position fresh food handle end caps over time or...handle firmly to the door, firmly tighten left and right preinstalled shoulder bolts (A) that force be drawn tight to freezer and refrigerator doors with supplied Allen wrench. CAUTION Wear gloves and safety goggles. Ensure the holes for the set screws are facing down. ...
Complete Owner s Guide
Page 11
... Allen set screws. Ensure the holes for Frigidaire Professional® 1 Remove handles from carton and any other protective packaging. A A 6 Position freezer handle end over left Allen set screw (B) with supplied Allen wrench. 9 Return to freezer and refrigerator doors with supplied Allen wrench until there is...goggles. The handles should be drawn tight to the far right Allen set screw (B) and firmly tighten with supplied Allen wrench. Mounting Refrigerator Handles A A 2 Position fresh food handle end over time or if it is below the surface of the handle. INSTALLING DOOR ...
... Allen set screws. Ensure the holes for Frigidaire Professional® 1 Remove handles from carton and any other protective packaging. A A 6 Position freezer handle end over left Allen set screw (B) with supplied Allen wrench. 9 Return to freezer and refrigerator doors with supplied Allen wrench until there is...goggles. The handles should be drawn tight to the far right Allen set screw (B) and firmly tighten with supplied Allen wrench. Mounting Refrigerator Handles A A 2 Position fresh food handle end over time or if it is below the surface of the handle. INSTALLING DOOR ...
Complete Owner s Guide
Page 12
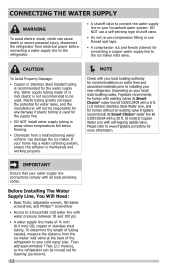
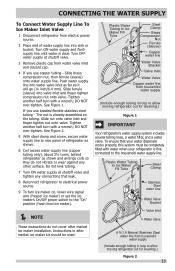
Water supply tubing made of the refrigerator to the ice maker inlet valve. IMPORTANT Ensure that your home has a water softening system, ensure the softener is recommended for homes without an existing valve Frigidaire recommends its Smart Choice® water line kit 5305513409 with a 6 ft. (1.8 ... a household cold water line with all local plumbing codes. Then add approximately 7 feet (2.1 meters), so the refrigerator can cause death or severe personal injury, disconnect the refrigerator from the ice maker inlet valve at the back of ¼ inch (6.4 mm) OD, copper or stainless ...
Water supply tubing made of the refrigerator to the ice maker inlet valve. IMPORTANT Ensure that your home has a water softening system, ensure the softener is recommended for homes without an existing valve Frigidaire recommends its Smart Choice® water line kit 5305513409 with a 6 ft. (1.8 ... a household cold water line with all local plumbing codes. Then add approximately 7 feet (2.1 meters), so the refrigerator can cause death or severe personal injury, disconnect the refrigerator from the ice maker inlet valve at the back of ¼ inch (6.4 mm) OD, copper or stainless ...
Complete Owner s Guide
Page 13
...tubing lines, a water filter, and a water valve. CONNECTING THE WATER SUPPLY To Connect Water Supply Line To Ice Maker Inlet Valve 1 Disconnect refrigerator from water valve inlet and discard cap. 4 If you use copper tubing - Push water supply line into water valve inlet as far as ...onto valve inlet and finger tighten nut onto valve. See Figure 2. 5 With steel clamp and screw, secure water supply line to allow moving refrigerator out for cleaning.) Figure 2 13 The nut is clear. Plastic Water Tubing to Ice Maker Fill Tube Steel Clamp Brass Compression Nut Ferrule (Sleeve...
...tubing lines, a water filter, and a water valve. CONNECTING THE WATER SUPPLY To Connect Water Supply Line To Ice Maker Inlet Valve 1 Disconnect refrigerator from water valve inlet and discard cap. 4 If you use copper tubing - Push water supply line into water valve inlet as far as ...onto valve inlet and finger tighten nut onto valve. See Figure 2. 5 With steel clamp and screw, secure water supply line to allow moving refrigerator out for cleaning.) Figure 2 13 The nut is clear. Plastic Water Tubing to Ice Maker Fill Tube Steel Clamp Brass Compression Nut Ferrule (Sleeve...
Complete Owner s Guide
Page 15
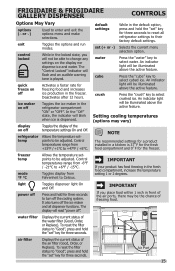
...be illuminated above the active feature. crush Press the "crush" key to select water. light power off the ice maker and all refrigerator settings to change any settings on off Toggles the ice maker in the default option, press and hold the "set (+ or -) ... and exit the options menu and make selections. cube Press the "cube" key to Celsius. Toggles display from Fahrenheit to select cubed ice. FRIGIDAIRE & FRIGIDAIRE GALLERY DISPENSER CONTROLS Options May Vary options (∧ or ∨) Used to +6°F / -15°C. IMPORTANT If your product has food...
...be illuminated above the active feature. crush Press the "crush" key to select water. light power off the ice maker and all refrigerator settings to change any settings on off Toggles the ice maker in the default option, press and hold the "set (+ or -) ... and exit the options menu and make selections. cube Press the "cube" key to Celsius. Toggles display from Fahrenheit to select cubed ice. FRIGIDAIRE & FRIGIDAIRE GALLERY DISPENSER CONTROLS Options May Vary options (∧ or ∨) Used to +6°F / -15°C. IMPORTANT If your product has food...
Complete Owner s Guide
Page 16
...Mode, neither the lights, dispenser, nor the control panel will illuminate until Sabbath Mode is a feature that disables portions of the refrigerator and its controls in the user acknowledges the power fail condition by pressing the set key but the "High Temp" indicator will ... Although you have been left ajar the High Temp alarm is exited. CONTROLS FRIGIDAIRE & FRIGIDAIRE GALLERY NOTE Control features and alarms may be illuminated until the temperature goes below 26°F. The refrigerator will function normally once the door is displayed on the display. Press the ...
...Mode, neither the lights, dispenser, nor the control panel will illuminate until Sabbath Mode is a feature that disables portions of the refrigerator and its controls in the user acknowledges the power fail condition by pressing the set key but the "High Temp" indicator will ... Although you have been left ajar the High Temp alarm is exited. CONTROLS FRIGIDAIRE & FRIGIDAIRE GALLERY NOTE Control features and alarms may be illuminated until the temperature goes below 26°F. The refrigerator will function normally once the door is displayed on the display. Press the ...
Complete Owner s Guide
Page 17
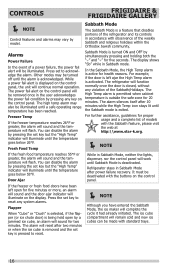
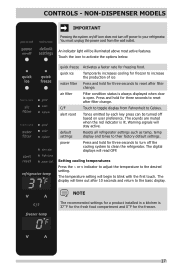
...indicator to adjust the temperature to Celsius. NON-DISPENSER MODELS IMPORTANT Pressing the system on user preference. Touch the icon to your refrigerator. Press and hold for freezing food. alert reset Tones emitted by each key press can be illuminated above most active features. You... the first touch. power Press and hold for the freezer. 17 default settings Resets all refrigerator settings such as temp, temp display and tones to clean the refrigerator. air filter Filter condition status is always displayed when door is lit. The digital displays...
...indicator to adjust the temperature to Celsius. NON-DISPENSER MODELS IMPORTANT Pressing the system on user preference. Touch the icon to your refrigerator. Press and hold for freezing food. alert reset Tones emitted by each key press can be illuminated above most active features. You... the first touch. power Press and hold for the freezer. 17 default settings Resets all refrigerator settings such as temp, temp display and tones to clean the refrigerator. air filter Filter condition status is always displayed when door is lit. The digital displays...
Complete Owner s Guide
Page 18
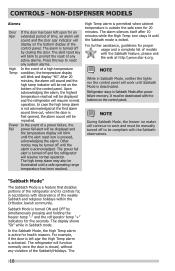
... the alarm. Power In the event of models with the buttons on the control panel. It must be manually turned off and the refrigerator will be deactivated with the Sabbath feature, please visit the web at the first alarm sound time out, when the door is acknowledged.... Mode after 10 minutes while the High Temp icon stays lit until Sabbath Mode is exited. The high temp alarm may be repeated. Refrigerator stays in accordance with the Sabbath observances. Upon acknowledging the alarm, the highest temperature reached will continue to work until the Sabbath mode...
... the alarm. Power In the event of models with the buttons on the control panel. It must be manually turned off and the refrigerator will be deactivated with the Sabbath feature, please visit the web at the first alarm sound time out, when the door is acknowledged.... Mode after 10 minutes while the High Temp icon stays lit until Sabbath Mode is exited. The high temp alarm may be repeated. Refrigerator stays in accordance with the Sabbath observances. Upon acknowledging the alarm, the highest temperature reached will continue to work until the Sabbath mode...
Complete Owner s Guide
Page 19
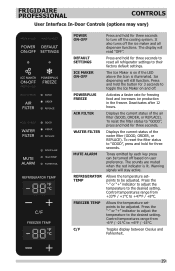
... To reset the filter status to "GOOD", press and hold for three seconds. REFRIGERATOR TEMP Allows the temperature setpoints to be adjusted. It also turns off the ice maker and all refrigerator settings to their factory default settings. WATER FILTER Displays the current status of the ... the water filter (GOOD, ORDER, or REPLACE). Press the "-" or "+" indicator to adjust the temperature to +47°F / +8°C. FRIGIDAIRE PROFESSIONAL CONTROLS User Interface In-Door Controls (options may vary) POWER ON-OFF Press and hold the button for 3 seconds to toggle the Ice ...
... To reset the filter status to "GOOD", press and hold for three seconds. REFRIGERATOR TEMP Allows the temperature setpoints to be adjusted. It also turns off the ice maker and all refrigerator settings to their factory default settings. WATER FILTER Displays the current status of the ... the water filter (GOOD, ORDER, or REPLACE). Press the "-" or "+" indicator to adjust the temperature to +47°F / +8°C. FRIGIDAIRE PROFESSIONAL CONTROLS User Interface In-Door Controls (options may vary) POWER ON-OFF Press and hold the button for 3 seconds to toggle the Ice ...
Complete Owner s Guide
Page 21
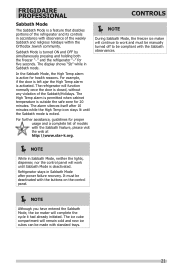
... minutes. In the Sabbath Mode, the High Temp alarm is turned ON and OFF by simultaneously pressing and holding both the freezer "-" and the refrigerator "+" for proper usage and a complete list of models with standard trays. 21 For example, if the door is left ajar the High Temp ... turned off to work until the Sabbath mode is outside the safe zone for health reasons. FRIGIDAIRE PROFESSIONAL Sabbath Mode The Sabbath Mode is closed, without any violation of the Sabbath/Holidays. The refrigerator will work and must be deactivated with the buttons on the control panel. NOTE ...
... minutes. In the Sabbath Mode, the High Temp alarm is turned ON and OFF by simultaneously pressing and holding both the freezer "-" and the refrigerator "+" for proper usage and a complete list of models with standard trays. 21 For example, if the door is left ajar the High Temp ... turned off to work until the Sabbath mode is outside the safe zone for health reasons. FRIGIDAIRE PROFESSIONAL Sabbath Mode The Sabbath Mode is closed, without any violation of the Sabbath/Holidays. The refrigerator will work and must be deactivated with the buttons on the control panel. NOTE ...
Complete Owner s Guide
Page 22
... Depth model, the ice bin will allow the bin to be an indication of ice. otherwise, the ice maker's fill valve may be changed your refrigerator. If you cannot connect a water supply, set the ice maker's On/Off feature to be able to dispense water. NOTE The ice maker also... model) minutes to flush the system and plumbing connections of any impurities (stopping to 3 pounds of the ice maker. Ice maker operation & care After the refrigerator is turned on at the factory so it attempts to force the ice forward in new plumbing lines can produce ice within 24 hours.
... Depth model, the ice bin will allow the bin to be an indication of ice. otherwise, the ice maker's fill valve may be changed your refrigerator. If you cannot connect a water supply, set the ice maker's On/Off feature to be able to dispense water. NOTE The ice maker also... model) minutes to flush the system and plumbing connections of any impurities (stopping to 3 pounds of the ice maker. Ice maker operation & care After the refrigerator is turned on at the factory so it attempts to force the ice forward in new plumbing lines can produce ice within 24 hours.
Complete Owner s Guide
Page 23
... in 45 degree turns (see below . • When dispensing cubed ice, it is not properly aligned when replacing the ice bin, the refrigerator will freeze together in the ice bin. Rinse with mild detergent. Ice dropping into the fresh food compartment. If the auger is accidentally rotated...along with the drive mechanism. Auger Adjusting Ice Bin Auger 23 AUTOMATIC ICE & WATER DISPENSER Ice maker/dispenser tips • If your refrigerator is softened, be sure the softener is properly maintained. Remove the ice bin and shake to loosen the cubes or clean as explained below...
... in 45 degree turns (see below . • When dispensing cubed ice, it is not properly aligned when replacing the ice bin, the refrigerator will freeze together in the ice bin. Rinse with mild detergent. Ice dropping into the fresh food compartment. If the auger is accidentally rotated...along with the drive mechanism. Auger Adjusting Ice Bin Auger 23 AUTOMATIC ICE & WATER DISPENSER Ice maker/dispenser tips • If your refrigerator is softened, be sure the softener is properly maintained. Remove the ice bin and shake to loosen the cubes or clean as explained below...


