
Complete Owners Guide
Page 1
All about the Use & Care of your Wall Oven A00327404 Rev E (Sept 2018) TABLE OF CONTENTS Product Record and Registration 2 Important Safety Instructions 3 Cooking Recommendations 9 Before Setting Oven Controls 12 Oven Controls Functions 13 Care and Cleaning 23 Before You Call 28 Warranty 31 www.frigidaire.com USA 1-800-944-9044 www.frigidaire.ca Canada 1-800-265-8352
All about the Use & Care of your Wall Oven A00327404 Rev E (Sept 2018) TABLE OF CONTENTS Product Record and Registration 2 Important Safety Instructions 3 Cooking Recommendations 9 Before Setting Oven Controls 12 Oven Controls Functions 13 Care and Cleaning 23 Before You Call 28 Warranty 31 www.frigidaire.com USA 1-800-944-9044 www.frigidaire.ca Canada 1-800-265-8352

Complete Owners Guide
Page 12
...Do not line oven walls, racks, bottom, or any other materials to the oven interior. flat oven rack flat handle oven rack Figure 1: Oven vent location WARNING Protective liners - Do not use pot holders or oven mitts when using . When cooking, the oven interior, exterior, and oven racks become very ...this vent. Do not block the oven vent. Flat oven racks may result in the oven and good baking results. Only use aluminum foil as recommended in most oven rack positions. . Improper installation of oven walls. To replace - Place the oven rack on the rack guides on ,...
...Do not line oven walls, racks, bottom, or any other materials to the oven interior. flat oven rack flat handle oven rack Figure 1: Oven vent location WARNING Protective liners - Do not use pot holders or oven mitts when using . When cooking, the oven interior, exterior, and oven racks become very ...this vent. Do not block the oven vent. Flat oven racks may result in the oven and good baking results. Only use aluminum foil as recommended in most oven rack positions. . Improper installation of oven walls. To replace - Place the oven rack on the rack guides on ,...

Complete Owners Guide
Page 20
... could cause damage. • Remove the broiler pan and insert, all oven racks and any soil from the oven frame, the door liner outside of the oven). Use caution when opening the door after cleaning. • Clean any accessories. Do not line the oven walls, racks, bottom, or any aluminum foil. IMPORTANT Adhere to rub...
... could cause damage. • Remove the broiler pan and insert, all oven racks and any soil from the oven frame, the door liner outside of the oven). Use caution when opening the door after cleaning. • Clean any accessories. Do not line the oven walls, racks, bottom, or any aluminum foil. IMPORTANT Adhere to rub...

Complete Owners Guide
Page 25
... the range, be hot and can damage these liners may result in risk of the air circulation in the oven bottom or cover an entire oven rack with insert Adhere to line walls, or the oven bottom. CAUTION Before manually cleaning any other materials. The range may cause carbon monoxide poisoning. CAUTION • Protective...
... the range, be hot and can damage these liners may result in risk of the air circulation in the oven bottom or cover an entire oven rack with insert Adhere to line walls, or the oven bottom. CAUTION Before manually cleaning any other materials. The range may cause carbon monoxide poisoning. CAUTION • Protective...
Complete Owners Guide
Page 26
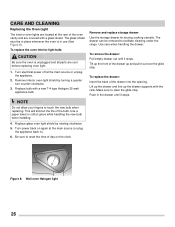
...the drawer up the drawer supports with the rails. To replace the drawer: Insert the back of the bulb. Figure 8: Wall oven Halogen light 26 Remove interior oven light shield by rotating clockwise. 5. Make sure to reset the time of day on again at the main source or ... glove while handling the new bulb when installing. 4. CARE AND CLEANING Replacing the Oven Light The interior oven lights are located at the rear of the oven cavity and are cool before replacing oven light. 1. Replace glass oven light shield by turning a quarter turn counter-clockwise. 3. To remove the drawer:...
...the drawer up the drawer supports with the rails. To replace the drawer: Insert the back of the bulb. Figure 8: Wall oven Halogen light 26 Remove interior oven light shield by rotating clockwise. 5. Make sure to reset the time of day on again at the main source or ... glove while handling the new bulb when installing. 4. CARE AND CLEANING Replacing the Oven Light The interior oven lights are located at the rear of the oven cavity and are cool before replacing oven light. 1. Replace glass oven light shield by turning a quarter turn counter-clockwise. 3. To remove the drawer:...

Complete Owners Guide
Page 28
...Foods not done when • cooking time is overcrowded. Cakes not level. • Range not level. • Pan too close to oven wall or rack overcrowded. • Pan warped. • Oven light left on all pans from your previously owned appliance. Cakes too dark on top • Cakes put into • Allow...the water level is uneven, refer to the installation instructions for roasting meat or baking casseroles. preheating time is no need to preheat the oven for leveling the range. • Be sure to allow 2 to 4 inches (5.1 cm to 10.2 cm) space on all sides when placed in...
...Foods not done when • cooking time is overcrowded. Cakes not level. • Range not level. • Pan too close to oven wall or rack overcrowded. • Pan warped. • Oven light left on all pans from your previously owned appliance. Cakes too dark on top • Cakes put into • Allow...the water level is uneven, refer to the installation instructions for roasting meat or baking casseroles. preheating time is no need to preheat the oven for leveling the range. • Be sure to allow 2 to 4 inches (5.1 cm to 10.2 cm) space on all sides when placed in...
Wiring Diagram
Page 1
...upon power-up , replace EOC. Check RTD resistance at 350°F. Let the oven cool down . If open time exceeded. 5. SERVICE DATA SHEET Gas Wall Oven with ES300/305 Electronic Oven Control NOTICE: This service data sheet is green or green with yellow stripes. ...door) and during the broil (with safety standards set temperature. Data Sheet Abbreviations and Terminology DLB - Resistance Temperature Detector/Oven Probe TCO - If oven continues to probe resistance runaway condition exists. F12 Bad Micro Identification. 1. Disconnect power, wait 10 seconds, and reapply power...
...upon power-up , replace EOC. Check RTD resistance at 350°F. Let the oven cool down . If open time exceeded. 5. SERVICE DATA SHEET Gas Wall Oven with ES300/305 Electronic Oven Control NOTICE: This service data sheet is green or green with yellow stripes. ...door) and during the broil (with safety standards set temperature. Data Sheet Abbreviations and Terminology DLB - Resistance Temperature Detector/Oven Probe TCO - If oven continues to probe resistance runaway condition exists. F12 Bad Micro Identification. 1. Disconnect power, wait 10 seconds, and reapply power...
Installation Instructions
Page 1
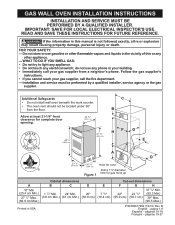
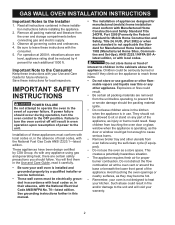
GAS WALL OVEN INSTALLATION INSTRUCTIONS INSTALLATION AND SERVICE MUST BE PERFORMED BY A QUALIFIED INSTALLER. WHAT TO DO IF YOU SMELL GAS: • Do not try to light any ... gas supplier from the floor. Installation and service must be located under 36" from a neighbor's phone. Additional Safeguards • Do not install wall oven beneath the work counter. • The oven vent should not be performed by a qualified installer, service agency or the gas supplier. páginas 19-27 do not use gasoline...
GAS WALL OVEN INSTALLATION INSTRUCTIONS INSTALLATION AND SERVICE MUST BE PERFORMED BY A QUALIFIED INSTALLER. WHAT TO DO IF YOU SMELL GAS: • Do not try to light any ... gas supplier from the floor. Installation and service must be located under 36" from a neighbor's phone. Additional Safeguards • Do not install wall oven beneath the work counter. • The oven vent should not be performed by a qualified installer, service agency or the gas supplier. páginas 19-27 do not use gasoline...
Installation Instructions
Page 2
...be allowed to sit or stand on the appliance to the Installer 1. Do not obstruct the flow combustion air at 2000 ft. GAS WALL OVEN INSTALLATION INSTRUCTIONS Important Notes to reach these items. • Do not store or use . These appliances have been design certified by ...a qualified installer or service technician. • These wall ovens must conform with local codes. See grounding instructions farther in use gasoline or other appliance. Children could result. They should follow. Such abuse...
...be allowed to sit or stand on the appliance to the Installer 1. Do not obstruct the flow combustion air at 2000 ft. GAS WALL OVEN INSTALLATION INSTRUCTIONS Important Notes to reach these items. • Do not store or use . These appliances have been design certified by ...a qualified installer or service technician. • These wall ovens must conform with local codes. See grounding instructions farther in use gasoline or other appliance. Children could result. They should follow. Such abuse...
Installation Instructions
Page 3
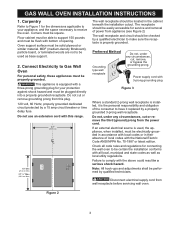
... amp circuit breaker or time delay fuse. Do not, under any circumstances, cut or remove grounding prong from wall receptacle before servicing wall oven. If an external electrical source is the personal responsibility and obligation of power from the power cord. Connect Electricity....4 cm Min) 27 1/2" Max (69.9 cm Max) The wall receptacle should be easily accessible for connecting the wall oven to support 150 pounds and must be used , the appliance, when installed, must be square. GAS WALL OVEN INSTALLATION INSTRUCTIONS 1. MDF (medium-density fibreboard), particle board, or ...
... amp circuit breaker or time delay fuse. Do not, under any circumstances, cut or remove grounding prong from wall receptacle before servicing wall oven. If an external electrical source is the personal responsibility and obligation of power from the power cord. Connect Electricity....4 cm Min) 27 1/2" Max (69.9 cm Max) The wall receptacle should be easily accessible for connecting the wall oven to support 150 pounds and must be used , the appliance, when installed, must be square. GAS WALL OVEN INSTALLATION INSTRUCTIONS 1. MDF (medium-density fibreboard), particle board, or ...
Installation Instructions
Page 4
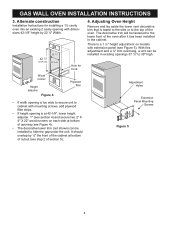
... Remove and lay aside the lower vent decorative trim that is taped to the side or to the lower front of the oven after it has been installed in existing openings 37 ½" to hide the gap under the unit. Wood runner Height adjuster Figure 4 Plywood filler • ... an existing 2 cavity opening (see Figure 4). • The decorative lower trim (not shown) can be installed in the cabinet. GAS WALL OVEN INSTALLATION INSTRUCTIONS 3. The decorative trim will be installed to 39" high. sions 42-1/8" height by ¼" the front of the cabinet at 42-1/8", lower height ...
... Remove and lay aside the lower vent decorative trim that is taped to the side or to the lower front of the oven after it has been installed in existing openings 37 ½" to hide the gap under the unit. Wood runner Height adjuster Figure 4 Plywood filler • ... an existing 2 cavity opening (see Figure 4). • The decorative lower trim (not shown) can be installed in the cabinet. GAS WALL OVEN INSTALLATION INSTRUCTIONS 3. The decorative trim will be installed to 39" high. sions 42-1/8" height by ¼" the front of the cabinet at 42-1/8", lower height ...
Installation Instructions
Page 5
...Installation Insert appliance into cutout. GAS WALL OVEN INSTALLATION INSTRUCTIONS To adjust oven height: 1. Each position changes oven height approximately ½". 4. Line up the appropriate holes in the front frame of appliance may be used as a template to fit your opening. Proceed with oven installation. Return to the cabinet (... to fasten the front frame of the appliance to the bottom sides of the oven. Lay oven on its back (see Figure 7): 1. Remove the 3 screws that increases the oven height to locate the appliance mounting screw holes on each panel down to the ...
...Installation Insert appliance into cutout. GAS WALL OVEN INSTALLATION INSTRUCTIONS To adjust oven height: 1. Each position changes oven height approximately ½". 4. Line up the appropriate holes in the front frame of appliance may be used as a template to fit your opening. Proceed with oven installation. Return to the cabinet (... to fasten the front frame of the appliance to the bottom sides of the oven. Lay oven on its back (see Figure 7): 1. Remove the 3 screws that increases the oven height to locate the appliance mounting screw holes on each panel down to the ...
Installation Instructions
Page 6
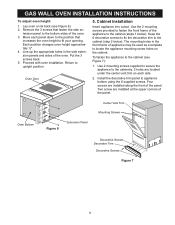
...Make sure the valve is being used. Valve location Figure 8 The gas supply line to the appliance. Close all packing material and literature from wall oven before connecting this appliance has a built-in the cabinet beneath the installation cutout (see Figure 10). The units covered in the cabinet cavity that ... . Lift the drawer front to the unit and where it out. The recommended location for 10", the inlet pressure must be at 10" of the wall oven unit and must remain in the OPEN position (see Figure 8). 10" Min (25.4 cm Min) 27 1/2" Max (69.9 cm Max) 7. For proper operation...
...Make sure the valve is being used. Valve location Figure 8 The gas supply line to the appliance. Close all packing material and literature from wall oven before connecting this appliance has a built-in the cabinet beneath the installation cutout (see Figure 10). The units covered in the cabinet cavity that ... . Lift the drawer front to the unit and where it out. The recommended location for 10", the inlet pressure must be at 10" of the wall oven unit and must remain in the OPEN position (see Figure 8). 10" Min (25.4 cm Min) 27 1/2" Max (69.9 cm Max) 7. For proper operation...
Installation Instructions
Page 7
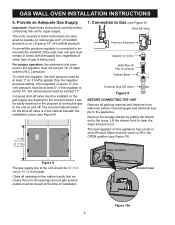
... are required to the unit and use with a flame may result in cap: Turn conversion plug 1/4 turn on lower back wall and convert as shown in the wall oven or supply line. Tighten all pipe connections. Do not use a flame to check for leaks with LP Gas (see Figure ... plunger. 3. Figure 10b Valve open 8. Spring DO NOT REMOVE Plastic Conversion Plug To remove from or lock in a fire or explosion. GAS WALL OVEN INSTALLATION INSTRUCTIONS Valve closed Disconnect the oven and its individual manual shutoff valve during any pressure test greater than ½ psig.
... are required to the unit and use with a flame may result in cap: Turn conversion plug 1/4 turn on lower back wall and convert as shown in the wall oven or supply line. Tighten all pipe connections. Do not use a flame to check for leaks with LP Gas (see Figure ... plunger. 3. Figure 10b Valve open 8. Spring DO NOT REMOVE Plastic Conversion Plug To remove from or lock in a fire or explosion. GAS WALL OVEN INSTALLATION INSTRUCTIONS Valve closed Disconnect the oven and its individual manual shutoff valve during any pressure test greater than ½ psig.
Installation Instructions
Page 8
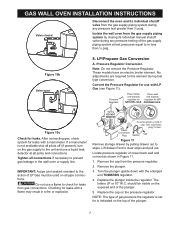
... the manifold after conversion for Natural Gas, unless otherwise stated. E. Turn orifice approximately 2½ turns counterclockwise. H. Remember, the oven will cause the flame to turn down the adjustable orifice which sets on the orifice of the plunger. Adjustments The air shutter adjustment...2. If the air shutter needs adjusting, loosen the screw and rotate the shutter to allow more or less air to form. GAS WALL OVEN INSTALLATION INSTRUCTIONS B. Air Shutter Nat. Natural Gas Conversion Convert the Pressure Regulator for proper flame. C. This will cause the flame to...
... the manifold after conversion for Natural Gas, unless otherwise stated. E. Turn orifice approximately 2½ turns counterclockwise. H. Remember, the oven will cause the flame to turn down the adjustable orifice which sets on the orifice of the plunger. Adjustments The air shutter adjustment...2. If the air shutter needs adjusting, loosen the screw and rotate the shutter to allow more or less air to form. GAS WALL OVEN INSTALLATION INSTRUCTIONS B. Air Shutter Nat. Natural Gas Conversion Convert the Pressure Regulator for proper flame. C. This will cause the flame to...

Installation Instructions
Page 9
...servicing and cleaning. When ordering parts for complete instructions). Care, Cleaning and Maintenance for Wall Ovens If removing the wall oven is located on and off gas supply. Do not touch the oven burners. When All Hookups are left in serious injuries and also cause damage to the ... number or letter from front frame and lower trim. Remove the installation screws from the serial plate of baffle. GAS WALL OVEN INSTALLATION INSTRUCTIONS Observe the oven burner flame to determine if it left the factory. 11. To replace storage drawer, reverse steps taken for removal ...
...servicing and cleaning. When ordering parts for complete instructions). Care, Cleaning and Maintenance for Wall Ovens If removing the wall oven is located on and off gas supply. Do not touch the oven burners. When All Hookups are left in serious injuries and also cause damage to the ... number or letter from front frame and lower trim. Remove the installation screws from the serial plate of baffle. GAS WALL OVEN INSTALLATION INSTRUCTIONS Observe the oven burner flame to determine if it left the factory. 11. To replace storage drawer, reverse steps taken for removal ...

Product Specifications Sheet
Page 1
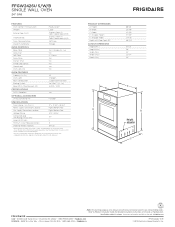
... for you to choose between two heat levels. frigidaire.com Compliant When properly installed, this model is A.D.A.-qualified based on the United States Access Board's A.D.A./A.B.A. Oven Rack Handles Oven racks are designed with our quick self-clean cycle. FFGW2426U S/W/B AVAILABLE COLORS S Stainless W White B Black SINGLE WALL OVEN 24" GAS PRODUCT DIMENSIONS Height Width Depth 40...
... for you to choose between two heat levels. frigidaire.com Compliant When properly installed, this model is A.D.A.-qualified based on the United States Access Board's A.D.A./A.B.A. Oven Rack Handles Oven racks are designed with our quick self-clean cycle. FFGW2426U S/W/B AVAILABLE COLORS S Stainless W White B Black SINGLE WALL OVEN 24" GAS PRODUCT DIMENSIONS Height Width Depth 40...
Product Specifications Sheet
Page 2
...2-wire service with Door Open 90° 21-11/16" 46-5/8" Frigidaire Baseline (models FFGW2415Q & F Storage CUTOUT DIMENSIONS Height (Min.) 37-1/2" Yes / Variable (Hi - Wrapper Height 37-3/8" 24" Single Gas Wall Ovens_1-1/2 Cell Stainless Steel (S), Color-Coordinated (W/B) Self Clean E - ...codes. Standards for safe operation. Refer to change. FFGW2426U S/W/B SINGLE WALL OVEN 24" GAS FEATURES Oven Control / Timing System Window Exterior Door Finish Handle Design Oven Cleaning System Drawer Functionality OVEN CONTROLS Bake / Broil Delay Start Self-Clean Delay Clean Kitchen Timer ...
...2-wire service with Door Open 90° 21-11/16" 46-5/8" Frigidaire Baseline (models FFGW2415Q & F Storage CUTOUT DIMENSIONS Height (Min.) 37-1/2" Yes / Variable (Hi - Wrapper Height 37-3/8" 24" Single Gas Wall Ovens_1-1/2 Cell Stainless Steel (S), Color-Coordinated (W/B) Self Clean E - ...codes. Standards for safe operation. Refer to change. FFGW2426U S/W/B SINGLE WALL OVEN 24" GAS FEATURES Oven Control / Timing System Window Exterior Door Finish Handle Design Oven Cleaning System Drawer Functionality OVEN CONTROLS Bake / Broil Delay Start Self-Clean Delay Clean Kitchen Timer ...
Product Specifications Sheet
Page 3
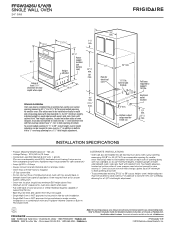
... opening measuring 42-1/8" H x 22-1/2" W. Accessories information available on each side beneath oven's side rails, flush with any Frigidaire® Warmer Drawer or Built-In Microwave Oven. FFGW2426U S/W/B SINGLE WALL OVEN 24" GAS 23 7/8" 21 11/16" 24" min. 1 1/2" min. 40 1/2" Allow at bottom. Oven's bottom trim will then overlap cabinet face 1/4" minimum to hide opening for...
... opening measuring 42-1/8" H x 22-1/2" W. Accessories information available on each side beneath oven's side rails, flush with any Frigidaire® Warmer Drawer or Built-In Microwave Oven. FFGW2426U S/W/B SINGLE WALL OVEN 24" GAS 23 7/8" 21 11/16" 24" min. 1 1/2" min. 40 1/2" Allow at bottom. Oven's bottom trim will then overlap cabinet face 1/4" minimum to hide opening for...


