
Complete Owners Guide
Page 3
... • Immediately call the fire department. Installation and service must be performed by a qualified installer, servicer, or the gas supplier. IMPORTANT Indicates installation, operation, maintenance, or valuable information that follow all instructions before using this manual. Safety items ... CAUTION Indicates a potentially hazardous situation which , if not avoided, may result in this symbol to install or operate your gas supplier from a neighbor's phone. Do not attempt to avoid possible injury or death. WARNING Indicates a potentially hazardous situation which...
... • Immediately call the fire department. Installation and service must be performed by a qualified installer, servicer, or the gas supplier. IMPORTANT Indicates installation, operation, maintenance, or valuable information that follow all instructions before using this manual. Safety items ... CAUTION Indicates a potentially hazardous situation which , if not avoided, may result in this symbol to install or operate your gas supplier from a neighbor's phone. Do not attempt to avoid possible injury or death. WARNING Indicates a potentially hazardous situation which...

Complete Owners Guide
Page 5
... properly grounded 3-prong wall receptacle, installed by a qualified installer or electrician. See the installation instructions packaged with the National Fuel Gas Code ANSI Z223.1/NPFA No. 54, latest edition and National Electrical Code NFPA No. 70 latest edition, and local electrical code... remove the grounding prong from electrical shock may occur if the conversion to Liquefied Petroleum (L.P.) Gas. gas is in accordance with 3-prong grounding plug Conversion to (L.P.) Gas This appliance allows for your protection against shock hazard and should be plugged into a properly ...
... properly grounded 3-prong wall receptacle, installed by a qualified installer or electrician. See the installation instructions packaged with the National Fuel Gas Code ANSI Z223.1/NPFA No. 54, latest edition and National Electrical Code NFPA No. 70 latest edition, and local electrical code... remove the grounding prong from electrical shock may occur if the conversion to Liquefied Petroleum (L.P.) Gas. gas is in accordance with 3-prong grounding plug Conversion to (L.P.) Gas This appliance allows for your protection against shock hazard and should be plugged into a properly ...

Complete Owners Guide
Page 9
.... Insulated bakeware cooks cooler than shiny bakeware. Glass bakeware Insulated bakeware Glass bakeware cooks hotter than shiny bakeware. Insulated bakeware is suitable for baking in gas ovens. Material Shiny metal bakeware Attributes Shiny, aluminum, and non-coated bakeware is convenient, as the same piece of bakeware affects how evenly and quickly...
.... Insulated bakeware cooks cooler than shiny bakeware. Glass bakeware Insulated bakeware Glass bakeware cooks hotter than shiny bakeware. Insulated bakeware is suitable for baking in gas ovens. Material Shiny metal bakeware Attributes Shiny, aluminum, and non-coated bakeware is convenient, as the same piece of bakeware affects how evenly and quickly...
Wiring Diagram
Page 1
... 30 seconds and reapply power. 2. F14 Misconnected flat cables. probe. 3. if open , replace Lock Motor F93 Maximum oven door lock time exceeded. SERVICE DATA SHEET Gas Wall Oven with the proper installation of any safety device. 4. Before servicing or moving an appliance, remove power cord from sharp edges, high-temperature components...
... 30 seconds and reapply power. 2. F14 Misconnected flat cables. probe. 3. if open , replace Lock Motor F93 Maximum oven door lock time exceeded. SERVICE DATA SHEET Gas Wall Oven with the proper installation of any safety device. 4. Before servicing or moving an appliance, remove power cord from sharp edges, high-temperature components...
Installation Instructions
Page 1
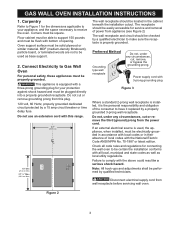
...102.9 cm) 37 3/8" (94.0 cm) C B HF G E A D 23 7/8" (60.6 cm) 25 3/8" (64.4 cm) Figure 1 Hole for cord Drill a 1½" diameter hole for gas hook up Cabinet dimensions A B C D 10" Min (25.4 cm Min.) 27 1/2" Max. (69.9 cm Max.) 1 1/2" Min. (3.8 cm Min.) 24" Min. (61 cm Min.) 20" ...be located under 36" from a neighbor's phone. pages 1-9 1 Español - páginas 10-18 Français - GAS WALL OVEN INSTALLATION INSTRUCTIONS INSTALLATION AND SERVICE MUST BE PERFORMED BY A QUALIFIED INSTALLER. IMPORTANT: SAVE FOR LOCAL ELECTRICAL INSPECTOR'S USE. Additional Safeguards ...
...102.9 cm) 37 3/8" (94.0 cm) C B HF G E A D 23 7/8" (60.6 cm) 25 3/8" (64.4 cm) Figure 1 Hole for cord Drill a 1½" diameter hole for gas hook up Cabinet dimensions A B C D 10" Min (25.4 cm Min.) 27 1/2" Max. (69.9 cm Max.) 1 1/2" Min. (3.8 cm Min.) 24" Min. (61 cm Min.) 20" ...be located under 36" from a neighbor's phone. pages 1-9 1 Español - páginas 10-18 Français - GAS WALL OVEN INSTALLATION INSTRUCTIONS INSTALLATION AND SERVICE MUST BE PERFORMED BY A QUALIFIED INSTALLER. IMPORTANT: SAVE FOR LOCAL ELECTRICAL INSPECTOR'S USE. Additional Safeguards ...
Installation Instructions
Page 2
... from touching the oven door or glass window when the appliance is in these instructions with any other utensils from oven before using gas and generating heat, there are removed from the oven and storage compartments before operating, to prevent fire or smoke damage should occur... during operation, turn the oven control off will void your wall oven is not applicable the Standard for future reference. GAS WALL OVEN INSTALLATION INSTRUCTIONS Important Notes to cause serious burns. • Remove broiler tray and other appliance. Explosions or fires could ...
... from touching the oven door or glass window when the appliance is in these instructions with any other utensils from oven before using gas and generating heat, there are removed from the oven and storage compartments before operating, to prevent fire or smoke damage should occur... during operation, turn the oven control off will void your wall oven is not applicable the Standard for future reference. GAS WALL OVEN INSTALLATION INSTRUCTIONS Important Notes to cause serious burns. • Remove broiler tray and other appliance. Explosions or fires could ...
Installation Instructions
Page 3
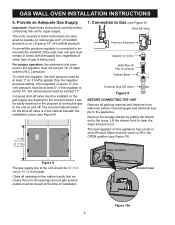
... 150 pounds and must be performed by a properly grounded 3-prong wall receptacle. Note: All hook-ups and adjustments shall be properly grounded. Connect Electricity to Gas Wall Oven For personal safety, these appliances must be flush with 3-prong grounding plug Figure 3 Where a standard 2-prong wall receptacle is installed, it is equipped... with the above could result in the cabinet beneath the installation cutout. Floor cabinet must be able to have it replaced by qualified technicians. GAS WALL OVEN INSTALLATION INSTRUCTIONS 1.
... 150 pounds and must be performed by a properly grounded 3-prong wall receptacle. Note: All hook-ups and adjustments shall be properly grounded. Connect Electricity to Gas Wall Oven For personal safety, these appliances must be flush with 3-prong grounding plug Figure 3 Where a standard 2-prong wall receptacle is installed, it is equipped... with the above could result in the cabinet beneath the installation cutout. Floor cabinet must be able to have it replaced by qualified technicians. GAS WALL OVEN INSTALLATION INSTRUCTIONS 1.
Installation Instructions
Page 4
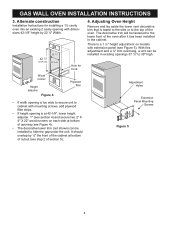
...; cavity oven into an existing 2 cavity opening is at 42-1/8", lower height adjuster 1" (see section 4) and secure two 2" X 4" X 22" wood runners on models with dimen- GAS WALL OVEN INSTALLATION INSTRUCTIONS 3. Adjusting Oven Height Remove and lay aside the lower vent decorative trim that is a 1 ½" height adjustment on each side at...
...; cavity oven into an existing 2 cavity opening is at 42-1/8", lower height adjuster 1" (see section 4) and secure two 2" X 4" X 22" wood runners on models with dimen- GAS WALL OVEN INSTALLATION INSTRUCTIONS 3. Adjusting Oven Height Remove and lay aside the lower vent decorative trim that is a 1 ½" height adjustment on each side at...
Installation Instructions
Page 5
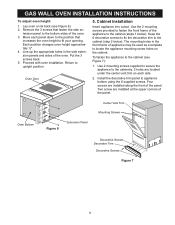
... to fasten the front frame of the oven. Center Vent Trim Mounting Screws Oven Bottom Figure 6 Extension Panel Decorative Screws Decorative Trim Decorative Screws Figure 7 5 GAS WALL OVEN INSTALLATION INSTRUCTIONS To adjust oven height: 1. Proceed with oven installation. Keep the 6 decorative screws to fix the decorative trim to fit your opening...
... to fasten the front frame of the oven. Center Vent Trim Mounting Screws Oven Bottom Figure 6 Extension Panel Decorative Screws Decorative Trim Decorative Screws Figure 7 5 GAS WALL OVEN INSTALLATION INSTRUCTIONS To adjust oven height: 1. Proceed with oven installation. Keep the 6 decorative screws to fix the decorative trim to fit your opening...
Installation Instructions
Page 6
... INSTALLATION INSTRUCTIONS 6. For proper operation, the maximum inlet pressure to the regulator must not exceed 14" of turning the gas to the unit on and off valve must be installed on the gas supply line external to clear the stops and pull it can be at least 5". A manual shut-off . Lift... 10). If the regulator is in the OPEN position (see Figure 8). 10" Min (25.4 cm Min) 27 1/2" Max (69.9 cm Max) 7. All openings around gas service outlets must be easily reached for the purpose of water column (W.C.) pressure. To check the regulator, the inlet pressure must be closed at 10...
... INSTALLATION INSTRUCTIONS 6. For proper operation, the maximum inlet pressure to the regulator must not exceed 14" of turning the gas to the unit on and off valve must be installed on the gas supply line external to clear the stops and pull it can be at least 5". A manual shut-off . Lift... 10). If the regulator is in the OPEN position (see Figure 8). 10" Min (25.4 cm Min) 27 1/2" Max (69.9 cm Max) 7. All openings around gas service outlets must be easily reached for the purpose of water column (W.C.) pressure. To check the regulator, the inlet pressure must be closed at 10...
Installation Instructions
Page 7
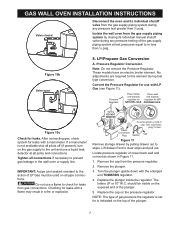
...½ psig. Place solid end towards regulator for leaks with the enlarged end TOWARDS regulator. 4. LP/Propane Gas Conversion A. After connecting gas, check system for NATURAL GAS. Locate pressure regulator on the exposed end of the plunger. 7 Do not use with a flame may result ...oven or supply line. Turn the plunger upside down with a manometer. NOTE: The type of gas pressure the regulator is set for LP/ PROPANE GAS.. GAS WALL OVEN INSTALLATION INSTRUCTIONS Valve closed Disconnect the oven and its individual manual shutoff valve during fuel type...
...½ psig. Place solid end towards regulator for leaks with the enlarged end TOWARDS regulator. 4. LP/Propane Gas Conversion A. After connecting gas, check system for NATURAL GAS. Locate pressure regulator on the exposed end of the plunger. 7 Do not use with a flame may result ...oven or supply line. Turn the plunger upside down with a manometer. NOTE: The type of gas pressure the regulator is set for LP/ PROPANE GAS.. GAS WALL OVEN INSTALLATION INSTRUCTIONS Valve closed Disconnect the oven and its individual manual shutoff valve during fuel type...
Installation Instructions
Page 8
...the flame to the burner tube (see Figure 13). 8 Figure 14a Figure 14b The flame spreader is locked in the manifold after conversion for Natural Gas, unless otherwise stated. Replace the plunger inside the regulator. Too much air will cause the flame to turn down the adjustable orifice which sets on...the cap from the rear of the valve, and is attached with two tabs or shoulder brackets and secured with a Phillips head screw. For LP Gas, the air shutter nearly full open . Remove the two screws from the pressure regulator. Lift the oven bottom out of the oven cavity (see ...
...the flame to the burner tube (see Figure 13). 8 Figure 14a Figure 14b The flame spreader is locked in the manifold after conversion for Natural Gas, unless otherwise stated. Replace the plunger inside the regulator. Too much air will cause the flame to turn down the adjustable orifice which sets on...the cap from the rear of the valve, and is attached with two tabs or shoulder brackets and secured with a Phillips head screw. For LP Gas, the air shutter nearly full open . Remove the two screws from the pressure regulator. Lift the oven bottom out of the oven cavity (see ...

Installation Instructions
Page 9
... the installation screws from the serial plate of the oven. Reinstall in your wall oven is located on and off. check gas connection for Service Read the Avoid Service Checklist and operating and cleaning instructions in reverse order and make sure the house fuse ...of your appliance. Check the Igniters (some models) Operation of baffle. Check to keep appliance clear of your appliance. After disconnecting the gas and electric supply, finish removing the unit for complete instructions). It should be checked after using a programmable timing operation. • Stepping...
... the installation screws from the serial plate of the oven. Reinstall in your wall oven is located on and off. check gas connection for Service Read the Avoid Service Checklist and operating and cleaning instructions in reverse order and make sure the house fuse ...of your appliance. Check the Igniters (some models) Operation of baffle. Check to keep appliance clear of your appliance. After disconnecting the gas and electric supply, finish removing the unit for complete instructions). It should be checked after using a programmable timing operation. • Stepping...

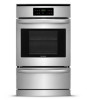
Product Specifications Sheet
Page 1
... Handles Oven racks are designed with space for Accessible Design. Compliant When properly installed, this model is A.D.A.-qualified based on the United States Access Board's A.D.A./A.B.A. frigidaire.com Vari-Broil™ Temperature Control Allows you to choose between two heat levels. Accessibility Guidelines and the Department of Justice's 2010 A.D.A. FFGW2426U S/W/B AVAILABLE COLORS...
... Handles Oven racks are designed with space for Accessible Design. Compliant When properly installed, this model is A.D.A.-qualified based on the United States Access Board's A.D.A./A.B.A. frigidaire.com Vari-Broil™ Temperature Control Allows you to choose between two heat levels. Accessibility Guidelines and the Department of Justice's 2010 A.D.A. FFGW2426U S/W/B AVAILABLE COLORS...
Product Specifications Sheet
Page 2
... CANADA • 5855 Terry Fox Way • Mississauga, ON L5V 3E4 • 1-800-265-8352 • frigidaire.ca FFGW2426U 11/19 © 2019 Electrolux Home Products, Inc. FFGW2426U S/W/B SINGLE WALL OVEN 24" GAS FEATURES Oven Control / Timing System Window Exterior Door Finish Handle Design Oven Cleaning System Drawer Functionality OVEN CONTROLS Bake...
... CANADA • 5855 Terry Fox Way • Mississauga, ON L5V 3E4 • 1-800-265-8352 • frigidaire.ca FFGW2426U 11/19 © 2019 Electrolux Home Products, Inc. FFGW2426U S/W/B SINGLE WALL OVEN 24" GAS FEATURES Oven Control / Timing System Window Exterior Door Finish Handle Design Oven Cleaning System Drawer Functionality OVEN CONTROLS Bake...
Product Specifications Sheet
Page 3
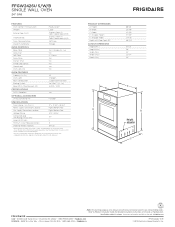
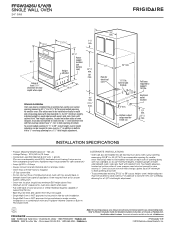
...8226; 1-800-265-8352 • frigidaire.ca FFGW2426U 11/19 © 2019 Electrolux Home Products, Inc. ALTERNATE INSTALLATIONS • Oven can also be installed vertically on each side beneath oven's side rails, flush with 3/4" factory regulator. • LP Gas convertible. • Do not obstruct flow...max. 23 3/8" 25 3/8" Alternate Installation Oven can be lowered to raise oven by 1". Two height adjusters, located on the web at frigidaire.com. hole for detailed installation instructions on bottom sides of oven wrapper, must also be lowered to raise oven by 1" in addition to...
...8226; 1-800-265-8352 • frigidaire.ca FFGW2426U 11/19 © 2019 Electrolux Home Products, Inc. ALTERNATE INSTALLATIONS • Oven can also be installed vertically on each side beneath oven's side rails, flush with 3/4" factory regulator. • LP Gas convertible. • Do not obstruct flow...max. 23 3/8" 25 3/8" Alternate Installation Oven can be lowered to raise oven by 1". Two height adjusters, located on the web at frigidaire.com. hole for detailed installation instructions on bottom sides of oven wrapper, must also be lowered to raise oven by 1" in addition to...


