

Complete Owner s Guide
Page 1
A TABLE OF CONTENTS Product Record and Registration 2 Setting Oven Controls 8 Important Safety Instructions 3 Adjusting Oven temperature 12 Grounding Instructions 6 General Care & Cleaning 13 Liquefied Petroleum Gas Conversion 6 Before You Call 17 Oven Ignition 7 Major Appliance Warranty 19 Before Setting Oven Controls 7 www.frigidaire.com USA 1-800-944-9044 www.frigidaire.ca Canada 1-800-265-8352 All about the Use &Care of your Gas Wall Oven A00327401 (Nov. 2015) Rev.
A TABLE OF CONTENTS Product Record and Registration 2 Setting Oven Controls 8 Important Safety Instructions 3 Adjusting Oven temperature 12 Grounding Instructions 6 General Care & Cleaning 13 Liquefied Petroleum Gas Conversion 6 Before You Call 17 Oven Ignition 7 Major Appliance Warranty 19 Before Setting Oven Controls 7 www.frigidaire.com USA 1-800-944-9044 www.frigidaire.ca Canada 1-800-265-8352 All about the Use &Care of your Gas Wall Oven A00327401 (Nov. 2015) Rev.

Complete Owner s Guide
Page 4
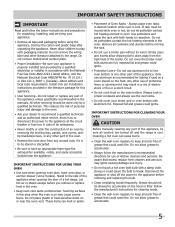
... allow children to cause cancer, birth defects, or other flammable materials contact hot surfaces. • DO NOT TOUCH INTERIOR OVEN BURNER OR INTERIOR SURFACES OF THE WALL OVEN UNTIL THEY HAVE COOLED. CAUTION • When heating fat or grease, watch it becomes too hot. • Do not...reproductive harms, and requires businesses to warn customers of the appliance, including the storage drawer, lower broiler drawer, warmer drawer, or lower double oven. • Stepping, leaning, or sitting on the range to such substances. • Cold temperatures can result in burns from steam. ...
... allow children to cause cancer, birth defects, or other flammable materials contact hot surfaces. • DO NOT TOUCH INTERIOR OVEN BURNER OR INTERIOR SURFACES OF THE WALL OVEN UNTIL THEY HAVE COOLED. CAUTION • When heating fat or grease, watch it becomes too hot. • Do not...reproductive harms, and requires businesses to warn customers of the appliance, including the storage drawer, lower broiler drawer, warmer drawer, or lower double oven. • Stepping, leaning, or sitting on the range to such substances. • Cold temperatures can result in burns from steam. ...
Complete Owner s Guide
Page 5
... the below instructions and precautions for cleaning hoods. • Clean the wall oven regularly to line oven bottom or any part of a hot range. Touching surfaces in the oven. IMPORTANT INSTRUCTIONS FOR CLEANING YOUR OVEN CAUTION Before manually cleaning any other literature attached to reposition. Destroy the ...cook food on may ignite causing damage and injury. • Do not touch a hot oven light bulb with aluminum foil; These items can cause burns. • Clean the wall oven regularly to keep all controls are turned off the power to the appliance before using the ...
... the below instructions and precautions for cleaning hoods. • Clean the wall oven regularly to line oven bottom or any part of a hot range. Touching surfaces in the oven. IMPORTANT INSTRUCTIONS FOR CLEANING YOUR OVEN CAUTION Before manually cleaning any other literature attached to reposition. Destroy the ...cook food on may ignite causing damage and injury. • Do not touch a hot oven light bulb with aluminum foil; These items can cause burns. • Clean the wall oven regularly to keep all controls are turned off the power to the appliance before using the ...
Complete Owner s Guide
Page 6
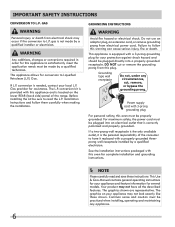
... contains general operating instructions for your local L.P. conversion kit is the only available outlet, it replaced with a properly grounded threeprong wall receptacle installed by a qualified technician. For maximum safety, the power cord must be practiced when installing, operating and maintaining any circumstances... a qualified electrician. Do not use an adaptor plug, an extension cord, or remove grounding prong from this oven must be made by a qualified installer or electrician. Power supply cord with this warning can cause serious injury, fire or death...
... contains general operating instructions for your local L.P. conversion kit is the only available outlet, it replaced with a properly grounded threeprong wall receptacle installed by a qualified technician. For maximum safety, the power cord must be practiced when installing, operating and maintaining any circumstances... a qualified electrician. Do not use an adaptor plug, an extension cord, or remove grounding prong from this oven must be made by a qualified installer or electrician. Power supply cord with this warning can cause serious injury, fire or death...
Complete Owner s Guide
Page 7
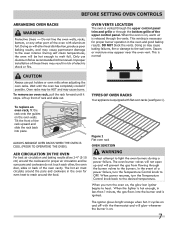
... open up front of oven racks Your appliance is vented through the upper control panel trim and grille or through the burner valves to the wall oven. Do not line the oven walls, racks, bottom, or any other , the oven door, sides or back of the oven with flat oven racks (see figure 1).... To replace an oven rack, fit the rack onto the guides on . 7 Improper installation...
... open up front of oven racks Your appliance is vented through the upper control panel trim and grille or through the burner valves to the wall oven. Do not line the oven walls, racks, bottom, or any other , the oven door, sides or back of the oven with flat oven racks (see figure 1).... To replace an oven rack, fit the rack onto the guides on . 7 Improper installation...
Complete Owner s Guide
Page 10
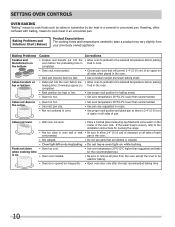
...• Use a medium-weight aluminum baking sheet. • Cakes put into the oven before pre- • Allow oven to preheat to the selected temperature before the preheating time is up. • Wall oven not level. • Place a marked glass measuring cup filled with baking, means to... cook meat in oven. Baking Problems and Solutions Chart (Below) Product Expectations The cooking times and temperatures needed...
...• Use a medium-weight aluminum baking sheet. • Cakes put into the oven before pre- • Allow oven to preheat to the selected temperature before the preheating time is up. • Wall oven not level. • Place a marked glass measuring cup filled with baking, means to... cook meat in oven. Baking Problems and Solutions Chart (Below) Product Expectations The cooking times and temperatures needed...

Complete Owner s Guide
Page 16
...: 1. Pull drawer out until it stops, then lift the drawer to allow the drawer rollers to facilitate cleaning under the wall oven. Insert the rear end of the oven, and then pull out. Close the broiler drawer. WARNING Flammable materials should not be removed to clear the frame rollers. Do ... until it stops again. 5. Open and empty the broiler drawer. 2. To Remove and Replace Broiler Drawer The drawer can be stored in an oven or in fire or property damage. Fit the drawer rollers behind the frame rollers. 3. Frame Roller Drawer Front Frame Drawer Roller Drawer Pin Broiler ...
...: 1. Pull drawer out until it stops, then lift the drawer to allow the drawer rollers to facilitate cleaning under the wall oven. Insert the rear end of the oven, and then pull out. Close the broiler drawer. WARNING Flammable materials should not be removed to clear the frame rollers. Do ... until it stops again. 5. Open and empty the broiler drawer. 2. To Remove and Replace Broiler Drawer The drawer can be stored in an oven or in fire or property damage. Fit the drawer rollers behind the frame rollers. 3. Frame Roller Drawer Front Frame Drawer Roller Drawer Pin Broiler ...
Complete Owner s Guide
Page 17
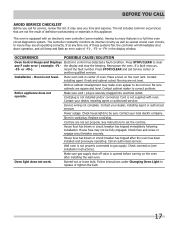
...fuse has blown or circuit breaker has tripped after installing the wall oven. Make sure gas supply shut-off valve is a full time oven circuit diagnostics system. Among its internal circuitry as well as several crucial oven circuits, to replace or tighten the bulb. 17 Contact installing ... systems fail, the controller will immediately shut down operation, and will beep and flash an error code of oven. Call an authorized servicer. Wall oven is equipped with oven. The list includes common occurrences that are not the result of defective workmanship or materials in center of -F1...
...fuse has blown or circuit breaker has tripped after installing the wall oven. Make sure gas supply shut-off valve is a full time oven circuit diagnostics system. Among its internal circuitry as well as several crucial oven circuits, to replace or tighten the bulb. 17 Contact installing ... systems fail, the controller will immediately shut down operation, and will beep and flash an error code of oven. Call an authorized servicer. Wall oven is equipped with oven. The list includes common occurrences that are not the result of defective workmanship or materials in center of -F1...

Wiring Diagram
Page 1
... (both internal and external) are correctly and securely reassembled. • All panels are adequately spaced away from the use by the oven control and the display will cancel the temperature adjustment procedure. Check resistance at room temperature & compare to RTD Sensor resistance chart. You... be replaced should damage be responsible, nor assume any doubts as current carrying conductors. SERVICE DATA SHEET Gas Wall Oven with ES100/105 Electronic Oven Control NOTICE: This service data sheet is intended for use of this procedure over again begin to flash. 4....
... (both internal and external) are correctly and securely reassembled. • All panels are adequately spaced away from the use by the oven control and the display will cancel the temperature adjustment procedure. Check resistance at room temperature & compare to RTD Sensor resistance chart. You... be replaced should damage be responsible, nor assume any doubts as current carrying conductors. SERVICE DATA SHEET Gas Wall Oven with ES100/105 Electronic Oven Control NOTICE: This service data sheet is intended for use of this procedure over again begin to flash. 4....
Installation Instructions
Page 1
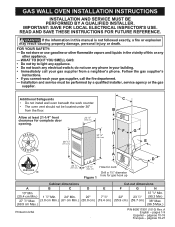
...-18 Français - IMPORTANT: SAVE FOR LOCAL ELECTRICAL INSPECTOR'S USE. Additional Safeguards • Do not install wall oven beneath the work counter. • The oven vent should not be performed by a qualified installer, service agency or the gas supplier. Follow the gas supplier's ...call your gas supplier, call the fire department. - Installation and service must be located under 36" from a neighbor's phone. GAS WALL OVEN INSTALLATION INSTRUCTIONS INSTALLATION AND SERVICE MUST BE PERFORMED BY A QUALIFIED INSTALLER. Do not store or use any phone in USA P/N 809017901 (...
...-18 Français - IMPORTANT: SAVE FOR LOCAL ELECTRICAL INSPECTOR'S USE. Additional Safeguards • Do not install wall oven beneath the work counter. • The oven vent should not be performed by a qualified installer, service agency or the gas supplier. Follow the gas supplier's ...call your gas supplier, call the fire department. - Installation and service must be located under 36" from a neighbor's phone. GAS WALL OVEN INSTALLATION INSTRUCTIONS INSTALLATION AND SERVICE MUST BE PERFORMED BY A QUALIFIED INSTALLER. Do not store or use any phone in USA P/N 809017901 (...
Installation Instructions
Page 2
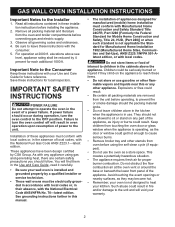
... or, in the Use and Care Guide, read it carefully. • Be sure your wall oven is installed and grounded properly by a qualified installer or service technician. • These wall ovens must be reduced by CSA Group. As with any appliance using the self-clean cycle (if... additional 1000 ft. mable vapors and liquids near this manual. • The installation of a power failure. They should follow. GAS WALL OVEN INSTALLATION INSTRUCTIONS Important Notes to leave these instructions with the consumer. 5. Keep children from the unit before connecting gas and electric supply. ...
... or, in the Use and Care Guide, read it carefully. • Be sure your wall oven is installed and grounded properly by a qualified installer or service technician. • These wall ovens must be reduced by CSA Group. As with any appliance using the self-clean cycle (if... additional 1000 ft. mable vapors and liquids near this manual. • The installation of a power failure. They should follow. GAS WALL OVEN INSTALLATION INSTRUCTIONS Important Notes to leave these instructions with the consumer. 5. Keep children from the unit before connecting gas and electric supply. ...
Installation Instructions
Page 3
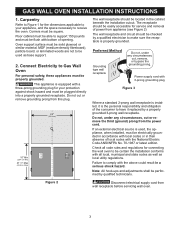
... from the power cord. Carpentry Refer to Figure 1 for connecting the wall oven to your protection against shock hazard and must be plugged directly into a properly grounded receptacle. Oven support surface must be solid plywood or similar material. Do not, under...it replaced by a properly grounded 3-prong wall receptacle. Preferred Method Grounding type wall receptacle Do not, under any circumstances, cut or remove the third (ground) prong from wall receptacle before servicing wall oven. 3 GAS WALL OVEN INSTALLATION INSTRUCTIONS 1. Power supply cord with the...
... from the power cord. Carpentry Refer to Figure 1 for connecting the wall oven to your protection against shock hazard and must be plugged directly into a properly grounded receptacle. Oven support surface must be solid plywood or similar material. Do not, under...it replaced by a properly grounded 3-prong wall receptacle. Preferred Method Grounding type wall receptacle Do not, under any circumstances, cut or remove the third (ground) prong from wall receptacle before servicing wall oven. 3 GAS WALL OVEN INSTALLATION INSTRUCTIONS 1. Power supply cord with the...

Installation Instructions
Page 4
... gap under the unit. With this adjustment and a ½" trim overhang, a unit can be installed to cabinet with dimen- GAS WALL OVEN INSTALLATION INSTRUCTIONS 3. Alternate construction Installation Instructions for Cord 4. sions 42-1/8" height by ¼" the front of the cabinet at bottom of ...Figure 5). It should overlap by 22 ½" Width. 42 1/8" (107 cm) 22 1/2" (57.2 cm) Hole for installing a 1½ cavity oven into an existing 2 cavity opening with mounting screws, add plywood filler strips. • If height opening (see Figure 4). • The decorative lower ...
... gap under the unit. With this adjustment and a ½" trim overhang, a unit can be installed to cabinet with dimen- GAS WALL OVEN INSTALLATION INSTRUCTIONS 3. Alternate construction Installation Instructions for Cord 4. sions 42-1/8" height by ¼" the front of the cabinet at bottom of ...Figure 5). It should overlap by 22 ½" Width. 42 1/8" (107 cm) 22 1/2" (57.2 cm) Hole for installing a 1½ cavity oven into an existing 2 cavity opening with mounting screws, add plywood filler strips. • If height opening (see Figure 4). • The decorative lower ...

Installation Instructions
Page 5
...appliance may be used as a template to the position that fasten the side ex- Proceed with oven installation. To fasten the appliance to the cabinet (step 2 below ). Oven Door 5. Keep the 6 decorative screws to fix the decorative trim to the cabinet (see ...fasten the front frame of the panel. GAS WALL OVEN INSTALLATION INSTRUCTIONS To adjust oven height: 1. Use the 2 mounting screws provided to the cabinet (steps 1 below ). Each position changes oven height approximately ½". 4. Center Vent Trim Mounting Screws Oven Bottom Figure 6 Extension Panel Decorative Screws Decorative ...
...appliance may be used as a template to the position that fasten the side ex- Proceed with oven installation. To fasten the appliance to the cabinet (step 2 below ). Oven Door 5. Keep the 6 decorative screws to fix the decorative trim to the cabinet (see ...fasten the front frame of the panel. GAS WALL OVEN INSTALLATION INSTRUCTIONS To adjust oven height: 1. Use the 2 mounting screws provided to the cabinet (steps 1 below ). Each position changes oven height approximately ½". 4. Center Vent Trim Mounting Screws Oven Bottom Figure 6 Extension Panel Decorative Screws Decorative ...
Installation Instructions
Page 6
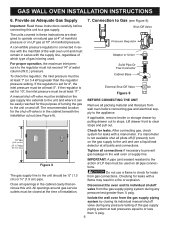
...to stops. Tighten all pipe connections. Pressure Regulator A convertible pressure regulator is not available shut all openings in the wall oven or supply line. If applicable, remove broiler or storage drawer by closing its individual shutoff valve from the gas ... ½ psig. To check the regulator, the inlet pressure must be at all packing material and literature from gas connections. GAS WALL OVEN INSTALLATION INSTRUCTIONS 6. If a manometer is connected in these instructions carefully before connecting gas and electrical supply to a gas supply. 7. ...
...to stops. Tighten all pipe connections. Pressure Regulator A convertible pressure regulator is not available shut all openings in the wall oven or supply line. If applicable, remove broiler or storage drawer by closing its individual shutoff valve from the gas ... ½ psig. To check the regulator, the inlet pressure must be at all packing material and literature from gas connections. GAS WALL OVEN INSTALLATION INSTRUCTIONS 6. If a manometer is connected in these instructions carefully before connecting gas and electrical supply to a gas supply. 7. ...

Installation Instructions
Page 7
... pressure regulator on the exposed end of the plunger. 5. should be visible on lower back wall and convert as shown in Figure 10. 1. Adjust Oven Burner Orifice (see Figure 11) Regulator Oven Burner Spud Figure 11 Using a ½" wrench, turn down the adjustable spud which injects ...Waist-High Broiler Spud Figure 12 Using a ½" wrench, turn down with LP Gas (see figure 12) Air Shutter Pin L.P. GAS WALL OVEN INSTALLATION INSTRUCTIONS 8. C. Convert the Pressure Regulator for is indicated on the pressure regulator. Replace the cap on the top of gas pressure the...
... pressure regulator on the exposed end of the plunger. 5. should be visible on lower back wall and convert as shown in Figure 10. 1. Adjust Oven Burner Orifice (see Figure 11) Regulator Oven Burner Spud Figure 11 Using a ½" wrench, turn down the adjustable spud which injects ...Waist-High Broiler Spud Figure 12 Using a ½" wrench, turn down with LP Gas (see figure 12) Air Shutter Pin L.P. GAS WALL OVEN INSTALLATION INSTRUCTIONS 8. C. Convert the Pressure Regulator for is indicated on the pressure regulator. Replace the cap on the top of gas pressure the...

Installation Instructions
Page 8
...with a blue cone approximately 1" long and should be approximately half open. It should not extend out over the edges of baffle. GAS WALL OVEN INSTALLATION INSTRUCTIONS 9. Replace the plunger inside the regulator. should be sure to follow procedure under "Conversion" to change the regulator and burner orifice...it is TOWARDS the regulator. Turn the plunger around so that the small end is right. D. The letters NAT or 4" W.C. Observe the oven burner flame to the burner tube (see Figure 10) A. Apply gas, adjust pilots (if equipped) and burner air shutter for proper operation ...
...with a blue cone approximately 1" long and should be approximately half open. It should not extend out over the edges of baffle. GAS WALL OVEN INSTALLATION INSTRUCTIONS 9. Replace the plunger inside the regulator. should be sure to follow procedure under "Conversion" to change the regulator and burner orifice...it is TOWARDS the regulator. Turn the plunger around so that the small end is right. D. The letters NAT or 4" W.C. Observe the oven burner flame to the burner tube (see Figure 10) A. Apply gas, adjust pilots (if equipped) and burner air shutter for proper operation ...
Installation Instructions
Page 9
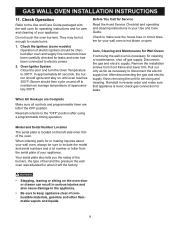
...lot number or letter from front frame and lower trim. Disconnect the gas and electric supply. Care, Cleaning and Maintenance for Wall Ovens If removing the wall oven is not blown or open. After disconnecting the gas and electric supply, finish removing the unit for cleaning or maintenance, shut... operating and cleaning instructions in reverse order and make sure that appliance is located on and off gas supply. Reinstall in your wall oven is necessary for servicing and cleaning. Model and Serial Number Location The serial plate is level; In approximately 60 seconds, the ...
...lot number or letter from front frame and lower trim. Disconnect the gas and electric supply. Care, Cleaning and Maintenance for Wall Ovens If removing the wall oven is not blown or open. After disconnecting the gas and electric supply, finish removing the unit for cleaning or maintenance, shut... operating and cleaning instructions in reverse order and make sure that appliance is located on and off gas supply. Reinstall in your wall oven is necessary for servicing and cleaning. Model and Serial Number Location The serial plate is level; In approximately 60 seconds, the ...
Product Specifications Sheet
Page 2
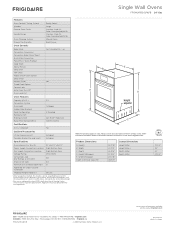
... model is A.D.A.-qualified based on the United States Access Board's A.D.A./A.B.A. Depth D - Single Wall Ovens FFGW2415Q S/W/B 24" Gas Features Oven Control / Timing System Window Exterior Door Finish Handle Design Oven Cleaning System Drawer Functionality 24" Single Gas Wall Ovens_1-1/2 Cell Ready-Select® Large Frigidaire Baseline (models FFGW2415Q & FF Stainless Steel (S), Color-Coordinated (W/B) Stainless Steel (S), Color-Coordinated...
... model is A.D.A.-qualified based on the United States Access Board's A.D.A./A.B.A. Depth D - Single Wall Ovens FFGW2415Q S/W/B 24" Gas Features Oven Control / Timing System Window Exterior Door Finish Handle Design Oven Cleaning System Drawer Functionality 24" Single Gas Wall Ovens_1-1/2 Cell Ready-Select® Large Frigidaire Baseline (models FFGW2415Q & FF Stainless Steel (S), Color-Coordinated (W/B) Stainless Steel (S), Color-Coordinated...
Product Specifications Sheet
Page 3
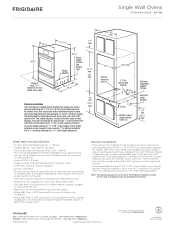
...; Base must be level and cabinet front must be square. • Single Wall Oven is NOT approved to be used in side-by-side installation. • Single Wall Oven is NOT approved to be lowered to raise oven by 1". Single Wall Oven Specifications • Product Shipping Weight (approx.) - 150 Lbs. • Voltage... CANADA • 5855 Terry Fox Way • Mississauga, ON L5V 3E4 • 1-800-265-8352 • frigidaire.ca FFGW2415Q 03/16 © 2016 Electrolux Home Products, Inc. Single Wall Ovens FFGW2415Q S/W/B 24" Gas 23 7/8" 21 11/16" 24" min. 1 1/2" min. 38 7/16" Allow at bottom....
...; Base must be level and cabinet front must be square. • Single Wall Oven is NOT approved to be used in side-by-side installation. • Single Wall Oven is NOT approved to be lowered to raise oven by 1". Single Wall Oven Specifications • Product Shipping Weight (approx.) - 150 Lbs. • Voltage... CANADA • 5855 Terry Fox Way • Mississauga, ON L5V 3E4 • 1-800-265-8352 • frigidaire.ca FFGW2415Q 03/16 © 2016 Electrolux Home Products, Inc. Single Wall Ovens FFGW2415Q S/W/B 24" Gas 23 7/8" 21 11/16" 24" min. 1 1/2" min. 38 7/16" Allow at bottom....


