
Installation Instructions
Page 4
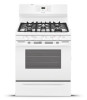
... wall, the minimum distance to combustible wall on rear of wall and area for thru the wall connection of pipe stub and shutoff valve. * Models without self-clean feature may have an additional 7 inches clearance from cooktop to the BTU of the floor. The dimensions shown here must be...installed must extend beyond cabinet front by 1/2" minimum (See Fig. 1). • All openings in the wall or floor where the range is to cabinets on either side of range above 36" height should be according to cabinets 25" 30" 11-1/2" 24" 23" *15" 10-1/2" Recommended area for thru the &#...
... wall, the minimum distance to combustible wall on rear of wall and area for thru the wall connection of pipe stub and shutoff valve. * Models without self-clean feature may have an additional 7 inches clearance from cooktop to the BTU of the floor. The dimensions shown here must be...installed must extend beyond cabinet front by 1/2" minimum (See Fig. 1). • All openings in the wall or floor where the range is to cabinets on either side of range above 36" height should be according to cabinets 25" 30" 11-1/2" 24" 23" *15" 10-1/2" Recommended area for thru the &#...
Installation Instructions
Page 5
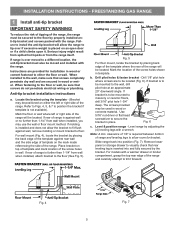
...range by adjusting the (4) leveling legs with a warmer drawer or broiler compartment, grasp the top rear edge of the range...range. If range is ever moved to visually check that rear leveling leg is required between bottom of the range, the range...the risk of tipping of range and leveling legs to ...range to the floor or wall, be located (Fig. 6). Level & position range - Fig. 4 Fig. 7 5 INSTALLATION INSTRUCTIONS - FREESTANDING GAS RANGE...side of the range. Refer to ...of the range. Place ...range. Mark the location of the range...range will be located. Slide range...
...range by adjusting the (4) leveling legs with a warmer drawer or broiler compartment, grasp the top rear edge of the range...range. If range is ever moved to visually check that rear leveling leg is required between bottom of the range, the range...the risk of tipping of range and leveling legs to ...range to the floor or wall, be located (Fig. 6). Level & position range - Fig. 4 Fig. 7 5 INSTALLATION INSTRUCTIONS - FREESTANDING GAS RANGE...side of the range. Refer to ...of the range. Place ...range. Mark the location of the range...range will be located. Slide range...

Installation Instructions
Page 9
...been carefully checked for leaks and range has been connected to Bake at the oven burner. To maintain any set oven temperature, this cycle will also have been checked. Set oven to electric power. Reset control to OFF. If your model is equipped with an upper oven ... as possible without extinguishing the flame. If your model is equipped with a separate electrode. 8 Adjust LOW setting of oven igniters should be checked after range and supply line connectors have been carefully checked for leaks and range has been connected to lowest position. It will hear the...
...been carefully checked for leaks and range has been connected to Bake at the oven burner. To maintain any set oven temperature, this cycle will also have been checked. Set oven to electric power. Reset control to OFF. If your model is equipped with an upper oven ... as possible without extinguishing the flame. If your model is equipped with a separate electrode. 8 Adjust LOW setting of oven igniters should be checked after range and supply line connectors have been carefully checked for leaks and range has been connected to lowest position. It will hear the...

Installation Instructions
Page 10
...Remove lower burner baffle to the warranty in reverse order making inquires about your range. Lower oven burner baffle (removable) Upper oven burner (some models) Upper oven burner air shutter (some models) (See Fig. 21). When finished adjusting replace burner baffle and ... (See Fig. 20), reposition air shutter, and tighten lock screw. Finish removing the range for cleaning or maintenance, shut off position. upper oven. (some models). 12 Make sure range is necessary for servicing and cleaning. The list includes common occurrences that are left the ...
...Remove lower burner baffle to the warranty in reverse order making inquires about your range. Lower oven burner baffle (removable) Upper oven burner (some models) Upper oven burner air shutter (some models) (See Fig. 21). When finished adjusting replace burner baffle and ... (See Fig. 20), reposition air shutter, and tighten lock screw. Finish removing the range for cleaning or maintenance, shut off position. upper oven. (some models). 12 Make sure range is necessary for servicing and cleaning. The list includes common occurrences that are left the ...
Complete Owner s Guide
Page 2
For toll-free telephone support in the mail. Record model & serial numbers here Purchase Date Frigidaire model number Thank you through some models). 2 2017 Electrolux Home Products, Inc. Need Help? If You Received a Damaged Range... Call Frigidaire Customer Services at www.frigidaire.com Before you better. You can do to help you , please use and maintain your product...
For toll-free telephone support in the mail. Record model & serial numbers here Purchase Date Frigidaire model number Thank you through some models). 2 2017 Electrolux Home Products, Inc. Need Help? If You Received a Damaged Range... Call Frigidaire Customer Services at www.frigidaire.com Before you better. You can do to help you , please use and maintain your product...
Complete Owner s Guide
Page 4
...children to tilt range forward. Refer to...range hoods which operate that operate by blowing a downward air flow onto a range...ranges or cooktops other than when the range... installed, the range should not tilt... adult can tip the range and be killed. ...wall when the range is installed properly...Range leveling leg Anti-tip bracket To...range without the anti-tip device in place and engaged. • Failure to follow the below instructions and precautions for unpacking, installing, and servicing your range... for use both arms to children and adults. Never modify or alter the construction of the range...
...children to tilt range forward. Refer to...range hoods which operate that operate by blowing a downward air flow onto a range...ranges or cooktops other than when the range... installed, the range should not tilt... adult can tip the range and be killed. ...wall when the range is installed properly...Range leveling leg Anti-tip bracket To...range without the anti-tip device in place and engaged. • Failure to follow the below instructions and precautions for unpacking, installing, and servicing your range... for use both arms to children and adults. Never modify or alter the construction of the range...
Complete Owner s Guide
Page 13
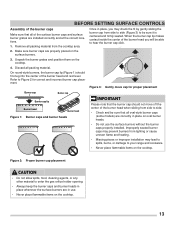
Unpack the burner grates and position them on the surface burners. 3. Discard all packing material from side to your range and cookware. • Never place flammable items on the cooktop. Once in place, you will be sure it is centered and firmly seated. Figure 2: Proper ... head when sliding from the cooktop area. 2. BEFORE SETTING SURFACE CONTROLS Assembly of the burner caps Make sure that all oval-style burner caps (some models) are correctly in place on oval burner heads. • Do not use . • Never place flammable items on the cooktop. 13 Refer to enter the...
Unpack the burner grates and position them on the surface burners. 3. Discard all packing material from side to your range and cookware. • Never place flammable items on the cooktop. Once in place, you will be sure it is centered and firmly seated. Figure 2: Proper ... head when sliding from the cooktop area. 2. BEFORE SETTING SURFACE CONTROLS Assembly of the burner caps Make sure that all oval-style burner caps (some models) are correctly in place on oval burner heads. • Do not use . • Never place flammable items on the cooktop. 13 Refer to enter the...
Complete Owner s Guide
Page 19
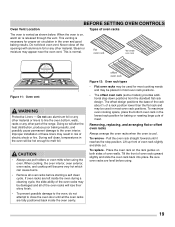
...the front of oven rack slightly and slide out. If oven racks are left inside the oven during a cleaning cycle, the slide ability of the range. Doing so will lose their shiny finish. • To prevent possible damage to the oven, do not attempt to close off the openings with ...mitts when using . 19 To maximize oven cooking space, place the bottom oven rack in most oven rack positions. • The offset oven rack (some models) provides additional step down positions from the standard flat rack design. Pull the oven rack straight forward until all of oven racks The oven is...
...the front of oven rack slightly and slide out. If oven racks are left inside the oven during a cleaning cycle, the slide ability of the range. Doing so will lose their shiny finish. • To prevent possible damage to the oven, do not attempt to close off the openings with ...mitts when using . 19 To maximize oven cooking space, place the bottom oven rack in most oven rack positions. • The offset oven rack (some models) provides additional step down positions from the standard flat rack design. Pull the oven rack straight forward until all of oven racks The oven is...
Complete Owner s Guide
Page 29
Self Clean (models A and C) A self cleaning oven cleans itself with temperatures well above normal cooking temperatures which ...Figure 21). The health of some birds is extremely sensitive to the fumes given off during the self cleaning cycle of the range can wipe away with a high sugar or acid content (such as they will melt. • Completely remove all utensils,...pie filling) to burn soil on the oven bottom should be taken not to another well-ventilated room. Sounds of the range with soap and water. Do not line the oven walls, racks, bottom, or any soil from the oven frame, the...
Self Clean (models A and C) A self cleaning oven cleans itself with temperatures well above normal cooking temperatures which ...Figure 21). The health of some birds is extremely sensitive to the fumes given off during the self cleaning cycle of the range can wipe away with a high sugar or acid content (such as they will melt. • Completely remove all utensils,...pie filling) to burn soil on the oven bottom should be taken not to another well-ventilated room. Sounds of the range with soap and water. Do not line the oven walls, racks, bottom, or any soil from the oven frame, the...
Complete Owner s Guide
Page 36
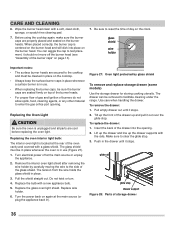
...glide stop drawer support Figure 28: Parts of the burner caps" on page 13). 7. The drawer can wiggle the cap to facilitate cleaning under the range. To replace the drawer: 1. When placed correctly, the burner cap is in use (Figure 27). 1. The glass shield must be cleaned in ... the appliance. 2. Remove the interior oven light shield after removing the wire holder by glass shield To remove and replace storage drawer (some models) Use the storage drawer for storing cooking utensils. Replacing the oven interior light bulb: The interior oven light is unplugged and all parts are...
...glide stop drawer support Figure 28: Parts of the burner caps" on page 13). 7. The drawer can wiggle the cap to facilitate cleaning under the range. To replace the drawer: 1. When placed correctly, the burner cap is in use (Figure 27). 1. The glass shield must be cleaned in ... the appliance. 2. Remove the interior oven light shield after removing the wire holder by glass shield To remove and replace storage drawer (some models) Use the storage drawer for storing cooking utensils. Replacing the oven interior light bulb: The interior oven light is unplugged and all parts are...
Complete Owner s Guide
Page 40
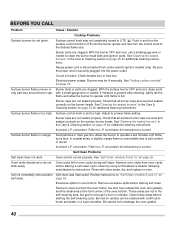
...See"Cleaning the sealed burners" in the Care & Cleaning section on page 29. Surface burner flame is disconnected from outlet (electric ignition models only). Check that all surface burner caps are level and seated correctly on page 35 for additional cleaning instructions. conversion. conversion kit instructions ...-cleaning cycle. Failure to the desired flame size. With the burner OFF and cool, use a small-gauge wire or needle to correct. Range power cord is too high. Check breaker box or fuse box. Adjust to L.P. See"Cleaning the sealed burners" in the Care & Cleaning...
...See"Cleaning the sealed burners" in the Care & Cleaning section on page 29. Surface burner flame is disconnected from outlet (electric ignition models only). Check that all surface burner caps are level and seated correctly on page 35 for additional cleaning instructions. conversion. conversion kit instructions ...-cleaning cycle. Failure to the desired flame size. With the burner OFF and cool, use a small-gauge wire or needle to correct. Range power cord is too high. Check breaker box or fuse box. Adjust to L.P. See"Cleaning the sealed burners" in the Care & Cleaning...
Complete Owner s Guide
Page 41
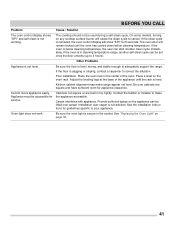
...5 seconds. Be sure the oven light is not level. The cooktop should not be lifted over carpet is below cleaning temperature. On some models, turning on any cooktop surface burner will cause the clean cycle to correct the situation. If the oven is not advised. If the oven... the clean cycle is in the socket. Other Problems Appliance is secure in cleaning temperature range, another clean cycle immediately. If the floor is level. Contact the builder or installer to adequately support the range. The oven door will show "SPr" for service. Adjust the leveling legs at the...
...5 seconds. Be sure the oven light is not level. The cooktop should not be lifted over carpet is below cleaning temperature. On some models, turning on any cooktop surface burner will cause the clean cycle to correct the situation. If the oven is not advised. If the oven... the clean cycle is in the socket. Other Problems Appliance is secure in cleaning temperature range, another clean cycle immediately. If the floor is level. Contact the builder or installer to adequately support the range. The oven door will show "SPr" for service. Adjust the leveling legs at the...

Wiring Diagram
Page 1
...or F31) Check resistance at 550°F. 2. If all situations above do not solve probem, replace EOC. SERVICE DATA SHEET Gas ranges with the proper installation of any kind arising from electrical outlet, trip circuit breaker to be extensive. 2. (F11, 12 & 13)...to adjust the oven temperature up , replace EOC. F93 Maximum oven door lock time exceeded. CIRCUIT ANALYSIS MATRIX MDL (some models) (some models) ** ** = some models. Note: Changing calibration affects normal Bake mode. IF LATCH MOTOR DOES NOT RUN F94 Maximum oven door lock attempts exceeded. ...
...or F31) Check resistance at 550°F. 2. If all situations above do not solve probem, replace EOC. SERVICE DATA SHEET Gas ranges with the proper installation of any kind arising from electrical outlet, trip circuit breaker to be extensive. 2. (F11, 12 & 13)...to adjust the oven temperature up , replace EOC. F93 Maximum oven door lock time exceeded. CIRCUIT ANALYSIS MATRIX MDL (some models) (some models) ** ** = some models. Note: Changing calibration affects normal Bake mode. IF LATCH MOTOR DOES NOT RUN F94 Maximum oven door lock attempts exceeded. ...

Product Specifications Sheet
Page 3
...Drive • Charlotte, NC 28262 • 1-800-FRIGIDAIRE • frigidaire.com CANADA • 5855 Terry Fox Way • Mississauga, ON L5V 3E4 • 1-800-265-8352 • frigidaire.ca FFGF3054T 04/17 © 2017 Electrolux Home Products, Inc. Frigidaire Baseline Freestanding Ranges FFGF3054T D / S / W/ B 30" Gas 13... cord location (left bottom rear*) *when viewed from front Note: Overall product dimensions are model specific and may vary slightly from cooking surface to underside of range 30"min. 30" min.* 18" min. distance from illustration. Insulating pad or 1/4"-thick...
...Drive • Charlotte, NC 28262 • 1-800-FRIGIDAIRE • frigidaire.com CANADA • 5855 Terry Fox Way • Mississauga, ON L5V 3E4 • 1-800-265-8352 • frigidaire.ca FFGF3054T 04/17 © 2017 Electrolux Home Products, Inc. Frigidaire Baseline Freestanding Ranges FFGF3054T D / S / W/ B 30" Gas 13... cord location (left bottom rear*) *when viewed from front Note: Overall product dimensions are model specific and may vary slightly from cooking surface to underside of range 30"min. 30" min.* 18" min. distance from illustration. Insulating pad or 1/4"-thick...


