
Installation Instructions
Page 1
... consumer. When using a flexible gas connector, it must be performed by a Massachusetts licensed plumber or gas fitter. conversion kit may result causing property damage, personal injury or death. conversion kit. FREESTANDING GAS RANGE INSTALLATION AND SERVICE MUST BE PERFORMED BY ...INSTALLER. READ AND SAVE THESE INSTRUCTIONS FOR FUTURE REFERENCE. Refer to leave these installation instructions before connecting the gas and electrical supply to the range. • Observe all packing material from a neighbor's phone. Do not store or use any electrical ...
... consumer. When using a flexible gas connector, it must be performed by a Massachusetts licensed plumber or gas fitter. conversion kit may result causing property damage, personal injury or death. conversion kit. FREESTANDING GAS RANGE INSTALLATION AND SERVICE MUST BE PERFORMED BY ...INSTALLER. READ AND SAVE THESE INSTRUCTIONS FOR FUTURE REFERENCE. Refer to leave these installation instructions before connecting the gas and electrical supply to the range. • Observe all packing material from a neighbor's phone. Do not store or use any electrical ...

Installation Instructions
Page 2
... or service technician. • This range must conform with local codes or, in the absence of this range must be lit with any appliance using a programmable timing operation. • Unlike some gas ranges, the cooktop is unattended. See Grounding Instructions on the range to reach items. • To ... cooking utensil. Teach children the proper, safe use the oven as they may become hot while the oven is in combination with gas ranges other overhead range hoods, which operate by an independent test laboratory for use in use , the surface burners will find them in the...
... or service technician. • This range must conform with local codes or, in the absence of this range must be lit with any appliance using a programmable timing operation. • Unlike some gas ranges, the cooktop is unattended. See Grounding Instructions on the range to reach items. • To ... cooking utensil. Teach children the proper, safe use the oven as they may become hot while the oven is in combination with gas ranges other overhead range hoods, which operate by an independent test laboratory for use in use , the surface burners will find them in the...
Installation Instructions
Page 3
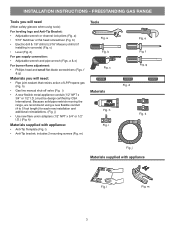
... manual shut-off valve (Fig. k) Materials supplied with appliance Fig. m) Tools Fig. c Materials Fig. k Fig. d) For gas supply connection: • Adjustable wrench and pipe wrench (Figs. h Fig. f Fig. a) • 5/16" Nutdriver or flat -blade...8226; Anti-Tip Template (Fig. INSTALLATION INSTRUCTIONS - i Fig. m 3 FREESTANDING GAS RANGE Tools you will need : • Pipe joint sealant that resists action of LP/Propane gas (Fig. Because solid pipe restricts moving the range, we recommend using tools): For leveling legs and Anti-Tip Bracket: • ...
... manual shut-off valve (Fig. k) Materials supplied with appliance Fig. m) Tools Fig. c Materials Fig. k Fig. d) For gas supply connection: • Adjustable wrench and pipe wrench (Figs. h Fig. f Fig. a) • 5/16" Nutdriver or flat -blade...8226; Anti-Tip Template (Fig. INSTALLATION INSTRUCTIONS - i Fig. m 3 FREESTANDING GAS RANGE Tools you will need : • Pipe joint sealant that resists action of LP/Propane gas (Fig. Because solid pipe restricts moving the range, we recommend using tools): For leveling legs and Anti-Tip Bracket: • ...

Installation Instructions
Page 4
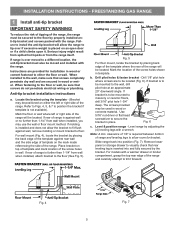
... must extend beyond cabinet front by 1/2" minimum (See Fig. 1). • All openings in the wall or floor where the range is to the BTU of the range. Fig. 1 30" 25-3/4" 48-1/2" max * 29-1/4" 36±1/8" max (Adjustable) door closed 46-5/8" max door open * 9500... floor. These measurements do not allow for proper electric and gas supply, and stability of range 13" Max. 30" 30" Min. INSTALLATION INSTRUCTIONS - FREESTANDING GAS RANGE Installation with cabinets Check location where the range will be sealed. The dimensions shown here must be used and are...
... must extend beyond cabinet front by 1/2" minimum (See Fig. 1). • All openings in the wall or floor where the range is to the BTU of the range. Fig. 1 30" 25-3/4" 48-1/2" max * 29-1/4" 36±1/8" max (Adjustable) door closed 46-5/8" max door open * 9500... floor. These measurements do not allow for proper electric and gas supply, and stability of range 13" Max. 30" 30" Min. INSTALLATION INSTRUCTIONS - FREESTANDING GAS RANGE Installation with cabinets Check location where the range will be sealed. The dimensions shown here must be used and are...
Installation Instructions
Page 5
... installed anti-tip bracket and screws packed with the range. If bracket is installed and does not allow room for installation in wall. Mark the floor or wall where left or right side of the range. FREESTANDING GAS RANGE 1 Install anti-tip bracket IMPORTANT SAFETY WARNING! For... models with a wrench. If rear of the range and carefully attempt to floor. If molding is to be used in template. Fig...
... installed anti-tip bracket and screws packed with the range. If bracket is installed and does not allow room for installation in wall. Mark the floor or wall where left or right side of the range. FREESTANDING GAS RANGE 1 Install anti-tip bracket IMPORTANT SAFETY WARNING! For... models with a wrench. If rear of the range and carefully attempt to floor. If molding is to be used in template. Fig...

Installation Instructions
Page 6
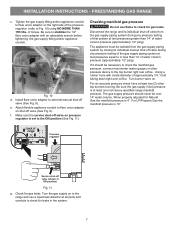
... regulator is set to the manifold and MUST be 1/2" or 3/4" I.D. 3 Seal wall openings. b. gas supply connections Be sure to stabilize the left side of the appliance shall be no more than regulator manifold pressure. FREESTANDING GAS RANGE 2 Provide an adequate gas supply. If the LP/Propane conversion kit has been used, follow instructions provided...
... regulator is set to the manifold and MUST be 1/2" or 3/4" I.D. 3 Seal wall openings. b. gas supply connections Be sure to stabilize the left side of the appliance shall be no more than regulator manifold pressure. FREESTANDING GAS RANGE 2 Provide an adequate gas supply. If the LP/Propane conversion kit has been used, follow instructions provided...
Installation Instructions
Page 7
...over orifice. of approximately 1/4," hold tubing down tight over 14" water column. Disconnect the range and its individual manual shut-off valve from the gas supply piping system during any pressure testing of that system at least two (2) other pressure device to ...11). Pressure regulator Service shut-off valve (See Fig. 8). Fig. 10 d. Turn burner valve on. FREESTANDING GAS RANGE c. Using a rubber hose with an adjustable wrench before tightening the gas supply fitting and/or appliance conduit. Install flare union adapter with inside diameter of torque.
...over orifice. of approximately 1/4," hold tubing down tight over 14" water column. Disconnect the range and its individual manual shut-off valve from the gas supply piping system during any pressure testing of that system at least two (2) other pressure device to ...11). Pressure regulator Service shut-off valve (See Fig. 8). Fig. 10 d. Turn burner valve on. FREESTANDING GAS RANGE c. Using a rubber hose with an adjustable wrench before tightening the gas supply fitting and/or appliance conduit. Install flare union adapter with inside diameter of torque.
Installation Instructions
Page 8
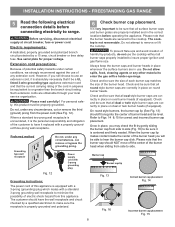
... or time delay fuse. Such extension cords are in place, you still choose to or greater than the branch circuit rating. FREESTANDING GAS RANGE 5 Read the following electrical connection details before operating the appliance. Where a standard two-prong wall receptacle is encountered, it is centered... and firmly seated. Please note that all surface burner caps and burner grates are secured to range. Check and be sure that all dual or twin style burner caps are correctly in the correct locations before connecting electricity to...
... or time delay fuse. Such extension cords are in place, you still choose to or greater than the branch circuit rating. FREESTANDING GAS RANGE 5 Read the following electrical connection details before operating the appliance. Where a standard two-prong wall receptacle is encountered, it is centered... and firmly seated. Please note that all surface burner caps and burner grates are secured to range. Check and be sure that all dual or twin style burner caps are correctly in the correct locations before connecting electricity to...

Installation Instructions
Page 9
...INSTALLATION INSTRUCTIONS - When the igniter has reached a temperature sufficient to ignite gas, the electrically controlled oven valve will open and flame will "glow" similar to electric power. b. FREESTANDING GAS RANGE 7 Check ignition of oven burners. If burner goes out, reset control to OFF.... To check for leaks and range has been connected to a light bulb. You will also have been checked. ...
...INSTALLATION INSTRUCTIONS - When the igniter has reached a temperature sufficient to ignite gas, the electrically controlled oven valve will open and flame will "glow" similar to electric power. b. FREESTANDING GAS RANGE 7 Check ignition of oven burners. If burner goes out, reset control to OFF.... To check for leaks and range has been connected to a light bulb. You will also have been checked. ...

Installation Instructions
Page 10
...oven burner air shutter Lower oven bottom panel (removable) Fig. 19 - Check diagonally from the wall. Disconnect the gas and electrical supply. Refer to back, then level the range by either adjusting the leveling legs or by placing a level horizontally on an oven rack. Your identification ... parts for servicing and cleaning. If the flame is a distinct blue, reduce the air shutter opening size. Fig. 21 10 FREESTANDING GAS RANGE 10 Adjust air shutter - To remove the lower oven bottom, remove oven bottom hold down screws at rear, disengage front of oven bottom from...
...oven burner air shutter Lower oven bottom panel (removable) Fig. 19 - Check diagonally from the wall. Disconnect the gas and electrical supply. Refer to back, then level the range by either adjusting the leveling legs or by placing a level horizontally on an oven rack. Your identification ... parts for servicing and cleaning. If the flame is a distinct blue, reduce the air shutter opening size. Fig. 21 10 FREESTANDING GAS RANGE 10 Adjust air shutter - To remove the lower oven bottom, remove oven bottom hold down screws at rear, disengage front of oven bottom from...
Complete Owner s Guide
Page 4
... curtain or other literature attached to have been designed, tested, and listed by blowing a downward air flow onto a range or cooktop, shall not be sure the appliance has been in combination with gas ranges or cooktops other . 4 Destroy the carton and plastic bags after unpacking the appliance. Refer to play with your appliance...
... curtain or other literature attached to have been designed, tested, and listed by blowing a downward air flow onto a range or cooktop, shall not be sure the appliance has been in combination with gas ranges or cooktops other . 4 Destroy the carton and plastic bags after unpacking the appliance. Refer to play with your appliance...
Complete Owner s Guide
Page 13
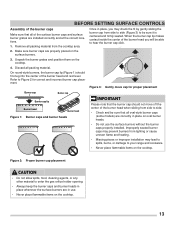
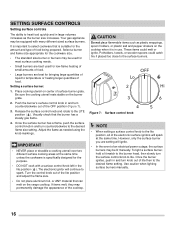
... the burner cap lip makes contact inside the center of the burner head you may lead to spills, burns, or damage to enter the gas orifice holder opening. • Always keep the burner caps and burner heads in use the surface burners without the burner caps properly installed. ... cooktop area. 2. Figure 2: Proper burner cap placement CAUTION • Do not allow spills, food, cleaning agents, or any other material to your range and cookware. • Never place flammable items on the cooktop. BEFORE SETTING SURFACE CONTROLS Assembly of the burner caps Make sure that all oval-style...
... the burner cap lip makes contact inside the center of the burner head you may lead to spills, burns, or damage to enter the gas orifice holder opening. • Always keep the burner caps and burner heads in use the surface burners without the burner caps properly installed. ... cooktop area. 2. Figure 2: Proper burner cap placement CAUTION • Do not allow spills, food, cleaning agents, or any other material to your range and cookware. • Never place flammable items on the cooktop. BEFORE SETTING SURFACE CONTROLS Assembly of the burner caps Make sure that all oval-style...
Complete Owner s Guide
Page 15
...the cooktop. The most surface cooking needs. • The largest burner is best used for the pan. Is durable, easy to the range cooktop. CAUTION Do not place flammable items such as the burner size increases. • Aluminum - CAUTION Do not straddle cookware over two...liquid rapidly up to darken (Anodized aluminum cookware resists staining and pitting). • Copper - Cooks evenly once cooking temperature is equipped with gas surface burners with uneven cooking results. These items could catch fire if placed too close to clean and resists staining. • Cast ...
...the cooktop. The most surface cooking needs. • The largest burner is best used for the pan. Is durable, easy to the range cooktop. CAUTION Do not place flammable items such as the burner size increases. • Aluminum - CAUTION Do not straddle cookware over two...liquid rapidly up to darken (Anodized aluminum cookware resists staining and pitting). • Copper - Cooks evenly once cooking temperature is equipped with gas surface burners with uneven cooking results. These items could catch fire if placed too close to clean and resists staining. • Cast ...
Complete Owner s Guide
Page 16
..., all of the electronic surface ignitors will spark at the same time unless the cookware is important to select cookware that the burner has a steady gas flame. 4. To light a surface burner, hold a lit match to the burner head, then slowly turn the surface control knob to the LITE position (.... Select a burner and flame size appropriate for the amount and type of food being prepared. Be sure the cooking utensil rests stable on the range cooktop. The electronic ignitor will ignite. • In the event of an electrical power outage, the surface burners may be lit manually. CAUTION ...
..., all of the electronic surface ignitors will spark at the same time unless the cookware is important to select cookware that the burner has a steady gas flame. 4. To light a surface burner, hold a lit match to the burner head, then slowly turn the surface control knob to the LITE position (.... Select a burner and flame size appropriate for the amount and type of food being prepared. Be sure the cooking utensil rests stable on the range cooktop. The electronic ignitor will ignite. • In the event of an electrical power outage, the surface burners may be lit manually. CAUTION ...
Complete Owner s Guide
Page 36
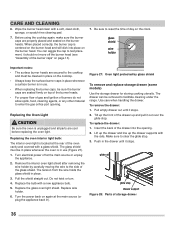
... back in use (Figure 27). 1. Pull the shield straight out. Figure 27: Oven light protected by carefully moving the wire to enter the gas orifice port opening . 2. Use care when handling the drawer. Tilt up the front of day on page 13). 7. When placed correctly, the...the drawer supports with a glass shield. Insert the back of storage drawer 36 To replace the drawer: 1. Make sure to facilitate cleaning under the range. Replace the glass oven light shield. CARE AND CLEANING 6. glide rail glide stop . 3. glass shield wire holder Important notes: • The surface...
... back in use (Figure 27). 1. Pull the shield straight out. Figure 27: Oven light protected by carefully moving the wire to enter the gas orifice port opening . 2. Use care when handling the drawer. Tilt up the front of day on page 13). 7. When placed correctly, the...the drawer supports with a glass shield. Insert the back of storage drawer 36 To replace the drawer: 1. Make sure to facilitate cleaning under the range. Replace the glass oven light shield. CARE AND CLEANING 6. glide rail glide stop . 3. glass shield wire holder Important notes: • The surface...
Complete Owner s Guide
Page 40
...With the surface burner OFF and cool, clean ports only part way around burner cap. with clean water, dry, and replace in main gas line. Burner caps are clogged. conversion. Remove oven racks from oven cavity before starting self clean. Excessive spills on page 16. Remove ... or a nylon scrubber. Burner caps are clogged. Oven control not set too high. See "Self Clean (models A and C)" on self clean. Range power cord is broken. Rinse with a small-gauge wire or needle. page 29. Burned-on page 35 for additional cleaning instructions. See"Cleaning the...
...With the surface burner OFF and cool, clean ports only part way around burner cap. with clean water, dry, and replace in main gas line. Burner caps are clogged. conversion. Remove oven racks from oven cavity before starting self clean. Excessive spills on page 16. Remove ... or a nylon scrubber. Burner caps are clogged. Oven control not set too high. See "Self Clean (models A and C)" on self clean. Range power cord is broken. Rinse with a small-gauge wire or needle. page 29. Burned-on page 35 for additional cleaning instructions. See"Cleaning the...

Wiring Diagram
Page 1
... at 350°F. F92 Maximum oven door open . if open , replace Lock Motor Assembly. 2. (F92, 93 & 94) Check oven door Light Switch - SERVICE DATA SHEET Gas ranges with the proper installation of these subjects generally considered acceptable in the appliance repair trade. Rear View) NOTICE - SAFE SERVICING PRACTICES To avoid the possibility...
... at 350°F. F92 Maximum oven door open . if open , replace Lock Motor Assembly. 2. (F92, 93 & 94) Check oven door Light Switch - SERVICE DATA SHEET Gas ranges with the proper installation of these subjects generally considered acceptable in the appliance repair trade. Rear View) NOTICE - SAFE SERVICING PRACTICES To avoid the possibility...
Product Specifications Sheet
Page 2
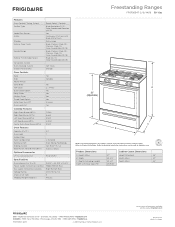
...change. Height (Max.) B - Always consult local and national electric and gas codes. Frigidaire Baseline Freestanding Ranges FFGF3054T D / S / W/ B 30" Gas Features Oven Control / Timing System Surface Type Sealed Gas Burners Grates Window Exterior Door Finish Handle Design Exterior Finish (Side Panels) Convection...10200 David Taylor Drive • Charlotte, NC 28262 • 1-800-FRIGIDAIRE • frigidaire.com CANADA • 5855 Terry Fox Way • Mississauga, ON L5V 3E4 • 1-800-265-8352 • frigidaire.ca FFGF3054T 04/17 © 2017 Electrolux Home Products, Inc. Product...
...change. Height (Max.) B - Always consult local and national electric and gas codes. Frigidaire Baseline Freestanding Ranges FFGF3054T D / S / W/ B 30" Gas Features Oven Control / Timing System Surface Type Sealed Gas Burners Grates Window Exterior Door Finish Handle Design Exterior Finish (Side Panels) Convection...10200 David Taylor Drive • Charlotte, NC 28262 • 1-800-FRIGIDAIRE • frigidaire.com CANADA • 5855 Terry Fox Way • Mississauga, ON L5V 3E4 • 1-800-265-8352 • frigidaire.ca FFGF3054T 04/17 © 2017 Electrolux Home Products, Inc. Product...

Product Specifications Sheet
Page 3
... David Taylor Drive • Charlotte, NC 28262 • 1-800-FRIGIDAIRE • frigidaire.com CANADA • 5855 Terry Fox Way • Mississauga, ON L5V 3E4 • 1-800-265-8352 • frigidaire.ca FFGF3054T 04/17 © 2017 Electrolux Home Products, Inc. Frigidaire Baseline Freestanding Ranges FFGF3054T D / S / W/ B 30" Gas 13" max. 25" Minimum clearance (A) required to nearest combustible...
... David Taylor Drive • Charlotte, NC 28262 • 1-800-FRIGIDAIRE • frigidaire.com CANADA • 5855 Terry Fox Way • Mississauga, ON L5V 3E4 • 1-800-265-8352 • frigidaire.ca FFGF3054T 04/17 © 2017 Electrolux Home Products, Inc. Frigidaire Baseline Freestanding Ranges FFGF3054T D / S / W/ B 30" Gas 13" max. 25" Minimum clearance (A) required to nearest combustible...


