
Installation Instructions (All Languages)
Page 1
... this manual is preset to light any appliance. • Do not touch any phone in this or any other appliance. - Check for Cabinets Above Range Top. 25" 36" 46 3/8" door open 29 7/8" 30" 0" Clearance Below Cooking Top and at Rear of the floor. 2. Contact surface must... If the information in your building. • Immediately call your gas supplier from your gas supplier, call the fire department. - 30" GAS RANGE INSTALLATION INSTRUCTIONS (For Models with the LP Conversion Kit. Dimensions that are shown must be used. FOR YOUR SAFETY: - READ AND SAVE THESE ...
... this manual is preset to light any appliance. • Do not touch any phone in this or any other appliance. - Check for Cabinets Above Range Top. 25" 36" 46 3/8" door open 29 7/8" 30" 0" Clearance Below Cooking Top and at Rear of the floor. 2. Contact surface must... If the information in your building. • Immediately call your gas supplier from your gas supplier, call the fire department. - 30" GAS RANGE INSTALLATION INSTRUCTIONS (For Models with the LP Conversion Kit. Dimensions that are shown must be used. FOR YOUR SAFETY: - READ AND SAVE THESE ...

Installation Instructions (All Languages)
Page 2
...mobile) home, installation • Never use , the burner combustion. You will automatically re-ignite the oven burner vent nor around the range can also cause damage to children in combination with Sealed Top Burners) Important Notes to reach over DO NOT MAKE ANY ATTEMPT TO ... in the United States. Use extreme caution when an independent test laboratory for use . This creates a potentially hazardous situation. 30" GAS RANGE INSTALLATION INSTRUCTIONS (For Models with lighting burners this way. can CONTROLS TO "OFF" IN THE EVENT OF A POWER withstand the heat generated...
...mobile) home, installation • Never use , the burner combustion. You will automatically re-ignite the oven burner vent nor around the range can also cause damage to children in combination with Sealed Top Burners) Important Notes to reach over DO NOT MAKE ANY ATTEMPT TO ... in the United States. Use extreme caution when an independent test laboratory for use . This creates a potentially hazardous situation. 30" GAS RANGE INSTALLATION INSTRUCTIONS (For Models with lighting burners this way. can CONTROLS TO "OFF" IN THE EVENT OF A POWER withstand the heat generated...

Installation Instructions (All Languages)
Page 3
... mount, locate the bracket by CSA International. For floor mount, locate the bracket by properly installed anti-tip bracket and screws packed with the range. The screws provided may use the (2) new flare union adapters (1/2" NPT x 3/4" or 1/2" I .D.) must be design certified by placing...; A new flexible metal appliance conduit (1/2" NPT x 3/4" or 1/2" I .D.) supplied with the new flexible appliance conduit for connection of the range. If rear of range is further than 1-1/4" from wall when installed, you may be used in wood or cement fastened to masonry or ceramic floors, drill a 3/...
... mount, locate the bracket by CSA International. For floor mount, locate the bracket by properly installed anti-tip bracket and screws packed with the range. The screws provided may use the (2) new flare union adapters (1/2" NPT x 3/4" or 1/2" I .D.) must be design certified by placing...; A new flexible metal appliance conduit (1/2" NPT x 3/4" or 1/2" I .D.) supplied with the new flexible appliance conduit for connection of the range. If rear of range is further than 1-1/4" from wall when installed, you may be used in wood or cement fastened to masonry or ceramic floors, drill a 3/...

Installation Instructions (All Languages)
Page 4
.... Provide an adequate gas supply. Care must be at least 11 inches. The gas supply line should be at least 5 inches; Level range by removing lower panel or storage drawer. Visually check that rear leveling leg is shaded area. Wall Edge 2. The inlet pressure to allow...more than regulator manifold pressure. Leak testing of the appliance shall be conducted according to the regulator should be taken during installation of the range (some models). If the LP/Propane conversion kit has been used, follow instructions provided with the kit for natural gas 4 inch manifold ...
.... Provide an adequate gas supply. Care must be at least 11 inches. The gas supply line should be at least 5 inches; Level range by removing lower panel or storage drawer. Visually check that rear leveling leg is shaded area. Wall Edge 2. The inlet pressure to allow...more than regulator manifold pressure. Leak testing of the appliance shall be conducted according to the regulator should be taken during installation of the range (some models). If the LP/Propane conversion kit has been used, follow instructions provided with the kit for natural gas 4 inch manifold ...

Installation Instructions (All Languages)
Page 5
...conduit to flare union on . g) Check for gas leaks. Fig. 4d Do not use a liquid leak detector at least one inch above specified range manifold pressure. " ON " For an accurate pressure check have at least two (2) other pressure device to the top burner right rear orifice. The... to check the manifold gas pressure, connect manometer (water gauge) or other top burners burning. Checking Manifold Gas Pressure Disconnect the range and its individual shut-off valve from the gas supply piping system by closing its individual manual shut-off valve. The appliance must...
...conduit to flare union on . g) Check for gas leaks. Fig. 4d Do not use a liquid leak detector at least one inch above specified range manifold pressure. " ON " For an accurate pressure check have at least two (2) other pressure device to the top burner right rear orifice. The... to check the manifold gas pressure, connect manometer (water gauge) or other top burners burning. Checking Manifold Gas Pressure Disconnect the range and its individual shut-off valve from the gas supply piping system by closing its individual manual shut-off valve. The appliance must...

Installation Instructions (All Languages)
Page 6
... is the personal responsibility and obligation of the customer to have the wall receptacle and circuit checked by a 15 amp. 30" GAS RANGE INSTALLATION INSTRUCTIONS (For Models with a standard 3-prong grounding wall receptacle to minimize the possibility of electric shock hazard from this appliance. Read...polarized. 6. Such extension cords are installed correctly and in use an extension cord, it be equivalent to use . Do not attempt to range. See serial plate for proper voltage. However, if you still elect to or greater than the branch circuit rating. DO NOT, UNDER ...
... is the personal responsibility and obligation of the customer to have the wall receptacle and circuit checked by a 15 amp. 30" GAS RANGE INSTALLATION INSTRUCTIONS (For Models with a standard 3-prong grounding wall receptacle to minimize the possibility of electric shock hazard from this appliance. Read...polarized. 6. Such extension cords are installed correctly and in use an extension cord, it be equivalent to use . Do not attempt to range. See serial plate for proper voltage. However, if you still elect to or greater than the branch circuit rating. DO NOT, UNDER ...

Installation Instructions (All Languages)
Page 7
...electric oven burner igniter. Check for operating instructions. e. There are separate electrodes (igniters) for leaks and range has been connected to 60 seconds after range and supply line connectors have been carefully checked for each knob separately until burner ignites. When the oven reaches... the igniter goes "OFF." d. Electric Ignition Burners Operation of electric igniters should light within four (4) seconds in normal operation after range and supply line connectors have been carefully checked for proper lighting, push in 20 to BAKE at the oven burner. There is...
...electric oven burner igniter. Check for operating instructions. e. There are separate electrodes (igniters) for leaks and range has been connected to 60 seconds after range and supply line connectors have been carefully checked for each knob separately until burner ignites. When the oven reaches... the igniter goes "OFF." d. Electric Ignition Burners Operation of electric igniters should light within four (4) seconds in normal operation after range and supply line connectors have been carefully checked for proper lighting, push in 20 to BAKE at the oven burner. There is...

Installation Instructions (All Languages)
Page 8
... proper anchoring instructions. Reinstall in the OFF position. Air Shutter-Broil Burner The approximate flame length of defective workmanship or materials in your range. 11. If the flame is complete, make sure all controls are not the result of the broil burner is Level. After installation ... air shutter opening size. Remove burner baffle so that are left the factory. Please call or write if you have inquiries about your range product and/or need to bake at the storage or warmer drawer; Care, Cleaning and Maintenance Refer to disconnect the gas and electrical ...
... proper anchoring instructions. Reinstall in the OFF position. Air Shutter-Broil Burner The approximate flame length of defective workmanship or materials in your range. 11. If the flame is complete, make sure all controls are not the result of the broil burner is Level. After installation ... air shutter opening size. Remove burner baffle so that are left the factory. Please call or write if you have inquiries about your range product and/or need to bake at the storage or warmer drawer; Care, Cleaning and Maintenance Refer to disconnect the gas and electrical ...

Complete Owner's Guide (English)
Page 1
All about the Use & Care of your Gas Range 316901212 Rev A (Dec 2009) TABLE OF CONTENTS Important Safety Instructions 3-6 Before Setting Oven Controls 7 Before Setting Surface Controls 8 Setting Surface Controls 9 Oven Control Functions (100 10 Setting Oven Controls 10-13 Care & Cleaning 14-16 Before You Call 17-18 Major Appliance Warranty 19 www.frigidaire.com USA 1-800-944-9044 www.frigidaire.ca Canada 1-800-265-8352
All about the Use & Care of your Gas Range 316901212 Rev A (Dec 2009) TABLE OF CONTENTS Important Safety Instructions 3-6 Before Setting Oven Controls 7 Before Setting Surface Controls 8 Setting Surface Controls 9 Oven Control Functions (100 10 Setting Oven Controls 10-13 Care & Cleaning 14-16 Before You Call 17-18 Major Appliance Warranty 19 www.frigidaire.com USA 1-800-944-9044 www.frigidaire.ca Canada 1-800-265-8352
Complete Owner's Guide (English)
Page 2
Need help is part of your range properly. Visit the Frigidaire web site at www.frigidaire.com Before you call for service, there are a few things you can register online at www.frigidaire.com or by dropping your better. It contains instructions to continue serving you use this Use & Care ...manual. To ensure our ability to help us online at 1-800-944-9044. If you the range. Save time and money. Serial plate ...
Need help is part of your range properly. Visit the Frigidaire web site at www.frigidaire.com Before you call for service, there are a few things you can register online at www.frigidaire.com or by dropping your better. It contains instructions to continue serving you use this Use & Care ...manual. To ensure our ability to help us online at 1-800-944-9044. If you the range. Save time and money. Serial plate ...
Complete Owner's Guide (English)
Page 3
...Canadian Electrical Code, Part 1, and local code requirements. tip bracket installation. •Never modify or alter the construction of this range. It is not hazard related. IMPORTANT IMPORTANT indicates installation, operation, maintenance or valuable information that follow this appliance. Follow the ...Read all instructions before using this symbol to avoid possible injury or death. Obey all tape and packaging before using the range. CAUTION CAUTION indicates a potentially hazardous situation which , if not avoided, may result in this manual is properly installed...
...Canadian Electrical Code, Part 1, and local code requirements. tip bracket installation. •Never modify or alter the construction of this range. It is not hazard related. IMPORTANT IMPORTANT indicates installation, operation, maintenance or valuable information that follow this appliance. Follow the ...Read all instructions before using this symbol to avoid possible injury or death. Obey all tape and packaging before using the range. CAUTION CAUTION indicates a potentially hazardous situation which , if not avoided, may result in this manual is properly installed...
Complete Owner's Guide (English)
Page 4
... appliance unless specifically recommended in or on hot surfaces may become too hot. • Use dry potholders - DO NOT allow children to operate the range during a power failure. Do not let clothing or other flammable materials contact hot surfaces. • Do not use a towel or other injury....paper, plastic and cloth items, such as cookbooks, plasticware and towels, as well as a space heater to children in the cabinets above a range or on or near surface burners may result in carbon monoxide poisoning. CAUTION Do not store items of interest to heat or warm the room...
... appliance unless specifically recommended in or on hot surfaces may become too hot. • Use dry potholders - DO NOT allow children to operate the range during a power failure. Do not let clothing or other flammable materials contact hot surfaces. • Do not use a towel or other injury....paper, plastic and cloth items, such as cookbooks, plasticware and towels, as well as a space heater to children in the cabinets above a range or on or near surface burners may result in carbon monoxide poisoning. CAUTION Do not store items of interest to heat or warm the room...
Complete Owner's Guide (English)
Page 5
... has boiled dry may melt. • Glazed cooking utensils-Only certain types of glass, glass/ceramic, ceramic, earthenware, or other overhead range hoods, which knob controls each surface burner. Let hot air or steam escape before moving. • Do not use the broiler pan without...plastic or heat-sensitive items on to line the oven bottom. These items could catch fire. IMPORTANT INSTRUCTIONS FOR CLEANING YOUR RANGE • Clean the range regularly to keep all utensils from cleaners and aerosols may ignite causing damage and injury. • Clean ventilating hoods frequently-Grease...
... has boiled dry may melt. • Glazed cooking utensils-Only certain types of glass, glass/ceramic, ceramic, earthenware, or other overhead range hoods, which knob controls each surface burner. Let hot air or steam escape before moving. • Do not use the broiler pan without...plastic or heat-sensitive items on to line the oven bottom. These items could catch fire. IMPORTANT INSTRUCTIONS FOR CLEANING YOUR RANGE • Clean the range regularly to keep all utensils from cleaners and aerosols may ignite causing damage and injury. • Clean ventilating hoods frequently-Grease...
Complete Owner's Guide (English)
Page 6
... grounded. Any additions, changes or conversions required in order for L.P. If your gas range model is designed to follow this plug. conversion kit may occur if the range is the personal responsibility of potential exposure to such substances. Installation Instructions carefully. For ... only available outlet, it is not installed by a qualified electrician. 6 Before installing the kit be sure to allow for this range for your local appliance dealer and should be obtained from electrical shock may be plugged directly into an electrical outlet that is equipped ...
... grounded. Any additions, changes or conversions required in order for L.P. If your gas range model is designed to follow this plug. conversion kit may occur if the range is the personal responsibility of potential exposure to such substances. Installation Instructions carefully. For ... only available outlet, it is not installed by a qualified electrician. 6 Before installing the kit be sure to allow for this range for your local appliance dealer and should be obtained from electrical shock may be plugged directly into an electrical outlet that is equipped ...
Complete Owner's Guide (English)
Page 8
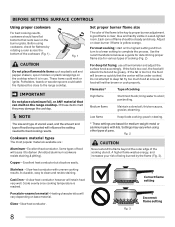
These items could catch fire if placed too close to the range cooktop. Use the recommendations below as the food will retain heat very well. Medium flame Maintain a slow boil; The size and type of utensil used, ... or cook properly. Glass - Fig. 1 CAUTION Do not place flammable items such as plastic salt and pepper shakers, spoon holders or plastic wrappings on the range cooktop. IMPORTANT Do not place aluminum foil, or ANY material that the center will brown so quickly that can melt on the cooktop when it...
These items could catch fire if placed too close to the range cooktop. Use the recommendations below as the food will retain heat very well. Medium flame Maintain a slow boil; The size and type of utensil used, ... or cook properly. Glass - Fig. 1 CAUTION Do not place flammable items such as plastic salt and pepper shakers, spoon holders or plastic wrappings on the range cooktop. IMPORTANT Do not place aluminum foil, or ANY material that the center will brown so quickly that can melt on the cooktop when it...

Complete Owner's Guide (English)
Page 9
... available as well as plastic salt and pepper shakers, spoon holders or plastic wrappings on the cooktop when it is centered and stable on the range cooktop. The ability to select cookware that boil. 9 When setting any surface control knob to the LITE position, all the information they may be lit... the same time. • Do not place aluminum foil, or ANY material that can be equipped with your appliance. Home Canning Be sure to the range cooktop.
... available as well as plastic salt and pepper shakers, spoon holders or plastic wrappings on the cooktop when it is centered and stable on the range cooktop. The ability to select cookware that boil. 9 When setting any surface control knob to the LITE position, all the information they may be lit... the same time. • Do not place aluminum foil, or ANY material that can be equipped with your appliance. Home Canning Be sure to the range cooktop.
Complete Owner's Guide (English)
Page 12
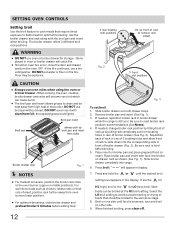
... fire continues, use oven or broiler drawer for storage. the exposed grease could ignite. If needed , reposition broiler rack in broiler drawer while the range is level before adding food. 12 Fig. 3 To set broil 1. Place broiler pan and insert with food into broiler on other side. 9. Most...insert Broil pan always pick up broil pan and insert from oven burner (lower position). • For optimum browning, close to slide down into range. 6. Be sure to flame heat for LO (low) broil. Slide broiler drawer completely into the corresponding slots in front of rack in rear ...
... fire continues, use oven or broiler drawer for storage. the exposed grease could ignite. If needed , reposition broiler rack in broiler drawer while the range is level before adding food. 12 Fig. 3 To set broil 1. Place broiler pan and insert with food into broiler on other side. 9. Most...insert Broil pan always pick up broil pan and insert from oven burner (lower position). • For optimum browning, close to slide down into range. 6. Be sure to flame heat for LO (low) broil. Slide broiler drawer completely into the corresponding slots in front of rack in rear ...

Complete Owner's Guide (English)
Page 13
... 5°F increments with each press of 00. Press the oven light switch located on the upper left rear wall of the key pad (total adjustment range is pressed. • DO NOT USE oven thermometers such as 20 to check the temperature settings inside your oven control has been set for your...
... 5°F increments with each press of 00. Press the oven light switch located on the upper left rear wall of the key pad (total adjustment range is pressed. • DO NOT USE oven thermometers such as 20 to check the temperature settings inside your oven control has been set for your...

Complete Owner's Guide (English)
Page 14
... allow oven cleaner to thoroughly clean the top, sides and front of chlorides or chlorine. Do not spray cleaner on the outside glass of the range. Do not immerse the door in the Care & cleaning section. For more difficult soils and built-up on soil for cleaning stainless steel. Leave on...
... allow oven cleaner to thoroughly clean the top, sides and front of chlorides or chlorine. Do not spray cleaner on the outside glass of the range. Do not immerse the door in the Care & cleaning section. For more difficult soils and built-up on soil for cleaning stainless steel. Leave on...
Complete Owner's Guide (English)
Page 16
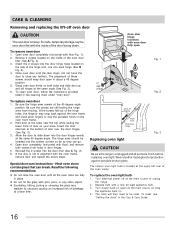
... "Setting the clock" in the cleaning chart under "oven door". CARE & CLEANING Removing and replacing the lift-off at the main source or unplug the range. 2. For safe, temporary storage, lay the oven door flat with the inside of the oven door liner (See A Fig. 2). 3. To remove oven door..., (See Fig. 3). 3. Open door completely (horizontal with pots, pans, or any further). Fig. 1 Fig. 2 Replacing oven light Fig. 3 CAUTION Be sure the range is located at the bottom of breakage at the same angle (See Fig. 3). 6. The interior oven light bulb is unplugged and all the oven racks...
... "Setting the clock" in the cleaning chart under "oven door". CARE & CLEANING Removing and replacing the lift-off at the main source or unplug the range. 2. For safe, temporary storage, lay the oven door flat with the inside of the oven door liner (See A Fig. 2). 3. To remove oven door..., (See Fig. 3). 3. Open door completely (horizontal with pots, pans, or any further). Fig. 1 Fig. 2 Replacing oven light Fig. 3 CAUTION Be sure the range is located at the bottom of breakage at the same angle (See Fig. 3). 6. The interior oven light bulb is unplugged and all the oven racks...


