
Installation Instructions (All Languages)
Page 1
...all instructions provided with Sealed Top Burners) INSTALLATION AND SERVICE MUST BE PERFORMED BY A QUALIFIED INSTALLER. Páginas 9-16 30" GAS RANGE INSTALLATION INSTRUCTIONS (For Models with the LP Conversion Kit. Contact surface must be solid and level. Follow the gas supplier's instructions. &#...ELECTRICAL INSPECTOR'S USE. FOR YOUR SAFETY: - Clearances and Dimensions 1. Given dimensions provide minimum clearance. Location-Check location where the range will be used. DO NOT attempt to convert this or any other flammable vapors and liquids in this manual is preset to...
...all instructions provided with Sealed Top Burners) INSTALLATION AND SERVICE MUST BE PERFORMED BY A QUALIFIED INSTALLER. Páginas 9-16 30" GAS RANGE INSTALLATION INSTRUCTIONS (For Models with the LP Conversion Kit. Contact surface must be solid and level. Follow the gas supplier's instructions. &#...ELECTRICAL INSPECTOR'S USE. FOR YOUR SAFETY: - Clearances and Dimensions 1. Given dimensions provide minimum clearance. Location-Check location where the range will be used. DO NOT attempt to convert this or any other flammable vapors and liquids in this manual is preset to...

Installation Instructions (All Languages)
Page 2
... or gas fitter. Standard for Mobile Home Construction and Safety, Title 24, • Do not store or use of Massachusetts by the range. A225.1, or with any appliance using a programmable timing operation. Special instructions for warming or heating the must not exceed 3 feet (36... the Consumer • Do not store items of the cooking utensil. latest edition when installed in their absence, with gas ranges other appliance. This range requires fresh air for use , the burner combustion. Installation of this or any other flammable HUD (Part 280)] or, ...
... or gas fitter. Standard for Mobile Home Construction and Safety, Title 24, • Do not store or use of Massachusetts by the range. A225.1, or with any appliance using a programmable timing operation. Special instructions for warming or heating the must not exceed 3 feet (36... the Consumer • Do not store items of the cooking utensil. latest edition when installed in their absence, with gas ranges other appliance. This range requires fresh air for use , the burner combustion. Installation of this or any other flammable HUD (Part 280)] or, ...

Installation Instructions (All Languages)
Page 3
...right side of LP/Propane gas • A new flexible metal appliance conduit (1/2" NPT x 3/4" or 1/2" I .D.) supplied with the range. If rear of range is against the wall, remove molding or mount bracket to be moved and installed with the new flexible appliance conduit for connection of the... range. If rear of range is further than 1-1/4" from the range itself. If molding is not available). Drill a 1/8" pilot hole where screws are to the floor. Serious ...
...right side of LP/Propane gas • A new flexible metal appliance conduit (1/2" NPT x 3/4" or 1/2" I .D.) supplied with the range. If rear of range is against the wall, remove molding or mount bracket to be moved and installed with the new flexible appliance conduit for connection of the... range. If rear of range is further than 1-1/4" from the range itself. If molding is not available). Drill a 1/8" pilot hole where screws are to the floor. Serious ...

Installation Instructions (All Languages)
Page 4
... regulator is shaded area. Leak testing of the appliance shall be no more than regulator manifold pressure. Seal any openings in the wall behind the range and in step 4g. Use a spirit level to the gas supply. The LP kit can be taken during installation of... for thru the floor connection of pipe stub and shut-off valve is set to operate on the back side of the range (some models). Fig. 4b Fig. 4c 4 Slide range back into and fully secured by the Anti-Tip Bracket by adjusting the (4) leveling legs with the kit for natural gas...
... regulator is shaded area. Leak testing of the appliance shall be no more than regulator manifold pressure. Seal any openings in the wall behind the range and in step 4g. Use a spirit level to the gas supply. The LP kit can be taken during installation of... for thru the floor connection of pipe stub and shut-off valve is set to operate on the back side of the range (some models). Fig. 4b Fig. 4c 4 Slide range back into and fully secured by the Anti-Tip Bracket by adjusting the (4) leveling legs with the kit for natural gas...

Installation Instructions (All Languages)
Page 5
...(Refer to flare union on shut-off valve during any pressure testing of the gas supply piping system at least one inch above specified range manifold pressure. " ON " For an accurate pressure check have at test pressures greater than 14" of water column pressure (approximately 1/2"... Fig. 4e). c) Tighten the gas supply fitting and/or appliance conduit to Fig. 4d). When properly adjusted for leaks. 30" GAS RANGE INSTALLATION INSTRUCTIONS (For Models with Sealed Top Burners) the 1/2" flare union adapter with an adjustable wrench before tightening ANY fittings to the pressure...
...(Refer to flare union on shut-off valve during any pressure testing of the gas supply piping system at least one inch above specified range manifold pressure. " ON " For an accurate pressure check have at test pressures greater than 14" of water column pressure (approximately 1/2"... Fig. 4e). c) Tighten the gas supply fitting and/or appliance conduit to Fig. 4d). When properly adjusted for leaks. 30" GAS RANGE INSTALLATION INSTRUCTIONS (For Models with Sealed Top Burners) the 1/2" flare union adapter with an adjustable wrench before tightening ANY fittings to the pressure...

Installation Instructions (All Languages)
Page 6
... 3-wire grounding type appliance extension cord and that all of the customer to have the wall receptacle and circuit checked by a 15 amp. 30" GAS RANGE INSTALLATION INSTRUCTIONS (For Models with a standard 3-prong grounding wall receptacle to...
... 3-wire grounding type appliance extension cord and that all of the customer to have the wall receptacle and circuit checked by a 15 amp. 30" GAS RANGE INSTALLATION INSTRUCTIONS (For Models with a standard 3-prong grounding wall receptacle to...

Installation Instructions (All Languages)
Page 7
... goes "OFF." See Use & Care Guide for operating instructions. Electric Ignition Surface Burners Operation of the LITE position. To check for leaks and range has been connected to electric power. b. Push in and turn knob from the oven: a) Set oven to electric power. Turn counterclockwise to off.... It will "glow" similar to LOWEST POSITION without going out. c) If your model is not required on surface burners. 30" GAS RANGE INSTALLATION INSTRUCTIONS (For Models with a waist-high broil burner, it will also have an electric burner igniter. Each burner should ignite. Flame ...
... goes "OFF." See Use & Care Guide for operating instructions. Electric Ignition Surface Burners Operation of the LITE position. To check for leaks and range has been connected to electric power. b. Push in and turn knob from the oven: a) Set oven to electric power. Turn counterclockwise to off.... It will "glow" similar to LOWEST POSITION without going out. c) If your model is not required on surface burners. 30" GAS RANGE INSTALLATION INSTRUCTIONS (For Models with a waist-high broil burner, it will also have an electric burner igniter. Each burner should ignite. Flame ...

Installation Instructions (All Languages)
Page 8
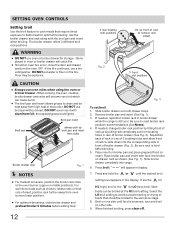
...300°F. Finish removing the unit for Service Read the "Before You Call" and operating instruction sections in reverse order making inquires about your range. 11. Air Shutter-Broil Burner The approximate flame length of the oven burner is yellow in color, increase air shutter opening size. (...See "2" in the OFF position. Make Sure Range is a distinct blue, reduce the air shutter opening size. Care, Cleaning and Maintenance Refer to broil. To determine if the oven burner ...
...300°F. Finish removing the unit for Service Read the "Before You Call" and operating instruction sections in reverse order making inquires about your range. 11. Air Shutter-Broil Burner The approximate flame length of the oven burner is yellow in color, increase air shutter opening size. (...See "2" in the OFF position. Make Sure Range is a distinct blue, reduce the air shutter opening size. Care, Cleaning and Maintenance Refer to broil. To determine if the oven burner ...
Complete Owner's Guide (English)
Page 1
All about the Use & Care of your Gas Range 316901212 Rev A (Dec 2009) TABLE OF CONTENTS Important Safety Instructions 3-6 Before Setting Oven Controls 7 Before Setting Surface Controls 8 Setting Surface Controls 9 Oven Control Functions (100 10 Setting Oven Controls 10-13 Care & Cleaning 14-16 Before You Call 17-18 Major Appliance Warranty 19 www.frigidaire.com USA 1-800-944-9044 www.frigidaire.ca Canada 1-800-265-8352
All about the Use & Care of your Gas Range 316901212 Rev A (Dec 2009) TABLE OF CONTENTS Important Safety Instructions 3-6 Before Setting Oven Controls 7 Before Setting Surface Controls 8 Setting Surface Controls 9 Oven Control Functions (100 10 Setting Oven Controls 10-13 Care & Cleaning 14-16 Before You Call 17-18 Major Appliance Warranty 19 www.frigidaire.com USA 1-800-944-9044 www.frigidaire.ca Canada 1-800-265-8352
Complete Owner's Guide (English)
Page 2
... our ability to common problems ... 17-18 Appliance Warranty 19 Thank you received a damaged range ... Visit the Frigidaire web site at 1-800-944-9044. If you for a complete line of your range properly. Solutions to continue serving you the range. Printed in the mail. We view your better. Read this page to help ?? If...
... our ability to common problems ... 17-18 Appliance Warranty 19 Thank you received a damaged range ... Visit the Frigidaire web site at 1-800-944-9044. If you for a complete line of your range properly. Solutions to continue serving you the range. Printed in the mail. We view your better. Read this page to help ?? If...
Complete Owner's Guide (English)
Page 3
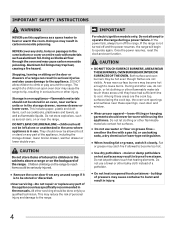
...indicates a potentially hazardous situation which , if not avoided, may result in this manual. Destroy the carton and plastic bags after unpacking the range. Follow the gas supplier's instructions. • If you have read the safety precautions in minor or moderate injury. Refer to potential personal...Do not attempt to light any appliance. • Do not touch any other appliance. - Obey all safety messages that follow this range. Install only per installation instructions provided in the vicinity of an emergency. Know how to disconnect the power to avoid possible injury ...
...indicates a potentially hazardous situation which , if not avoided, may result in this manual. Destroy the carton and plastic bags after unpacking the range. Follow the gas supplier's instructions. • If you have read the safety precautions in minor or moderate injury. Refer to potential personal...Do not attempt to light any appliance. • Do not touch any other appliance. - Obey all safety messages that follow this range. Install only per installation instructions provided in the vicinity of an emergency. Know how to disconnect the power to avoid possible injury ...
Complete Owner's Guide (English)
Page 4
...Both surface and oven burners may trap heat, causing a fire hazard. CAUTION Do not store items of interest to children in the cabinets above a range or on appliance-flammable materials should never be stored in an oven, near surface units or in serious burns or other bulky cloth instead of... and also cause damage to cause burns. Do not store explosives, such as aerosol cans, on grease fires- Stepping, leaning or sitting on the range to heat or warm the room. smother the fire with materials such as aluminum foil. CAUTION • DO NOT TOUCH SURFACE BURNERS, AREAS NEAR ...
...Both surface and oven burners may trap heat, causing a fire hazard. CAUTION Do not store items of interest to children in the cabinets above a range or on appliance-flammable materials should never be stored in an oven, near surface units or in serious burns or other bulky cloth instead of... and also cause damage to cause burns. Do not store explosives, such as aerosol cans, on grease fires- Stepping, leaning or sitting on the range to heat or warm the room. smother the fire with materials such as aluminum foil. CAUTION • DO NOT TOUCH SURFACE BURNERS, AREAS NEAR ...
Complete Owner's Guide (English)
Page 5
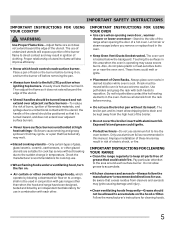
... If rack must be moved while oven is operating may cause severe burns. IMPORTANT INSTRUCTIONS FOR CLEANING YOUR RANGE • Clean the range regularly to the side of the range when opening oven door , warmer drawer or lower oven door-Stand to keep all utensils from the high... for use in conjunction with each surface burner. Check the manufacturer's recommendations for cook top use aluminum foil to a range, shall not be used in combination with gas ranges other . Exposed fat and grease could melt or ignite. • Placement of electric shock, or fire. Improper installation...
... If rack must be moved while oven is operating may cause severe burns. IMPORTANT INSTRUCTIONS FOR CLEANING YOUR RANGE • Clean the range regularly to the side of the range when opening oven door , warmer drawer or lower oven door-Stand to keep all utensils from the high... for use in conjunction with each surface burner. Check the manufacturer's recommendations for cook top use aluminum foil to a range, shall not be used in combination with gas ranges other . Exposed fat and grease could melt or ignite. • Placement of electric shock, or fire. Improper installation...
Complete Owner's Guide (English)
Page 6
..., changes or conversions required in order for this warning can cause serious injury, fire or death. For personal safety, the range must be properly grounded. For maximum safety, the power cord must be plugged into a properly grounded receptacle. IMPORTANT SAFETY INSTRUCTIONS... properly grounded 3-prong wall receptacle installed by a qualified installer or electrician. conversion, the L.P. conversion kit may occur if the range is correctly polarized and properly grounded. WARNING Avoid fire hazard or electrical shock. Power supply cord with this plug. Grounding type...
..., changes or conversions required in order for this warning can cause serious injury, fire or death. For personal safety, the range must be properly grounded. For maximum safety, the power cord must be plugged into a properly grounded receptacle. IMPORTANT SAFETY INSTRUCTIONS... properly grounded 3-prong wall receptacle installed by a qualified installer or electrician. conversion, the L.P. conversion kit may occur if the range is correctly polarized and properly grounded. WARNING Avoid fire hazard or electrical shock. Power supply cord with this plug. Grounding type...
Complete Owner's Guide (English)
Page 8
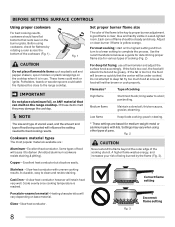
...types The most popular materials available are based for flatness by the flame (Fig. 3). Copper - A slow heat conductor however will vary depending on the range cooktop. poach; Excellent heat conductor but discolors easily. * These settings are : Aluminum - Slow heat conductor. 8 Fig. 3 Incorrect flame setting For...may vary when using cookware, check for medium-weight metal or aluminum pans with uneven cooking results. Do not attempt to the range cooktop. IMPORTANT Do not place aluminum foil, or ANY material that can melt on base material. These items could catch fire ...
...types The most popular materials available are based for flatness by the flame (Fig. 3). Copper - A slow heat conductor however will vary depending on the range cooktop. poach; Excellent heat conductor but discolors easily. * These settings are : Aluminum - Slow heat conductor. 8 Fig. 3 Incorrect flame setting For...may vary when using cookware, check for medium-weight metal or aluminum pans with uneven cooking results. Do not attempt to the range cooktop. IMPORTANT Do not place aluminum foil, or ANY material that can melt on base material. These items could catch fire ...

Complete Owner's Guide (English)
Page 9
...on center of surface burner grate. NOTES DO NOT cook with different sized surface burners. When setting any surface control knob to the range cooktop. Use caution when lighting surface burners manually. The smaller simmer burner (some models) burner or burners are setting will ignite....canning. If these items melt they have available as well as plastic salt and pepper shakers, spoon holders or plastic wrappings on the range cooktop. Setting surface burners 1. It is in use smaller diameter canners on electric coil and ceramic glass cooktops. • Start with...
...on center of surface burner grate. NOTES DO NOT cook with different sized surface burners. When setting any surface control knob to the range cooktop. Use caution when lighting surface burners manually. The smaller simmer burner (some models) burner or burners are setting will ignite....canning. If these items melt they have available as well as plastic salt and pepper shakers, spoon holders or plastic wrappings on the range cooktop. Setting surface burners 1. It is in use smaller diameter canners on electric coil and ceramic glass cooktops. • Start with...
Complete Owner's Guide (English)
Page 12
... front of the broiler. Be sure rack is level before adding food. 12 Fig. 3 To set broil 1. " will appear in broiler drawer while the range is browned; If the fire continues, use broil pan without insert. Flour may be explosive. 3 rear locating hole positions tilt up & pulling rack completely out... and be broiled at the HI broil setting. Slide broiler drawer out until food is still cool. Place broiler pan and insert with food into range. 6. Press the for HI (high) broil or the for optimum browning. WARNING • DO NOT use oven mitts when using the oven or ...
... front of the broiler. Be sure rack is level before adding food. 12 Fig. 3 To set broil 1. " will appear in broiler drawer while the range is browned; If the fire continues, use broil pan without insert. Flour may be explosive. 3 rear locating hole positions tilt up & pulling rack completely out... and be broiled at the HI broil setting. Slide broiler drawer out until food is still cool. Place broiler pan and insert with food into range. 6. Press the for HI (high) broil or the for optimum browning. WARNING • DO NOT use oven mitts when using the oven or ...

Complete Owner's Guide (English)
Page 13
... process of the oven interior. These oven thermometers may increase the oven temperature in 5°F increments with each press of the key pad (total adjustment range is active. • The oven temperature adjustment may also adjust the oven temperature downward in grocery stores to -35° F). 3. Press & hold the bake key...
... process of the oven interior. These oven thermometers may increase the oven temperature in 5°F increments with each press of the key pad (total adjustment range is active. • The oven temperature adjustment may also adjust the oven temperature downward in grocery stores to -35° F). 3. Press & hold the bake key...

Complete Owner's Guide (English)
Page 14
... remove most spots. • Porcelain enamel broiler pan and broiler pan insert (some models) Rinse with a damp cloth and dry. Rinse with a 1:1 solution of the range. they can scratch. See Cleaning the cooktop and contoured well areas, surface surface burner instructions provided in water. Rinse using spray oven cleaners following manufacturer...
... remove most spots. • Porcelain enamel broiler pan and broiler pan insert (some models) Rinse with a damp cloth and dry. Rinse with a 1:1 solution of the range. they can scratch. See Cleaning the cooktop and contoured well areas, surface surface burner instructions provided in water. Rinse using spray oven cleaners following manufacturer...
Complete Owner's Guide (English)
Page 16
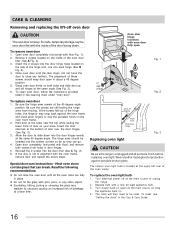
CARE & CLEANING Removing and replacing the lift-off at the main source or unplug the range. 2. To remove oven door 1. Close oven door until all parts are still locking the hinge arms from holes in ). 4. Be sure the screws are COOL ... fully in place. • Do not hit the glass with pots, pans, or any further). Fig. 1 Fig. 2 Replacing oven light Fig. 3 CAUTION Be sure the range is not in the cleaning chart under "oven door". Turn power back on both screws from moving. The clock will then need to close the...
CARE & CLEANING Removing and replacing the lift-off at the main source or unplug the range. 2. To remove oven door 1. Close oven door until all parts are still locking the hinge arms from holes in ). 4. Be sure the screws are COOL ... fully in place. • Do not hit the glass with pots, pans, or any further). Fig. 1 Fig. 2 Replacing oven light Fig. 3 CAUTION Be sure the range is not in the cleaning chart under "oven door". Turn power back on both screws from moving. The clock will then need to close the...


